
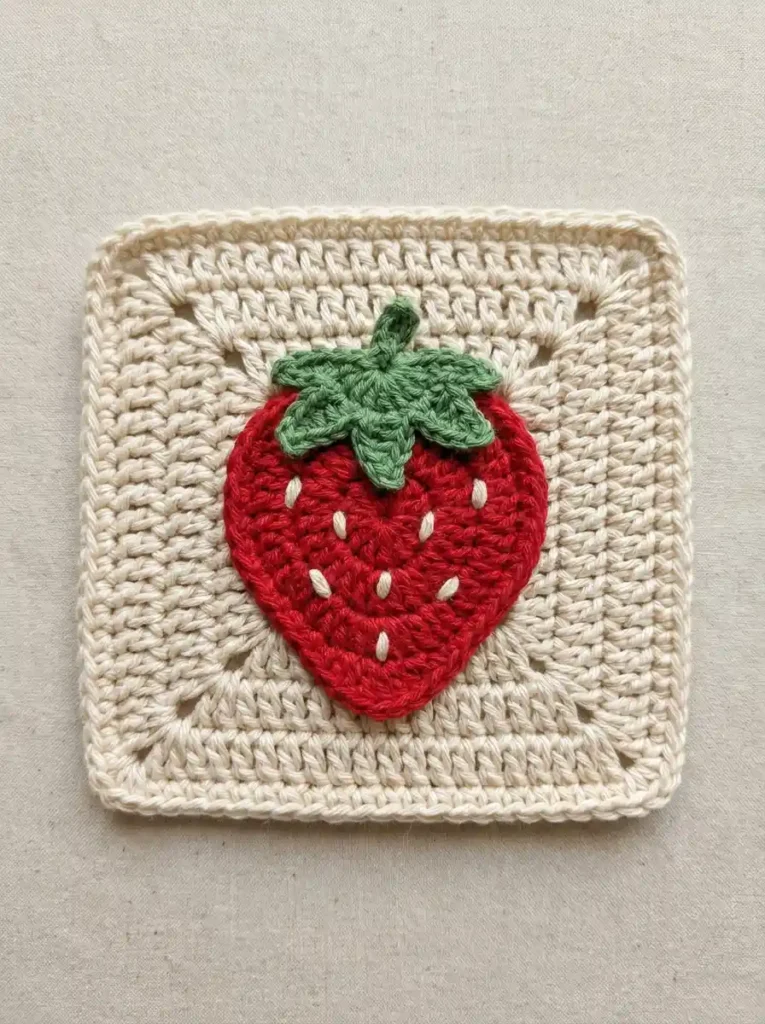
This strawberry granny square coaster combines a warm cream square with a bold red strawberry, a leafy green top, and a handful of simple embroidered seeds. The strawberry sits slightly above the background, while the green calyx overlaps the top edge to give the motif a little extra dimension without making the project complicated.
The cream square is worked from the center outward in joined rounds. The strawberry body and leafy cap are made separately, the seed details are embroidered onto the fruit, and the finished pieces are sewn securely to the front of the square.
Project at a glance
| Skill level | Confident beginner |
|---|---|
| Terminology | US crochet terms |
| Construction | Joined-round square with separate strawberry and calyx appliqués |
| Recommended yarn | DK-weight smooth cotton or cotton blend |
| Hook | 3.5 mm |
| Approximate size | About 5–6 in / 13–15 cm square with the suggested yarn and hook |
Materials
- DK-weight cotton or cotton-blend yarn in warm cream for the square and seed details
- DK-weight yarn in strawberry red for the fruit
- DK-weight yarn in medium leafy green for the calyx and stem
- 3.5 mm crochet hook
- Yarn needle
- Scissors
- A few removable stitch markers or pins for positioning the appliqués
You only need a partial skein of cream and small amounts of red and green. Smooth cotton or a cotton blend gives the coaster enough body to lie flat while keeping the double-crochet posts, strawberry shaping, and leaf edges easy to see.
Stitches and abbreviations
- ch – chain
- sl st – slip stitch
- sc – single crochet
- hdc – half double crochet
- dc – double crochet
- tr – treble crochet
- st – stitch
- sp – space
- RS – right side
- WS – wrong side
Before you start
The cream square is worked with the RS facing throughout and is not turned. The beginning ch 3 of each double-crochet round counts as one dc. Slip-stitch joins do not count as stitches.
Keep the corner ch-2 spaces relaxed. Those spaces form the small diagonal openings that lead toward each corner, so pulling them too tightly can make the square cup instead of lying flat.
The strawberry is worked from a tight center outward. The outer shaping round changes stitch height around the circle to create broad upper shoulders and a tapered lower point rather than a plain round appliqué.
Crochet pattern
Cream granny square
With cream yarn, ch 4 and join with sl st in the first ch to form a small ring.
R1: Ch 3, 2 dc in ring, ch 2, [3 dc in ring, ch 2] × 3. Join with sl st to the top of the beginning ch 3. Do not turn. (12 dc, 4 ch-2 corner spaces)
Slip stitch in each of the next 2 dc and into the next ch-2 corner space.
R2: Ch 3, dc in same corner sp, ch 2, 2 dc in same corner sp. Dc in each of the next 3 dc. [(2 dc, ch 2, 2 dc) in next corner sp, dc in each of the next 3 dc] × 3. Join with sl st to the top of the beginning ch 3. (28 dc, 4 ch-2 corner spaces)
Slip stitch in the next dc and into the next ch-2 corner space.
R3: Ch 3, dc in same corner sp, ch 2, 2 dc in same corner sp. Dc in each of the next 7 dc. [(2 dc, ch 2, 2 dc) in next corner sp, dc in each of the next 7 dc] × 3. Join with sl st to the top of the beginning ch 3. (44 dc, 4 ch-2 corner spaces)
Slip stitch in the next dc and into the next ch-2 corner space.
R4: Ch 3, dc in same corner sp, ch 2, 2 dc in same corner sp. Dc in each of the next 11 dc. [(2 dc, ch 2, 2 dc) in next corner sp, dc in each of the next 11 dc] × 3. Join with sl st to the top of the beginning ch 3. (60 dc, 4 ch-2 corner spaces)
Slip stitch in the next dc and into the next ch-2 corner space.
R5: Ch 3, dc in same corner sp, ch 2, 2 dc in same corner sp. Dc in each of the next 15 dc. [(2 dc, ch 2, 2 dc) in next corner sp, dc in each of the next 15 dc] × 3. Join with sl st to the top of the beginning ch 3. (76 dc, 4 ch-2 corner spaces)
🧶 Checkpoint: Before adding the final edge, lay the square flat. You should see four matching sides and four small diagonal lines of corner openings. The center may be mostly covered later, but the outer rounds should remain even and clearly visible around the strawberry.
Final cream edging
Slip stitch in the next dc and into the next ch-2 corner space.
R6: Ch 1; this does not count as a stitch. Work 3 sc in the corner sp, sc in each of the next 19 dc. [3 sc in next corner sp, sc in each of the next 19 dc] × 3. Join with sl st to the first sc. (88 sc)
Fasten off and weave in the ends. The three single crochets at each corner soften the outer point while still keeping the coaster recognizably square.
Red strawberry body
With red yarn, make an adjustable magic ring.
R1: Ch 1; this does not count as a stitch. Work 10 hdc in the ring. Pull the ring firmly closed and join with sl st to the first hdc. Do not turn. (10 hdc)
R2: Ch 1; this does not count as a stitch. Work 2 hdc in each st around. Join with sl st to the first hdc. (20 hdc)
For the next round, treat the first stitch after the join as the top center of the strawberry. The eleventh stitch of R2 becomes the lower center and carries the pointed increase.
R3: Ch 1; this does not count as a stitch. Sc in same st, 2 sc in next st, 2 hdc in next st, hdc in next st, dc in each of next 3 sts, hdc in next st, sc in each of next 2 sts, (dc, tr, dc) in next st, sc in each of next 2 sts, hdc in next st, dc in each of next 3 sts, hdc in next st, 2 hdc in next st, 2 sc in final st. Join with sl st to the first sc. (26 sts)
This round widens the upper half, keeps the sides smooth, and creates one definite bottom point with the center treble crochet.
Strawberry edging
R4: Ch 1; this does not count as a stitch. Sc in each stitch around, except work 3 sc in the center tr at the bottom point. Join with sl st to the first sc. (28 sc)
Fasten off, leaving a long red tail for sewing. Gently smooth the top of the fruit with your fingers and pull the lower point slightly downward so the shape reads as a strawberry rather than a circle.
🧶 Checkpoint: The finished red piece should be broadest across its upper half, curve inward gradually along both sides, and finish with one centered soft point. Small differences between the two sides are fine; avoid stretching one side longer than the other.
Embroider the seed dots
Use a short length of cream yarn threaded onto a yarn needle. Make each seed with one small vertical straight stitch across the surface of the red fabric. Keep the stitches short enough to sit neatly between the crochet rows rather than covering several red stitches.
Add exactly eight seeds in a loose staggered arrangement:
- 2 seeds across the upper third of the strawberry, just below where the green cap will sit
- 2 seeds across the next section down
- 3 seeds across the lower-middle portion
- 1 seed centered above the bottom point
Space the seeds by roughly two or three red stitches where the fabric allows. Do not pull the embroidery tightly; each cream stitch should rest on the surface without puckering the strawberry.
Weave the cream tails securely into the WS of the red appliqué.
Five-point leafy green calyx
The green top is made as one connected piece with five broad leaf points. One of those points will face straight down over the center of the strawberry, with two points spreading diagonally and the remaining two extending toward the sides.
With green yarn, make an adjustable magic ring.
R1: Ch 1; this does not count as a stitch. Work 10 sc in the ring. Pull the ring mostly closed and join with sl st to the first sc. (10 sc)
Leaf: From the anchor stitch, ch 5. Starting in the second ch from the hook, work sc in next ch, hdc in next ch, dc in next ch, hdc in final ch. Rotate the chain so you can work back along the unused loops on the opposite side. Work hdc, dc, hdc, sc along the opposite side, then sl st back into the original anchor stitch. (8 leaf sts)
R2: [Sl st in next sc of R1, make 1 Leaf from that stitch, sl st in next sc of R1] × 5. (5 leaf points)
Fasten off and weave in this tail. Arrange the five leaves so one point faces downward and the remaining four spread evenly across the upper edge.
Short green stem
With the calyx RS facing and one leaf pointing straight downward, join green yarn to a stitch of the center ring directly opposite that lower leaf.
Stem: Ch 5. Starting in the second ch from the hook, sc in next ch, hdc in each of next 2 ch, sc in final ch. Sl st into the adjacent stitch of the center ring. (4 stem sts)
Fasten off, leaving enough yarn to secure the stem if needed. The stem should be short and upright rather than long or floppy.
Attach the strawberry
Place the cream square RS up and locate its center by lining up the midpoint of the top and bottom edges with the midpoint of the left and right edges.
Position the red strawberry so its top center and lower point sit on the vertical centerline of the square. The strawberry should fill much of the central area while still leaving a broad cream frame visible on every side.
The lower point should stop well before the outer cream edging. Pin the red piece in place, then thread the long red tail onto a yarn needle.
Whipstitch around the inside edge of the red border, catching a strand from the back of the strawberry and a strand of the cream square immediately underneath. Keep the seam snug but not tight enough to pucker either layer.
Follow the strawberry’s full outline, including the curved shoulders and lower point. Secure the yarn on the WS and weave in the tail.
Add the leafy cap
Center the green calyx over the upper edge of the strawberry with the short stem pointing upward. Let the lower center leaf overlap the red fruit, and arrange the other four leaves so they spread across the top and upper sides.
The green center should sit over the upper portion of the red strawberry rather than floating above it. Use green yarn and small whipstitches to secure the center ring firmly to the strawberry.
Next, tack the inner half of each leaf to the red fabric. Leave the outer tips slightly freer so the calyx has the gentle raised dimension visible on a handmade appliqué instead of being pressed completely flat.
Secure the short stem near its base and, if necessary, add one small tack near its upper end so it stays upright.
Finishing your coaster
Weave all remaining yarn ends into the WS. Because this piece may be used as a coaster, weave each tail through several stitch backs, reverse direction once, and trim only after the yarn feels secure.
Light blocking will help the cream square settle into an even shape. Dampen or steam-block according to your yarn fiber, then straighten the four sides while keeping the corners softly rounded.
Shape the strawberry and green leaves with your fingers before the piece dries. Keep the red point centered, spread the five leaves so each one remains visible, and make sure the stem points upward without leaning heavily to one side.
Troubleshooting
- The cream square cups upward: the corner chains are probably too tight. Work the ch-2 spaces more loosely on the next round rather than adding extra side stitches.
- The square ruffles: check that you have not added extra double crochets along the sides or worked more than one corner increase into the same corner space.
- The strawberry looks circular: gently widen the upper shoulder stitches and pull the center treble at the bottom downward before sewing. The lower point should remain visibly narrower than the upper half.
- The seed stitches pucker the red fabric: the embroidery yarn is too tight. Ease the straight stitches until they sit on the surface without drawing neighboring red stitches together.
- The green leaves curl too much: loosen the foundation chains slightly and smooth each leaf before sewing. Secure the inner portion of the leaf while leaving only the outer tip slightly raised.
Adjusting the square size
If you want a larger coaster or want to use the motif as a blanket square, add another cream double-crochet round before the final single-crochet edging.
For each extra round, work (2 dc, ch 2, 2 dc) in every ch-2 corner space and one dc in every dc along each side. Each additional round adds four double crochets to every side.
When the square reaches the size you want, add the same single-crochet edging: one sc in each side stitch and 3 sc in every corner space.
For proportions closest to this version, keep the strawberry large enough to dominate the center while leaving at least two substantial cream rounds visible around most of its edge.
If you make this strawberry coaster, feel free to share your finished version or leave a question if you need help with the strawberry shaping, seed placement, or leafy cap.












