
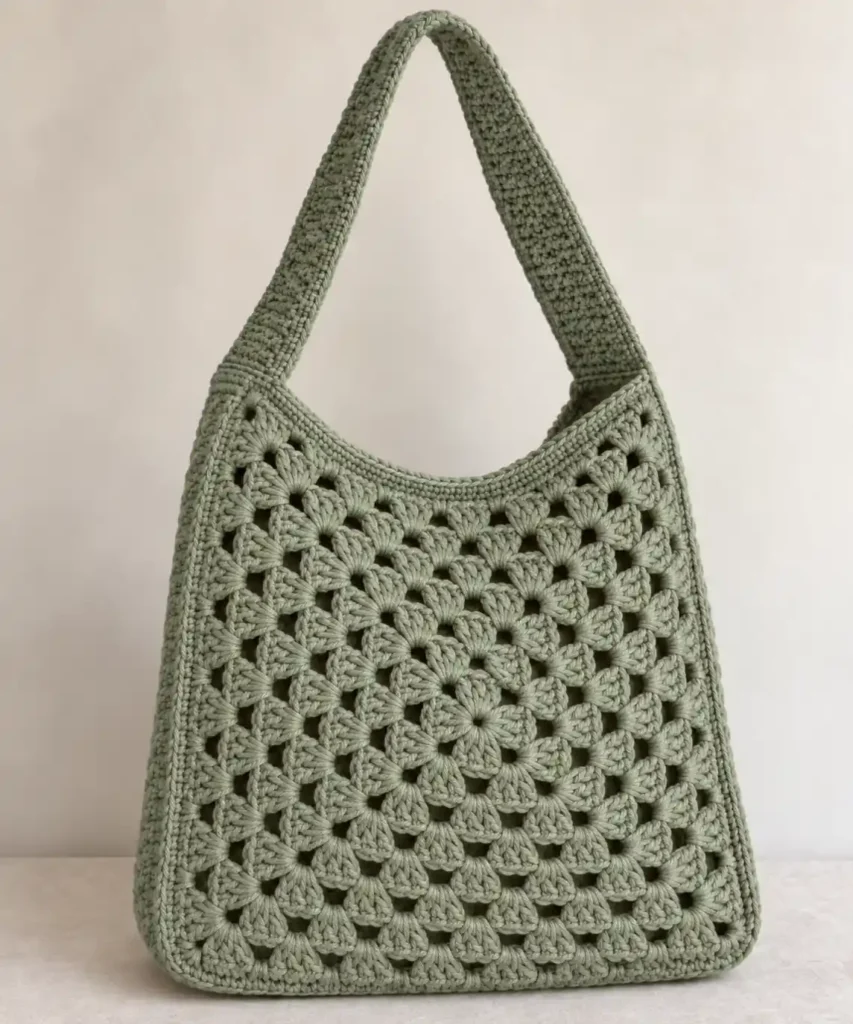
This sage green granny square crochet bag combines two oversized traditional granny-square panels with one continuous solid crochet band. That band is the key to the finished shape: the lower section becomes the side and bottom gusset, while the unsewn upper section continues directly into the wide shoulder strap.
This construction creates the visible depth along both sides of the bag and allows the strap to flow naturally upward from the body instead of looking like a separate handle sewn onto two flat squares. The finished opening dips gently in the center, giving the bag its relaxed hobo silhouette.
Project details
| Skill level | Confident beginner |
|---|---|
| Terminology | US crochet terms |
| Construction | 2 granny-square panels + 1 continuous gusset/strap band |
| Yarn | Medium-weight #4 smooth cotton or cotton blend |
| Hook | 5 mm crochet hook |
| Finished shape | Medium hobo-style shoulder bag with a broad strap |
With the suggested yarn and hook, a nine-round panel will commonly finish in roughly the 12–14 inch range after the solid border is added. The two panels must match each other exactly; their relationship is more important than reaching a fixed measurement.
Materials
- Approximately 350–450 g medium-weight #4 cotton or cotton-blend yarn in muted sage green
- 5 mm crochet hook
- Tapestry needle
- Scissors
- 8 removable stitch markers
Choose a smooth yarn with good stitch definition. Cotton or a cotton-rich blend gives the granny clusters a crisp shape while creating a substantial solid band that can support the bag along the sides, bottom, and shoulder.
The granny-square fabric should remain flexible and open, while the solid band should feel noticeably denser. If your fabric feels stiff or the square begins to cup, move up one hook size rather than deliberately stretching the stitches.
Stitches and abbreviations
- ch – chain
- ch-sp – chain space
- dc – double crochet
- sc – single crochet
- sl st – slip stitch
- st(s) – stitch(es)
- RS – right side
- WS – wrong side
Granny cluster: 3 dc worked into the same chain space.
Corner group: 3 dc, ch 2, 3 dc worked into the same ch-2 corner space.
Before you start
The granny squares are worked in joined rounds without turning. The beginning ch 3 counts as the first dc. Slip stitches used to close a round or move into position do not count as stitches.
Work ch 1 between neighboring granny clusters and ch 2 at every corner. Keep the ch-2 spaces relaxed so all four corners can open evenly.
The shoulder strap is not made as a separate short handle and sewn onto the upper corners. Instead, one long rectangular crochet strip is joined into a loop. The lower part of that loop forms the bag’s gusset, while the remaining upper arc becomes the shoulder strap. This creates the continuous solid-crochet sides visible beside the granny-square panels.
Crochet pattern
Large granny-square panel
Make 2 identical panels.
Ch 4. Join with a sl st in the first ch to form a small center ring.
R1: Ch 3, 2 dc in ring, ch 2, [3 dc in ring, ch 2] × 3. Join with a sl st to the top of the beginning ch 3. Do not turn. (12 dc, 4 ch-2 corner spaces)
R2: Sl st in each of the next 2 dc and into the next ch-2 corner space. Ch 3, 2 dc, ch 2, 3 dc in the same corner space, ch 1. [(3 dc, ch 2, 3 dc) in the next ch-2 corner space, ch 1] × 3. Join to the top of the beginning ch 3. (24 dc, 4 ch-1 spaces, 4 ch-2 corner spaces)
R3: Sl st in each of the next 2 dc and into the next corner space. Ch 3, 2 dc, ch 2, 3 dc in the same space. Ch 1, 3 dc in the next ch-1 space, ch 1. [(3 dc, ch 2, 3 dc) in the next corner space, ch 1, 3 dc in the next ch-1 space, ch 1] × 3. Join. (36 dc, 8 ch-1 spaces, 4 ch-2 corner spaces)
R4: Sl st in each of the next 2 dc and into the next corner space. Ch 3, 2 dc, ch 2, 3 dc in the same space. [Ch 1, 3 dc in the next ch-1 space] × 2, ch 1. [(3 dc, ch 2, 3 dc) in the next corner space, [ch 1, 3 dc in the next ch-1 space] × 2, ch 1] × 3. Join. (48 dc, 12 ch-1 spaces, 4 ch-2 corner spaces)
R5: Sl st in each of the next 2 dc and into the next corner space. Ch 3, 2 dc, ch 2, 3 dc in the same space. [Ch 1, 3 dc in the next ch-1 space] × 3, ch 1. [(3 dc, ch 2, 3 dc) in the next corner space, [ch 1, 3 dc in the next ch-1 space] × 3, ch 1] × 3. Join. (60 dc, 16 ch-1 spaces, 4 ch-2 corner spaces)
R6: Sl st in each of the next 2 dc and into the next corner space. Ch 3, 2 dc, ch 2, 3 dc in the same space. [Ch 1, 3 dc in the next ch-1 space] × 4, ch 1. [(3 dc, ch 2, 3 dc) in the next corner space, [ch 1, 3 dc in the next ch-1 space] × 4, ch 1] × 3. Join. (72 dc, 20 ch-1 spaces, 4 ch-2 corner spaces)
R7: Sl st in each of the next 2 dc and into the next corner space. Ch 3, 2 dc, ch 2, 3 dc in the same space. [Ch 1, 3 dc in the next ch-1 space] × 5, ch 1. [(3 dc, ch 2, 3 dc) in the next corner space, [ch 1, 3 dc in the next ch-1 space] × 5, ch 1] × 3. Join. (84 dc, 24 ch-1 spaces, 4 ch-2 corner spaces)
R8: Sl st in each of the next 2 dc and into the next corner space. Ch 3, 2 dc, ch 2, 3 dc in the same space. [Ch 1, 3 dc in the next ch-1 space] × 6, ch 1. [(3 dc, ch 2, 3 dc) in the next corner space, [ch 1, 3 dc in the next ch-1 space] × 6, ch 1] × 3. Join. (96 dc, 28 ch-1 spaces, 4 ch-2 corner spaces)
R9: Sl st in each of the next 2 dc and into the next corner space. Ch 3, 2 dc, ch 2, 3 dc in the same space. [Ch 1, 3 dc in the next ch-1 space] × 7, ch 1. [(3 dc, ch 2, 3 dc) in the next corner space, [ch 1, 3 dc in the next ch-1 space] × 7, ch 1] × 3. Join. (108 dc, 32 ch-1 spaces, 4 ch-2 corner spaces)
🧶 Checkpoint: The granny section should now show nine clear rounds from the small center ring to the outer edge. Each outer side has ten visible granny clusters when the corner clusters at both ends are included.
Solid frame around each panel
The dense frame is an important part of the finished bag. It separates the open granny-square texture from the solid gusset and provides a strong edge for joining.
Border R1: Sl st in each of the next 2 dc and into the next ch-2 corner space. Ch 1; this does not count as a stitch. Work 3 sc in the same corner space. Continue around, working 1 sc in every dc, 1 sc in every ch-1 space, and 3 sc in each ch-2 corner space. Join with a sl st to the first sc. (152 sc)
Place a marker in the middle sc of each 3-sc corner group.
Border R2: Ch 1; this does not count as a stitch. Sc in the same stitch and in each stitch around, working 3 sc in each marked corner stitch. Join with a sl st to the first sc. (160 sc)
Move each marker into the middle stitch of its new 3-sc corner group. Fasten off.
There are 40 stitch intervals from one marked corner stitch to the next, or 41 stitches when both corner stitches are included. This count is important when the panels are joined to the gusset band.
Continuous side, bottom and shoulder band
Make 1 band only. This single component creates the left side, bottom depth, right side, and shoulder strap.
The band is worked lengthwise so its long edges have the same compact single-crochet stitch spacing as the solid border of the granny panels.
Ch 216 loosely.
Row 1: Sc in the second ch from the hook and in each ch across. Turn. (215 sc)
Rows 2–10: Ch 1; this does not count as a stitch. Sc in each st across. Turn. (215 sc)
Fasten off after Row 10, leaving a long tail.
You now have one very long rectangular strip approximately 10 sc rows wide. The two long edges will eventually be attached to the front and back panels, while most of the upper section remains free to form the shoulder strap.
Join the band into one loop
Bring the two short 10-row ends together without twisting the strip. Using the long yarn tail and a tapestry needle, mattress stitch or whipstitch the corresponding row ends together from one long edge to the other.
Weave the tail securely into the dense fabric.
Place this small joining seam at the center of what will become the bottom of the bag. Positioning the seam underneath keeps the shoulder portion smooth and uninterrupted.
Mark the gusset section
Lay the loop flat with the joining seam centered at the bottom and the large unsewn arc extending upward like a shoulder strap.
On one long edge of the band, mark four positions:
- From the center-bottom seam, count 20 stitch positions toward the left and place the bottom-left marker.
- From the same bottom seam, count 20 stitch positions toward the right and place the bottom-right marker.
- From the bottom-left marker, continue upward along the loop for 40 stitch intervals and place the top-left marker.
- From the bottom-right marker, continue upward along the opposite side for 40 stitch intervals and place the top-right marker.
The section running from top-left to bottom-left, across the bottom, and up to top-right is the gusset section. The much longer arc remaining above the two top markers is the shoulder strap.
Transfer matching markers to the opposite long edge of the band directly across the 10-row width. The front and back panels will therefore attach to exactly corresponding points.
🧶 Checkpoint: Before sewing anything, the band should already resemble a large loop with a shallow U-shaped lower section and a much longer free arc above it. The free arc is the finished strap; do not cut it or sew separate handle ends onto the bag.
Assembling the granny square hobo bag
Attach the front panel
Place one granny-square panel with its RS facing outward. Choose one side as the top opening.
Match the panel’s top-left corner marker to the band’s top-left marker on one long edge. Match the panel’s bottom-left corner to the band’s bottom-left marker, the bottom-right corner to the band’s bottom-right marker, and the top-right corner to the band’s top-right marker.
The complete top edge of the granny square remains unattached.
Join sage yarn at the top-left corner. With the RS facing you, work a slip-stitch seam through the corresponding panel-border stitch and band-edge stitch.
Continue down the left side, matching one panel stitch to one band stitch. Work through the bottom-left corner, continue across the full bottom edge, turn naturally around the bottom-right corner, and continue up the right side to the top-right marker. (121 joined stitch pairs)
Fasten off.
Keep the slip stitches relaxed. The seam should form a narrow raised crochet line between the open granny-square panel and the solid band.
Attach the back panel
Turn the work over and position the second granny square on the opposite long edge of the same band, again with its RS facing outward.
Match all four panel corners to the corresponding markers on that side of the band.
Starting at the top-left corner, repeat the same slip-stitch joining method down the side, across the bottom, and up the opposite side. (121 joined stitch pairs)
Fasten off.
Both panels should now be separated by the 10-row-wide solid crochet band. This creates genuine depth through the sides and bottom rather than forcing two flat squares directly against one another.
🧶 Checkpoint: Look at the bag from a slight side angle. You should see a narrow solid crochet panel between the front and back granny squares, with a raised joining line beside the front panel. That same solid band should continue upward without interruption to become the shoulder strap.
Shape the upper opening
No separate handle needs to be attached. The free section of the continuous band already forms the complete shoulder strap.
The upper edge of each granny square remains finished with the two solid single-crochet border rounds. Gently pull the shoulder strap upward and let the center of the front and back top edges relax downward.
The two upper corners should rise where they meet the solid band, while the middle of each granny-square panel settles into a shallow curve. Do not tighten the top borders or add a rigid reinforcing cord; the natural drape is what creates the hobo shape.
Finishing
Weave all remaining yarn tails into the solid border, gusset, or joining seams rather than through the open chain spaces of the granny-square fabric.
Gently shape the bag by hand. If the granny panels need smoothing, lightly dampen the finished bag and arrange the clusters evenly. Keep the side gusset upright and allow the lower corners to remain softly rounded rather than sharply blocked.
The continuous band should create visible depth along the left side, across the bottom, and along the right side. Above the two upper corners it should continue seamlessly into one broad shoulder strap with no separate handle attachment.
The strap may soften slightly at its highest point when the bag is hanging. That bend is natural for a wide single-crochet strap and helps maintain the casual hobo appearance.
Troubleshooting
- The granny panels cup before assembly: the ch-2 corner spaces are probably too tight. Loosen the corner chains or move up one hook size.
- The panels ruffle: the chains or double-crochet clusters are too loose. Tighten the working tension slightly while keeping every cluster and chain space in place.
- The gusset is pulling one panel out of shape: one of the panel corners is probably attached to the wrong band marker. The three attached sides must each span exactly 40 stitch intervals between corner markers.
- The raised joining seam puckers: the slip stitches are too tight. Redo the affected section with enough slack for the granny-square edge and solid band to lie beside one another naturally.
- One side of the bag looks deeper than the other: check that the front and back panels use corresponding markers on opposite edges of the same band.
- The strap twists: the long strip was twisted before its short ends were joined. Undo that seam, straighten the entire band, and reconnect it as a flat untwisted loop.
- The bag opening looks too square: lift the bag by the strap and allow the middle of the two top panel edges to relax. The hobo curve develops from drape rather than from decreases in the granny-square pattern.
Adjusting the strap length
The free upper arc of the band controls the shoulder drop. If you want a longer strap, add extra stitches to the starting chain before working Row 1. Add those extra stitches only to the free strap section; the marked gusset section must still match the three 40-interval edges of each granny-square panel.
For example, adding 12 stitches to the starting chain adds approximately 12 single-crochet stitch widths to the strap without changing the bag body. Remove stitches in the same way for a shorter shoulder drop.
Do not alter the 10-row band width unless you intentionally want a narrower or wider side gusset. Keeping the same width from the bottom of the bag all the way around the shoulder strap is what gives this design its continuous, unified appearance.
Once the ends are woven in, the finished bag should show one large sage-green granny square on the front, an identical square on the back, a narrow solid frame around each panel, a clearly visible solid side and bottom gusset, and one broad crochet band continuing seamlessly into the shoulder strap. If you make this granny square hobo bag, feel free to share your finished version or leave a question if you get stuck on a step.












