
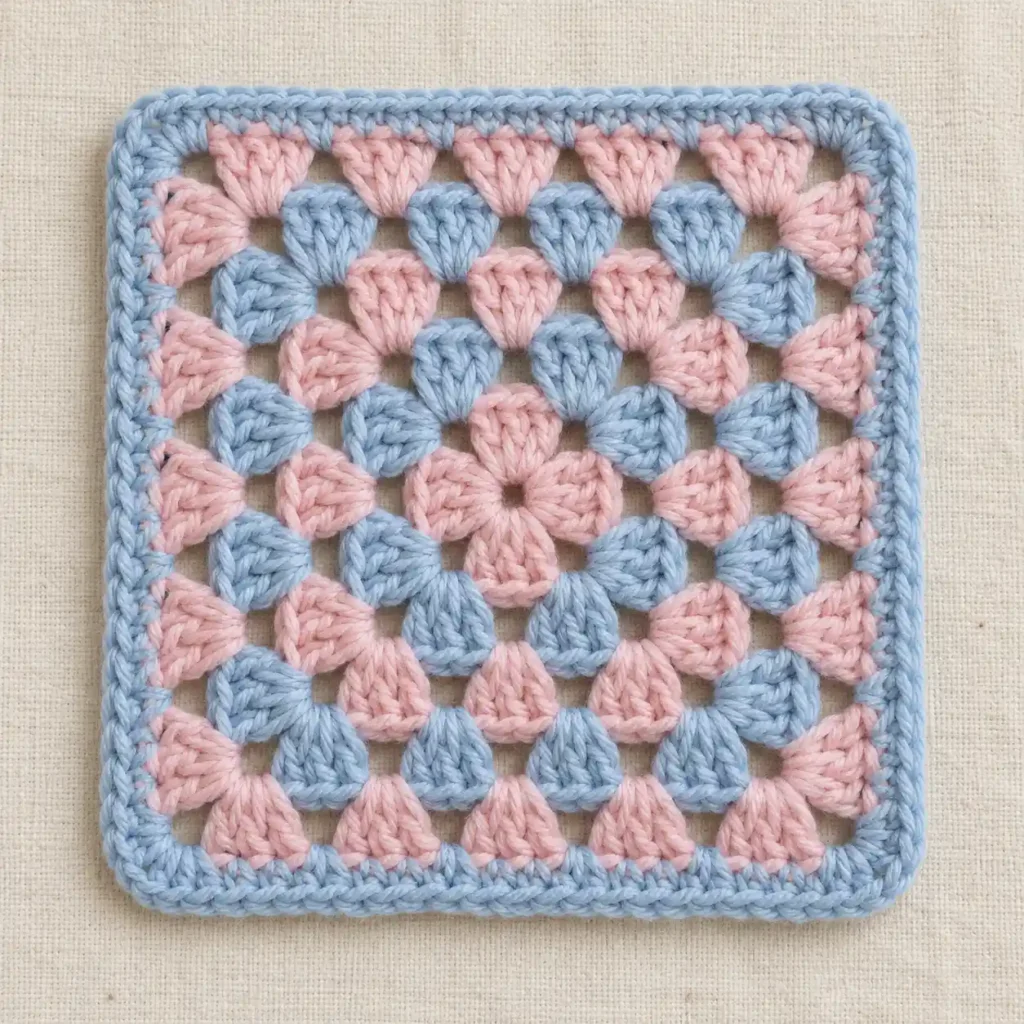
This simple pink and blue granny square uses the classic three-double-crochet cluster construction, with complete color changes after every round. The blush-pink and powder-blue rounds form clear nested squares, while a slim blue single-crochet border gives the finished motif a tidy outer edge.
The construction stays traditional from the center outward: four clusters establish the first four corners, and every later round adds one more granny cluster along each side. It is a practical pattern for a confident beginner who wants to practice chain spaces, corner increases, joined rounds, and clean color changes without complicated stitchwork.
Project at a glance
| Skill level | Confident beginner |
|---|---|
| Terminology | US crochet terms |
| Construction | Center-out joined granny-square rounds |
| Main stitches | Chain, slip stitch, double crochet, single crochet |
| Yarn | Smooth worsted-weight #4 yarn |
| Hook | 5 mm crochet hook |
| Finished size | About 6 in / 15 cm square with this yarn and hook range, depending on tension |
Materials
- Smooth worsted-weight #4 yarn in soft blush pink
- Smooth worsted-weight #4 yarn in soft powder blue
- 5 mm crochet hook
- Yarn needle for weaving in ends
- Scissors
- Blocking mat and rust-resistant pins, optional but helpful
Acrylic, cotton-acrylic, or another smooth plied yarn works well because the individual double-crochet posts remain easy to see. Avoid very fuzzy yarn for this version; a cleaner yarn surface helps the small chain spaces and cluster structure stay distinct.
You only need a partial skein of each color. Pink is used for R1, R3, and R5, while blue is used for R2, R4, and the final border.
Stitches and abbreviations
- ch – chain
- ch-1 sp – chain-1 space
- ch-2 sp – chain-2 space
- dc – double crochet
- sc – single crochet
- sl st – slip stitch
- sp – space
- RS – right side
A granny cluster in this pattern means 3 dc worked into the same chain space. A corner is made with 3 dc, ch 2, 3 dc in the same corner space.
Before you start
The square is worked in joined rounds with the RS facing throughout. Do not turn the work.
The beginning ch 3 counts as the first dc of the first granny cluster in each round. Slip-stitch joins do not count as stitches.
Every side gap between neighboring granny clusters is a ch-1 space. Every corner is a ch-2 space. Keeping those two types of spaces consistent is what allows the square to expand evenly.
Fasten off after every granny round because the color changes completely from one round to the next. When joining the next color, attach it in any ch-2 corner space.
Keep the ch-2 corner spaces relaxed. Tight corner chains can make the square cup upward, while very loose corner chains can make the corners flare.
Crochet pattern
Foundation with blush pink: Ch 4. Sl st in the first ch to form a small ring.
R1 – blush pink: Ch 3, 2 dc in the center ring, ch 2. [3 dc in the ring, ch 2] × 3. Sl st to the top of the beginning ch 3. Fasten off. (4 granny clusters, 4 ch-2 corner spaces)
This first round establishes the complete geometry of the square. You should have four compact groups around the center opening with one ch-2 corner between each group.
R2 – powder blue: Join blue with a sl st in any ch-2 corner sp. Ch 3, 2 dc in the same corner sp, ch 2, 3 dc in the same corner sp, ch 1. In each of the remaining 3 corner spaces, work [3 dc, ch 2, 3 dc] in the corner sp, ch 1. Sl st to the top of the beginning ch 3. Fasten off. (8 granny clusters, 4 ch-1 side spaces, 4 ch-2 corner spaces)
🧶 Checkpoint: After R2, the motif should already read as a small square with four obvious corners. If it looks circular, check that every corner contains two 3-dc clusters separated by a ch-2 space.
R3 – blush pink: Join pink with a sl st in any ch-2 corner sp. Ch 3, 2 dc in the same corner sp, ch 2, 3 dc in the same corner sp, ch 1. Repeat the following around 3 sides: [3 dc in the next ch-1 sp, ch 1, then work 3 dc, ch 2, 3 dc in the next ch-2 corner sp, ch 1] × 3. Work 3 dc in the remaining ch-1 sp, ch 1. Sl st to the top of the beginning ch 3. Fasten off. (12 granny clusters, 8 ch-1 side spaces, 4 ch-2 corner spaces)
At this stage there is one ordinary side cluster centered between each pair of corner sections.
R4 – powder blue: Join blue with a sl st in any ch-2 corner sp. Ch 3, 2 dc in the same corner sp, ch 2, 3 dc in the same corner sp, ch 1. Repeat around 3 sides: [[3 dc in the next ch-1 sp, ch 1] × 2, then work 3 dc, ch 2, 3 dc in the next ch-2 corner sp, ch 1] × 3. Across the final side, [3 dc in the next ch-1 sp, ch 1] × 2. Sl st to the top of the beginning ch 3. Fasten off. (16 granny clusters, 12 ch-1 side spaces, 4 ch-2 corner spaces)
R4 adds two ordinary blue side clusters between each pair of corner sections. Keep working into the chain spaces rather than into the tops of the double crochets.
R5 – blush pink: Join pink with a sl st in any ch-2 corner sp. Ch 3, 2 dc in the same corner sp, ch 2, 3 dc in the same corner sp, ch 1. Repeat around 3 sides: [[3 dc in the next ch-1 sp, ch 1] × 3, then work 3 dc, ch 2, 3 dc in the next ch-2 corner sp, ch 1] × 3. Across the final side, [3 dc in the next ch-1 sp, ch 1] × 3. Sl st to the top of the beginning ch 3. Fasten off. (20 granny clusters, 16 ch-1 side spaces, 4 ch-2 corner spaces)
Each outer side now shows five pink granny clusters when you count from one corner section to the next: one corner cluster at each end with three ordinary side clusters between them.
Add the powder-blue border
The narrow blue edging is worked separately from the final pink granny round. It uses single crochet so the perimeter looks smoother and more finished without hiding the open granny-square structure.
Border round – powder blue: Join blue with a sl st in any ch-2 corner sp. Ch 1; the ch 1 does not count as a stitch. Work 3 sc in the same corner sp.
Work 1 sc in each dc and 1 sc in each ch-1 sp across the first side, then work 3 sc in the next ch-2 corner sp.
Repeat that same side sequence across the next 2 sides: 1 sc in each dc and each ch-1 sp across the side, then 3 sc in the next corner.
Across the final side, work 1 sc in each dc and each ch-1 sp. Sl st to the first sc to join. Fasten off. (88 sc total)
Each side between the corner spaces contains 15 dc and 4 ch-1 spaces, so there are 19 regular sc along each side, plus 3 sc in every corner.
Finishing your granny square
Weave every yarn tail securely into stitches of the same color on the back of the work. Change direction once or twice while weaving so the tails are less likely to loosen.
Light blocking will sharpen the corners and make the open spaces more even. Pin the square with all four sides straight and the corners at roughly 90-degree angles, then block according to your yarn fiber. Cotton can be wet blocked, while acrylic should be treated gently with steam held above the fabric rather than pressed directly with a hot iron.
Allow the square to dry completely before removing the pins. The finished fabric should lie flat while still keeping the characteristic small openings between granny clusters.
Troubleshooting
- The square cups upward: the ch-2 corner spaces are probably too tight. Make the corner chains a little more relaxed, and check that every corner contains the full 3 dc, ch 2, 3 dc sequence.
- The edges ripple: the chain spaces may be too loose or the hook may be slightly large for your tension. Keep the ch-1 spaces compact and avoid stretching them while working the next round.
- One side has fewer clusters: a ch-1 side space was probably skipped. Before beginning the next round, check that R3 has one side cluster per side, R4 has two, and R5 has three.
- The border pulls inward: make sure you worked one sc into every dc and every ch-1 space, with 3 sc in each corner space.
- The colors look patchy instead of forming square bands: complete and fasten off each entire round before changing color. Do not change colors between individual granny clusters.
Make the square larger
You can continue the same granny-square construction before adding the blue border. Each additional round adds one more ordinary granny cluster along every side.
To add another round, join the new color in any ch-2 corner space. Work 3 dc, ch 2, 3 dc in every corner, work 3 dc in every ch-1 side space, and place ch 1 between neighboring granny groups.
If you continue the alternating color sequence, R6 would be powder blue, R7 blush pink, and so on. Wait until the square reaches the size you want before working the single-crochet border.
Every added granny round increases the total number of granny clusters by 4 and the number of ch-1 side spaces by 4, while the square always keeps exactly four ch-2 corner spaces.
This pink and blue granny square is especially useful for practicing a clean traditional center, consistent corners, and full-round color changes. If you make one, feel free to share how yours turned out or leave a question if you get stuck on a round.












