
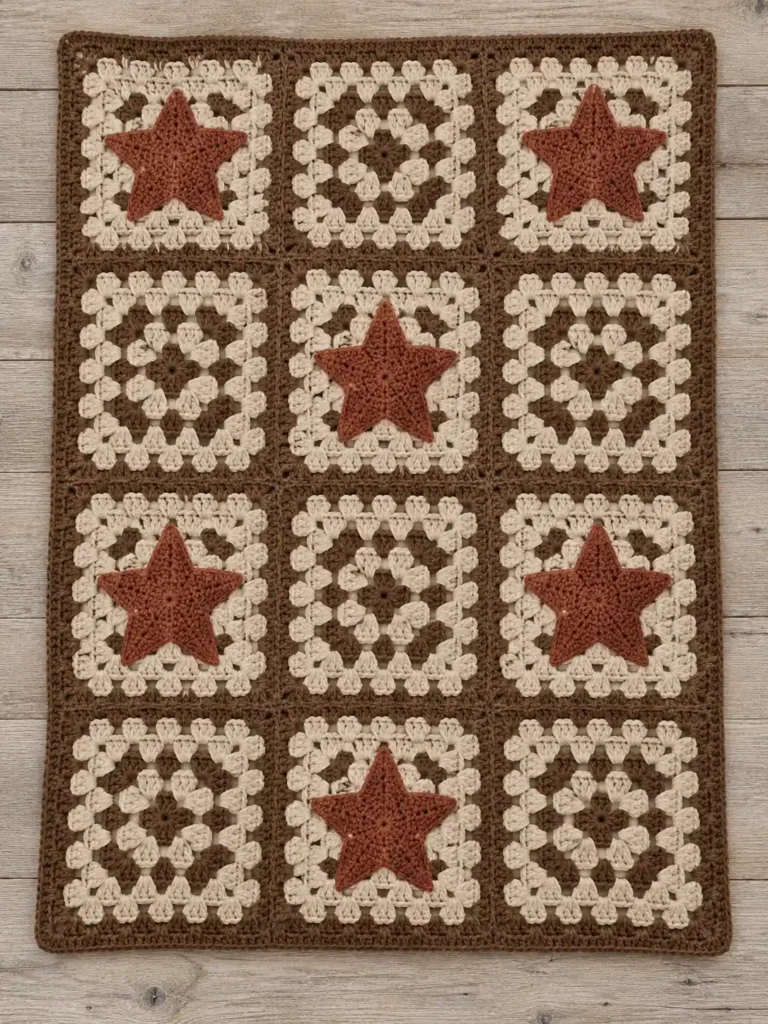
This rustic star blanket combines traditional open granny-square texture with large terracotta crochet stars and a warm oatmeal-and-brown Western palette. The blanket is assembled from exactly twelve matching six-round granny squares arranged in a 3 × 4 grid, with six five-point star appliqués alternating across the surface.
The two cream rounds near the outside are worked separately even though there is no color change between them. Every square then finishes with a saddle-brown granny round, and the completed motifs are joined with brown yarn so their outer rounds form the strong dark grid between the lighter squares. Each star receives a narrow crochet edging before attachment, giving its five points the firm, clearly defined outline of the finished design.
Project at a glance
| Skill level | Advanced beginner to intermediate |
|---|---|
| Terminology | US crochet terms |
| Construction | 12 granny squares and 6 separate star appliqués |
| Layout | 3 squares across × 4 squares down |
| Yarn | Smooth worsted-weight #4 |
| Hook | 5 mm crochet hook |
Exact gauge is not critical, but all twelve squares need to finish at the same blocked size. With ordinary worsted-weight yarn and this six-round construction, the finished piece works naturally as a lap blanket, although its exact dimensions will depend on your yarn and tension.
The stars are deliberately large. Once blocked, each one should span roughly two-thirds to three-quarters of its square while leaving the outer saddle-brown granny round visible around it.
Materials
- Warm oatmeal cream worsted-weight #4 yarn: for the light granny-square rounds.
- Saddle-brown worsted-weight #4 yarn: for the square centers, brown accent rounds, final square rounds, joins, and blanket border.
- Muted terracotta-rust worsted-weight #4 yarn: for all six stars.
- 5 mm crochet hook.
- Tapestry needle.
- Scissors.
- Blocking mats and rust-resistant pins if available.
Choose a smooth yarn with clear stitch definition. Acrylic, wool blends, and smooth cotton blends all work well. Very fuzzy yarn can hide the individual granny clusters and soften the star points too much.
For yarn planning, make one complete granny square first and weigh it if you want a useful quantity for your particular yarn. Multiply that amount by twelve, then allow additional saddle brown for joining and the perimeter. The six terracotta stars require substantially less yarn than the blanket body.
Stitches and abbreviations
- ch – chain
- ch-sp – chain space
- dc – double crochet
- hdc – half double crochet
- hdc2tog – half double crochet two together
- sc – single crochet
- sl st – slip stitch
- RS – right side
- WS – wrong side
Granny cluster: 3 dc worked into the same chain space.
hdc2tog: Yarn over, insert the hook in the next stitch and pull up a loop, yarn over, insert the hook in the following stitch and pull up a loop, yarn over and pull through all five loops on the hook. One hdc2tog counts as 1 stitch.
Before you start
The granny squares are worked on the RS in joined rounds without turning. The beginning ch 3 counts as the first dc in the granny-square pattern. Slip-stitch joins do not count as stitches.
Use the same color sequence for every square:
- R1: saddle brown
- R2: oatmeal cream
- R3: saddle brown
- R4: oatmeal cream
- R5: oatmeal cream
- R6: saddle brown
R4 and R5 are two separate cream granny rounds. Do not combine or omit one of them; the pair creates the broad light-colored area surrounding the darker inner ring.
Keep both the ch-1 side spaces and ch-2 corner spaces relaxed. The finished fabric should have obvious traditional granny-square openings rather than a tightly packed solid surface.
Crochet pattern
Granny square – make 12
R1 – saddle brown: Ch 4. Join with a sl st in the first ch to form a small ring. Ch 3, 2 dc in the ring, ch 2. [3 dc in the ring, ch 2] × 3. Join with a sl st to the top of the beginning ch 3. Fasten off. (12 dc in 4 clusters, 4 ch-2 corner spaces)
R2 – oatmeal cream: Join cream with a sl st in any ch-2 corner sp. Ch 3, 2 dc in the same sp, ch 2, 3 dc in the same sp, ch 1. [(3 dc, ch 2, 3 dc) in the next ch-2 corner sp, ch 1] × 3. Join with a sl st to the top of the beginning ch 3. Fasten off. (8 clusters, 4 ch-2 corner spaces, 4 ch-1 side spaces; 2 clusters per side)
R3 – saddle brown: Join brown with a sl st in any ch-2 corner sp. Ch 3, 2 dc in the same sp, ch 2, 3 dc in the same sp, ch 1. Work 3 dc in the next ch-1 sp, ch 1. [(3 dc, ch 2, 3 dc) in the next ch-2 corner sp, ch 1, 3 dc in the next ch-1 sp, ch 1] × 3. Join with a sl st to the top of the beginning ch 3. Fasten off. (12 clusters, 4 ch-2 corner spaces, 8 ch-1 side spaces; 3 clusters per side)
R4 – oatmeal cream: Join cream with a sl st in any ch-2 corner sp. Ch 3, 2 dc in the same sp, ch 2, 3 dc in the same sp, ch 1. [3 dc in the next ch-1 sp, ch 1] × 2. [(3 dc, ch 2, 3 dc) in the next ch-2 corner sp, ch 1, [3 dc in the next ch-1 sp, ch 1] × 2] × 3. Join with a sl st to the top of the beginning ch 3. (16 clusters, 4 ch-2 corner spaces, 12 ch-1 side spaces; 4 clusters per side)
Do not fasten off. Sl st in each of the next 2 dc, then sl st into the next ch-2 corner sp.
R5 – oatmeal cream: Ch 3, 2 dc in the same corner sp, ch 2, 3 dc in the same sp, ch 1. [3 dc in the next ch-1 sp, ch 1] × 3. [(3 dc, ch 2, 3 dc) in the next ch-2 corner sp, ch 1, [3 dc in the next ch-1 sp, ch 1] × 3] × 3. Join with a sl st to the top of the beginning ch 3. Fasten off. (20 clusters, 4 ch-2 corner spaces, 16 ch-1 side spaces; 5 clusters per side)
R6 – saddle brown: Join brown with a sl st in any ch-2 corner sp. Ch 3, 2 dc in the same sp, ch 2, 3 dc in the same sp, ch 1. [3 dc in the next ch-1 sp, ch 1] × 4. [(3 dc, ch 2, 3 dc) in the next ch-2 corner sp, ch 1, [3 dc in the next ch-1 sp, ch 1] × 4] × 3. Join with a sl st to the top of the beginning ch 3. Fasten off. (24 clusters, 4 ch-2 corner spaces, 20 ch-1 side spaces; 6 clusters and 5 ch-1 spaces per side)
🧶 Checkpoint: The finished square should show a small brown center, one cream round, one brown round, two cream rounds, and one final saddle-brown granny round. It should lie flat with six granny clusters along each side.
Make eleven more identical squares. Weave in all color-change ends on the WS and lightly block the twelve squares to the same dimensions before joining.
Five-point star center – make 6
The stars are made separately. Each begins with a compact three-round circular center, followed by five tapered points. A final single-crochet outline runs around all five points and gives the star its distinct raised edge.
For the star center, the beginning ch 2 does not count as a stitch.
Star R1: With terracotta rust, ch 4 and join with a sl st in the first ch to form a small ring. Ch 2, work 10 dc into the ring. Join with a sl st to the first dc. (10 dc)
Star R2: Ch 2. Work 2 dc in each stitch around. Join with a sl st to the first dc. (20 dc)
Star R3: Ch 2. [1 dc in the next stitch, 2 dc in the next stitch] × 10. Join with a sl st to the first dc. Fasten off. (30 dc)
First star point
With the star RS facing, join terracotta yarn with a sl st in any stitch of R3. Each point uses six consecutive stitches of the 30-stitch outer circle.
Point Row 1: Ch 1; the ch 1 does not count as a stitch. Hdc in the same stitch and in each of the next 5 stitches. Turn. (6 hdc)
Point Row 2: Ch 1. Hdc2tog, hdc in each of the next 2 stitches, hdc2tog. Turn. (4 hdc)
Point Row 3: Ch 1. [Hdc2tog] × 2. Turn. (2 hdc)
Point Row 4: Ch 1. Hdc2tog. Fasten off. (1 hdc)
Remaining four star points
Return the star to RS facing. Join terracotta yarn with a sl st in the first unused stitch of R3 immediately beside the previous point. Repeat Point Rows 1–4 across the next six unused stitches.
Repeat three more times, always using the next six unused stitches. After the fifth point is complete, all 30 stitches of Star R3 will have been used exactly once. Each of the five points therefore has the same six-stitch foundation.
Star outline
Keep the RS facing. Choose any valley where two point bases meet. Join terracotta yarn with a sl st through the outer edge at that valley and ch 1; the ch 1 does not count as a stitch.
Work up the first side of the point with 1 sc in the side edge of Point Row 1, 1 sc in the side edge of Point Row 2, and 1 sc in the side edge of Point Row 3. Work 2 sc in the single tip stitch from Point Row 4. Work down the opposite side with 1 sc in the side edge of Point Row 3, 1 sc in the side edge of Point Row 2, and 1 sc in the side edge of Point Row 1. (8 sc around the first point)
To anchor the valley, insert the hook through the top of the first Star R3 stitch used as the foundation of the next point and work 1 sl st. This slip stitch sits at the base between the two points and keeps the notch crisp.
Repeat the same edging around each of the next four points: 3 sc up the side, 2 sc in the tip, 3 sc down the opposite side, then 1 sl st into the first R3 foundation stitch of the following point.
After the fifth point, work the final valley sl st into the first R3 foundation stitch of the first point. Join with a sl st to the first sc and fasten off. (40 sc around the five points, 5 valley anchor sl sts)
Weave the star tails into the WS without pulling the points out of shape. Lightly block the star with all five tips evenly spaced and the valleys clearly defined.
🧶 Checkpoint: Each blocked star should have five broad triangular points, a small circular center, and one uninterrupted narrow crochet outline. The points should be large enough to extend well across the cream portion of a granny square without hiding its final brown round.
Make five more identical stars for a total of six.
Assembly
Arrange the twelve squares
Lay the blocked granny squares RS up in four rows of three. The stars alternate in a checkerboard arrangement:
- Row 1: star square, plain square, star square
- Row 2: plain square, star square, plain square
- Row 3: star square, plain square, star square
- Row 4: plain square, star square, plain square
This gives exactly six star squares and six plain squares.
Attach the stars
Center one star RS up on each of the six designated granny squares. Place the small central opening of the star directly over the center of the square and orient one point toward the midpoint of the square’s upper edge.
The star tips should extend across the cream granny rounds but stop before the final saddle-brown R6. Lay out all six stars before sewing so their size, centering, and orientation remain consistent.
Thread a tapestry needle with terracotta yarn. Beginning in a valley, sew around the complete star perimeter using small whipstitches placed just inside the final sc outline. Catch the granny-square fabric immediately beneath the star without pulling tightly. Sewing inside the border leaves the raised outer edge clearly visible.
Secure every valley and each of the five tips. When the perimeter is complete, make one small hidden tack through the terracotta center and the granny-square center beneath it. This prevents the large appliqué from forming a loose bubble while still allowing it to retain the slight relief of a separately crocheted layer.
Weave the attachment yarn securely into the WS of the square.
Join the squares with a visible brown slip-stitch seam
The brown joining seam is worked from the front so it remains visible as a narrow chain-like ridge between the motifs. Combined with the saddle-brown R6 of each square, it creates the strong grid running across the blanket.
Each R6 side contains six 3-dc clusters, giving 18 dc stitches, with five ch-1 spaces between them. The two corner spaces form the joining positions at the ends of the edge.
Place two squares side by side with both RS facing upward and the edges touching. Align the corresponding corner spaces and all granny clusters.
With saddle-brown yarn and a slip knot on the hook, insert the hook through both starting corner spaces from front to back and work 1 sl st.
For the dc stitches, work through the two loops nearest the seam: insert the hook through the seam-side loop of the next dc on the first square and then through the seam-side loop of the corresponding dc on the second square. Yarn over and pull through both edge loops and the loop already on the hook to make 1 sl st.
At a pair of corresponding ch-1 spaces, insert the hook through both spaces and work 1 sl st. Continue across the edge, matching every dc with its corresponding dc and every ch-1 space with its corresponding ch-1 space. Finish with 1 sl st through the two corner spaces at the opposite end. (25 joining sl sts across one complete square edge)
🧶 Watch for: The joining chain should sit visibly on the RS but remain narrow and flexible. If the joined edge becomes shorter than the unjoined edge, loosen the slip stitches before continuing.
Join the three squares in each horizontal row first, making two vertical seams per row.
Next join Row 1 to Row 2, Row 2 to Row 3, and Row 3 to Row 4. Follow the same matching method across each three-square width, keeping the horizontal seam aligned as it passes the existing vertical joins.
At every four-square intersection, pass the joining stitch neatly through the matching corner junction without adding an increase. If a tiny opening remains at an intersection, close it afterward from the WS with one or two small saddle-brown stitches.
Finishing the blanket
Add the outer border
The assembled blanket receives one dense saddle-brown single-crochet round outside the existing brown granny-square edges. This narrow finishing round straightens the perimeter while allowing the cluster texture of R6 to remain visible inside it.
With the blanket RS facing, join saddle brown with a sl st in any outer blanket corner space. Ch 1; the ch 1 does not count as a stitch. Work 3 sc in the same corner space.
Across one exposed R6 square edge, work 1 sc in each of the 18 dc stitches and 1 sc in each of the 5 ch-1 spaces. (23 sc across each square-edge segment)
Where two squares meet along the outer perimeter, work 1 sc through the joined corner junction. Continue immediately across the next exposed square edge.
At each of the remaining three outer blanket corners, work 3 sc in the corner space.
Continue around the complete blanket in the same manner. Join with a sl st to the first sc and fasten off. (344 sc total)
The perimeter consists of fourteen exposed square-edge segments with 23 sc on each, ten single stitches at the joins between adjacent perimeter squares, and four outer corners containing 3 sc each.
Block the completed blanket
Weave in every remaining yarn end on the WS. Lay the blanket flat and gently align the three columns and four rows. Straighten the four outside edges and shape the corners without stretching the open granny spaces excessively.
Keep the star appliqués slightly dimensional rather than pressing them completely flat. Their points and outer edges should lie neatly against the blanket while the extra crochet layer remains visible.
Block according to the fiber content of your yarn and allow the blanket to dry completely while flat.
Troubleshooting
- The granny square cups upward: the corner ch-2 spaces may be too tight or one corner cluster may be missing. Loosen the corner chains and confirm that every corner contains two 3-dc clusters.
- The broad cream section is missing: check that both R4 and R5 were worked. They are two separate cream granny rounds even though the yarn color does not change between them.
- A star looks too small: block its five points fully before attaching it. The finished star should fill most of the cream area while leaving the brown R6 visible.
- The star has rounded rather than crisp valleys: make sure the outline is anchored with one sl st at each junction between neighboring point foundations.
- The star puckers the square: the sewing yarn is too tight. The attachment stitches should hold the appliqué flat without shortening its perimeter.
- The brown grid pulls inward: loosen the front slip-stitch seams. Their finished length should match the granny-square edges rather than cinching them together.
- The outside edge ripples: check that you worked only one sc at each ordinary perimeter square junction and 3 sc only at the four true blanket corners.
Final project check
- The blanket contains exactly 12 matching six-round granny squares arranged 3 across and 4 down.
- The square color sequence is brown, cream, brown, cream, cream, brown.
- Exactly 6 squares carry large terracotta five-point stars in an alternating layout.
- Every star has a narrow outlined edge and is securely attached while remaining slightly raised above the granny-square surface.
- The brown joins form a visible grid and one dense saddle-brown single-crochet round finishes the outside perimeter.
Once blocked, the large terracotta stars, open oatmeal granny clusters, and saddle-brown framework give this blanket its distinctive rustic Western appearance. If you make your own version, feel free to share the finished project or leave a question if you get stuck on any step.












