
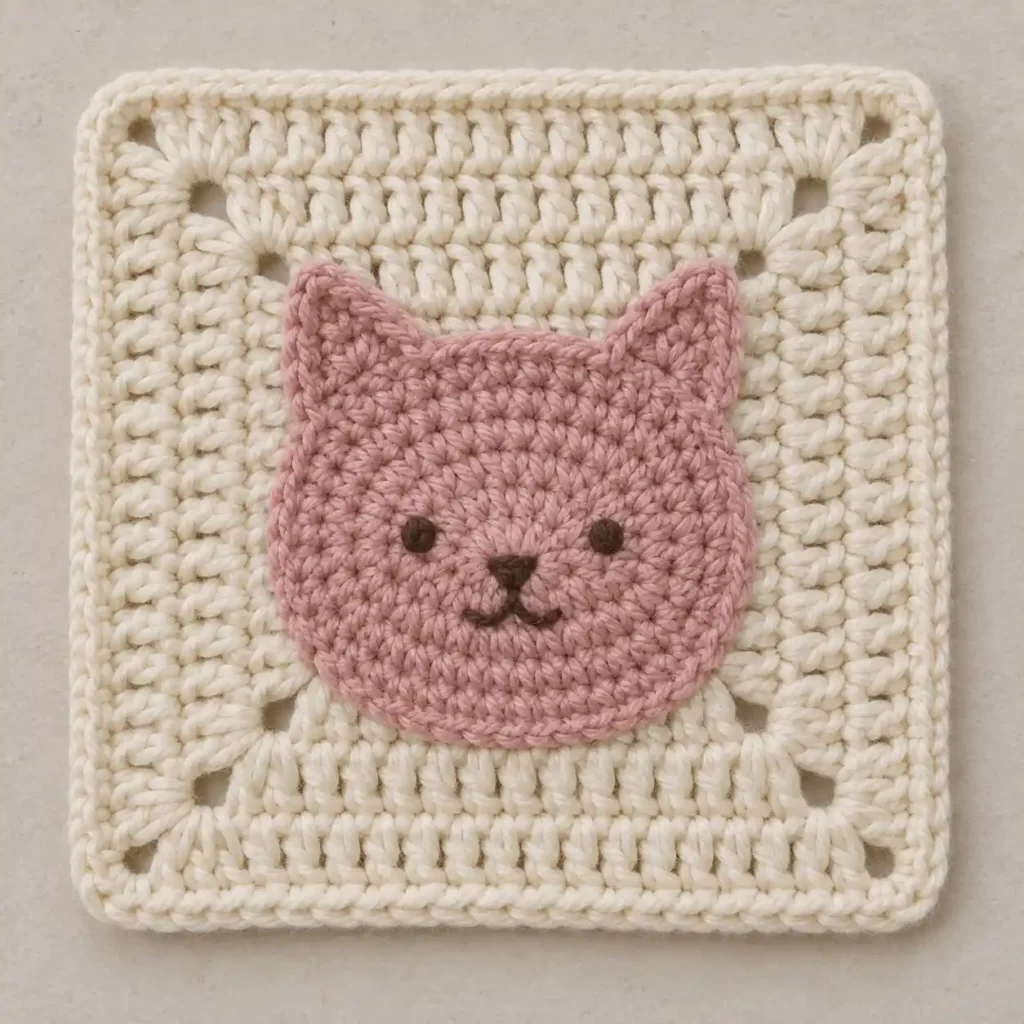
This cute cat granny square combines a warm ivory open granny-square base with a large dusty-rose cat appliqué and a tiny embroidered face. The cat covers much of the center of the square, leaving a generous ivory frame and the characteristic granny-square openings visible around it.
The square is worked first in joined rounds and finished with a narrow single-crochet edging. The cat face is crocheted separately as one flat piece, with both ears worked directly onto the head before the whole motif receives its final outline. Once the facial details are embroidered, the cat is sewn securely to the center of the square.
Project at a glance
| Skill level | Comfortable beginner |
|---|---|
| Terminology | US crochet terms |
| Construction | Joined-round granny square with separate cat appliqué |
| Yarn | Smooth worsted-weight #4 cotton or cotton-blend |
| Hooks | 4.5 mm for the square and 4 mm for the cat |
Materials
- Worsted-weight #4 smooth cotton or cotton-blend yarn in warm ivory for the square
- A partial skein of the same yarn in dusty rose for the cat
- A small amount of dark chocolate brown yarn for the face
- 4.5 mm crochet hook
- 4 mm crochet hook
- Yarn needle
- Scissors
- Removable stitch markers
- Blocking mat and pins if desired
A smooth yarn with a rounded strand works especially well for this design because the double-crochet posts, granny spaces, and individual stitches in the cat remain easy to see. Very fuzzy yarn can soften the edges too much and make the facial embroidery disappear into the surface.
The cat is worked with a slightly smaller hook than the square. This produces a firmer appliqué with a clearly defined outline while allowing the ivory background to remain a little softer.
Stitches and abbreviations
- ch – chain
- ch-sp – chain space
- dc – double crochet
- sc – single crochet
- sc2tog – single crochet two stitches together
- sl st – slip stitch
- st(s) – stitch(es)
- RS – right side
- WS – wrong side
To make an sc2tog, insert the hook into the next stitch and pull up a loop, insert the hook into the following stitch and pull up another loop, then yarn over and pull through all three loops on the hook.
Before you start
The ivory granny square is worked in joined rounds without turning. In the granny rounds, the beginning ch 3 counts as the first dc. Slip stitches used to move into a corner space do not count as stitches.
The ch-1 spaces between granny groups and the ch-2 spaces at the corners remain intentionally open. Crochet into those spaces rather than into the individual chains.
The cat head is also worked in joined rounds without turning. Its beginning ch 1 does not count as a stitch. Keep the cat tension firm enough for the appliqué to lie flat without becoming stiff.
Crochet pattern
Warm ivory granny square
With the 4.5 mm hook and warm ivory yarn, make a magic ring.
R1: Ch 3, work 2 dc into the ring, ch 2, then [3 dc into the ring, ch 2] × 3. Pull the ring closed. Join with a sl st to the top of the beginning ch 3. Do not turn. (12 dc, 4 ch-2 corner spaces)
Sl st across the next 2 dc and into the next ch-2 corner space.
R2: Ch 3, 2 dc in the same corner space, ch 2, 3 dc in the same corner space, ch 1. In each of the next 3 corner spaces work (3 dc, ch 2, 3 dc), ch 1 after each corner. Join to the top of the beginning ch 3. (24 dc, 4 ch-1 spaces, 4 ch-2 corner spaces)
Sl st across the next 2 dc and into the next ch-2 corner space.
R3: Ch 3, 2 dc in the same corner space, ch 2, 3 dc in the same corner space, ch 1, 3 dc in the next ch-1 space, ch 1. [Work (3 dc, ch 2, 3 dc) in the next corner space, ch 1, 3 dc in the next ch-1 space, ch 1] × 3. Join to the top of the beginning ch 3. (36 dc, 8 ch-1 spaces, 4 ch-2 corner spaces)
Sl st across the next 2 dc and into the next ch-2 corner space.
R4: Ch 3, 2 dc in the same corner space, ch 2, 3 dc in the same corner space, ch 1. Work 3 dc in each of the next 2 ch-1 spaces, placing ch 1 after each group. [Work (3 dc, ch 2, 3 dc) in the next corner space, ch 1, then work 3 dc in each of the next 2 ch-1 spaces with ch 1 after each group] × 3. Join to the top of the beginning ch 3. (48 dc, 12 ch-1 spaces, 4 ch-2 corner spaces)
Sl st across the next 2 dc and into the next ch-2 corner space.
R5: Ch 3, 2 dc in the same corner space, ch 2, 3 dc in the same corner space, ch 1. Work 3 dc in each of the next 3 ch-1 spaces, placing ch 1 after each group. [Work (3 dc, ch 2, 3 dc) in the next corner space, ch 1, then work 3 dc in each of the next 3 ch-1 spaces with ch 1 after each group] × 3. Join to the top of the beginning ch 3. (60 dc, 16 ch-1 spaces, 4 ch-2 corner spaces)
🧶 Checkpoint: The square should lie flat with four matching sides and four open corners. From one corner to the next, each side should contain five 3-dc granny groups separated by four visible ch-1 spaces.
Add the narrow ivory border
The final ivory round creates the neat, slightly raised line around the absolute outside edge while preserving the open granny construction underneath.
R6: Ch 1, which does not count as a stitch. In the current ch-2 corner space work 2 sc, ch 2, 2 sc. Work 1 sc in each dc and 1 sc in each ch-1 space across the side. In the next corner work (2 sc, ch 2, 2 sc). Repeat the same side and corner sequence around the remaining square. Join with a sl st to the first sc. (92 sc, 4 ch-2 corner spaces)
Fasten off and weave in the ivory ends.
Dusty-rose cat head
Use the 4 mm hook and dusty-rose yarn. The main head is a flat round motif. Two broad pointed ears are then worked directly onto the upper edge, so the finished cat remains one crocheted appliqué rather than a collection of separately sewn pieces.
Make a magic ring.
R1: Ch 1, work 6 sc into the ring. Pull the ring closed and join with a sl st to the first sc. (6 sc)
R2: Ch 1, work 2 sc in each stitch around. Join to the first sc. (12 sc)
R3: Ch 1, [sc in the next stitch, 2 sc in the next stitch] × 6. Join. (18 sc)
R4: Ch 1, [sc in each of the next 2 stitches, 2 sc in the next stitch] × 6. Join. (24 sc)
R5: Ch 1, [sc in each of the next 3 stitches, 2 sc in the next stitch] × 6. Join. (30 sc)
R6: Ch 1, [sc in each of the next 4 stitches, 2 sc in the next stitch] × 6. Join. (36 sc)
R7: Ch 1, [sc in each of the next 5 stitches, 2 sc in the next stitch] × 6. Join. (42 sc)
R8: Ch 1, [sc in each of the next 6 stitches, 2 sc in the next stitch] × 6. Join. (48 sc)
Fasten off and flatten the head gently with your fingers. The piece should be smooth and broad with no cupping or strong rippling.
Shape the ears
Place the head RS up with the R8 join at the top center. Beginning with the stitch immediately after the join, count the 48 stitches clockwise.
The first ear is worked across stitches 4–11. The second ear is worked across stitches 39–46. This leaves five exposed stitches centered between the ear bases and keeps the ears widely spaced like the finished cat silhouette.
Work the following instructions once for each ear.
Ear Row 1, RS: Join dusty-rose yarn in the first stitch of the 8-stitch ear section. Ch 1, sc in the same stitch and in each of the next 7 stitches. Turn. (8 sc)
Ear Row 2, WS: Ch 1, sc2tog, sc in each of the next 4 stitches, sc2tog. Turn. (6 sc)
Ear Row 3, RS: Ch 1, sc2tog, sc in each of the next 2 stitches, sc2tog. Turn. (4 sc)
Ear Row 4, WS: Ch 1, [sc2tog] × 2. Turn. (2 sc)
Ear Row 5, RS: Ch 1, sc2tog. (1 sc)
Fasten off. Make the second ear in exactly the same way.
🧶 Checkpoint: Both ears should have broad 8-stitch bases, gently taper toward the tips, and sit on opposite sides of a short flat section at the top of the head. Small differences between the tips are fine, but the bases should line up evenly.
Edge the complete cat silhouette
A final single-crochet outline smooths the cheeks and gives the ears the clearly defined border visible around the finished appliqué.
With the RS facing, join dusty-rose yarn to an exposed R8 stitch at the bottom center of the head.
Edging round: Ch 1. Work 1 sc in each exposed R8 stitch until you reach the base of the first ear. Skip the 8 R8 stitches covered by that ear base. Work 1 sc into each of the 4 row-end spaces up the first side of the ear, 3 sc into the tip stitch, then 1 sc into each of the 4 row-end spaces down the other side. Continue with 1 sc in each exposed R8 stitch between the ears. Edge the second ear in the same way, then work 1 sc in each remaining exposed R8 stitch around the head. Join to the first sc. (54 sc)
Fasten off, leaving a long dusty-rose tail for assembly.
Add the embroidered face
Embroider the facial features before attaching the cat to the square. This makes it easy to hide the brown yarn ends completely on the back of the appliqué.
Thread the yarn needle with dark chocolate-brown yarn. Position two small eyes on the same horizontal line a little above the center of the head. Keep the space between the eyes noticeably wider than the width of the nose.
For each eye, make several short satin stitches over the same small area until you have a compact round dot. Avoid pulling the stitches tightly enough to pucker the pink fabric.
Place the nose midway between the eyes and slightly lower. Make a tiny inverted triangle using two or three short stitches.
Bring the brown yarn straight down from the bottom point of the nose with one short vertical stitch. Add one short curved or diagonal stitch toward each side to create the small smiling mouth.
Keep all of the embroidery compact. The tiny features leave plenty of dusty-rose crochet visible and give the cat its simple expression.
Attach the cat to the square
Place the finished ivory square RS up on a flat surface. Position the cat in the center with the ears pointing toward the top edge.
The cat should occupy roughly the central three-fifths of the square’s width. Leave a visible ivory frame around both sides, beneath the rounded chin, and above the ears. Center the nose and the gap between the ears on the vertical centerline of the square.
Pin the appliqué lightly if necessary. Thread the long dusty-rose tail onto a yarn needle.
Beginning at the lower center, whipstitch through the outer edge stitches of the cat and through the upper loops of the ivory crochet beneath it. Take a securing stitch about every one or two cat edging stitches.
Sew around the entire rounded lower edge, continue up one cheek, around the outer edge and tip of the first ear, across the shallow valley between the ears, around the second ear, and back down the opposite cheek.
Secure the complete outer edge rather than leaving the ear tips or cheeks loose. Keep the stitches relaxed so the square stays flat and the cat retains a subtle raised-appliqué appearance.
Secure the yarn on the WS and weave the tail through several nearby stitches before trimming.
Finishing the square
Weave in all remaining ends on the WS. If the square needs a little shaping, damp-block it with the four outer corners pinned evenly.
Keep the corner chain spaces open while blocking and avoid stretching the center aggressively. The granny clusters should remain plump and the cat should stay softly raised from the ivory background.
Allow the square to dry completely before removing the pins.
Troubleshooting
- The ivory square is cupping: the corner chains are probably too tight. Work the ch-2 corners more loosely and confirm that each corner contains two 3-dc groups.
- The square is ruffling: check that you have only one 3-dc group in every side ch-1 space and exactly two groups in each corner.
- The cat head is wavy: check the increase sequence carefully. Each main head round adds exactly 6 stitches.
- The ears do not match: confirm that both start across exactly 8 stitches and follow the same 8, 6, 4, 2, 1 shaping sequence.
- The square puckers after attaching the cat: the sewing stitches are too tight. Undo the affected section and resew it with relaxed tension.
Optional larger background
If you want more ivory space around the cat, add another granny round before the single-crochet border.
Extra granny round: Sl st into a corner space. Ch 3, 2 dc in the same corner space, ch 2, 3 dc in the same space, ch 1. Work 3 dc into each of the next 4 ch-1 side spaces, placing ch 1 after every group. Repeat the same corner and side sequence around. Join to the beginning ch 3. (72 dc, 20 ch-1 spaces, 4 ch-2 corner spaces)
Then work the same edging method: (2 sc, ch 2, 2 sc) in every corner, 1 sc in every dc, and 1 sc in every ch-1 space. (108 sc, 4 ch-2 corner spaces)
Keep the cat itself unchanged so the larger version simply gains a wider ivory border.
This simple cat motif keeps the recognizable granny-square texture visible while giving the center a soft, raised character. If you make one, feel free to share your finished square or leave a question if you need help with the ear shaping or assembly.












