
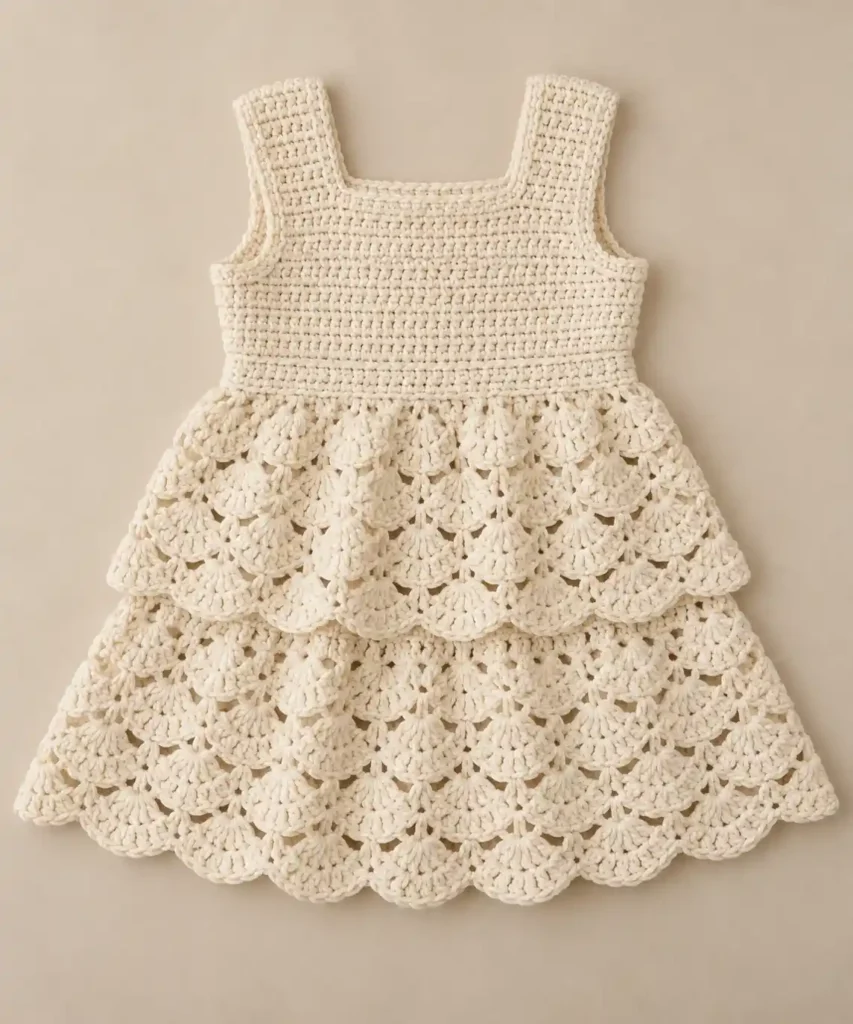
This ivory cream toddler dress combines a crisp square neckline, broad shoulder sections, a compact solid bodice, and two overlapping layers of large crochet shells. The shorter upper flounce creates the distinctive tiered effect, while the longer skirt underneath gives the dress its softly flared shape and deep scalloped lower edge.
The bodice is made from two matching panels and joined at the shoulders and sides. A narrow empire waistband is crocheted around the lower edge, then both skirt layers are worked directly from that band. The long skirt uses the back loops of the waistband, leaving the front loops available for the shorter upper tier.
The most important feature of the skirt is the broad staggered shell pattern. Seven-double-crochet fans alternate with chain-space rounds, giving the fabric the large rounded, almost petal-like texture while keeping every shell connected to a clear crochet foundation.
Project at a glance
| Skill level | Advanced beginner to intermediate |
|---|---|
| Terminology | US crochet terms |
| Suggested size | Toddler 2T–3T |
| Construction | Two bodice panels with two integrated skirt tiers |
| Main texture | Solid hdc bodice with staggered 7-dc shells |
| Approximate chest | About 24 in / 61 cm at the stated gauge |
The bodice is designed with a little wearing ease rather than a close fit. Its straight shape keeps the top simple and structured, while most of the fullness is introduced immediately below the waistband.
Materials
- DK or light-worsted cotton or cotton-blend yarn in warm ivory cream, approximately 800–1,000 yd / 730–915 m
- 4 mm crochet hook, or size needed to obtain gauge
- Yarn needle
- Stitch markers
- Scissors
A smooth cotton or cotton-blend yarn gives the best balance between stitch definition and drape. The bodice needs enough body to hold the square neckline, while the large shells should remain soft enough to overlap naturally.
Gauge
Approximately 16 hdc and 12 rows = 4 in / 10 cm in half-double crochet.
Matching the stitch gauge is more important than matching the row gauge exactly. If your swatch is significantly wider than this, change hook size before beginning the bodice.
🧶 Crochet Tip: Make the front and back panels with the same hook and tension. Because the neckline and shoulders are broad and geometric, even a small difference between the two panels can make the finished top sit unevenly.
Stitches and abbreviations
- ch – chain
- sc – single crochet
- hdc – half-double crochet
- dc – double crochet
- sl st – slip stitch
- st(s) – stitch(es)
- sk – skip
- sp – space
- BLO – back loop only
- FLO – front loop only
- RS – right side
- WS – wrong side
- hdc2tog – half-double crochet 2 stitches together
Large shell: Work 7 dc into the indicated ch-5 space.
To make hdc2tog, yarn over and insert the hook into the next stitch, yarn over and pull up a loop, yarn over and insert the hook into the following stitch, yarn over and pull up a loop, then yarn over and pull through all 5 loops on the hook.
Before you start
The front and back bodice panels are worked identically from the waist upward. Turn after every bodice row. The beginning ch 1 does not count as a stitch.
After assembly, the waistband and skirt are crocheted in joined rounds without turning. The beginning ch 3 of a shell round counts as the first dc. All other beginning chains do not count as stitches.
The shell pattern alternates between a broad fan round and an anchoring round. Each anchoring sc is placed in the center, fourth dc of the shell below. A ch-5 space then stretches naturally to the center of the next shell. Working the following 7-dc fan into that ch-5 space offsets the next row of shells and prevents the lace from becoming tightly gathered.
Crochet pattern
Front bodice panel
Ch 49.
Row 1: Hdc in 2nd ch from hook and in each remaining ch across. Turn. (48 hdc)
Rows 2–8: Ch 1, hdc in each st across. Turn. (48 hdc)
Row 9: Ch 1, sl st loosely in first 3 sts, hdc in next 42 sts, leaving final 3 sts unworked. Turn. (42 hdc)
Row 10: Ch 1, hdc2tog, hdc in next 38 sts, hdc2tog. Turn. (40 hdc)
Rows 11–18: Ch 1, hdc in each st across. Turn. (40 hdc)
First shoulder
Row 19: Ch 1, hdc in first 12 sts. Leave remaining stitches unworked. Turn. (12 hdc)
Rows 20–24: Ch 1, hdc in each st across. Turn. (12 hdc)
Fasten off.
Second shoulder
With RS facing, skip the center 16 sts of Row 18. Join yarn in the next stitch; 12 stitches remain between the joining point and the outside edge.
Row 19: Ch 1, hdc in joining st and next 11 sts. Turn. (12 hdc)
Rows 20–24: Ch 1, hdc in each st across. Turn. (12 hdc)
Fasten off.
🧶 Checkpoint: The panel should now have a straight lower edge, shallow shaping at both underarms, a wide squared neckline opening, and two matching broad shoulder sections.
Back bodice panel
Make a second panel exactly as for the front, following Rows 1–24.
Assemble the bodice
Place the front and back panels with RS together and all outer edges aligned.
Using ivory yarn and a yarn needle, seam each pair of 12-stitch shoulder sections together. Keep the seam secure but flexible.
For each side seam, begin at the lower edge and sew upward along the sides of Rows 1–8 only. Stop before the shaping created in Row 9. Repeat on the opposite side.
Turn the bodice RS out.
Square neckline edging
Join yarn at one shoulder seam.
Neckline R1: Ch 1. Work 1 sc into each of the 6 row ends down the first side of the front neckline, 1 sc in each of the 16 center neckline sts, and 1 sc into each of the 6 row ends up the second side. Continue around the back neckline in the same manner. Join with sl st to first sc. (56 sc)
Neckline R2: Ch 1, sc in each st around. Join with sl st to first sc. (56 sc)
Fasten off.
The second round gives the neckline the clearly defined raised edge. Keep both rounds relaxed enough that the straight sections remain straight rather than being pulled into a rounded opening.
Armhole edging
Join yarn at the center of one underarm.
Armhole R1: Ch 1. Work 1 sc in each of the 3 exposed underarm stitches on the front panel, 1 sc into each of the 16 row ends around the front armhole edge, 1 sc into each of the 16 row ends down the back armhole edge, then 1 sc in each of the 3 exposed back underarm stitches. Join to first sc. (38 sc)
Armhole R2: Ch 1, sc in each st around. Join with sl st to first sc. (38 sc)
Fasten off and repeat around the second armhole.
Make the empire waistband
With the dress RS facing, join yarn at one side seam along the lower foundation edge.
R1: Ch 1. Work 1 sc into each of the 48 foundation positions across the front and each of the 48 foundation positions across the back. Join with sl st to first sc. Do not turn. (96 sc)
R2: Ch 1, hdc in each st around. Join with sl st to first hdc. (96 hdc)
R3: Ch 1, sc in each st around. Join with sl st to first sc. (96 sc)
These three compact rounds form the narrow horizontal band separating the solid upper bodice from the deeply textured skirt.
🧶 Watch for: On the next round, work through the back loops only. The unused front loops of waistband R3 must remain intact because the shorter upper flounce will be crocheted into them later.
Crochet the layered shell skirt
Long lower skirt
The lower skirt is worked first. Its upper portion will eventually sit behind the shorter flounce, while its lower shell rows form the visible bottom half of the dress.
R1: Working in BLO of waistband R3, ch 1. [Sc in next st, 2 sc in next st] × 48. Join with sl st to first sc. (144 sc)
R2: Ch 1, sc in first st, ch 5, sk next 5 sts. [Sc in next st, ch 5, sk next 5 sts] × 23. Join with sl st to first sc. (24 sc, 24 ch-5 spaces)
R3: Sl st into first ch-5 sp. Ch 3, 6 dc in same sp, ch 1. [7 dc in next ch-5 sp, ch 1] × 23. Join to top of beginning ch 3. (24 shells, 24 ch-1 spaces; 168 dc)
R4: Sl st across the next 3 dc to reach the fourth, center dc of the first shell. Ch 1, sc in same dc, ch 5. [Sc in fourth dc of next shell, ch 5] × 23. Join to first sc. (24 sc, 24 ch-5 spaces)
R5: Sl st into first ch-5 sp. Ch 3, 6 dc in same sp, ch 1. [7 dc in next ch-5 sp, ch 1] × 23. Join to top of beginning ch 3. (24 shells, 24 ch-1 spaces; 168 dc)
R6: Sl st across to the fourth dc of the first shell. Ch 1, sc in same dc, ch 5. [Sc in fourth dc of next shell, ch 5] × 23. Join. (24 sc, 24 ch-5 spaces)
R7: Repeat R5. (24 shells, 24 ch-1 spaces; 168 dc)
R8: Repeat R6. (24 sc, 24 ch-5 spaces)
R9: Repeat R5. (24 shells, 24 ch-1 spaces; 168 dc)
R10: Repeat R6. (24 sc, 24 ch-5 spaces)
R11: Repeat R5. (24 shells, 24 ch-1 spaces; 168 dc)
R12: Repeat R6. (24 sc, 24 ch-5 spaces)
R13: Repeat R5. (24 shells, 24 ch-1 spaces; 168 dc)
R14: Repeat R6. (24 sc, 24 ch-5 spaces)
R15: Repeat R5. (24 shells, 24 ch-1 spaces; 168 dc)
R16: Repeat R6. (24 sc, 24 ch-5 spaces)
R17: Repeat R5. (24 shells, 24 ch-1 spaces; 168 dc)
The long skirt now has eight broad shell rounds. The ch-5 spaces allow enough horizontal room between the center points of neighboring 7-dc shells, so the fans can remain broad and rounded instead of bunching or cupping inward.
The shells in one row should sit between the shells of the preceding row. This staggered placement creates the dense overlapping texture while preserving small, regular lace openings.
Lower hem edging
R18: Ch 1. Sl st loosely in each dc of every shell and work 1 sl st into each ch-1 sp around. Join to first sl st. (192 sl sts)
Fasten off.
Keep the slip stitches loose so the final edge follows each broad shell curve. The hem should remain deeply scalloped rather than being pulled into a straight line.
Short upper skirt tier
Fold the long skirt downward so the unused FLO of waistband R3 are clearly accessible.
Join yarn in an unused front loop at one side seam.
R1: Working only in the unused FLO of waistband R3, ch 1. [Sc in next 3 sts, 2 sc in next st] × 24. Join with sl st to first sc. (120 sc)
R2: Ch 1, sc in first st, ch 5, sk next 5 sts. [Sc in next st, ch 5, sk next 5 sts] × 19. Join to first sc. (20 sc, 20 ch-5 spaces)
R3: Sl st into first ch-5 sp. Ch 3, 6 dc in same sp, ch 1. [7 dc in next ch-5 sp, ch 1] × 19. Join to top of beginning ch 3. (20 shells, 20 ch-1 spaces; 140 dc)
R4: Sl st across the next 3 dc to reach the fourth dc of the first shell. Ch 1, sc in same dc, ch 5. [Sc in fourth dc of next shell, ch 5] × 19. Join. (20 sc, 20 ch-5 spaces)
R5: Sl st into first ch-5 sp. Ch 3, 6 dc in same sp, ch 1. [7 dc in next ch-5 sp, ch 1] × 19. Join. (20 shells, 20 ch-1 spaces; 140 dc)
R6: Repeat R4. (20 sc, 20 ch-5 spaces)
R7: Repeat R5. (20 shells, 20 ch-1 spaces; 140 dc)
R8: Repeat R4. (20 sc, 20 ch-5 spaces)
R9: Repeat R5. (20 shells, 20 ch-1 spaces; 140 dc)
The shorter tier now contains four broad shell rounds. It should overlap the upper half of the long skirt without extending close to the final hem.
Upper-tier edging
R10: Ch 1. Sl st loosely in each dc of every shell and work 1 sl st into each ch-1 sp around. Join to first sl st. (160 sl sts)
Fasten off.
🧶 Checkpoint: The shorter tier should hang freely over the long skirt with a clearly visible scalloped edge. The two skirt layers are connected only at the waistband and should not be sewn together farther down.
Finishing the dress
Weave all yarn ends securely into the WS. Around the waistband, weave the ends horizontally through several stitches rather than pulling them vertically through the band, which can create a gathered spot.
Light blocking helps the neckline, shoulders, and large shell rows settle into their final shape. Wet-block or carefully steam-block according to the fiber content of your yarn.
Lay the dress flat and straighten the four sides of the neckline. Align both shoulder sections and make sure the two armholes have matching curves.
Spread the long skirt into a softly flared bell shape. Then lay the shorter tier naturally over it so the upper scalloped edge is clearly visible and roughly the lower half of the long skirt remains exposed.
Do not stretch the chain spaces excessively during blocking. They should form small, recognizable openings between the dense fans rather than becoming large mesh holes.
Allow the individual shells to retain a little natural depth and variation. Their slight overlap is what gives the skirt its full, dimensional appearance.
Troubleshooting
- The square neckline is becoming rounded: the neckline edging is too tight. Rework it more loosely so the straight sections can lie flat.
- The shoulder sections tilt inward: check that both shoulders contain 12 stitches and that exactly 16 center stitches were left for the neckline.
- The skirt cups or pulls inward: the chain spaces between shell centers may be too tight. Keep every ch-5 relaxed enough to span naturally from one shell center to the next.
- The shells look narrow and flat: confirm that every shell contains 7 dc worked into one ch-5 space.
- The shell rows line up in rigid vertical columns: the next shell should be worked into the ch-5 space between the center anchors of two shells below. This shifts each new shell halfway across the previous repeat.
- The lower skirt does not flare: check R1 carefully. The 96 waistband stitches must increase evenly to 144 stitches before the lace foundation begins.
- The upper tier is as large as the long skirt: check its setup count. The upper layer uses 120 stitches and 20 shells; the lower layer uses 144 stitches and 24 shells.
- The upper tier pulls the lower skirt upward: make sure the two tiers were worked through separate loops of waistband R3. The long skirt uses BLO and the shorter tier uses the unused FLO.
Adjusting the skirt length
For a slightly longer dress, add another complete anchoring-and-shell pair before the lower hem edging. Repeat the construction of R16 and R17 while keeping all 24 shell repeats.
To shorten the dress, remove one complete anchoring-and-shell pair. Always finish the lower skirt on a shell round before adding the slip-stitch edging.
The upper tier can be adjusted in the same way. Add or remove one complete anchoring-and-shell pair while preserving all 20 repeats.
If you change the skirt length significantly, check the bodice against the intended child’s measurements first. Toddler height can vary considerably within the same clothing size.
Final project check
- The neckline is broad and distinctly square.
- The bodice is compact and mostly solid with two matching broad shoulders.
- A narrow three-round waistband clearly separates the bodice from the lace.
- The shorter tier contains four large staggered shell rounds and overlaps the long skirt freely.
- The long skirt contains eight broad shell rounds with a deep scalloped lower edge.
Once lightly blocked, the broad staggered fans should create the full layered texture while the simple square-neck bodice keeps the upper half of the dress neat and balanced. If you make this ivory cream toddler dress, feel free to share your finished project or leave a question if you get stuck on one of the shell rounds.












