
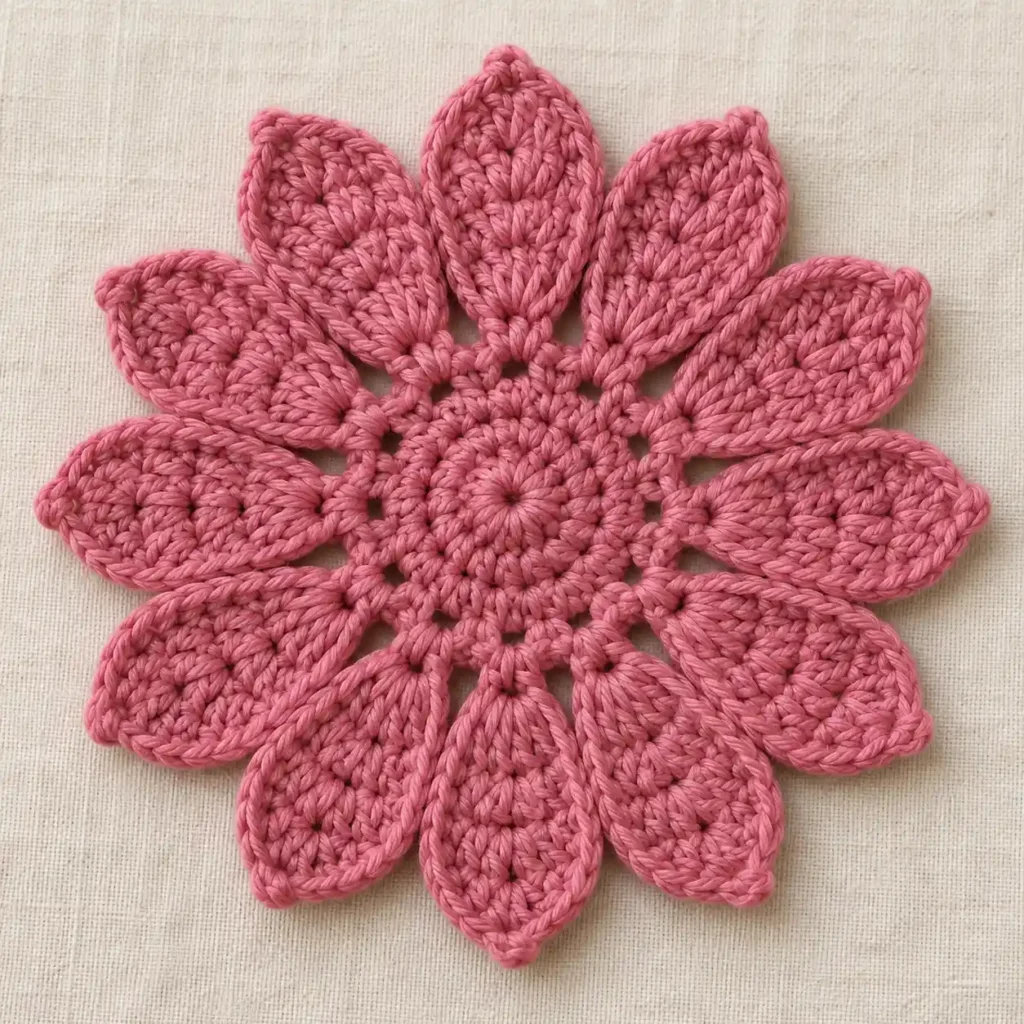
This crochet dahlia has a compact circular center surrounded by exactly twelve long, pointed petals. Each petal is narrow at the base, fuller through the middle, and tapered again toward the tip, with a raised crochet outline and a visible chain-like ridge running through its center.
The flower is worked as one connected motif. First you crochet the round center and make twelve evenly spaced chain openings around its outer edge. Each petal is then built directly from one of those openings around a short foundation chain, edged with single crochet, and finished with a surface-crochet center ridge before moving to the next petal.
Project at a glance
| Skill level | Confident beginner to intermediate |
|---|---|
| Terminology | US crochet terms |
| Construction | Joined center rounds with 12 directly crocheted petals |
| Yarn | DK or light-worsted smooth cotton or cotton blend |
| Hook | Approximately 4 mm |
| Colors | One solid dusty rose or raspberry pink |
Materials
- DK or light-worsted cotton or cotton-blend yarn in dusty rose, raspberry pink, or a similar solid pink shade
- 4 mm crochet hook, or the hook size that gives you firm but flexible stitches
- One removable stitch marker
- Yarn needle
- Scissors
- Blocking mat and rustproof pins, optional
A smooth yarn with clear stitch definition is ideal. Cotton or a cotton-rich blend helps the long petals hold their shape and keeps the raised edging and center ridges easy to see.
Stitches and abbreviations
- ch – chain
- sl st – slip stitch
- sc – single crochet
- hdc – half-double crochet
- dc – double crochet
- tr – treble crochet
- st(s) – stitch(es)
- RS – right side
Surface slip stitch: Insert the hook from the front through the indicated stitch or chain strand, catch the working yarn behind the fabric, and pull it through the fabric and immediately through the loop already on the hook. Keep these stitches relaxed so they form a raised chain rather than drawing the fabric inward.
Before you start
The flower center is worked in joined rounds without turning. Chain 1 at the beginning of a center round does not count as a stitch, and the slip stitch used to join the round does not count as a stitch.
The petal construction is slightly different from ordinary row-shaped petals. Each petal begins with a foundation chain extending outward from the flower center. You crochet along one side of this chain, around its base, and back along the opposite side. This creates the elongated leaf-like dahlia shape and places the crochet stitches in the same direction on all twelve petals.
For the petal body, work the first side into only one side loop of each foundation chain and the second side into the opposite side loop. Leave the small third strand, or back bump, running along the center unused. That exposed line becomes the guide for the raised center ridge later.
🧶 Crochet Tip: Keep each petal foundation chain relaxed and even. A tight chain will shorten the center of the petal and can make the finished petal curl or twist.
Crochet pattern
Flower center
Make a magic ring.
R1: Ch 1. Work 12 hdc into the magic ring. Pull the ring almost completely closed. Join with a sl st to the first hdc. Do not turn. (12 hdc)
R2: Ch 1. Work 2 hdc in each st around. Join with a sl st to the first hdc. Do not turn. (24 hdc)
R3: Ch 1. [Hdc in next st, 2 hdc in next st] × 12. Join with a sl st to the first hdc. Do not turn. (36 hdc)
R4: Ch 1. [Hdc in next 2 sts, 2 hdc in next st] × 12. Join with a sl st to the first hdc. Do not turn. (48 hdc)
Petal foundation round
R5: Ch 1. [Sc in next 3 sts, ch 2, skip next st] × 12. Join with a sl st to the first sc. Do not turn. (36 sc, 12 ch-2 spaces)
Slip stitch in each of the next 2 sc, then sl st into the first ch-2 space. This is the starting point for Petal 1.
🧶 Checkpoint: The center should lie flat with twelve clearly separated ch-2 openings around the perimeter. Each opening will hold exactly one petal.
Petal 1
With the RS facing and the hook positioned in a ch-2 space of R5, ch 13. The chain should extend straight outward from the flower center.
The chain nearest the hook remains unused for the moment and will help form the pointed outer tip.
Petal body, first side: Beginning in the second ch from the hook and working toward the center of the flower, use only one side loop of each foundation chain.
Sl st in next ch, sc in next ch, hdc in next ch, dc in next 2 ch, tr in next 3 ch, dc in next 2 ch, hdc in next ch. You have worked across 11 chains.
In the final foundation chain at the base, work 3 sc. These three stitches turn the work smoothly around the base of the petal.
Petal body, second side: Without turning the work, continue back toward the outer tip using the unused side loop of the same foundation chains.
Hdc in next ch, dc in next 2 ch, tr in next 3 ch, dc in next 2 ch, hdc in next ch, sc in next ch, sl st in next ch.
Sl st into the unused chain at the outer tip to close the petal shape. (25 body sts)
The petal should now be narrow at both ends and widest through the middle. A line of unused foundation-chain strands should remain visible from the tip toward the flower center.
Single-crochet petal edging
Do not fasten off.
Ch 1.
Working from the tip toward the flower center, sc once in each of the 11 body stitches along the first side of the petal.
Sc once in each of the 3 sc around the rounded base.
Continue with 1 sc in each of the 11 body stitches along the opposite side, working back toward the outer tip.
In the unused tip chain, work sc, ch 1, sc.
Join with a sl st to the first edging sc. (27 sc, 1 ch-1 tip space)
The single-crochet edging should form one continuous raised outline around the petal, while the ch-1 space creates a small pointed tip.
Raised center ridge
Keep the RS facing. Position the working yarn behind the petal.
Beginning immediately below the pointed tip, work 1 surface sl st into each exposed center strand of the original foundation chain, moving toward the flower center.
Work 11 surface sl sts along the exposed chain strands.
At the bottom of the ridge, work one surface sl st into the middle sc of the 3-sc group at the base of the petal, then sl st into the same ch-2 space of R5 where the petal began.
The petal now has three clearly defined features: a dense crocheted body, a raised single-crochet perimeter, and a narrow chain-like ridge through its center.
🧶 Checkpoint: The finished petal should look like an elongated pointed leaf. Its base should remain relatively narrow, the middle should be noticeably fuller, and the raised center line should run straight toward the flower center without pulling the petal into a fold.
Move to the next petal
After returning to the R5 ch-2 space, sl st in each of the next 3 sc of R5, then sl st into the next ch-2 space.
You are now positioned to begin the next petal.
Petals 2–12
Repeat the complete Petal 1 instructions in each remaining ch-2 space:
- Ch 13.
- Work the first side of the petal toward the center.
- Work 3 sc in the final base chain.
- Work the matching second side back toward the tip.
- Close the petal at the unused tip chain.
- Add the complete single-crochet edging.
- Work the raised surface-slip-stitch ridge back toward the center.
- Anchor in the same ch-2 space.
- Slip stitch across the next 3 center sc to the following ch-2 space.
Continue until exactly 12 petals have been completed.
After Petal 12, return down its center ridge and sl st into its original ch-2 space as before. Fasten off rather than travelling to another space.
Finishing the dahlia
Weave the starting and finishing yarn tails securely into the wrong side of the circular center. Because the petals are crocheted directly onto the outer round, there are no separate petal sewing seams to hide.
Lay the flower RS up and spread the petals evenly around the center. Leave the small ch-2 openings between the petal bases visible rather than pulling the petals tightly against one another. Those openings help separate the twelve petals and allow each one to keep its own clear outline.
Light blocking will give the flower a cleaner shape. Damp the piece, flatten the center first, then arrange all twelve petals so their tips point outward at roughly even intervals.
Pin the pointed tips first. Then gently smooth the widest section of each petal without stretching the stitches. The petals do not need to be perfectly identical; slight differences in angle and curve give the motif a natural handmade appearance.
Allow the flower to dry completely before removing the pins.
Troubleshooting
- The flower center cups upward: Check that R2, R3, and R4 contain all of the stated increases. If the counts are correct, loosen your hdc tension slightly.
- The center becomes wavy: The stitches are probably too loose for the selected yarn. Try a slightly smaller hook rather than changing the increase sequence.
- The petals look too narrow: Check the three central treble stitches on each side. These taller stitches create most of the petal’s width.
- The petals look too round: Make sure the short sl st, sc, and hdc sequence is worked at the outer end before the taller stitches begin, and keep the ch-1 point in the edging.
- A petal twists: The foundation chain is usually too tight or the stitches were accidentally worked into different chain strands on the two sides. Keep the original chain relaxed and use the same loop treatment consistently.
- The center ridge pulls the petal inward: Redo the surface slip stitches more loosely. They should rest on the fabric rather than behave like a tight seam.
- The petal edges look uneven: Check that the edging contains one sc in every body stitch and that the three stitches around the petal base are not skipped.
- The spaces between petals disappear: Do not crochet petal stitches into the R5 ch-2 spaces other than the starting and finishing anchor. Keep the spaces open between neighboring petals.
Adjusting the size
The simplest way to change the finished size while preserving the twelve-petal proportions is to change yarn weight and hook size together. A finer cotton yarn will make a smaller flower, while a heavier yarn will create a larger decorative dahlia.
If you change yarn, choose a hook that keeps the petals firm enough for the pointed shape while still allowing the center to lie flat. Avoid making only the petal foundation chain substantially longer unless you are also prepared to redesign the stitch-height sequence; simply adding chains would make the petals narrow and out of proportion.
The finished flower works well as a large appliqué, bag decoration, wall-hanging motif, cushion embellishment, or centerpiece for another crochet project. If you make one, feel free to share your finished dahlia or leave a question if you need help with the petal construction.












