
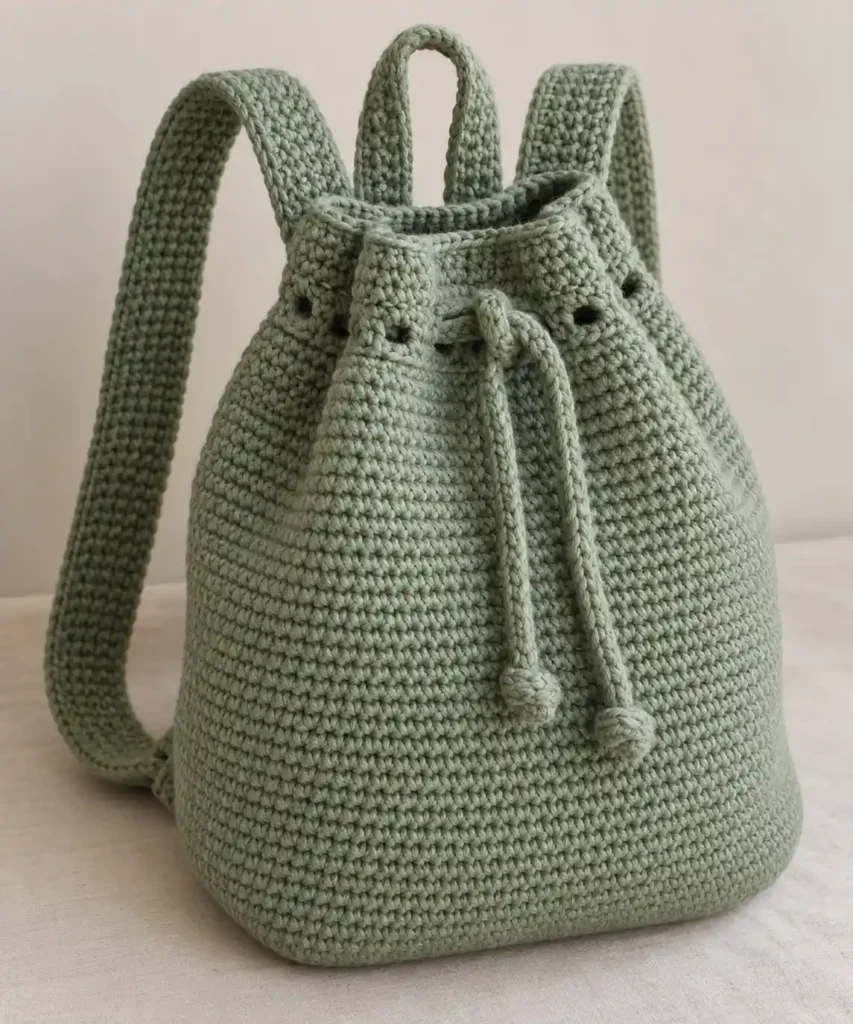
This sage green crochet backpack has a softly structured bucket shape with rounded lower corners, a gently narrower upper body, a gathered drawstring closure, two wide shoulder straps, and a short carrying loop at the back. The compact single-crochet texture keeps the design simple and practical while giving the finished bag the dense handmade surface that defines the project.
The backpack begins with a flat rectangular base. A setup round is worked around its perimeter, then the body grows directly upward from that edge. Most of the body remains full and straight before a small amount of shaping near the top creates the subtle taper visible beneath the drawstring opening.
The drawstring passes through twelve evenly spaced crochet eyelets and finishes with simple knotted ends at the front. Two separately crocheted straps and one smaller carrying loop complete the backpack.
Project at a glance
| Skill level | Advanced beginner |
|---|---|
| Terminology | US crochet terms |
| Main stitch | Single crochet |
| Construction | Flat base, body worked upward in rounds, separate straps, loop, and drawstring |
| Yarn | Medium-weight #4 cotton or cotton-blend yarn |
| Hook | 4 mm crochet hook |
| Finished shape | Small-to-medium rounded bucket backpack |
A firm gauge is more important than matching an exact measurement. Your single crochet should form a dense, flexible fabric with very little space between stitches. The backpack should stand with some structure when empty but still feel soft enough for the drawstring opening to gather easily.
Materials
- Medium-weight #4 smooth cotton, cotton-acrylic, or similarly firm yarn in muted sage green, approximately 550–750 yards
- 4 mm crochet hook, or a hook size that produces dense single crochet fabric with your chosen yarn
- Yarn needle
- Stitch markers
- Removable markers or scrap yarn for marking the front, back, and strap positions
- Scissors
A smooth yarn with visible twist works especially well here because the individual crochet stitches remain clearly defined. Cotton gives the backpack more body, while a cotton-acrylic blend can make the finished bag slightly lighter and softer.
Use the same yarn and hook for the body, straps, carrying loop, and drawstring so all of the visible components have a consistent texture.
Stitches and abbreviations
- ch – chain
- sc – single crochet
- sc2tog – single crochet two stitches together
- sl st – slip stitch
- st/sts – stitch/stitches
- sk – skip
- ch-sp – chain space
- BLO – back loop only
- RS – right side
- WS – wrong side
The beginning ch 1 does not count as a stitch. Slip-stitch joins do not count as stitches. The body is worked in joined rounds without turning.
Single crochet decrease
To make an sc2tog, insert the hook into the next stitch and pull up a loop, insert the hook into the following stitch and pull up another loop, yarn over, and pull through all three loops on the hook. One decrease replaces two stitches with one.
Before you start
The finished silhouette depends on three stages: a flat base, a full lower body, and a gently tapered upper section. Do not begin decreasing immediately after the base. Keeping most of the body at its full stitch count creates the roomy bucket shape rather than a narrow pouch.
The rectangular base has two long edges and two shorter side edges. After completing the perimeter round, choose one long edge as the back and mark its center. The body-round join will be placed at this center-back position so the joining line stays away from the front of the finished backpack.
🧶 Crochet Tip: The fabric should be dense enough to support the rounded bucket shape but not so tight that the top refuses to gather. If your swatch feels hard and board-like, move up one hook size.
Crochet pattern
Flat backpack base
Ch 29.
Row 1: Sc in the second ch from hook and in each remaining ch across. Ch 1, turn. (28 sts)
Rows 2–11: Sc in each st across. Ch 1, turn. (28 sts)
Row 12: Sc in each st across. Do not turn. (28 sts)
The base is now a simple rectangle measuring 28 stitches across and 12 rows deep.
Perimeter setup round
Continue with RS facing.
Setup round: Ch 1. Sc in each of the 28 sts across Row 12. Work 12 sc evenly down the first short edge, placing one sc into each row end. Work 28 sc across the unused loops along the foundation edge. Work 12 sc evenly up the remaining short edge. Join with a sl st to the first sc. (80 sts)
Fasten off.
Lay the base flat. Choose one 28-stitch long edge as the back and place a marker at approximately its center. Mark the opposite long edge as the front.
🧶 Checkpoint: The base should still lie mostly flat, with gently softened corners rather than pointed corners. A slight tendency for the perimeter to curve upward is fine because the next round begins the sides of the backpack.
Main backpack body
With RS facing, join the yarn at the marked center-back stitch.
R1: Ch 1. Working in BLO, sc in the same st and in each remaining st around. Join with a sl st to the first sc. Do not turn. (80 sts)
The back-loop-only round creates a subtle fold between the flat base and the upright sides.
R2–R30: Ch 1, sc in each st around. Join with a sl st to the first sc. Do not turn. (80 sts each round)
As these rounds build, the backpack should develop a full rounded-rectangle body. The lower corners will soften naturally rather than staying sharply square.
Shape the upper body
The upper section narrows slightly before the drawstring opening. These decreases are deliberately gradual so the finished backpack remains roomy through the lower two-thirds of the body.
R31: Ch 1. [Sc in next 18 sts, sc2tog] × 4. Join. (76 sts)
R32–R33: Ch 1, sc in each st around. Join. (76 sts)
R34: Ch 1. [Sc in next 17 sts, sc2tog] × 4. Join. (72 sts)
R35–R37: Ch 1, sc in each st around. Join. (72 sts)
🧶 Checkpoint: The backpack should now be broadest through the lower body and only slightly narrower near the opening. The decrease section should look like a gentle taper, not a sharply cinched waist.
Drawstring eyelets
R38: Ch 1. [Sc in next 4 sts, ch 2, sk next 2 sts] × 12. Join with a sl st to the first sc. (48 sc, 12 ch-2 spaces)
This round creates twelve evenly spaced eyelets around the entire opening.
R39: Ch 1. [Sc in next 4 sc, 2 sc in next ch-2 space] × 12. Join. (72 sts)
R40–R42: Ch 1, sc in each st around. Join. (72 sts)
R43: Sl st loosely in each st around. Join to the first sl st. (72 sl sts)
Fasten off and weave the yarn tail into the inside of the backpack.
The several plain rounds above the eyelets create the soft upper band that folds and gathers naturally when the drawstring is tightened.
Shoulder straps – make 2
Ch 10.
Row 1: Sc in the second ch from hook and in each remaining ch across. Ch 1, turn. (9 sts)
Rows 2–110: Sc in each st across. Ch 1 and turn after Rows 2–109. Do not chain or turn after Row 110. (9 sts)
Fasten off, leaving a long tail for sewing.
Make a second strap exactly the same way.
The straps should look broad and substantial rather than cord-like. Before assembly, place both strips beside one another and make sure their lengths match. If you want shorter or longer straps, remove or add the same number of rows to both pieces.
Top carrying loop
Ch 7.
Row 1: Sc in the second ch from hook and in each remaining ch across. Ch 1, turn. (6 sts)
Rows 2–24: Sc in each st across. Ch 1 and turn after Rows 2–23. Do not chain or turn after Row 24. (6 sts)
Fasten off, leaving a long sewing tail.
This short strip will arch above the top of the backpack when both ends are sewn close together at the center back.
Crochet drawstring
Ch 180 loosely.
Beginning in the second ch from the hook, sl st into the back bump of every chain across. Keep the slip stitches relaxed so the cord remains flexible and slightly rounded instead of twisting into a stiff spiral.
Fasten off securely and weave each yarn tail back through the cord for several stitches.
Assembly
Mark the back
Place the backpack upright with the 28-stitch back section facing you. Treat the back stitches as positions 1 through 28 from left to right.
The center-back joining line should sit between the two future shoulder straps and beneath the carrying loop.
Attach the lower strap ends
Position the lower end of the left strap over back positions 1–9. Let approximately five strap rows overlap the lower body beginning near R2.
Position the lower end of the right strap over back positions 20–28 at the same height.
Use the long yarn tails and a yarn needle to sew around all four edges of each overlapping strap end. Work through full body stitches without pulling them out of shape.
Reinforce the horizontal edge nearest the base with a second pass of stitching.
Attach the upper strap ends
Bring each strap upward without twisting it.
Place the upper end of the left strap over approximately the same back positions 1–9, with the overlap covering R32–R36.
Place the upper end of the right strap over back positions 20–28 at the same height.
Pin or mark both pieces before sewing. Set the backpack upright and check that the straps curve naturally behind it and that neither strap is twisted.
Sew completely around each upper overlap. Reinforce the upper and lower horizontal edges of the attachment with an additional pass.
🧶 Watch for: Keep the strap attachments broad and flat against the body. Sewing only a narrow line across the end allows the strap to hinge outward and can make the attachment look weak.
Attach the carrying loop
Center the carrying loop between the shoulder straps at the upper back.
Place one end of the loop over back positions 10–14 and the opposite end over positions 15–19. Let approximately four rows of each end overlap the body around R37–R40.
The center portion should remain free and curve upward into a short arch.
Sew around the complete edge of each overlapping end. Keep both ends at the same height so the handle rises vertically from the center of the backpack.
Thread the drawstring
Turn the backpack so the front faces you.
Choose two neighboring eyelets near the center front as the beginning and ending points for the drawstring.
Insert one end of the cord through the first eyelet. Continue weaving the cord over and under the upper fabric, passing through every ch-2 eyelet around the entire backpack.
Bring the second end out through the neighboring front eyelet.
Adjust the cord until the two front tails are approximately equal in length.
Pull both tails gently. The twelve eyelets should move toward one another and create soft gathers around the opening while the lower body remains broad and rounded.
Finish the drawstring ends
Tie a compact overhand knot near each end of the crochet cord. Push each knot into a neat rounded shape with your fingers before tightening it completely.
The finished knots should be large enough to stop the ends from slipping accidentally through the eyelets while remaining simple and unobtrusive.
Finishing and troubleshooting
Weave all remaining ends securely into the WS of the fabric. Change direction at least once when weaving the tails from the straps and carrying loop because these areas receive repeated movement during use.
The backpack needs only gentle shaping. Place a folded towel inside the bag, smooth the lower corners with your hands, and allow the sides to settle into a softly rounded rectangular silhouette.
If you wet-block cotton yarn, shape the bag without stretching it vertically. Excessive stretching can make the body long and narrow and can reduce the softly full proportions of the finished backpack.
Common problems
- The backpack looks like a straight rectangular bag instead of a bucket: Make sure both decrease rounds were worked. The reduction from 80 to 72 stitches is what creates the subtle narrower upper section.
- The upper section narrows too sharply: Check that you worked the plain rounds between the decrease rounds. Do not work both sets of decreases consecutively.
- The lower corners look too angular: Gently shape the bag after finishing. The dense crochet fabric softens significantly once the body is upright and lightly filled.
- The base pulls upward: The perimeter stitches may have been worked too tightly. Each short side needs one sc in every one of the 12 row ends.
- The eyelets look uneven: R38 must repeat the same six-stitch span twelve times: four sc followed by a ch-2 space over two skipped stitches.
- The opening does not gather smoothly: Check that the cord passes through all twelve eyelets in sequence and that the ch-2 spaces were not crocheted unusually tightly.
- The straps twist: Remove the upper attachment stitches, allow the strap to hang naturally from its lower attachment, then reposition the upper end before resewing.
Adjusting the height
To make the backpack taller, add complete 80-stitch rounds before R31. To make it shorter, remove several of the plain rounds between R2 and R30.
Keep both shaping rounds, the 72-stitch upper section, and the twelve-eyelet round unchanged. This preserves the softly tapered bucket silhouette and drawstring construction.
Adjusting the straps
Add or remove an equal number of rows from both shoulder straps before assembly. Keep each strap 9 stitches wide so the proportions remain close to the broad supportive straps used throughout the design.
The carrying loop can also be shortened by a few rows if you prefer it to sit closer to the upper edge. Keep both attachment areas broad enough to hold the loop securely.
Final check
- The lower body is full and softly rounded while the upper section narrows only slightly.
- All twelve drawstring eyelets are open and evenly spaced.
- The drawstring exits at the center front with two similar-length tails and simple end knots.
- Both shoulder straps are the same width and length and are securely attached at four broad points.
- The short carrying loop is centered between the shoulder straps.
Once the ends are secure and the body has been gently shaped, your sage green crochet backpack is ready to use. If you make this project, feel free to share your finished backpack or leave a question if you need help with one of the construction steps.












