
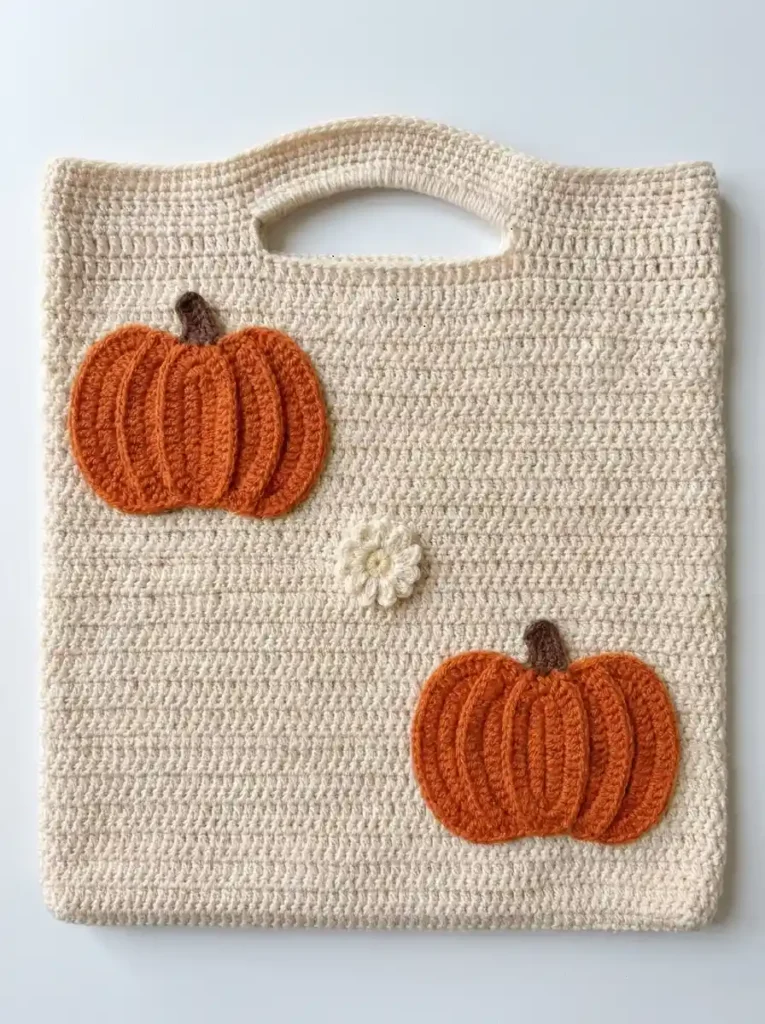
This cream crochet tote is decorated with two unmistakable orange pumpkins and one small cream daisy. Each pumpkin is built from five overlapping oval crochet segments, which creates the rounded lobes and deep vertical divisions without relying on embroidered or surface-crocheted lines.
The tote itself stays simple: two matching cream panels are worked in rows of double crochet, with the handle opening formed directly into the upper part of each panel. The pumpkins and daisy are made separately and sewn onto the front before the two bag panels are joined.
Project at a glance
| Skill level | Advanced beginner |
|---|---|
| Terminology | US crochet terms |
| Construction | Two flat tote panels with integrated handles and separately sewn appliqués |
| Yarn | DK or light-worsted cotton or cotton blend |
| Hooks | 4 mm for the tote and 3.5 mm for the appliqués |
Materials
- DK or light-worsted cotton or cotton-blend yarn in warm cream for the tote panels and daisy petals
- A small amount of muted pumpkin-orange yarn for the two pumpkin appliqués
- A small amount of medium brown yarn for the pumpkin stems
- A small amount of golden-orange yarn for the daisy center
- 4 mm crochet hook
- 3.5 mm crochet hook
- Yarn needle
- Stitch markers
- Scissors
- Blocking mat and pins if desired
A smooth cotton or cotton-blend yarn helps the long double-crochet posts of the tote remain visible and gives the pumpkin segments enough body to hold their rounded shape. Keep all colors in the same yarn-weight family so the appliqués look substantial without becoming bulky against the cream fabric.
Stitches and abbreviations
- ch – chain
- sl st – slip stitch
- sc – single crochet
- hdc – half double crochet
- dc – double crochet
- RS – right side
- WS – wrong side
- st(s) – stitch(es)
Before you start
Both tote panels are worked from the bottom upward in turned rows. Ch 2 at the beginning of a double-crochet row does not count as a stitch, so work the first dc into the first stitch of every row.
The handle opening is created by dividing the work into two shoulder sections for several rows and then reconnecting those sections with a chain. This gives the opening enough height to form the broad rounded slot at the top of the bag.
Make and attach the pumpkins and daisy before joining the front and back panels. This keeps all appliqué sewing tails hidden inside the finished tote.
Crochet pattern
Front and back tote panels
Make two identical panels with the 4 mm hook and cream yarn.
Ch 50.
Row 1: Dc in 3rd ch from hook and in each remaining ch. Turn. (48 sts)
Rows 2–24: Ch 2, dc in each st across. Turn. (48 sts)
Shape the handle opening
The 20 center stitches will remain unworked while the two 14-stitch shoulder sections are built separately.
Left shoulder, Row 25: Ch 2, dc in first 14 sts. Turn. Leave the remaining stitches unworked. (14 sts)
Left shoulder, Rows 26–28: Ch 2, dc in each st across. Turn. (14 sts)
Fasten off after Row 28.
With the RS facing, count across the 20 unworked center stitches of Row 24. Join cream yarn in the first of the final 14 stitches.
Right shoulder, Row 25: Ch 2, dc in the joining st and in each remaining st across. Turn. (14 sts)
Right shoulder, Rows 26–28: Ch 2, dc in each st across. Turn. (14 sts)
Fasten off.
Reconnect above the handle
With the RS facing, join cream yarn at the outside edge of the left shoulder.
Row 29: Ch 2, dc across the 14 left-shoulder sts, ch 20 loosely, then dc across all 14 right-shoulder sts. Turn. (28 dc, 20 ch)
Row 30: Ch 2, dc in each of the first 14 dc, work 1 dc in each of the 20 chains, then dc in each of the remaining 14 dc. Turn. (48 sts)
Rows 31–32: Ch 2, dc in each st across. Turn. (48 sts)
Row 33: Ch 1, sc in each st across. (48 sts)
Fasten off.
Finish the handle opening
With the RS facing, join cream yarn at one lower corner of the handle opening.
Handle edging: Sc in each of the 20 exposed stitches along the lower edge of the opening. Work 2 sc evenly into the side of each of the 4 dc shoulder rows, sc once into each of the 20 stitches along the upper edge of the opening, then work 2 sc into the side of each of the 4 rows on the opposite end. Join with a sl st to the first sc. (56 sc)
Fasten off.
🧶 Checkpoint: The opening should form a broad horizontal oval once the panel is relaxed. If the upper edge pulls tightly across the opening, remake the ch-20 bridge more loosely.
Pumpkin segment
Each pumpkin is made from five separately crocheted orange oval segments. Make ten segments total: five for each pumpkin.
Use the 3.5 mm hook and pumpkin-orange yarn.
Ch 9.
R1: Work 2 sc in the 2nd ch from hook, sc in each of the next 6 ch, then work 4 sc in the last ch. Rotate the foundation so you can work along the unused loops on the opposite side. Sc in each of the next 6 loops, then work 2 sc in the remaining loop at the end. Join with a sl st to the first sc. (20 sts)
R2: Work 2 sc in each of the next 2 sts, sc in each of the next 6 sts, 2 sc in each of the next 4 sts, sc in each of the next 6 sts, then 2 sc in each of the final 2 sts. Join with a sl st. (28 sts)
R3: Ch 1, sc in each st around without increasing. Join with a sl st to the first sc. (28 sts)
Fasten off, leaving a long sewing tail.
R3 deliberately adds no increases. This gives each oval a softly raised outer edge instead of making the piece completely flat.
Make all ten pumpkin segments the same way.
Brown pumpkin stems
Make two with brown yarn and the 3.5 mm hook.
Ch 5.
Row 1: Sc in 2nd ch from hook and in each remaining ch. Turn. (4 sts)
Row 2: Ch 1, sc in each st across. Turn. (4 sts)
Row 3: Ch 1, sc2tog, sc in next 2 sts. Turn. (3 sts)
Row 4: Ch 1, sc in each st across. (3 sts)
Fasten off, leaving a sewing tail.
Small cream daisy
Use the 3.5 mm hook.
With golden-orange yarn, make an adjustable ring.
R1: Work 8 sc into the ring. Pull the ring closed and join with a sl st to the first sc. (8 sts)
Fasten off the orange yarn and join cream yarn in any stitch.
R2: In the same stitch work sl st, ch 2, hdc, dc, hdc, ch 2, sl st. Repeat the same petal sequence in each of the remaining 7 stitches. (8 petals)
Fasten off, leaving a long cream tail for sewing.
Build the two pumpkins
Each pumpkin is assembled from five overlapping orange ovals. The separate edges of the five pieces create the raised vertical ribs and rounded sections, so no additional surface crochet is needed.
Lay five orange segments on a flat surface with all long axes running vertically.
Place the outer segments
Put one segment on the far left and another on the far right. Angle their upper ends slightly inward so the overall shape is wider through the middle and narrower near the stem.
The lower ends can angle inward slightly as well, creating a broad rounded base rather than a straight horizontal bottom.
Add the inner segments
Place one segment between the center and left outer piece and another between the center and right outer piece. Allow each inner segment to overlap approximately one-third of the neighboring outer segment.
Keep the upper edges of these two pieces a little higher than the center position. Their rounded tops create the two visible pumpkin shoulders.
Add the center segment
Place the fifth orange oval vertically over the middle of the arrangement. It should overlap both inner pieces and sit slightly lower at the top, creating a shallow indentation where the brown stem will emerge.
Allow its lower end to extend just slightly below the neighboring inner segments. This creates the small central bulge visible along the bottom of the pumpkin.
The five pieces should now read as one squat pumpkin rather than five separate ovals.
🧶 Checkpoint: Before sewing, you should see exactly five vertical orange sections. The outside silhouette should be wider than it is tall, with two rounded upper shoulders, a shallow dip beneath the stem, and a softly rounded lower edge.
Arrange the appliqués on the front panel
Lay one finished tote panel RS up with the handle at the top. Arrange all appliqués before sewing anything permanently.
Upper-left pumpkin
Place the first pumpkin in the upper-left portion of the panel, below and to the left of the handle opening. Keep a clear band of cream fabric between the pumpkin and both the side edge and handle.
On the 48-stitch panel, a useful starting position is approximately stitches 5–22 across and Rows 17–24 vertically.
Lower-right pumpkin
Place the second pumpkin diagonally opposite the first in the lower-right portion of the panel.
A useful starting position is approximately stitches 29–46 across and Rows 5–13 vertically. Leave visible cream fabric between the pumpkin and the bottom and right edges.
Center daisy
Place the small cream daisy between the two pumpkins, close to the diagonal line connecting them but slightly offset so the arrangement does not look rigidly symmetrical.
The daisy should remain much smaller than either pumpkin and should not touch either orange motif.
Sew the pumpkins in place
Sew each brown stem to the cream panel first. Position it behind the top center of the pumpkin so only the upper portion remains visible. A slight natural lean is fine.
Next, attach the five orange segments in the same order used to build the pumpkin.
Sew the far-left and far-right pieces first. Use the orange sewing tails and catch primarily the back strand of R3 so the front loops around each segment remain visible.
Attach the inner-left and inner-right pieces next. Preserve their overlap over the outer pieces rather than spreading all five ovals flat beside one another.
Attach the central segment last. Its edge should remain fully visible because this is the strongest vertical rib in the finished pumpkin.
Keep all seams secure but relaxed. Do not pull the orange pieces completely flat against one another; the small amount of relief between their edges is what gives the pumpkin its segmented appearance.
Repeat the same assembly for the second pumpkin.
For the daisy, sew around the small golden center and add a discreet anchoring stitch at the base of each cream petal. Leave the outer ends of the petals slightly raised.
Assemble the tote
After all appliqués are attached and their tails are woven in, place the front and back panels together with WS touching and RS facing outward.
Align the bottom foundation edges, both side edges, top corners, and handle openings.
Join cream yarn at the upper-left outside corner.
Working through both panels, work 2 sc evenly into the edge of each of the 33 rows down the left side. (66 sc)
Continue across the bottom with 1 sc through each corresponding pair of foundation stitches. (48 sc)
Work 2 sc into the edge of each of the 33 rows up the right side. (66 sc)
Fasten off at the upper-right corner. (180 joining sc total)
The top and both handle openings remain open.
Finishing the tote
Weave all remaining cream ends securely into the inside of the bag. Pay special attention to the yarn ends near the handle opening because that area receives the most stress during use.
Lightly block the tote flat. Straighten the side and bottom edges and gently shape each handle opening into a long rounded oval.
Do not press the pumpkins completely flat. Shape the five orange sections with your fingers so their overlapping edges remain visible and the two pumpkin silhouettes stay rounded.
Troubleshooting
- The tote fabric feels loose or stretchy: move down one hook size so the double-crochet rows become firmer and better support the appliqués.
- The handle opening pulls inward: the ch-20 bridge is probably too tight. Remake those chains more loosely before continuing the upper rows.
- The pumpkin looks like a flower: the five ovals are probably spreading outward too much. Keep every segment vertical, overlap neighboring pieces, and form one continuous squat pumpkin silhouette.
- The pumpkin looks like five separate leaves: increase the overlap between adjacent orange segments and place the central oval over the inner pair so there are no cream gaps between sections.
- The pumpkin looks too flat: avoid sewing through the entire face of each segment. Secure around the outer edges while leaving the overlapping rims slightly raised.
The finished tote should show a clean cream double-crochet body with a wide integrated handle opening, two rounded orange pumpkins arranged diagonally across the front, and one small cream daisy between them. Each pumpkin should have five clearly visible overlapping vertical segments and a short brown stem, making the pumpkin identity obvious at first glance.
If you make this tote, feel free to share how it turned out or leave a question if you need help arranging the pumpkin segments or shaping the handle.












