
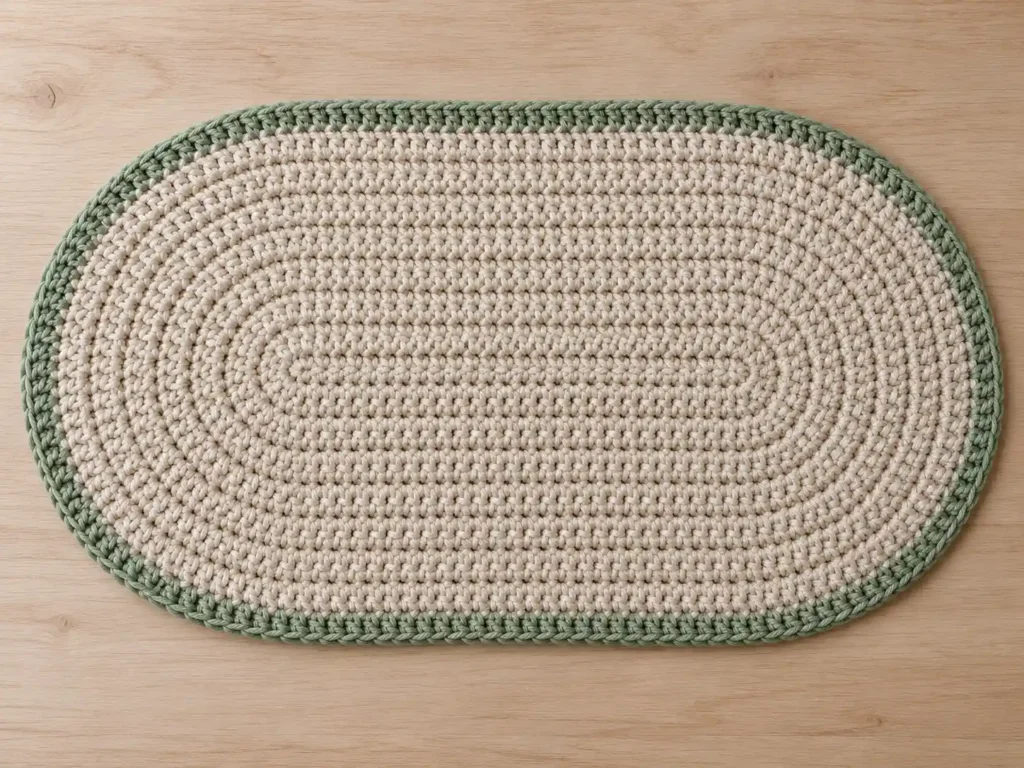
This simple oval crochet placemat combines a dense warm-oatmeal center with a narrow sage-green finishing edge. The long, mostly straight sides and softly rounded ends create a practical elongated table mat that sits comfortably beneath a dinner plate.
The entire placemat is crocheted as one continuous flat piece. You begin around both sides of a foundation chain, then expand outward in joined half-double-crochet rounds. The straight sections stay consistent while evenly distributed increases shape only the two curved ends.
Project at a glance
| Skill level | Confident beginner |
|---|---|
| Terminology | US crochet terms |
| Construction | Joined oval rounds around a foundation chain |
| Main stitch | Half double crochet |
| Border | One single-crochet round |
| Yarn | Medium #4 cotton or cotton-blend yarn |
| Hook | 5 mm crochet hook |
| Finished size | Approximately 18 inches long by 12 inches wide |
Your finished measurement may vary slightly with yarn and tension. More important than an exact measurement is keeping the placemat distinctly elongated, with two long straight sections connected by evenly rounded ends.
Materials
- Smooth medium-weight #4 cotton or cotton-blend yarn in warm oatmeal, natural cream, or light beige for the main placemat
- A small amount of the same yarn weight in muted sage green for the border
- 5 mm crochet hook
- 4 removable stitch markers
- Yarn needle
- Scissors
- Blocking mat and rust-resistant pins, optional
A smooth cotton or cotton-blend yarn works especially well because it gives the half double crochet stitches clear definition while producing a stable surface for tableware. Avoid very fuzzy yarns, which can hide the stitch structure and make the finished mat feel less crisp.
Allow roughly 250 yards of the main oatmeal shade for a generously sized placemat, plus a small amount of sage green for the final round. Yarn usage will change with your individual tension and chosen cotton yarn.
Stitches and abbreviations
- ch – chain
- hdc – half double crochet
- sc – single crochet
- sl st – slip stitch
- st(s) – stitch(es)
- inc – work 2 stitches into the same stitch
- RS – right side
Work through both top loops throughout unless the pattern specifically states otherwise.
Before you start
The placemat is worked on the RS in joined rounds and is not turned. Ch 1 at the beginning of a round does not count as a stitch. The joining slip stitch also does not count as a stitch.
After the first round, think of the placemat as two 28-stitch straight sections connected by two curved sections. Those 28 stitches remain unchanged throughout the oatmeal body. All shaping increases are confined to the rounded ends.
Place stitch markers where each straight section meets a curve. Move the markers upward as you work so you can immediately see where the increases belong.
🧶 Crochet Tip: Keep your starting chain relaxed. A foundation chain that is noticeably tighter than the later rounds can pull the center inward and prevent the placemat from lying completely flat.
Oval placemat crochet pattern
Warm-oatmeal body
With oatmeal yarn, ch 31.
R1: Hdc in 2nd ch from hook, hdc in next 28 ch, 3 hdc in last ch. Rotate the work so you can continue along the unused loops on the opposite side of the same foundation chain. Hdc in next 28 foundation loops, then work 2 hdc into the same starting chain that already contains the first hdc. Join with sl st to the first hdc. (62 sts)
You now have two 28-stitch straight sections and three stitches forming each rounded end.
Sl st into the next stitch to position your hook at the beginning of the first straight section. This positioning slip stitch does not count as a stitch.
R2: Ch 1, hdc in same st and next 27 sts, [2 hdc in next st] × 3, hdc in next 28 sts, [2 hdc in next st] × 3. Join with sl st to first hdc. (68 sts)
R3: Ch 1, hdc in same st and next 27 sts, [hdc in next st, 2 hdc in next st] × 3, hdc in next 28 sts, [hdc in next st, 2 hdc in next st] × 3. Join with sl st to first hdc. (74 sts)
R4: Ch 1, hdc in same st and next 27 sts, [hdc in next 2 sts, 2 hdc in next st] × 3, hdc in next 28 sts, [hdc in next 2 sts, 2 hdc in next st] × 3. Join with sl st to first hdc. (80 sts)
R5: Ch 1, hdc in same st and next 27 sts, [hdc in next 3 sts, 2 hdc in next st] × 3, hdc in next 28 sts, [hdc in next 3 sts, 2 hdc in next st] × 3. Join with sl st to first hdc. (86 sts)
R6: Ch 1, hdc in same st and next 27 sts, [hdc in next 4 sts, 2 hdc in next st] × 3, hdc in next 28 sts, [hdc in next 4 sts, 2 hdc in next st] × 3. Join with sl st to first hdc. (92 sts)
R7: Ch 1, hdc in same st and next 27 sts, [hdc in next 5 sts, 2 hdc in next st] × 3, hdc in next 28 sts, [hdc in next 5 sts, 2 hdc in next st] × 3. Join with sl st to first hdc. (98 sts)
🧶 Checkpoint: The shape should now clearly resemble an elongated oval. The long sections should remain mostly straight while the two ends curve smoothly without forming corners or pointed tips.
R8: Ch 1, hdc in same st and next 27 sts, [hdc in next 6 sts, 2 hdc in next st] × 3, hdc in next 28 sts, [hdc in next 6 sts, 2 hdc in next st] × 3. Join with sl st to first hdc. (104 sts)
R9: Ch 1, hdc in same st and next 27 sts, [hdc in next 7 sts, 2 hdc in next st] × 3, hdc in next 28 sts, [hdc in next 7 sts, 2 hdc in next st] × 3. Join with sl st to first hdc. (110 sts)
R10: Ch 1, hdc in same st and next 27 sts, [hdc in next 8 sts, 2 hdc in next st] × 3, hdc in next 28 sts, [hdc in next 8 sts, 2 hdc in next st] × 3. Join with sl st to first hdc. (116 sts)
R11: Ch 1, hdc in same st and next 27 sts, [hdc in next 9 sts, 2 hdc in next st] × 3, hdc in next 28 sts, [hdc in next 9 sts, 2 hdc in next st] × 3. Join with sl st to first hdc. (122 sts)
R12: Ch 1, hdc in same st and next 27 sts, [hdc in next 10 sts, 2 hdc in next st] × 3, hdc in next 28 sts, [hdc in next 10 sts, 2 hdc in next st] × 3. Join with sl st to first hdc. (128 sts)
R13: Ch 1, hdc in same st and next 27 sts, [hdc in next 11 sts, 2 hdc in next st] × 3, hdc in next 28 sts, [hdc in next 11 sts, 2 hdc in next st] × 3. Join with sl st to first hdc. (134 sts)
R14: Ch 1, hdc in same st and next 27 sts, [hdc in next 12 sts, 2 hdc in next st] × 3, hdc in next 28 sts, [hdc in next 12 sts, 2 hdc in next st] × 3. Join with sl st to first hdc. (140 sts)
Fasten off the oatmeal yarn. The body should now lie flat with a dense, continuous half-double-crochet texture and evenly rounded ends.
Sage-green finishing border
Join sage-green yarn at the beginning of one straight side. The final round is worked in single crochet, making the contrasting border slightly shorter and firmer than the oatmeal body while keeping the edge neat and clearly defined.
R15: Ch 1, sc in same st and next 27 sts, [sc in next 13 sts, 2 sc in next st] × 3, sc in next 28 sts, [sc in next 13 sts, 2 sc in next st] × 3. Join with sl st to first sc. (146 sts)
Fasten off the sage yarn and weave the tail securely into the wrong side.
Keeping the oval smooth
The two 28-stitch long sections never receive increases. Their stitches stack directly above one another, which is what keeps the upper and lower edges relatively straight.
Each rounded end gains three stitches per body round. The spaces between those increases become progressively longer as the mat grows, allowing the curve to expand gradually instead of forming a point.
The same controlled expansion continues in the sage border. Although single crochet is shorter than half double crochet, keeping three evenly distributed increases at each rounded end allows the new outer edge to follow the existing curve without pulling tightly around it.
🧶 Watch for: Keep every increase inside the marked curved sections. An increase that drifts onto a long side can make that edge bow outward instead of remaining straight.
Finishing and blocking
Weave all yarn ends into several neighboring stitches on the wrong side. Keep the tails secure without pulling tightly enough to gather the surrounding fabric.
Blocking helps settle the oval into its clean finished shape. Lightly dampen the placemat according to the care instructions for your yarn, then place it flat with the RS facing upward.
Shape the two long edges until they are nearly parallel. Next, smooth both rounded ends and compare them so the curves look balanced. Pin gently rather than stretching the fabric aggressively.
Allow the placemat to dry completely before removing the pins.
Troubleshooting
- The rounded ends curl upward: first check that all three increases were worked at each end. If the count is correct, relax your tension slightly through the curved sections.
- The rounded ends ruffle: an accidental extra increase is the most likely cause. Recount the previous curved section before continuing.
- A long side bows outward: an increase may have moved outside the curved section. Keep all 28 straight-side stitches plain.
- The center forms a ridge: the foundation chain is probably too tight. Work the starting chain more loosely or use a slightly larger hook for the foundation chain only.
- The sage border pulls inward: make sure all six border increases are present and avoid tightening your single crochet stitches around the curves.
Adjusting the size
To change the length, adjust the foundation chain. Every additional foundation chain adds one stitch to each long straight side, while the rounded-end construction remains the same.
For example, adding four foundation chains adds four stitches to each straight side. All curved-end instructions can still be worked using the same progressive increase structure.
To make the placemat wider, continue the established oatmeal sequence before adding the sage border. After R14, the next oatmeal round would use 13 plain hdc between each increase across both curved ends. Each later body round adds one more plain stitch between increases.
If you add one extra oatmeal round, the sage border must continue from that new stitch distribution rather than using the written R15 unchanged. Keep three evenly spaced single-crochet increases across each curved end so the final edge follows the larger oval smoothly.
Caring for your placemat
Follow the care instructions for your chosen yarn. Cotton and many cotton blends can be reshaped while damp and dried flat, which helps the long sides and rounded ends retain their form.
If the placemat becomes slightly distorted after washing, gently reshape and block it again rather than stretching one area independently.
This oval placemat is a practical project for practicing controlled increases and joined rounds while creating a useful table piece. If you make one, feel free to share your finished placemat or leave a question if you need help with the shaping.












