
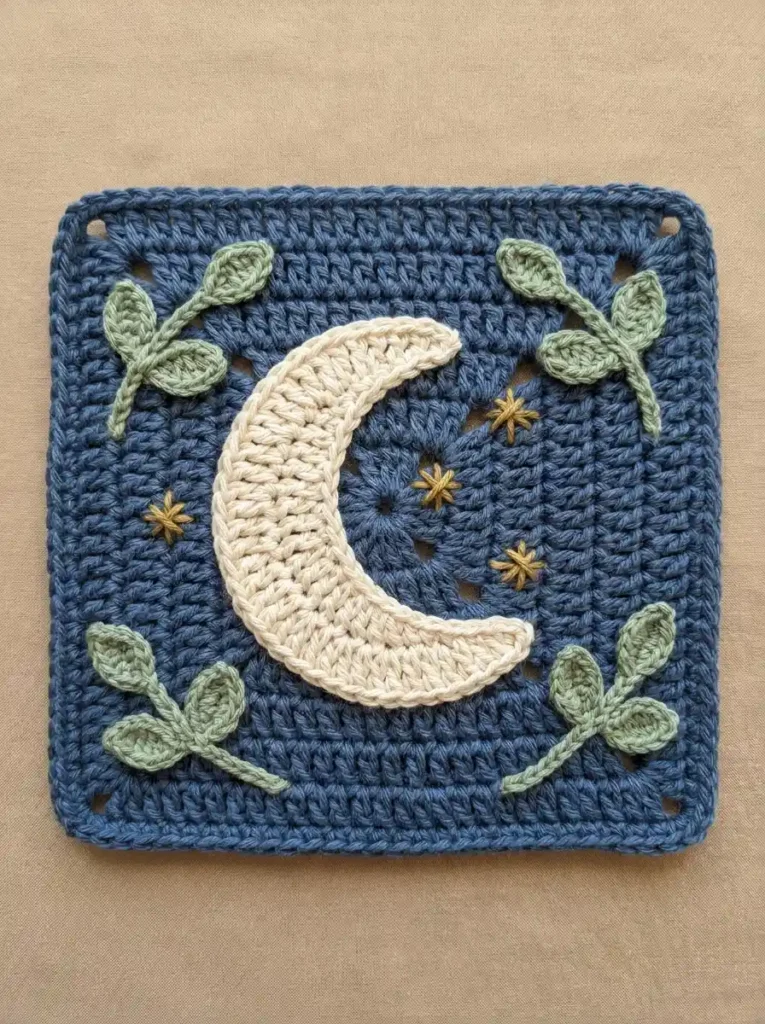
This crescent moon garden square combines a deep dusty-blue crochet background with a broad cream moon, four tiny golden starbursts, and soft sage leafy sprigs in all four corners. The moon opens toward the right, leaving a little pocket of blue “night sky” for the stars while the greenery frames the design without covering the square itself.
The base is worked from the center outward in joined double-crochet rounds. The moon is a separate curved appliqué, and each corner sprig is assembled from one short crocheted stem and three matching leaves. The stars are added last with simple embroidery.
Project at a glance
| Skill level | Advanced beginner |
|---|---|
| Terminology | US crochet terms |
| Construction | Center-out square with separate moon and leafy appliqués |
| Yarn | DK or light-worsted smooth cotton or cotton blend |
| Hook | 3.5 mm |
Materials
- DK or light-worsted smooth yarn in dusty midnight blue or muted denim blue for the square
- Warm cream yarn for the crescent moon
- Soft sage-green yarn for the four stems and twelve leaves
- A small amount of muted mustard-gold yarn for the four embroidered stars
- 3.5 mm crochet hook
- Yarn needle
- Scissors
- Optional removable stitch markers
A smooth yarn with clear stitch definition suits this motif well. Keep the fabric firm enough that the square and moon hold their shapes, but avoid very tight tension because the crescent and leaves need enough flexibility to lie neatly against the background.
Stitches and abbreviations
- ch – chain
- sc – single crochet
- hdc – half-double crochet
- dc – double crochet
- sl st – slip stitch
- st – stitch
- sts – stitches
- ch-sp – chain space
- RS – right side
Before you start
The blue square is worked in joined rounds with the RS facing throughout and is not turned. The beginning ch 3 counts as the first dc. Slip-stitch joins do not count as stitches.
The cream crescent is worked back and forth in turned rows. Its beginning chains do not count as stitches. Regular increases across successive rows create a widening outer curve while the shorter foundation edge becomes the inner curve.
The leaves are worked around both sides of a foundation chain. This leaves a subtle central ridge through each leaf, which helps give the greenery its visible handmade texture.
Crochet pattern
Dusty-blue square
With blue yarn, make a magic ring.
R1: Ch 3, work 2 dc into the ring, ch 2, then [3 dc into the ring, ch 2] × 3. Tighten the ring. Join with a sl st to the top of the beginning ch 3. (12 dc, 4 ch-2 corner spaces)
Sl st in each of the next 2 dc, then sl st into the next ch-2 corner space.
R2: Ch 3, dc in the same corner space, ch 2, 2 dc in the same corner space. Dc in each of the next 3 dc. [(2 dc, ch 2, 2 dc) in the next corner space, dc in each of the next 3 dc] × 3. Join to the top of the beginning ch 3. (28 dc, 4 ch-2 corner spaces; 7 dc per side)
Sl st in the next dc, then sl st into the next corner space.
R3: Ch 3, dc in the same corner space, ch 2, 2 dc in the same corner space. Dc in each of the next 7 dc. [(2 dc, ch 2, 2 dc) in the next corner space, dc in each of the next 7 dc] × 3. Join to the top of the beginning ch 3. (44 dc, 4 ch-2 corner spaces; 11 dc per side)
Sl st in the next dc, then sl st into the next corner space.
R4: Ch 3, dc in the same corner space, ch 2, 2 dc in the same corner space. Dc in each of the next 11 dc. [(2 dc, ch 2, 2 dc) in the next corner space, dc in each of the next 11 dc] × 3. Join to the top of the beginning ch 3. (60 dc, 4 ch-2 corner spaces; 15 dc per side)
Sl st in the next dc, then sl st into the next corner space.
R5: Ch 3, dc in the same corner space, ch 2, 2 dc in the same corner space. Dc in each of the next 15 dc. [(2 dc, ch 2, 2 dc) in the next corner space, dc in each of the next 15 dc] × 3. Join to the top of the beginning ch 3. (76 dc, 4 ch-2 corner spaces; 19 dc per side)
Sl st in the next dc, then sl st into the next corner space.
R6: Ch 3, dc in the same corner space, ch 2, 2 dc in the same corner space. Dc in each of the next 19 dc. [(2 dc, ch 2, 2 dc) in the next corner space, dc in each of the next 19 dc] × 3. Join to the top of the beginning ch 3. (92 dc, 4 ch-2 corner spaces; 23 dc per side)
Sl st in the next dc, then sl st into the next corner space.
R7: Ch 3, dc in the same corner space, ch 2, 2 dc in the same corner space. Dc in each of the next 23 dc. [(2 dc, ch 2, 2 dc) in the next corner space, dc in each of the next 23 dc] × 3. Join to the top of the beginning ch 3. (108 dc, 4 ch-2 corner spaces; 27 dc per side)
🧶 Checkpoint: Before adding the outer edge, the square should lie reasonably flat with four matching corner openings and a broad uninterrupted blue area in the middle for the moon.
Final square edging
Sl st in the next dc, then sl st into the next ch-2 corner space.
Edging round: Ch 1. Work sc, ch 2, sc in the starting corner space. Sc in each of the next 27 dc. [(Sc, ch 2, sc) in the next corner space, sc in each of the next 27 dc] × 3. Join with a sl st to the first sc. (116 sc, 4 ch-2 corner spaces)
Fasten off and weave in the ends.
Warm-cream crescent moon
The crescent is made separately as a widening curved strip. Each new row contains four evenly spaced increases, which allows the outer edge to expand more than the shorter foundation edge and encourages the piece to bend naturally into a crescent.
With cream yarn, ch 17.
Row 1, RS: Sc in the second ch from the hook and in each remaining ch across. Turn. (16 sc)
Row 2: Ch 1, [sc in each of the next 3 sts, 2 sc in the next st] × 4. Turn. (20 sc)
Row 3: Ch 1, [hdc in each of the next 4 sts, 2 hdc in the next st] × 4. Turn. (24 hdc)
Row 4: Ch 1, [hdc in each of the next 5 sts, 2 hdc in the next st] × 4. Turn. (28 hdc)
Row 5: Ch 2, [dc in each of the next 6 sts, 2 dc in the next st] × 4. Turn. (32 dc)
Row 6: Ch 1, sc in each st across. (32 sc)
Fasten off, leaving a long cream tail for sewing.
Gently curve the foundation edge inward with your fingers while allowing the longer Row 6 edge to spread outward. The two row-end sides naturally angle toward one another and form the tapered upper and lower ends of the crescent.
🧶 Checkpoint: The moon should have a narrow concave inner edge, a much broader convex outer edge, and two softly tapered ends. It should curve without ruffling heavily. If the outer edge ripples, work Row 6 with slightly firmer tension.
Sage-green leaves
Make twelve leaves in total, three for each corner sprig.
With sage yarn, ch 7.
R1: Starting in the second ch from the hook, sc in the next ch, hdc in the next ch, dc in each of the next 2 ch, hdc in the next ch, then work sc, ch 2, sc in the final ch.
Rotate the foundation chain and work along the unused loops on the opposite side: hdc in the next ch, dc in each of the next 2 ch, hdc in the next ch, sc in the final ch. Join with a sl st to the first sc. (12 sts, 1 ch-2 tip space)
R2: Ch 1, sc in each of the first 6 sts, work sc, ch 2, sc in the ch-2 tip space, then sc in each of the remaining 6 sts. Join with a sl st to the first sc. (14 sc, 1 ch-2 tip space)
Fasten off, leaving a sewing tail.
The completed leaf should be a small almond or teardrop shape with a rounded base, pointed outer tip, narrow sc outline, and visible foundation line running through its center.
Sage-green stems
Make four stems.
Ch 12.
Starting in the second ch from the hook, sl st in each ch back toward the beginning. (11 sl sts)
Fasten off, leaving a long tail for attachment.
Build the four leafy sprigs
Each corner uses one stem and three leaves. Assemble the sprigs before permanently sewing them to the square so it is easier to compare their proportions.
Lay one stem diagonally. Position the first leaf at the outer tip of the stem so its pointed end continues the direction of the stem. Place a second leaf a little lower on one side and the third leaf slightly below it on the opposite side.
The three leaves should fan outward rather than stacking directly on top of one another. Keep their rounded bases close to the stem and allow their pointed ends to spread apart.
Use the leaf tails to tack each rounded leaf base securely to the stem. A few stitches through the lowest portion of each leaf are enough; leave most of the leaf edge free so it retains a subtle raised appearance.
Repeat for all four sprigs, keeping the same three-leaf arrangement while mirroring the direction as needed for the different corners.
Attach the crescent moon
Lay the blue square flat with the RS facing up. Place the cream moon slightly left of the exact center, with the open side of the crescent facing right.
The broad outer curve should face the left side of the square. The upper tip points toward the upper-right area and the lower tip toward the lower-right area, leaving a clear blue opening between them.
Keep the crescent comfortably inside the border and leave enough blue background around all sides for the stars and leafy corners.
Using the long cream tail, sew around the complete perimeter with small relaxed whipstitches. Follow both the convex outside curve and the concave inside curve so the moon cannot lift away from the background.
Do not pull the seam too tightly. The rows should remain visible and the crescent should retain a small amount of natural appliqué relief.
Embroider the four golden stars
Use mustard-gold yarn and a yarn needle to add four small starbursts around the moon. Each star is made from three short straight stitches crossing through one central point, creating six simple rays.
For each star, make one short vertical stitch. Cross its center with one diagonal stitch running from upper-left to lower-right, then add a second diagonal stitch running from upper-right to lower-left.
Keep every ray short. The stars should read as tiny accents rather than large separate motifs.
Place the four stars with uneven but balanced spacing:
- One small star to the left of the lower-middle portion of the crescent
- One star inside the open blue area near the upper half of the crescent
- One star farther right around the middle of the open sky area
- One star toward the lower-right side of the crescent opening
Avoid placing the stars in a perfectly straight line. Slightly different angles and spacing give the little celestial details a more natural handmade look.
Attach the leafy corner sprigs
Arrange one three-leaf sprig in each corner before sewing anything permanently. Each stem should run diagonally between the center of the square and its outer corner.
Orient the terminal leaf generally toward the corner. Let the two side leaves fan toward the nearby top, bottom, or side edge so each group fills its corner without becoming crowded.
Keep the sprigs comfortably inside the outer blue edging. None of the leaves should cover a corner opening or touch the cream moon.
The upper-left and lower-right sprigs should mirror one another. Mirror the upper-right and lower-left sprigs in the same way. Small differences in individual leaf angles are perfectly natural.
Sew each stem to the blue background through several evenly spaced points along its length. Then secure the rounded base of every leaf and add one small stitch near the middle of the leaf if extra stability is needed.
Leave most of each leaf’s outer edge free. This gives the greenery the lightly raised look of appliqué while keeping the attachment physically secure.
🧶 Checkpoint: Each corner should contain one short visible stem and three clearly separate leaves. Keep a generous band of blue crochet between the greenery and the moon so the design stays open rather than crowded.
Finishing your moon garden square
Weave all remaining yarn tails securely into the wrong side, keeping tails within matching-colored stitches whenever practical.
Light blocking will help settle the square and smooth the moon’s curves. Shape the blue background first, then gently arrange the crescent and leaves without stretching their edges.
If you are using cotton, lightly dampen the square and allow it to dry flat. For another fiber, use a blocking method appropriate to that yarn. Avoid pressing the appliqués completely flat; a small amount of dimension around the moon and leaves suits this motif.
Troubleshooting
- The square cups at the corners: The ch-2 corner spaces are probably too tight. Work those chains more loosely while keeping the dc counts unchanged.
- The moon looks like a straight strip: Gently curve the shorter foundation edge inward. The progressively larger row counts should allow the longer outer edge to spread around it.
- The moon outer edge ruffles: Check the row totals of 16, 20, 24, 28, and 32 before the final sc row. If the counts are correct, use slightly firmer tension on the final edge.
- A leaf looks round instead of pointed: Make sure both rounds preserve the ch-2 tip space at the outer end of the leaf.
- The corner greenery looks crowded: Fan the three leaves apart and move the whole sprig closer to the corner rather than overlapping the leaves with one another.
A few final details to check
- The cream moon has one continuous broad crescent shape with its opening facing right.
- There are four small embroidered gold stars around the moon.
- Each corner contains one sage stem and exactly three distinct leaves.
- The foliage remains separate from the moon and does not cover the square border.
- The blue square lies reasonably flat with four matching corner openings.
Once the square has been lightly blocked and all of the appliqués are secure, the cream crescent should stand clearly against the deep blue background with the tiny gold stars and leafy corners framing it. If you make this moon garden square, feel free to share your finished version or leave a question if you need help with the crescent shaping or sprig placement.












