
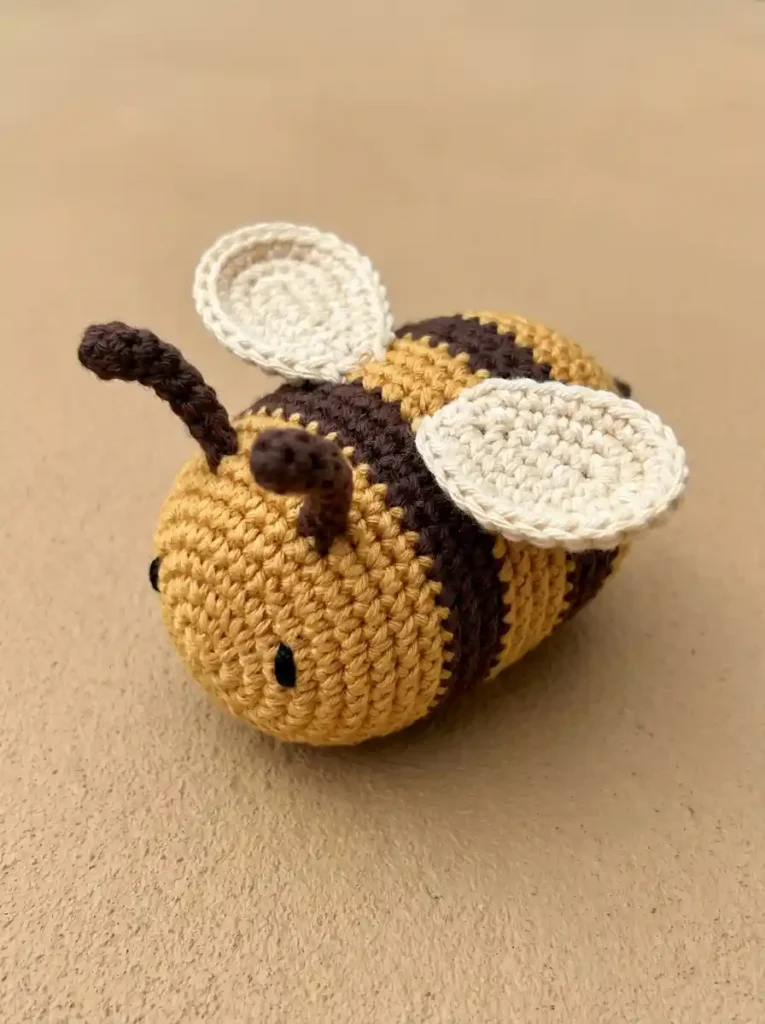
This little bumblebee is built around one simple stuffed oval, so the striped body stays smooth and easy to shape. A rounded golden face, two dark bands, two broad cream wings, and a pair of chunky curled antennae give it plenty of personality without adding lots of tiny pieces.
The body is worked from the face toward the tail in joined single-crochet rounds. Keeping the color changes at the joins creates clean bands, while the wings are made separately as dense oval pieces and sewn across the upper sides of the body.
Project at a glance
| Skill level | Confident beginner |
|---|---|
| Terminology | US crochet terms |
| Construction | One stuffed body, two wings, two antennae |
| Main stitch | Single crochet |
| Yarn | DK-weight cotton or cotton-blend |
| Hook | 3 mm crochet hook |
With DK yarn, this makes a small palm-sized bee, generally around 7–9 cm long depending on your tension and how firmly you stuff it. Exact size is not important, but the fabric should be dense enough that the stuffing stays hidden.
Materials
- DK-weight golden-yellow cotton or cotton-blend yarn
- DK-weight deep brown yarn for the stripes and antennae
- DK-weight warm cream yarn for the wings
- 3 mm crochet hook
- Two small black safety eyes, approximately 4 mm, or black yarn for embroidered eyes
- Polyester fiberfill
- Stitch marker
- Tapestry needle
- Scissors
🧶 Crochet Tip: For a toy intended for a baby or very young child, embroider the eyes securely with black yarn instead of using safety eyes.
Stitches and abbreviations
- ch – chain
- sl st – slip stitch
- sc – single crochet
- inc – work 2 sc in the same stitch
- dec – single crochet 2 stitches together
- MR – magic ring
Before you start
The body is worked in joined rounds without turning. Ch 1 at the beginning of each round does not count as a stitch, and the slip-stitch join does not count as a stitch. Join each round to the first sc.
Keep every join on the underside of the bee. This gives you one consistent seam line and keeps the yellow-and-brown bands clean across the more visible upper surface.
The bee begins at the front of the face and grows toward the tail. Insert the eyes before stuffing becomes difficult, then begin filling the body once the tail decreases start.
Crochet pattern
Golden-yellow face and front body
Begin with golden-yellow yarn.
R1: Make an MR. Ch 1, work 6 sc into the ring. Pull the ring firmly closed and join with a sl st to the first sc. (6 sc)
R2: Ch 1, inc in each stitch around. Join. (12 sc)
R3: Ch 1, [sc in the next stitch, inc in the next stitch] × 6. Join. (18 sc)
R4: Ch 1, [sc in each of the next 2 stitches, inc in the next stitch] × 6. Join. (24 sc)
R5: Ch 1, [sc in each of the next 3 stitches, inc in the next stitch] × 6. Join. (30 sc)
R6: Ch 1, sc in each stitch around. Join. (30 sc)
R7: Ch 1, sc in each stitch around. Join. (30 sc)
R8: Ch 1, sc in each stitch around. Join. (30 sc)
These even rounds extend the front dome into a short oval rather than leaving the face perfectly spherical.
Add the eyes
Turn the work so the joining seam is underneath. Place the two black eyes between R5 and R6 on the opposite side of the seam.
Space them about six to seven stitches apart. Keep them low enough on the rounded front that the face remains visible from a slightly elevated angle, but do not place them close to the magic-ring center.
Secure the safety-eye backs inside the body. If embroidering instead, wait until the body is complete and make two small vertical or round black stitches in the same positions.
First dark-brown stripe
Change to deep brown at the join.
R9: Ch 1, sc in each stitch around. Join. (30 sc)
R10: Ch 1, sc in each stitch around. Join. (30 sc)
R11: Ch 1, sc in each stitch around. Join. (30 sc)
Middle golden stripe
Change to golden yellow.
R12: Ch 1, sc in each stitch around. Join. (30 sc)
R13: Ch 1, sc in each stitch around. Join. (30 sc)
R14: Ch 1, sc in each stitch around. Join. (30 sc)
Second dark-brown stripe
Change to deep brown.
R15: Ch 1, sc in each stitch around. Join. (30 sc)
R16: Ch 1, sc in each stitch around. Join. (30 sc)
R17: Ch 1, sc in each stitch around. Join. (30 sc)
Golden rear section
Change back to golden yellow.
R18: Ch 1, sc in each stitch around. Join. (30 sc)
R19: Ch 1, sc in each stitch around. Join. (30 sc)
At this stage the body should look like a short stuffed-to-be cylinder with a rounded yellow face, two broad dark stripes, and a yellow section between them.
Shape the tail
Continue in golden yellow.
R20: Ch 1, [sc in each of the next 3 stitches, dec over the next 2 stitches] × 6. Join. (24 sc)
Begin stuffing the body. Push the filling firmly into the face first, then fill the striped middle section. Keep the stuffing even so the body stays oval rather than developing a flat side.
R21: Ch 1, sc in each stitch around. Join. (24 sc)
R22: Ch 1, [sc in each of the next 2 stitches, dec over the next 2 stitches] × 6. Join. (18 sc)
Add more stuffing, concentrating on the center of the body rather than packing the final opening too firmly.
R23: Ch 1, [sc in the next stitch, dec over the next 2 stitches] × 6. Join. (12 sc)
R24: Ch 1, dec around. Join. (6 sc)
Fasten off, leaving a tail. Thread the tail through the front loops of the remaining 6 stitches, pull the opening closed, and hide the yarn end inside the body.
🧶 Checkpoint: The finished body should be longer than it is wide, with a full rounded face, broad middle, and softly narrowing yellow rear. If it looks almost spherical, redistribute the stuffing toward the front and middle instead of adding more.
First cream wing
The wings are made separately as dense crochet ovals. They are not stuffed.
With cream yarn, ch 6.
R1: Beginning in the second ch from the hook, sc in each of the next 4 ch, work 3 sc in the final ch. Rotate the foundation so you can work along the unused loops on the opposite side. Sc in each of the next 3 loops, then work 2 sc in the final loop. Join with a sl st to the first sc. (12 sc)
R2: Ch 1, [sc in the next stitch, inc in the next stitch] × 6. Join. (18 sc)
R3: Ch 1, [sc in each of the next 2 stitches, inc in the next stitch] × 6. Join. (24 sc)
Fasten off, leaving a long cream tail for sewing.
Second cream wing
Make a second wing exactly the same way. (12, 18, 24 sc)
Lay both wings flat before assembly. They should have matching broad oval silhouettes, visible concentric crochet rounds, and softly rounded ends.
First antenna
With deep-brown yarn, ch 8.
Beginning in the second ch from the hook, sl st in each of the 7 chains. Fasten off, leaving a long tail for sewing.
The reinforced chain should naturally form a firm, slightly curved cord. Roll it gently between your fingers if you want a more pronounced bend.
Second antenna
Make the second antenna exactly the same way.
Assembling the bumblebee
Attach the wings
Lay the bee so the eye side faces forward and the color-change seam stays underneath.
Position the wings across the upper sides of the middle body, roughly spanning the first dark stripe and central yellow stripe around R10–R14.
Place one wing on each side of the body. Angle the broad rounded ends slightly backward toward the tail rather than straight out to the sides.
The inner long edge of each oval should touch the body over several stitches. Using the cream sewing tail, secure about five to six stitches of this inner edge to the bee with small firm whip stitches.
Leave most of the outer wing edge unsewn. The crochet fabric will naturally sit a little above the body, giving the wings their raised shape without stuffing.
Check the bee from above before knotting the second wing. Both wings should be visible and should begin at approximately the same position along the body.
Attach the antennae
Place the antennae on the upper front of the golden face, just ahead of the first brown stripe.
Position their bases several stitches apart, approximately around R6–R7. The antennae should point upward and slightly forward, with gentle curves rather than perfectly straight lines.
Use the long dark-brown tails to sew each antenna base through several nearby body stitches. A broad attachment at the first two chain stitches keeps the antenna from appearing to hang from a single thread.
After securing the bases, gently curl the free ends with your fingers. One antenna may curve slightly more than the other; a small handmade difference is fine.
Finishing the bee
Weave all remaining yarn ends into the body. Shape the bee between your palms, rolling it gently so the face stays rounded and the middle remains full.
Lift both cream wings so they sit above the striped body instead of being pressed flat against it. Adjust the antennae until both are clearly visible from the front and slightly above.
If you used embroidered eyes, make two compact black marks between R5 and R6, keeping them evenly spaced across the golden face. Pull the embroidery only firmly enough to sit against the crochet surface; tight stitches can dent the stuffing underneath.
Troubleshooting
- The bee looks too round: avoid overstuffing the final tail section. Concentrate the filling through the face and middle so the body stays oval.
- The stripes form a noticeable step: keep every color change at the same underside join and make the final slip stitch of each round consistently.
- The wings look round instead of oval: make sure R1 is worked around the foundation chain rather than into a ring. The chain foundation establishes the elongated shape.
- The wings flop completely downward: sew a slightly longer section of the inner edge to the body while leaving the broad outer half free.
- The antennae look loose: secure the first two chain stitches of each antenna against several body stitches instead of attaching only the chain end.
Final details to check
- The body is one continuous stuffed oval with a rounded golden face and gently tapered rear.
- The color sequence reads golden yellow, dark brown, golden yellow, dark brown, then golden yellow.
- Two broad cream oval wings sit across the upper middle of the body.
- Two short dark-brown antennae rise securely from the upper front.
- Two small black eyes remain clearly visible on the golden face.
Once the ends are hidden and the wings and antennae are shaped, your mini crochet bumblebee is finished. If you make one, feel free to share how yours turned out or leave a question if you get stuck on the body shaping or wing placement.












