
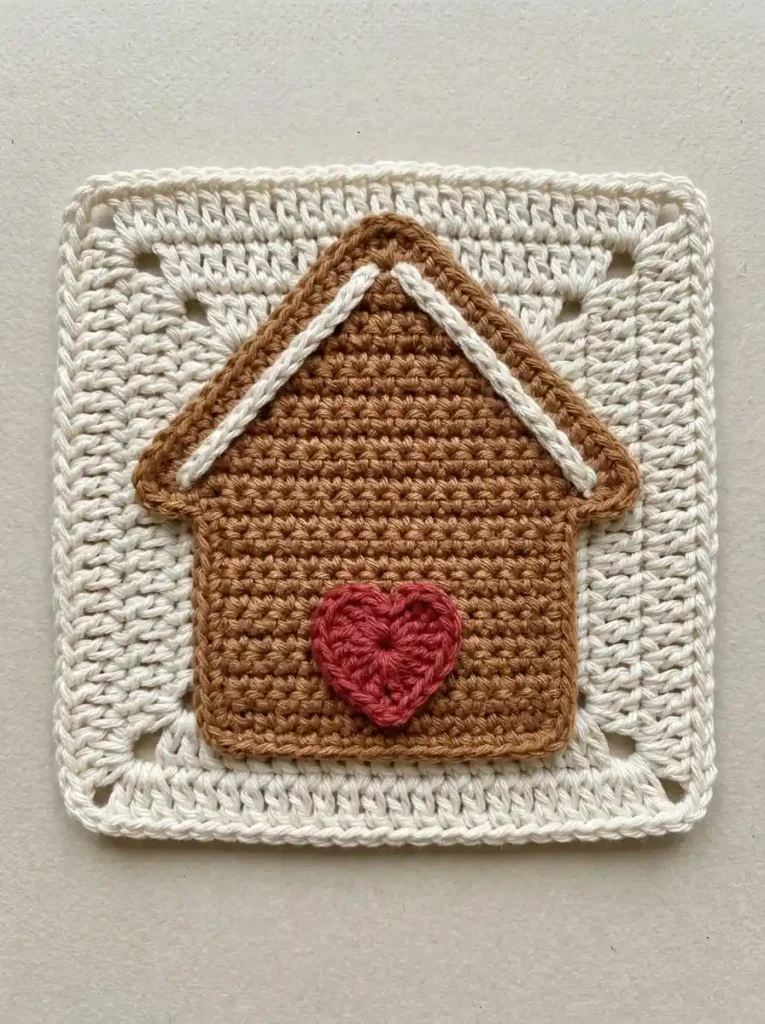
This gingerbread house square combines a warm cream crochet base with a simple brown house, a broad triangular roof, two narrow frosting lines, and one red crochet heart centered like a candy door. The slightly oversized roof creates clear eaves on both sides, which gives the appliqué its familiar little-house silhouette.
The rectangular body and triangular roof are crocheted separately and finished with a narrow brown outline before assembly. The cream frosting sits just inside the roof edge rather than replacing it, while the red heart has its own second shaping round for a clearly defined pair of lobes and pointed lower tip.
Project at a glance
| Skill level | Confident beginner to intermediate |
|---|---|
| Terminology | US crochet terms |
| Construction | Center-out square with separate body, roof, and heart |
| Yarn | DK-weight cotton or cotton-blend |
| Hook | 3.5 mm crochet hook |
The finished dimensions will vary with yarn and tension. Aim for a firm, clearly defined fabric rather than a loose or drapey one so the house edges, roof slopes, and small heart keep their shape.
Materials
- DK-weight warm cream yarn for the square and roof frosting
- DK-weight gingerbread-brown yarn for the house body and roof
- DK-weight muted candy-red yarn for the heart door
- 3.5 mm crochet hook
- Tapestry needle
- Scissors
- Stitch marker if helpful
Use the same yarn weight for all three colors. Smooth cotton or a cotton-blend is especially useful because the horizontal brown rows stay distinct and the surface-crochet frosting remains easy to recognize.
Stitches and abbreviations
- ch – chain
- ch-sp – chain space
- sl st – slip stitch
- sc – single crochet
- hdc – half double crochet
- dc – double crochet
- tr – treble crochet
- sc2tog – single crochet 2 stitches together
- MR – magic ring
- RS – right side
- WS – wrong side
Before you start
The cream square is worked in joined rounds without turning. The beginning ch 3 counts as the first dc, while slip-stitch joins do not count as stitches.
The brown house pieces are worked in turned rows. Ch 1 at the beginning of a sc row does not count as a stitch.
The roof is deliberately wider than the rectangular body. The body is 18 stitches across and the roof begins with 24 stitches, leaving approximately three stitches of overhang on each side when the pieces are centered.
Crochet pattern
Cream solid granny square
With cream yarn, ch 4 and join with a sl st in the first ch to form a small center ring.
R1: Ch 3, 2 dc into the ring, ch 2, [3 dc into the ring, ch 2] × 3. Join with a sl st to the top of the beginning ch 3. Do not turn. (12 dc, 4 ch-2 corner spaces)
Sl st across the next 2 dc and into the next ch-2 corner space.
R2: Ch 3, 1 dc in the same corner space, ch 2, 2 dc in the same corner space. Dc in each of the next 3 dc. [2 dc, ch 2, 2 dc in the next corner space; dc in each of the next 3 dc] × 3. Join to the beginning ch 3. (28 dc, 4 ch-2 corner spaces)
Sl st in the next dc and into the next corner space.
R3: Ch 3, 1 dc in the same corner space, ch 2, 2 dc in the same corner space. Dc in each of the next 7 dc. [2 dc, ch 2, 2 dc in the next corner space; dc in each of the next 7 dc] × 3. Join. (44 dc, 4 ch-2 corner spaces)
Sl st in the next dc and into the next corner space.
R4: Ch 3, 1 dc in the same corner space, ch 2, 2 dc in the same corner space. Dc in each of the next 11 dc. [2 dc, ch 2, 2 dc in the next corner space; dc in each of the next 11 dc] × 3. Join. (60 dc, 4 ch-2 corner spaces)
Sl st in the next dc and into the next corner space.
R5: Ch 3, 1 dc in the same corner space, ch 2, 2 dc in the same corner space. Dc in each of the next 15 dc. [2 dc, ch 2, 2 dc in the next corner space; dc in each of the next 15 dc] × 3. Join. (76 dc, 4 ch-2 corner spaces)
Sl st in the next dc and into the next corner space.
R6: Ch 3, 1 dc in the same corner space, ch 2, 2 dc in the same corner space. Dc in each of the next 19 dc. [2 dc, ch 2, 2 dc in the next corner space; dc in each of the next 19 dc] × 3. Join. (92 dc, 4 ch-2 corner spaces)
Final cream edging
Sl st in the next dc and into the next ch-2 corner space.
Edging round: Ch 1, work 3 sc in the corner space. Sc in each of the next 23 dc. [3 sc in the next corner space; sc in each of the next 23 dc] × 3. Join with a sl st to the first sc. (104 sc)
Fasten off and weave in the ends.
🧶 Checkpoint: The cream base should lie flat with four matching corner openings, straight sides, and a narrow continuous finishing edge.
Gingerbread house body
With gingerbread-brown yarn, ch 19.
Row 1: Sc in the second ch from the hook and in each remaining ch. Ch 1, turn. (18 sc)
Rows 2–17: Sc in each stitch across. Ch 1, turn. (18 sc)
Row 18: Sc in each stitch across. Do not turn. (18 sc)
Brown outline around the body
Do not fasten off. The outline is worked directly around the rectangle and creates the clearly defined raised edge around the walls and lower edge.
Outline round: Ch 1. Rotate the piece and work 18 sc evenly down the first side, placing one sc in the end of each row. Ch 1 at the lower corner. Work 18 sc across the unused loops of the foundation edge. Ch 1. Work 18 sc evenly up the second side. Ch 1. Work 18 sc across the top edge. Ch 1 and join with a sl st to the first sc. (72 sc, 4 ch-1 corner spaces)
Fasten off, leaving a long tail for sewing.
The body should now be close to square in proportion, with horizontal rows through the center and a narrow brown outline framing all four edges.
Broad triangular gingerbread roof
With gingerbread-brown yarn, ch 25.
Row 1: Sc in the second ch from the hook and in each remaining ch. Ch 1, turn. (24 sc)
Row 2: Sc2tog, sc in each of the next 20 stitches, sc2tog. Ch 1, turn. (22 sc)
Row 3: Sc2tog, sc in each of the next 18 stitches, sc2tog. Ch 1, turn. (20 sc)
Row 4: Sc2tog, sc in each of the next 16 stitches, sc2tog. Ch 1, turn. (18 sc)
Row 5: Sc2tog, sc in each of the next 14 stitches, sc2tog. Ch 1, turn. (16 sc)
Row 6: Sc2tog, sc in each of the next 12 stitches, sc2tog. Ch 1, turn. (14 sc)
Row 7: Sc2tog, sc in each of the next 10 stitches, sc2tog. Ch 1, turn. (12 sc)
Row 8: Sc2tog, sc in each of the next 8 stitches, sc2tog. Ch 1, turn. (10 sc)
Row 9: Sc2tog, sc in each of the next 6 stitches, sc2tog. Ch 1, turn. (8 sc)
Row 10: Sc2tog, sc in each of the next 4 stitches, sc2tog. Ch 1, turn. (6 sc)
Row 11: Sc2tog, sc in each of the next 2 stitches, sc2tog. Ch 1, turn. (4 sc)
Row 12: Sc2tog twice. Ch 1, turn. (2 sc)
Row 13: Sc2tog. (1 sc)
Fasten off.
The roof should form a broad triangle with a centered peak. Its lower edge is six stitches wider than the house body, creating a noticeable but balanced eave on both sides.
Brown outline around the roof
Join brown yarn at the lower-left corner of Row 1.
Roof outline: Ch 1 and work 24 sc across the lower roof edge. Ch 1 at the right eave. Work 13 sc evenly up the right slope, placing approximately one sc into the edge of each roof row. Ch 1 at the peak. Work 13 sc evenly down the left slope. Ch 1 at the left eave and join with a sl st to the first sc. (50 sc, 3 ch-1 corner spaces)
Fasten off and weave in the tail.
This outline should remain visible outside the cream frosting so the roof has a clear brown frame from one eave, over the peak, and down to the opposite eave.
Add the cream frosting lines
Lay the roof RS up with its broad Row 1 edge at the bottom. The frosting is worked on the surface of the brown roof rather than around its outermost edge.
Hold cream yarn behind the roof. Insert the hook through the brown fabric near the left side of Row 12, approximately one stitch inside the brown outline, catch the cream yarn, and pull a loop to the front.
Work downward toward the left eave with one relaxed surface sl st through each successive row edge from Row 12 through Row 2. Keep the line parallel to the roof slope and one stitch inside the brown perimeter. (11 surface sl sts)
Fasten off.
Repeat along the right roof slope, again beginning near Row 12 and working down through Row 2. (11 surface sl sts)
The two frosting lines should visually approach one another near the peak without covering the brown peak itself. At the lower ends, leave a small section of brown eave visible beyond the cream stitching.
🧶 Watch for: The brown roof outline should remain visible outside both cream lines. Keep the surface slip stitches relaxed so they sit on top of the roof without shortening or curling the slopes.
Red candy-heart door
The heart is worked in two stages so it has a compact center and a clearly defined outer edge.
With muted red yarn, make an MR.
R1: Ch 2, work 3 tr into the MR, 3 dc into the MR, ch 1, 1 tr into the MR, ch 1, 3 dc into the MR, 3 tr into the MR, ch 2, then sl st into the MR. Pull the ring mostly closed while keeping the heart shape visible. (13 tall stitches, 2 ch-1 spaces)
Do not turn.
R2: Ch 1. Work 2 sc around the beginning ch-2 section. Work 2 sc in the first tr, 2 hdc in the next tr, 2 sc in the next tr. Sc in each of the next 3 dc. Work 2 sc in the next ch-1 space. In the central tr work sc, ch 1, sc. Work 2 sc in the next ch-1 space. Sc in each of the next 3 dc. Work 2 sc in the next tr, 2 hdc in the next tr, and 2 sc in the final tr. Work 2 sc around the ending ch-2 section, then sl st into the MR at the top-center notch. (28 sts, 1 ch-1 point space)
Fasten off, leaving a long tail for sewing.
The heart should have two similarly sized rounded lobes, a clear notch at the top, and one small pointed lower end. The second round forms the thicker crochet outline visible around the candy-heart door.
Assembling the gingerbread house
Attach the candy heart
Lay the brown body RS up. Position the red heart vertically on the lower half of the rectangle and center it between the side edges.
Leave several brown rows visible below the pointed end. The heart should sit comfortably inside the brown body rather than touching the outline.
Using the red sewing tail, stitch around the complete R2 edge. Keep the seam close to the outer stitches so the raised red outline remains visible.
Attach the house body to the square
Lay the cream square RS up. Center the body horizontally and position it in the lower-middle portion of the square, leaving a visible cream band below the brown lower edge.
Use the long brown tail to sew around the body outline. Secure the two sides and lower edge carefully so the rectangle remains straight and flat.
The upper portion of the body will be covered slightly by the roof, so keep that edge flat but do not pull the sewing yarn tightly enough to pucker the background.
Attach the roof
Center the broad roof directly above the body. Its 24-stitch lower edge is wider than the 18-stitch body, so approximately three stitches of brown roof should extend past each side wall.
Lower the roof until its bottom edge overlaps the upper body slightly. The resulting eaves should project evenly on the left and right.
Using matching brown yarn, sew the lower roof edge securely across the upper part of the body.
Then secure the two roof slopes and peak to the cream square with small stitches placed through the brown outline. Avoid sewing across the cream frosting lines.
The visible brown outline should frame each cream frosting line along the complete roof slope.
🧶 Checkpoint: From directly above, the finished appliqué should have a nearly square brown body, a noticeably wider triangular roof with matching eaves, a brown roof outline outside two cream frosting lines, and one red heart centered low on the house.
Finishing your square
Weave all remaining yarn tails securely into the back. Check the roof peak, both eaves, the sides of the house, and the lower brown outline to make sure each section lies smoothly against the cream base.
If the cream square needs shaping, lightly damp-block it and pin the outer sides and corners into an even square. Avoid stretching the appliqué or pressing heavily over the raised outlines.
Allow everything to dry completely, then gently smooth the brown house and straighten the two cream roof lines with your fingers.
Troubleshooting
- The roof looks too narrow: check that its first row contains 24 sc while the body is only 18 sc wide. The extra width is what creates the visible eaves.
- The roof peak leans to one side: every shaping row must decrease once at both edges. Missing one sc2tog will move the peak away from the center.
- The cream frosting hides the brown roof edge: place each surface-crochet line about one stitch inside the brown outline rather than directly into the outermost edge.
- The red heart looks too thin: complete R2. The second shaping round creates the thicker outer edge and stronger heart silhouette.
- The cream square puckers behind the house: loosen the sewing stitches around the brown pieces. They need to be secure without drawing the background inward.
Final details to check
- The cream square lies flat with four matching corner openings and a simple outer edging.
- The brown body has horizontal rows plus a visible outline along its sides and lower edge.
- The triangular roof extends clearly beyond both walls and has a brown border around its perimeter.
- Two narrow cream frosting lines sit just inside the brown roof slopes.
- The red heart has two rounded lobes, a defined notch, a pointed bottom, and a visible second-round outline.
Once the last ends are hidden, your gingerbread house square is ready to use as a decorative motif or combine with coordinating crochet squares. If you make one, feel free to share how yours turned out or leave a question if you get stuck on the roof shaping.












