
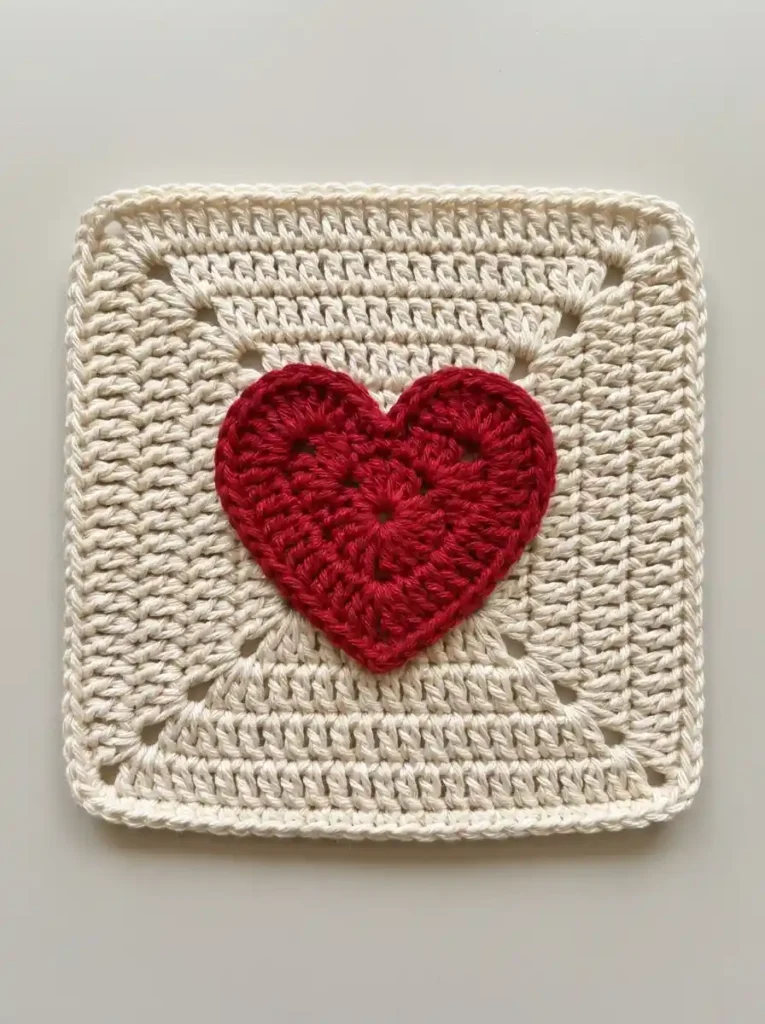
This sweet two-tone crochet block combines a warm cream square with a bold red heart appliqué centered on top. The heart has rounded upper lobes, a narrow center dip, a defined lower point, and a slim finishing edge that gives it the crisp outlined look that makes the motif stand out against the cream background.
The square is worked from the center outward in joined rounds. The heart is crocheted separately in three stages and sewn flat to the front, leaving just a little natural relief around its edge.
Project at a glance
| Skill level | Confident beginner |
|---|---|
| Terminology | US crochet terms |
| Construction | Joined-round square with separate heart appliqué |
| Recommended yarn | DK-weight smooth cotton or cotton blend |
| Hook | 3.5 mm |
| Approximate size | About 5–6 in / 13–15 cm square with the suggested yarn and hook |
Materials
- DK-weight cotton or cotton-blend yarn in warm cream for the square
- DK-weight yarn in cherry red or deep red for the heart
- 3.5 mm crochet hook
- Yarn needle
- Scissors
- A few removable stitch markers or pins for positioning the heart
A partial skein of cream and a small amount of red are enough for one block. A smooth, lightly twisted yarn works especially well because it keeps the double-crochet posts in the square and the radiating stitches in the heart easy to see.
Stitches and abbreviations
- ch – chain
- sl st – slip stitch
- sc – single crochet
- hdc – half double crochet
- dc – double crochet
- tr – treble crochet
- st – stitch
- sp – space
- RS – right side
Before you start
The cream square is worked with the RS facing throughout and is not turned. The beginning ch 3 of each double-crochet round counts as one dc. Slip-stitch joins do not count as stitches.
Keep the ch-2 corner spaces relaxed. The diagonal line of corner openings is part of the square’s structure, so avoid tightening those chains until the openings disappear.
The red heart is made separately. Its first stage is worked directly into one center ring, the second stage enlarges and defines the lobes and point, and the third stage adds the narrow outer edge.
Crochet pattern
Cream granny square
With cream yarn, ch 4 and join with sl st in the first ch to form a small ring.
R1: Ch 3, 2 dc in ring, ch 2, [3 dc in ring, ch 2] × 3. Join with sl st to the top of the beginning ch 3. Do not turn. (12 dc, 4 ch-2 corner spaces)
Slip stitch in each of the next 2 dc and into the next ch-2 corner space.
R2: Ch 3, dc in same corner sp, ch 2, 2 dc in same corner sp. Dc in each of the next 3 dc. [(2 dc, ch 2, 2 dc) in next corner sp, dc in each of the next 3 dc] × 3. Join with sl st to the top of the beginning ch 3. (28 dc, 4 ch-2 corner spaces)
Slip stitch in the next dc and into the next ch-2 corner space.
R3: Ch 3, dc in same corner sp, ch 2, 2 dc in same corner sp. Dc in each of the next 7 dc. [(2 dc, ch 2, 2 dc) in next corner sp, dc in each of the next 7 dc] × 3. Join with sl st to the top of the beginning ch 3. (44 dc, 4 ch-2 corner spaces)
Slip stitch in the next dc and into the next ch-2 corner space.
R4: Ch 3, dc in same corner sp, ch 2, 2 dc in same corner sp. Dc in each of the next 11 dc. [(2 dc, ch 2, 2 dc) in next corner sp, dc in each of the next 11 dc] × 3. Join with sl st to the top of the beginning ch 3. (60 dc, 4 ch-2 corner spaces)
Slip stitch in the next dc and into the next ch-2 corner space.
R5: Ch 3, dc in same corner sp, ch 2, 2 dc in same corner sp. Dc in each of the next 15 dc. [(2 dc, ch 2, 2 dc) in next corner sp, dc in each of the next 15 dc] × 3. Join with sl st to the top of the beginning ch 3. (76 dc, 4 ch-2 corner spaces)
🧶 Checkpoint: Lay the square flat before adding the outer edge. You should see four matching cream sections, a diagonal line of small corner openings running toward each outer corner, and enough flat center area for the heart to sit without covering the outer two rounds.
Final cream edging
Slip stitch in the next dc and into the next ch-2 corner space.
R6: Ch 1; this does not count as a stitch. Work 3 sc in the corner sp, sc in each of the next 19 dc. [3 sc in next corner sp, sc in each of the next 19 dc] × 3. Join with sl st to the first sc. (88 sc)
Fasten off and weave in the ends. Working three single crochets into each corner creates the softly curved outer corner while the ch-2 opening from the previous round remains visible just inside the edging.
Red heart appliqué
The heart is made separately and sewn on after the cream square is finished. Keep the magic ring snug but not excessively tight so the first group of stitches can spread evenly around the center.
With red yarn, make an adjustable magic ring.
R1: Ch 2, 3 tr in ring, 3 dc in ring, ch 1, tr in ring, ch 1, 3 dc in ring, 3 tr in ring, ch 2, sl st in ring. Pull the ring closed. Do not turn. (13 tall sts, 2 ch-1 spaces)
This first stage already forms a small heart: the two groups of treble crochets make the upper lobes, the single center treble points downward, and the beginning and ending chains meet at the top dip.
Shape and enlarge the heart
Continue with the same red yarn. Work around the outside edge of R1 from the top center toward the first lobe, down to the point, around the second lobe, and back to the top center.
R2: Ch 1; this does not count as a stitch. Work 2 sc around the first ch-2 section, 2 hdc in the first tr, 3 dc in the next tr, 2 dc in the next tr, dc in each of the next 3 dc, 2 dc in the next ch-1 sp, (dc, tr, dc) in the center tr, 2 dc in the next ch-1 sp, dc in each of the next 3 dc, 2 dc in the next tr, 3 dc in the next tr, 2 hdc in the next tr, 2 sc around the ending ch-2 section. Finish with sl st into the center ring at the top dip. (31 sts)
The middle stitch of the first 3-dc group is the high point of the first lobe. The tr in the center increase is the bottom point. The middle stitch of the second 3-dc group is the high point of the second lobe.
🧶 Checkpoint: Before adding the final edge, the heart should have two similarly sized rounded lobes, a clear narrow dip between them, broad sides, and one centered lower point. Smooth the stitches with your fingers now rather than trying to correct the silhouette after sewing.
Heart edging
The last round is intentionally narrow. It outlines the heart without adding another bulky layer.
R3: Ch 1; this does not count as a stitch. Sc in the next 5 sts, 2 sc in the next st, sc in the next 9 sts, 3 sc in the next st, sc in the next 9 sts, 2 sc in the next st, sc in the final 5 sts. Finish with sl st into the center ring at the top dip. (35 sc)
The two 2-sc increases round the highest part of each lobe. The 3-sc increase at the bottom keeps the heart point distinct instead of allowing the edging to pull it inward.
Fasten off, leaving a long tail for sewing.
Attach the heart
Place the cream square RS up. Fold it lightly from side to side and then from top to bottom, or count the stitches along opposite edges, to locate the center.
Place the heart with its center dip and lower point on the vertical centerline. The widest part of the heart should cover the center of the block while leaving roughly the outer two cream double-crochet rounds visible around the motif.
The lower point should sit directly below the top dip rather than leaning toward either lower corner. Adjust the two lobes until their outer edges sit approximately equal distances from the left and right sides of the square.
Pin the heart in place. Thread the long red tail onto a yarn needle and sew around the inside edge of R3 with small whipstitches. Catch a back strand of the red edging and a strand from the cream stitch directly underneath it.
Continue around the full perimeter. Secure both rounded lobes, sew down into the top dip, follow both side curves, and place one firm stitch beneath the lower point.
Keep the sewing tension gentle. The heart should remain visibly separate from the square rather than being pulled so tightly that the red stitches sink into the cream fabric.
If the center rises noticeably after the perimeter is attached, add one loose hidden tack near the middle of the heart. One central tack is enough; avoid stitching across the visible face of the appliqué.
Finishing your square
Weave all remaining ends into the wrong side. Change direction once while weaving each tail so normal handling does not pull it free.
Light blocking helps straighten the cream sides and makes the four corner curves more even. Dampen or steam-block according to the fiber you used, then arrange the square with all four sides straight and the diagonal corner openings evenly positioned.
Shape the heart separately while the block is still damp. Round each lobe with your fingers, press the center dip slightly inward, and pull the bottom point gently downward. Do not stretch the red motif so far that the surrounding cream rounds distort.
Troubleshooting
- The cream square cups upward: the ch-2 corner spaces are probably too tight. Loosen those chains on the next round rather than adding extra stitches to the sides.
- The square ruffles: check for accidental extra double crochets along a side or in a corner. Every corner receives only the stated 2 dc, ch 2, 2 dc increase.
- The heart lobes look too narrow: the treble and double-crochet increases in R2 may be worked too tightly. Relax those groups and spread them slightly before working R3.
- The heart loses its center dip: make sure both ends of the heart return to the center ring rather than being joined across the opening. The dip should remain visibly lower than the two lobes.
- The bottom point becomes rounded: check that the 3-sc increase in R3 is centered directly over the treble that forms the point in R2.
- The cream fabric puckers beneath the appliqué: the sewing stitches are too tight. Remove that section of seam and resew it with enough slack for the square to lie flat.
Adjusting the square size
If you want a larger cream block while keeping the same heart, add another solid-square round before the single-crochet edging.
For every additional double-crochet round, work (2 dc, ch 2, 2 dc) in each ch-2 corner space and one dc in every dc along each side. Each added round increases every side by four double crochets.
When the square reaches the size you want, finish with the same edging method: one sc in every side stitch and 3 sc in each corner space.
For proportions closest to this design, keep the heart at roughly half the width of the finished cream block so two substantial cream rounds remain visible outside the widest part of the red motif.
The two colors can also be reversed without changing the construction. Keep both yarns the same weight so the heart does not become disproportionately thick or small compared with the square.
If you make this heart-centered block, feel free to share your finished version or leave a question if you need help with the heart shaping or placement.












