
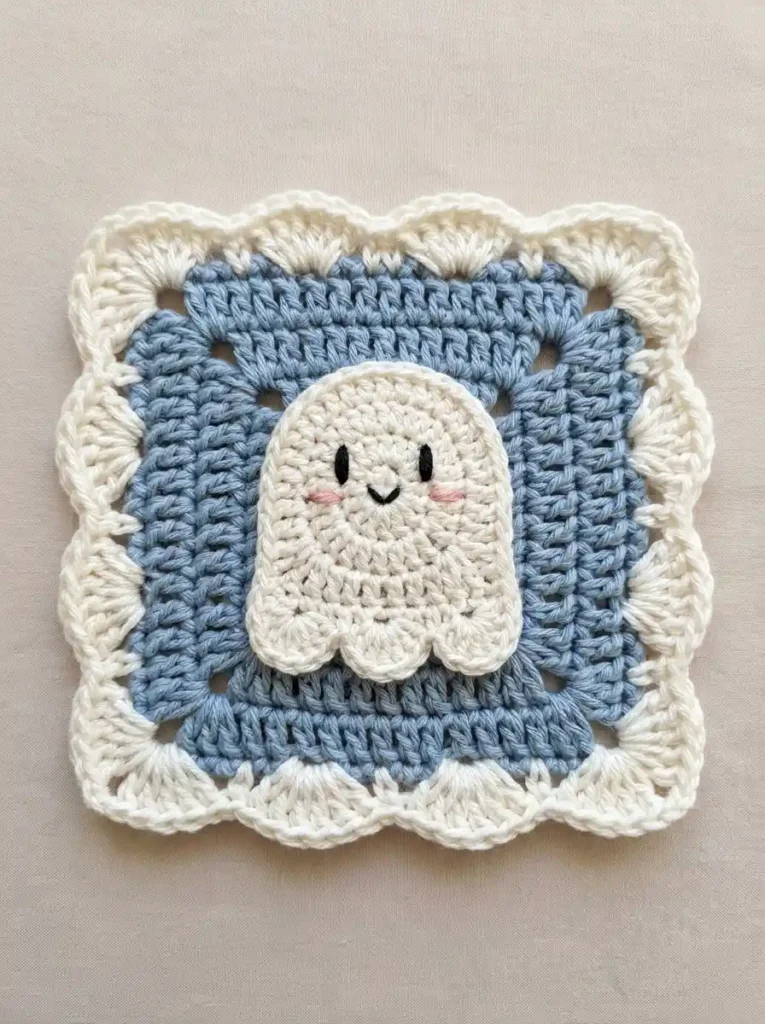
This soft blue granny square has a raised cream ghost in the center, tiny embroidered features, rosy cheeks, and a wide cloud-like border around the outside. The ghost stays intentionally simple: a rounded body, three soft bumps along the lower edge, two little eyes, a curved mouth, and just enough blush to give it a kawaii expression.
The blue square is worked from the center outward in joined rounds. The ghost is made separately as a center-out oval appliqué and sewn onto the square, while the cream scalloped border is crocheted directly around the completed blue base.
Project at a glance
| Skill level | Confident beginner |
|---|---|
| Terminology | US crochet terms |
| Construction | Center-out square, separate ghost appliqué, embroidered face, and scalloped border |
| Yarn | DK or light-worsted cotton or cotton blend |
| Hook | 3.5 mm crochet hook |
| Finished size | Usually about 5 to 6.5 inches square with the suggested yarn and hook |
Materials
- DK or light-worsted yarn in muted dusty blue for the square
- DK or light-worsted yarn in warm cream for the ghost and outer border
- Small amount of black yarn or embroidery floss for the eyes and mouth
- Small amount of soft blush-pink yarn or embroidery floss for the cheeks
- 3.5 mm crochet hook
- Yarn needle
- Scissors
- Stitch markers, optional
- Blocking mat and pins, optional
A smooth cotton or cotton-rich yarn works especially well for this square because it keeps the blue background flat and gives the cream scallops a clear rounded shape. Use the same main yarn weight for the blue square, ghost, and border so the different parts look balanced together.
Exact gauge is not important for a decorative square. Aim for a fabric that is firm enough to hold the appliqué neatly but still flexible enough to block flat. If your stitches are loose enough that the square becomes floppy or the ghost loses its shape, use a slightly smaller hook.
Stitches and abbreviations
- ch — chain
- ch-sp — chain space
- dc — double crochet
- hdc — half double crochet
- sc — single crochet
- sl st — slip stitch
- inc — work 2 sc in the same stitch
- st/sts — stitch/stitches
- RS — right side
Before you start
The blue square is worked in joined rounds without turning. The beginning ch 3 counts as the first dc. Each corner contains a ch-2 space, and the slip-stitch join does not count as a stitch.
The ghost is crocheted separately around both sides of a short foundation chain. This creates the concentric oval texture through the body while keeping the piece flat. The lower end is finished with three integrated scallops rather than adding separate little feet.
Block the blue square before sewing on the ghost. A flat background makes it much easier to center the appliqué and prevents the sewing stitches from pulling the square out of shape.
Crochet pattern
Dusty blue square
With blue yarn, make a magic ring. Keep the RS facing you and do not turn.
R1: Ch 3, 2 dc in the ring, ch 2, [3 dc in the ring, ch 2] × 3. Pull the ring closed and join with a sl st to the top of the beginning ch 3. (12 dc, 4 ch-2 corner spaces)
To begin the following rounds, sl st across the next dc stitches and into the next ch-2 corner space.
R2: Ch 3, 1 dc in the same corner space, ch 2, 2 dc in the same corner space, [1 dc in each of the next 3 dc, (2 dc, ch 2, 2 dc) in the next corner space] × 3, 1 dc in each of the final 3 dc. Join to the top of the beginning ch 3. (28 dc, 4 ch-2 corner spaces; 7 dc per side)
R3: Move into the next corner space. Ch 3, 1 dc in the same space, ch 2, 2 dc in the same space, [1 dc in each of the next 7 dc, (2 dc, ch 2, 2 dc) in the next corner space] × 3, 1 dc in each of the final 7 dc. Join. (44 dc, 4 ch-2 corner spaces; 11 dc per side)
R4: Move into the next corner space. Ch 3, 1 dc in the same space, ch 2, 2 dc in the same space, [1 dc in each of the next 11 dc, (2 dc, ch 2, 2 dc) in the next corner space] × 3, 1 dc in each of the final 11 dc. Join. (60 dc, 4 ch-2 corner spaces; 15 dc per side)
R5: Move into the next corner space. Ch 3, 1 dc in the same space, ch 2, 2 dc in the same space, [1 dc in each of the next 15 dc, (2 dc, ch 2, 2 dc) in the next corner space] × 3, 1 dc in each of the final 15 dc. Join. (76 dc, 4 ch-2 corner spaces; 19 dc per side)
R6: Move into the next corner space. Ch 3, 1 dc in the same space, ch 2, 2 dc in the same space, [1 dc in each of the next 19 dc, (2 dc, ch 2, 2 dc) in the next corner space] × 3, 1 dc in each of the final 19 dc. Join. (92 dc, 4 ch-2 corner spaces; 23 dc per side)
🧶 Checkpoint: The blue square should lie flat with four matching sides and small diagonal openings at the corners. Do not pull the ch-2 corner spaces tight; the cream border needs those corners to remain relaxed.
Cream foundation round for the border
Join cream yarn in any ch-2 corner space.
R7: Ch 1; this does not count as a stitch. Work 1 sc in the same corner space, 1 sc in each of the next 23 dc, [1 sc in the next corner space, 1 sc in each of the next 23 dc] × 3. Join with a sl st to the first sc. (96 sc)
This round is intentionally narrow. It gives every scallop in the final border a clear crochet foundation instead of working the larger shells directly into the blue dc stitches.
Scalloped cloud border
The final cream round uses sixteen broad shells: one shell at each corner and three additional shells along each side.
R8: Ch 1, then work 7 dc in the same corner sc.
For each of the first three sides, work [skip 2 sc, sl st in the next sc, skip 2 sc, 7 dc in the next sc] × 3, then skip 2 sc, sl st in the next sc, skip 2 sc, and work 7 dc in the next corner sc.
For the final side, work [skip 2 sc, sl st in the next sc, skip 2 sc, 7 dc in the next sc] × 3, skip 2 sc, sl st in the next sc, skip the final 2 sc, then join with a sl st to the first dc of the starting corner shell. Fasten off. (16 scallops)
Gently shape each shell with your fingers. The border should form broad rounded cloud bumps rather than tight little ruffles. The square should still read as square overall, with the corner shells curving naturally around each corner.
Cream ghost appliqué
The ghost is made separately. Work around both sides of the foundation chain in joined rounds without turning. The first chain end will become the lower end of the ghost, so place a marker there if that helps you keep the orientation clear.
With cream yarn, ch 8.
R1: Beginning in the second ch from the hook, work 2 sc in the first ch, 1 sc in each of the next 5 ch, 3 sc in the final ch. Rotate the work and continue along the unused loops on the opposite side of the foundation chain: 1 sc in each of the next 5 ch, then 1 sc in the same first foundation ch that already contains the first 2 sc. Join with a sl st to the first sc. (16 sc)
You now have three stitches grouped around each end of the oval with five stitches along each straight side.
R2: Ch 1, work 2 sc in each of the next 3 stitches, 1 sc in each of the next 5 stitches, 2 sc in each of the next 3 stitches, 1 sc in each of the final 5 stitches. Join. (22 sc)
R3: Ch 1, [1 sc in the next stitch, 2 sc in the next stitch] × 3, 1 sc in each of the next 5 stitches, [1 sc in the next stitch, 2 sc in the next stitch] × 3, 1 sc in each of the final 5 stitches. Join. (28 sc)
R4: Ch 1, [1 sc in each of the next 2 stitches, 2 sc in the next stitch] × 3, 1 sc in each of the next 5 stitches, [1 sc in each of the next 2 stitches, 2 sc in the next stitch] × 3, 1 sc in each of the final 5 stitches. Join. (34 sc)
The first 12 stitches of R4 form the rounded lower end. The next 5 stitches form one side, the following 12 stitches curve around the head, and the final 5 stitches form the opposite side.
Three-bump ghost hem
The final round keeps the head and sides smooth while turning the lower arc into three rounded bumps.
R5: Ch 1. Across the first 12 stitches, work [sl st in the next stitch, skip 1 stitch, 5 hdc in the next stitch, skip 1 stitch] × 3. Then work 1 sc in each of the remaining 22 stitches around the sides and head. Join with a sl st to the first sl st of the round and fasten off, leaving a long tail for sewing. (3 lower scallops, 22 sc)
Finger-shape the ghost before sewing. The head should stay broad and rounded, the sides should be gently curved rather than sharply tapered, and all three bottom bumps should point downward as one continuous hem.
🧶 Checkpoint: The ghost should look like one continuous oval-based piece, not a circle with separate feet. The three bottom scallops should be similar in size and remain clearly attached to the same lower edge.
Add the kawaii face
Keep the RS of the ghost facing you. The expression sits in the upper half of the body, leaving plenty of plain cream fabric below the face before the three lower scallops begin.
Using black yarn or embroidery floss, make two short vertical eyes. Position them symmetrically on either side of the center line, approximately one round apart horizontally. Keep each eye only a few stitches long so it looks like a simple narrow oval rather than a large safety eye.
Make the mouth one round below the eyes. Use two or three small black stitches to form a tiny shallow U shape centered between them. Keep the mouth small; it should not extend as far sideways as either eye.
With blush-pink yarn, add one short cheek on each side of the face. Place each cheek slightly below and outside its neighboring eye. Two or three relaxed horizontal embroidery stitches are enough to create the soft rectangular blush marks.
Secure the embroidery tails on the WS without pulling tightly. Over-tight embroidery can pucker the cream appliqué and distort the face.
Attach the ghost to the square
Lay the blocked square RS up and place the ghost in the center of the blue area. Keep the rounded head at the top and the three scallops at the bottom.
Center the ghost horizontally. Position it so there is a generous blue frame around the head and sides while the bottom scallops sit slightly below the exact vertical center of the square. The cream border should remain completely visible around the blue background.
Thread the cream sewing tail onto a yarn needle. Beginning near one lower side, sew through the back loops or back portions of the ghost’s edge stitches and the blue stitches directly underneath.
Continue around the sides and rounded head. Keep the seam close to the outer edge so the full cream silhouette remains visible.
Along the bottom, secure the upper bases of the three scallops but avoid pulling the rounded outer edges completely flat. Leaving a tiny amount of natural lift helps the three bumps remain distinct.
Check the ghost after every few inches of sewing. If one side begins to lean, straighten the appliqué before continuing rather than trying to correct the position after the entire perimeter is attached.
Finishing your ghost square
Weave all yarn tails securely into stitches of the same color. Keep the black and pink embroidery tails inside the cream ghost so they do not show through the blue background.
If the square needs a final adjustment, lightly mist the blue area and pin the outer border into shape. Shape the cream scallops with your fingers rather than stretching them hard against the blocking mat.
The finished square should have a flat dusty-blue center, a softly raised cream ghost with three bottom bumps, a tiny embroidered face with blush cheeks, and sixteen broad cream scallops forming the cloud-like outer edge.
Troubleshooting
- The blue square cups at the corners: The ch-2 corner spaces are probably too tight. Work those chains more loosely so each round has enough room to turn.
- The cream border ruffles heavily: The shell stitches may be too loose or the foundation round may be stretching. Use slightly firmer tension on the 7-dc shells and block the border gently rather than pulling it outward.
- The ghost becomes too round: Make sure the five straight-side stitches remain unchanged during the increase rounds. The increases belong only around the two ends of the oval.
- The bottom bumps blend together: Check that each scallop is separated by its slip-stitch anchor and skipped stitches. Those lower anchor points are what keep the three bumps distinct.
- The face puckers: The embroidery is being pulled too tightly. Loosen the black and pink stitches until they rest on the surface without compressing the cream crochet underneath.
This square is simple enough to repeat while still having plenty of personality from the little face and cloud-like edging. If you make one, feel free to share your finished ghost or leave a question if you get stuck on any part of the pattern.












