
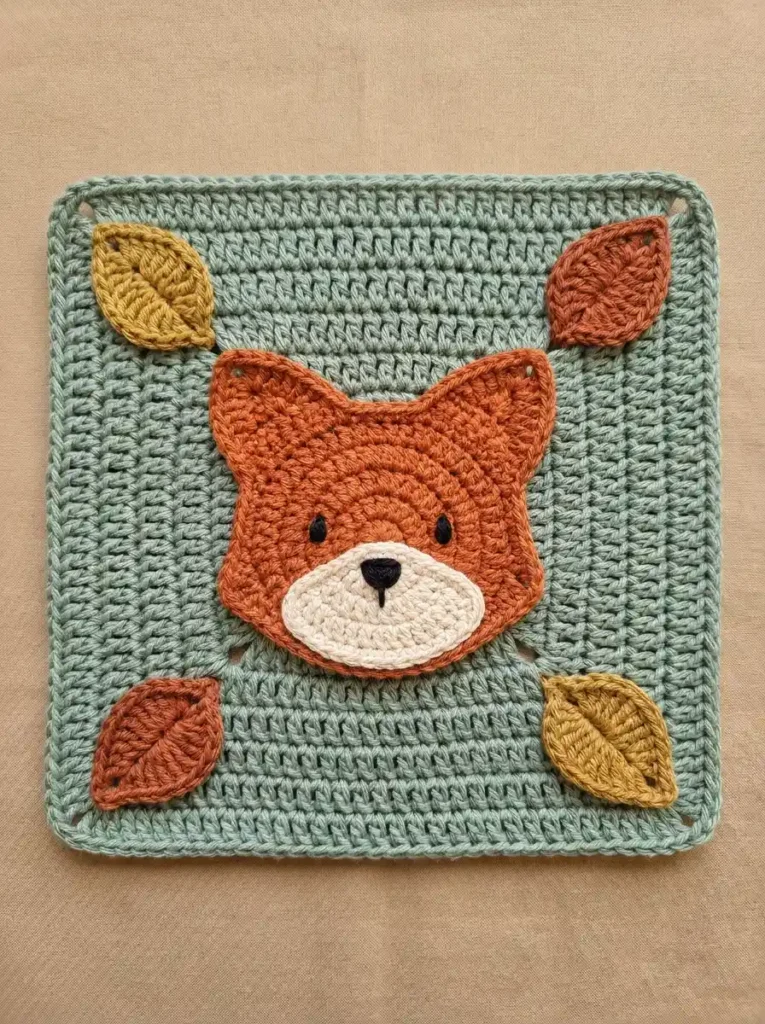
This woodland crochet square combines a muted sage-green background with a warm rust-orange fox face and four small autumn leaves. The broad pointed ears, cream oval muzzle, tiny black face details, and diagonally placed mustard-and-rust leaves give the square its distinctive woodland character without crowding the crochet texture.
The sage square is worked from the center outward in joined double-crochet rounds. The fox begins as a flat center-out half-double-crochet face, with both pointed ears crocheted directly onto the upper edge. A separate single-crochet edging then follows the complete fox silhouette. The cream muzzle and four leaves are made separately and attached afterward.
Project at a glance
| Skill level | Advanced beginner |
|---|---|
| Terminology | US crochet terms |
| Construction | Center-out square with separately attached fox, muzzle, and leaves |
| Yarn | DK or light-worsted smooth cotton or cotton blend |
| Hook | 3.5 mm |
Materials
- DK or light-worsted smooth yarn in muted sage green for the square
- Warm rust or burnt-orange yarn for the fox head and two leaves
- Muted mustard-gold yarn for two leaves
- Soft cream yarn for the muzzle
- A small amount of black yarn or embroidery thread for the eyes, nose, and short mouth line
- 3.5 mm crochet hook
- Yarn needle
- Scissors
- Removable stitch markers
Use the same yarn weight throughout so the appliqués stay proportional to the square. Smooth cotton or a cotton blend works particularly well because the fox rounds, leaf ridges, and narrow finishing edges remain clearly defined.
A firm but comfortable tension works best. The background should lie flat, while the appliqués should feel dense enough to keep their outlines without becoming stiff.
Stitches and abbreviations
- ch – chain
- sc – single crochet
- hdc – half-double crochet
- dc – double crochet
- tr – treble crochet
- sl st – slip stitch
- st – stitch
- sts – stitches
- ch-sp – chain space
- RS – right side
- sc2tog – single crochet two stitches together
- sc3tog – single crochet three stitches together
For an sc2tog, pull up a loop in each of the next two stitches, yarn over, and pull through all three loops on the hook.
For an sc3tog, pull up a loop in each of the next three stitches, yarn over, and pull through all four loops on the hook.
Before you start
The sage square is worked in joined rounds with the RS facing throughout. Do not turn. The beginning ch 3 counts as the first dc, while slip-stitch joins do not count as stitches.
The orange center of the fox is worked in joined half-double-crochet rounds without turning. Its beginning ch 1 does not count as a stitch.
The four leaves are worked around both sides of a short foundation chain. That foundation forms the raised center ridge through each finished leaf.
Keep the square’s ch-2 corner spaces relaxed. The small openings remain visible through the final edging.
Crochet pattern
Sage-green square
With sage-green yarn, make a magic ring.
R1: Ch 3, work 2 dc into the ring, ch 2, then [3 dc into the ring, ch 2] × 3. Tighten the ring. Join with a sl st to the top of the beginning ch 3. (12 dc, 4 ch-2 corner spaces)
Sl st in each of the next 2 dc, then sl st into the next ch-2 corner space.
R2: Ch 3, dc in the same corner space, ch 2, 2 dc in the same corner space. Dc in each of the next 3 dc. [(2 dc, ch 2, 2 dc) in the next corner space, dc in each of the next 3 dc] × 3. Join with a sl st to the top of the beginning ch 3. (28 dc, 4 ch-2 corner spaces; 7 dc per side)
Sl st in the next dc, then sl st into the next ch-2 corner space.
R3: Ch 3, dc in the same corner space, ch 2, 2 dc in the same corner space. Dc in each of the next 7 dc. [(2 dc, ch 2, 2 dc) in the next corner space, dc in each of the next 7 dc] × 3. Join with a sl st to the top of the beginning ch 3. (44 dc, 4 ch-2 corner spaces; 11 dc per side)
Sl st in the next dc, then sl st into the next ch-2 corner space.
R4: Ch 3, dc in the same corner space, ch 2, 2 dc in the same corner space. Dc in each of the next 11 dc. [(2 dc, ch 2, 2 dc) in the next corner space, dc in each of the next 11 dc] × 3. Join with a sl st to the top of the beginning ch 3. (60 dc, 4 ch-2 corner spaces; 15 dc per side)
Sl st in the next dc, then sl st into the next ch-2 corner space.
R5: Ch 3, dc in the same corner space, ch 2, 2 dc in the same corner space. Dc in each of the next 15 dc. [(2 dc, ch 2, 2 dc) in the next corner space, dc in each of the next 15 dc] × 3. Join with a sl st to the top of the beginning ch 3. (76 dc, 4 ch-2 corner spaces; 19 dc per side)
Sl st in the next dc, then sl st into the next ch-2 corner space.
R6: Ch 3, dc in the same corner space, ch 2, 2 dc in the same corner space. Dc in each of the next 19 dc. [(2 dc, ch 2, 2 dc) in the next corner space, dc in each of the next 19 dc] × 3. Join with a sl st to the top of the beginning ch 3. (92 dc, 4 ch-2 corner spaces; 23 dc per side)
Sl st in the next dc, then sl st into the next ch-2 corner space.
R7: Ch 3, dc in the same corner space, ch 2, 2 dc in the same corner space. Dc in each of the next 23 dc. [(2 dc, ch 2, 2 dc) in the next corner space, dc in each of the next 23 dc] × 3. Join with a sl st to the top of the beginning ch 3. (108 dc, 4 ch-2 corner spaces; 27 dc per side)
🧶 Checkpoint: The square should lie reasonably flat with four matching corner openings. Keep those openings visible when adding the narrow finishing edge.
Final square edging
Sl st in the next dc, then sl st into the next ch-2 corner space.
Edging round: Ch 1. Work sc, ch 2, sc in the starting corner space. Sc in each of the next 27 dc. [(Sc, ch 2, sc) in the next corner space, sc in each of the next 27 dc] × 3. Join with a sl st to the first sc. (116 sc, 4 ch-2 corner spaces)
Fasten off and weave in the ends.
Rust-orange fox head
The head starts as a flat half-double-crochet circle. Eight evenly spaced increases are added in each round, giving the face its broad rounded shape. The two ears are then worked directly from the upper edge, followed by one continuous single-crochet outline around the entire fox silhouette.
With rust-orange yarn, make a magic ring.
R1: Ch 1, work 8 hdc into the ring. Tighten the ring and join with a sl st to the first hdc. Do not turn. (8 hdc)
R2: Ch 1, work 2 hdc in each st around. Join with a sl st to the first hdc. (16 hdc)
R3: Ch 1, [hdc in the next st, 2 hdc in the next st] × 8. Join with a sl st to the first hdc. (24 hdc)
R4: Ch 1, [hdc in each of the next 2 sts, 2 hdc in the next st] × 8. Join with a sl st to the first hdc. (32 hdc)
R5: Ch 1, [hdc in each of the next 3 sts, 2 hdc in the next st] × 8. Join with a sl st to the first hdc. (40 hdc)
R6: Ch 1, [hdc in each of the next 4 sts, 2 hdc in the next st] × 8. Join with a sl st to the first hdc. (48 hdc)
R7: Ch 1, [hdc in each of the next 5 sts, 2 hdc in the next st] × 8. Join with a sl st to the first hdc. (56 hdc)
Fasten off. Lay the circle with the RS facing up and position the R7 join at the lower center. Count the R7 stitches clockwise beginning with the stitch immediately after the join.
Left pointed ear
With the RS facing, join rust-orange yarn to stitch 18 of R7.
Row 1: Ch 1, sc in the same st and in each of the next 8 sts through stitch 26. Turn. (9 sc)
Row 2: Ch 1, sc2tog, sc in each of the next 5 sts, sc2tog. Turn. (7 sc)
Row 3: Ch 1, sc2tog, sc in each of the next 3 sts, sc2tog. Turn. (5 sc)
Row 4: Ch 1, sc2tog, sc in the next st, sc2tog. Turn. (3 sc)
Row 5: Ch 1, sc3tog. (1 sc)
Fasten off.
Right pointed ear
With the RS facing, join rust-orange yarn to stitch 31 of R7.
Row 1: Ch 1, sc in the same st and in each of the next 8 sts through stitch 39. Turn. (9 sc)
Row 2: Ch 1, sc2tog, sc in each of the next 5 sts, sc2tog. Turn. (7 sc)
Row 3: Ch 1, sc2tog, sc in each of the next 3 sts, sc2tog. Turn. (5 sc)
Row 4: Ch 1, sc2tog, sc in the next st, sc2tog. Turn. (3 sc)
Row 5: Ch 1, sc3tog. (1 sc)
Fasten off.
Fox-head outer edging
With the RS facing, join rust-orange yarn in stitch 1 of R7 at the lower portion of the head.
Edging: Ch 1. Sc in R7 stitches 1 through 17. Work 1 sc into the end of each of Rows 1 through 4 up the first side of the left ear, 3 sc around the Row 5 tip, then 1 sc into the end of each of Rows 4 through 1 down the opposite side. Skip the nine R7 stitches covered by the ear base.
Sc in R7 stitches 27 through 30. Work 1 sc into the end of each of Rows 1 through 4 up the first side of the right ear, 3 sc around the Row 5 tip, then 1 sc into the end of each of Rows 4 through 1 down the opposite side. Skip the nine R7 stitches covered by the second ear base.
Sc in R7 stitches 40 through 56. Join with a sl st to the first edging sc. (60 sc)
Fasten off, leaving a long orange tail for attaching the head to the square.
🧶 Checkpoint: The seven face rounds should lie flat rather than ruffling. The final edging should create one continuous orange outline around both cheeks, both pointed ears, and the shallow dip between them.
Cream oval muzzle
The cream muzzle is made separately as a low horizontal oval.
With cream yarn, ch 6.
R1: Work 2 hdc in the second ch from the hook, hdc in each of the next 3 ch, and 4 hdc in the final ch. Rotate the foundation chain and work along the unused loops: hdc in each of the next 3 ch, then 2 hdc into the same foundation ch that contains the first 2 hdc. Join with a sl st to the first hdc. (14 hdc)
R2: Ch 1, 2 hdc in each of the first 2 sts, hdc in each of the next 3 sts, 2 hdc in each of the next 4 sts, hdc in each of the next 3 sts, then 2 hdc in each of the final 2 sts. Join with a sl st to the first hdc. (22 hdc)
R3: Ch 1, [hdc in the next st, 2 hdc in the next st] × 2, hdc in each of the next 3 sts, [hdc in the next st, 2 hdc in the next st] × 4, hdc in each of the next 3 sts, [hdc in the next st, 2 hdc in the next st] × 2. Join with a sl st to the first hdc. (30 hdc)
R4: Ch 1, sc in each st around. Join with a sl st to the first sc. (30 sc)
Fasten off, leaving a long cream tail for sewing.
The muzzle should be clearly wider than it is tall, with softly rounded ends and a narrow cream finishing edge.
Autumn leaves
Make four leaves with the same construction: two in mustard gold and two in rust orange.
Each leaf is worked around a short foundation chain. The stitches on the two sides radiate away from that chain, leaving the center slightly raised.
Ch 9.
R1: Starting in the second ch from the hook, sc in the next ch, hdc in the next ch, dc in the next ch, tr in each of the next 2 ch, dc in the next ch, hdc in the next ch. In the final ch work sc, ch 2, sc.
Rotate the work and continue along the unused loops on the opposite side of the foundation chain: hdc in the next ch, dc in the next ch, tr in each of the next 2 ch, dc in the next ch, hdc in the next ch, sc in the final ch. Join with a sl st to the first sc. (16 sts, 1 ch-2 tip space)
R2: Ch 1, sc in each of the first 8 sts, work sc, ch 2, sc in the ch-2 tip space, then sc in each of the remaining 8 sts. Join with a sl st to the first sc. (18 sc, 1 ch-2 tip space)
Fasten off, leaving a long tail for sewing.
The finished leaf should have a broad almond-like shape, one pointed end, a clearly visible center ridge, and a narrow outer sc edge.
Assembling the fox face
Complete the muzzle and black facial details before sewing the orange head to the square. This makes it easier to hide the embroidery ends behind the appliqué.
Lay the fox head with the RS facing up. Center the cream muzzle across the lower portion of the face. Keep its long axis horizontal and leave a narrow band of orange visible below the cream edge.
Using the cream tail, sew around the complete R4 muzzle edge with small relaxed whipstitches. The muzzle should sit slightly above the orange surface without pulling the face inward.
Add the eyes
Using black yarn, place one small vertical eye above each upper side of the muzzle. Keep the pair level and equally spaced from the vertical centerline.
Make each eye with two or three short stitches placed closely together to create a compact narrow oval.
Add the nose and mouth line
Center the black nose on the upper half of the cream muzzle. Use several short stitches to form a small inverted triangle.
From the lower point of the nose, make one short straight stitch downward. Keep this line narrow and stop before reaching the lower cream edge.
🧶 Watch for: Check the face before securing the black yarn. The eyes should sit just above the outside edges of the muzzle, while the nose and short mouth line remain on the vertical centerline.
Attach the fox to the square
Lay the sage square flat with the RS facing up. Position the fox centrally with both ear tips pointing toward the top edge.
The round lower portion of the face should occupy the center of the square while leaving a broad sage-green frame visible around it. Keep the ear tips well inside the outer border.
Align the dip between the ears with the square’s vertical centerline. The nose, mouth line, and lower center of the muzzle should follow the same line.
Using the long orange tail, sew through the final orange edging and the sage background with small whipstitches. Follow the full silhouette around the cheeks, ears, and center dip.
Keep the seam relaxed enough that the head retains a small amount of raised appliqué texture.
Attach the autumn leaves
Arrange the leaves in the four corner areas before sewing them down:
- Mustard-gold leaf at the upper-left
- Rust-orange leaf at the upper-right
- Rust-orange leaf at the lower-left
- Mustard-gold leaf at the lower-right
Angle each leaf along the diagonal running from the center of the square toward its corner. The pointed end should face the corresponding outer corner, while the broader end points generally toward the fox.
Keep each leaf comfortably inside the sage border. Do not cover the square’s corner opening, touch the fox head, or overlap another leaf.
For the lightly raised appearance, sew mainly along the center foundation-chain ridge. Add a small securing stitch near the broad end and another close to the pointed end, leaving most of the outer edges free.
🧶 Checkpoint: The four leaves should radiate diagonally outward toward the corners. Mustard sits on one diagonal and rust on the other, with visible sage crochet separating every leaf from the fox.
Finishing your woodland square
Weave all remaining tails into the wrong side, keeping them within matching-colored stitches whenever practical.
Light blocking helps the sage square settle evenly while preserving its small corner openings. Shape the background without stretching the fox or leaves.
If using cotton yarn, lightly dampen the square and smooth it into shape. Allow it to dry completely. If using steam, keep the heat suitable for the fiber and avoid pressing directly onto the appliqués.
The fox outline, cream muzzle, pointed ears, and leaf edges should retain a little natural relief rather than being pressed completely flat.
Troubleshooting
- The square cups upward: Keep every ch-2 corner relaxed and confirm that each structural round receives the complete corner increase.
- The outer corner openings disappear: Make sure the final edging uses sc, ch 2, sc in every corner space rather than filling the corner with solid stitches.
- The fox face ruffles: Recheck the half-double-crochet increases. Each round adds exactly 8 stitches, finishing with 56 hdc in R7.
- One ear differs noticeably from the other: Both ears must use the same 9, 7, 5, 3, 1 shaping sequence before the common outer edging is worked.
- The leaves sit at the wrong angle: Rotate each leaf so the pointed tip aims toward its outer corner and the broader end faces generally toward the center.
A few final details to check
- The sage square retains four small open corners after the finishing round.
- The fox face has seven flat concentric hdc rounds and one continuous sc outline around the cheeks and ears.
- The cream muzzle sits horizontally across the lower center of the face.
- Each leaf has a raised center ridge and points diagonally toward an outer corner.
- The mustard and rust leaves alternate diagonally around the fox.
Once the square is lightly blocked and the appliqués are secure, the rust-orange fox should sit clearly in the center with the four autumn leaves framing it from the corners. If you make this woodland square, feel free to share your finished version or leave a question if you need help with the ear shaping, leaf placement, or assembly.












