
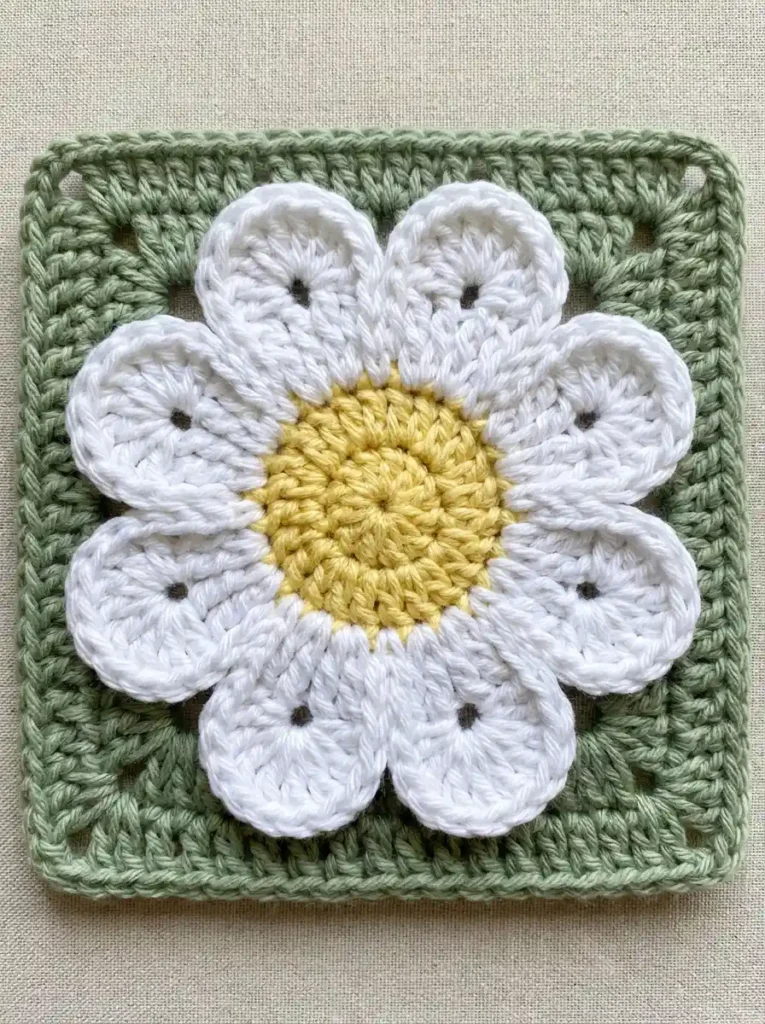
This daisy granny square coaster has a round butter-yellow center, exactly eight broad white petals with small openings, and a soft sage-green granny-square frame. The flower sits slightly above the green background, which gives the petals the dimensional look without requiring eight separately crocheted pieces.
The construction is worked from the center outward. The yellow circle is made first, the white petals are crocheted into the front loops of its final round, and the sage-green background is then worked into the unused back loops of that same yellow round. Using the front and back loops separately is important here because it keeps the petals raised while giving the green square its own secure foundation.
Project at a glance
| Skill level | Confident beginner to intermediate |
|---|---|
| Terminology | US crochet terms |
| Construction | Center-out, one-piece motif with raised integrated petals |
| Yarn | DK cotton or cotton blend |
| Hook | 3.5 mm, adjusted if needed for a firm, flat fabric |
Materials
- DK-weight cotton or cotton-blend yarn in butter yellow for the center
- DK-weight cotton or cotton-blend yarn in soft white for the petals
- DK-weight cotton or cotton-blend yarn in sage green for the square
- 3.5 mm crochet hook
- Yarn needle
- Scissors
- Blocking mat and pins, optional
You only need a small amount of each color. A smooth cotton yarn is especially useful for this motif because it keeps the petal edges crisp and gives the granny clusters enough definition to show clearly.
Stitches and abbreviations
- ch – chain
- sl st – slip stitch
- sc – single crochet
- hdc – half double crochet
- dc – double crochet
- st(s) – stitch(es)
- sp – space
- FLO – front loop only
- BLO – back loop only
- RS – right side
Before you start
Keep the RS facing throughout and do not turn between the full rounds. In the yellow center, beginning ch 1 does not count as a stitch. In the green granny rounds, beginning ch 3 counts as the first dc.
The yellow center finishes with 32 stitches. Think of those stitches as eight groups of four. Each white petal occupies one four-stitch group on the front-loop side. The untouched back loops remain available for the green transition round.
This front-loop/back-loop construction is what allows the petal edges to remain visibly independent. Avoid crocheting the green background through the white petal stitches themselves, because that would pull the petals flatter and make the flower look less dimensional.
Crochet pattern
Butter-yellow flower center
With yellow yarn, make an adjustable ring.
R1: Ch 1, work 8 sc into the ring. Pull the ring firmly closed and join with sl st to the first sc. (8 sc)
R2: Ch 1, work 2 hdc in each st around. Join with sl st to the first hdc. (16 hdc)
R3: Ch 1, [1 hdc in next st, 2 hdc in next st] × 8. Join with sl st to the first hdc. (24 hdc)
R4: Ch 1, [1 hdc in each of next 2 sts, 2 hdc in next st] × 8. Join with sl st to the first hdc. (32 hdc)
Fasten off yellow. The center should be round and flat, with a compact middle and a smooth outer edge. Do not block it yet.
Eight soft rounded white petals
The petals are worked directly into the front loops only of R4. Leave every back loop untouched for the sage-green background.
With the RS facing, join white yarn with a sl st in the FLO of any stitch of R4. Treat this as stitch 1 of the first four-stitch petal group.
Petal 1: Ch 7. Skip the next 2 yellow stitches and sl st in the FLO of the following stitch. The chain now forms an arch from the first stitch of the four-stitch group to the fourth stitch.
Working around the ch-7 arch and moving back toward the first anchor, work 2 sc, 3 hdc, 5 dc, 3 hdc, 2 sc around the chain. Slide the stitches gently along the arch while you work so the five dc sit around the broad outer curve rather than bunching along one side.
Sl st into the FLO of the original petal anchor. (15 body sts around the petal arch)
To move to the next petal, sl st through the FLO of the next 4 yellow stitches. The fourth of those slip stitches becomes the starting anchor for the next petal.
Petals 2–7: Repeat the same petal sequence six more times:
Ch 7, skip the next 2 yellow sts, sl st in FLO of the following st; work 2 sc, 3 hdc, 5 dc, 3 hdc, 2 sc around the ch-7 arch; sl st back into the petal’s first anchor; then sl st through the FLO of the next 4 yellow sts to reach the beginning of the following group.
Petal 8: Work the same ch-7 arch and the same 15 stitches around it. Sl st into its first anchor. To finish, sl st through the FLO of the remaining 3 yellow stitches and join with sl st to the original white joining stitch.
Fasten off white. (8 petals, 15 body sts per petal)
🧶 Checkpoint: You should have exactly eight broad petals. Each petal should have a small opening inside its upper half, a rounded outer edge, and a narrower base where it meets the yellow center. Gently slide the stitches around each chain arch until the openings look balanced before starting the green section.
The petals should overlap their neighbors slightly along the lower side edges. That small amount of overlap helps produce the full daisy shape, but the tips and the little openings should still be individually visible.
Sage-green transition behind the petals
Turn the petals gently forward so you can see the unused back loops of yellow R4. The green yarn is worked into those back loops, behind the white flower.
Choose a back loop positioned close to a gap between two petal bases and join sage green there.
Green R1: Ch 3, work 2 dc in the same BLO, ch 2, skip the next 3 back loops. [Work 3 dc in the next BLO, ch 2, skip the next 3 back loops] × 7. Join with sl st to the top of the beginning ch 3. (8 clusters, 8 ch-2 spaces)
The eight green clusters form a support ring behind the flower. Most of this round will be partially hidden by the raised petals, while the chain spaces create the small open areas between the petals and the square.
Turn the green ring into a square
Sl st across the first cluster and into the next ch-2 space. This becomes Corner 1. Every other ch-2 space will be a corner.
Green R2: In the first ch-2 space, ch 3, 2 dc, ch 2, 3 dc. Ch 1, work 3 dc in the next ch-2 space, ch 1.
[Work 3 dc, ch 2, 3 dc in the next ch-2 space, ch 1; work 3 dc in the following ch-2 space, ch 1] × 3.
Join with sl st to the top of the beginning ch 3. (12 clusters, 8 ch-1 side spaces, 4 ch-2 corner spaces)
You should now have four clearly defined corners. Each side has one center cluster between its two corner groups.
Build the visible granny-square frame
Sl st across the stitches of the first corner cluster until you reach the next ch-2 corner space.
Green R3: In the corner space, ch 3, 2 dc, ch 2, 3 dc.
Ch 1, work 3 dc in the next ch-1 space, ch 1, work 3 dc in the following ch-1 space, ch 1.
In the next corner space work 3 dc, ch 2, 3 dc.
Continue around in the same manner, placing one 3-dc cluster in every ch-1 side space, ch 1 between neighboring clusters, and 3 dc, ch 2, 3 dc in every corner.
Join with sl st to the top of the beginning ch 3. (16 clusters, 12 ch-1 side spaces, 4 ch-2 corner spaces)
This round forms the main visible sage-green frame. Each side should now have two ordinary side clusters between the corner groups, with the raised white petals sitting inside rather than being trapped beneath the green stitches.
🧶 Checkpoint: Lay the motif flat before adding the border. All four sides should be approximately equal, the four corner openings should match, and the flower should remain centered with the eight petals free to sit slightly above the green frame.
Finish with the narrow sage-green border
Keep the green yarn attached.
Green R4: Ch 1. Work 1 sc in each dc and 1 sc in each ch-1 side space. In each ch-2 corner space work 2 sc, ch 1, 2 sc.
Continue around all four sides and join with sl st to the first sc. (76 sc, 4 ch-1 corner spaces)
Fasten off and weave in the green end securely on the back.
Shape and finish the coaster
Weave the yellow and white ends into the back of the motif without pulling them so tightly that the center puckers. Keep the white tail away from the upper edges of the petals so the rounded outlines remain flexible.
Shape the petals individually with your fingers. Push the tallest stitches toward the outside curve and arrange the shorter stitches closer to the base. The petals should look broadly oval rather than narrow or pointed.
The small opening in each petal is part of the design. If an opening has become hidden, gently spread the stitches along its chain arch instead of stretching the whole petal.
Light blocking will straighten the green frame while preserving the flower’s raised texture. Pin the four green corners first, straighten each side, and then arrange the petals without pinning them completely flat. Allow the motif to dry before removing the pins.
Troubleshooting
- The petal holes are too large: your ch-7 arches may be loose. Make the chains slightly firmer, or use ch 6 for the petal arch while keeping the rest of the petal sequence unchanged.
- The petals look narrow or pointed: slide more of the five dc toward the outer middle of each arch and spread the hdc gradually toward the sides. The stitch distribution, not extra stitches, creates the rounded end.
- The petals lie completely flat: check that the white yarn was worked only through the front loops and the green yarn only through the unused back loops of yellow R4.
- The green square twists around the flower: Green R1 must contain exactly eight evenly spaced clusters. Each cluster uses one back loop followed by three skipped back loops.
- The corners pull upward: loosen the ch-2 corner spaces in the granny rounds. Tight corner chains prevent the square from spreading evenly.
Optional larger version
If you want a larger square, add one more sage-green granny round before the single-crochet edging. In every corner work 3 dc, ch 2, 3 dc. Work one 3-dc cluster in every ch-1 side space, with ch 1 between neighboring clusters. Then add the same narrow sc border around the new outer round.
For the compact flower-to-frame proportions of this coaster, keep the extra green area modest. Adding several additional granny rounds will produce a usable square, but the daisy will look proportionally smaller.
Final shape check
- The butter-yellow center lies flat and has a compact middle.
- There are exactly eight broad white petals with eight small visible openings.
- The petals sit slightly above the green background rather than being stitched flat into it.
- The sage-green frame has four matching open corners and even granny clusters.
- The narrow final border follows the entire square without hiding the corner openings.
After a light block and a little finger-shaping, the finished motif should have a full eight-petal daisy centered over a neat sage-green square, with the petals remaining soft, rounded, and gently raised. If you make one, feel free to share your finished coaster or leave a question if you get stuck on the petal construction.












