
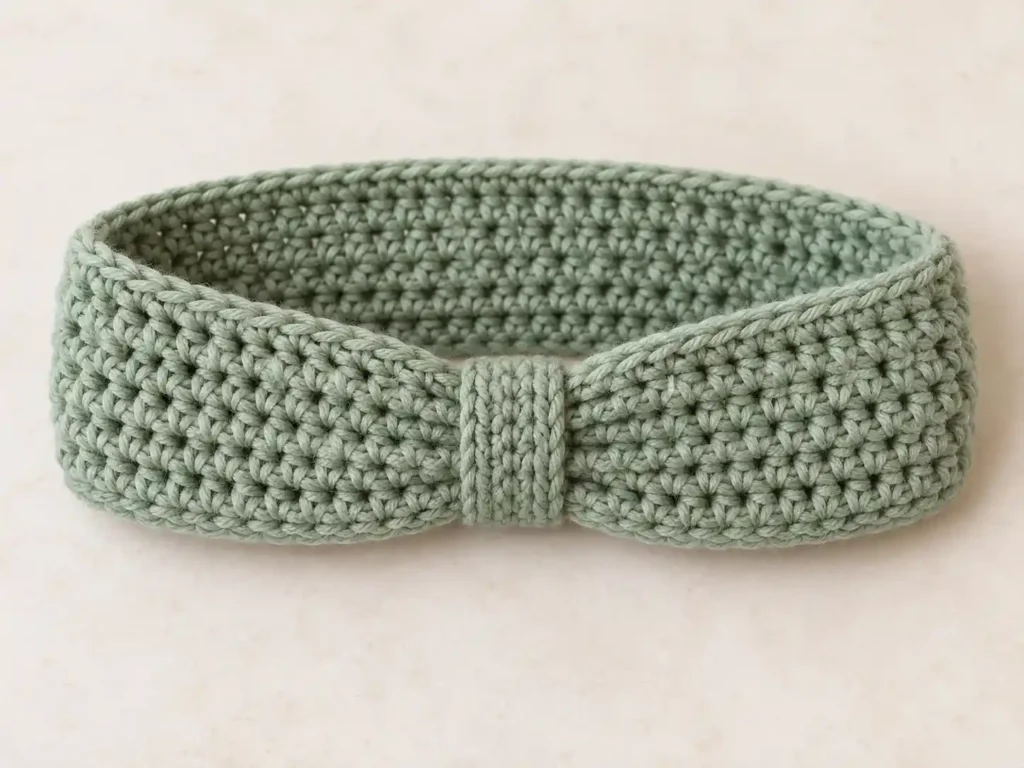
This crochet woven stitch band has a dense pebbled texture, two slim chain-like finished edges, and a narrow ribbed center wrap that gently pulls the front into a soft bow-like shape without creating a bulky knot. The center detail covers the joining seam, so the finished headband looks clean from the front while remaining simple to construct.
The main band is worked lengthwise in only seven rows. A compact paired-stitch repeat creates the small textured motifs across the fabric, the short ends are joined into a loop, and loose slip-stitch edging produces the narrow raised lines along the upper and lower edges. The center wrap is crocheted separately in back-loop single crochet and sewn around the gathered seam.
Project at a glance
| Skill level | Easy |
|---|---|
| Terminology | US crochet terms |
| Construction | Lengthwise rectangle, seamed loop, slip-stitch edging, separate center wrap |
| Yarn | Smooth worsted weight #4 |
| Hook | 4.5 mm crochet hook |
| Main texture | Dense paired single crochet and double crochet repeat |
The 82-chain foundation below is a useful adult-size starting point, but the exact circumference depends on yarn, hook, and tension. Before beginning the first row, wrap the foundation chain around the intended wearer’s head. It should meet with a little stretch rather than hanging loosely.
Materials
- Smooth worsted weight #4 yarn in soft sage green or another solid color
- 4.5 mm crochet hook
- Yarn needle
- Scissors
- Stitch marker, optional
Choose a smooth, well-plied yarn with clear stitch definition. Cotton blends, soft acrylic, and similar worsted-weight yarns work well because the small paired stitches remain visible without becoming stiff.
The fabric should feel substantial but flexible. If the stitches are very loose and the openings between them become obvious, move down a hook size. If the band feels rigid and difficult to gather at the center, move up slightly.
Stitches and abbreviations
- ch — chain
- sc — single crochet
- dc — double crochet
- sl st — slip stitch
- st — stitch
- sts — stitches
- BLO — back loop only
- RS — right side
- WS — wrong side
Woven texture repeat: Work 1 sc and 1 dc into the same stitch, skip the next stitch, and repeat. The short and tall stitches sharing one insertion point create the compact clustered texture seen across the band.
Before you start
The foundation chain runs around the circumference of the headband. You will then crochet only seven rows to create the width. This construction keeps the visible texture running lengthwise across the finished band.
The woven repeat is worked over pairs of stitches. Every main row contains 81 stitches: 40 paired groups plus one final single crochet. Keep the skipped stitches directly beneath the paired groups rather than accidentally working into them.
🧶 Crochet Tip: Check the foundation-chain fit before Row 1. If you need to change the circumference, add or remove chains in multiples of 2. Keep the chain comfortably relaxed so the lower edge does not become tighter than the rest of the band.
Crochet pattern
Main woven-texture band
Ch 82.
Row 1: Work 1 sc and 1 dc in the 2nd ch from the hook. Skip the next ch. [(Sc, dc) in the next ch, skip the next ch] × 39. Sc in the final ch. Turn. (81 sts)
Row 2: Ch 1; the turning chain does not count as a stitch. Work (sc, dc) in the first st. Skip the next st. [(Sc, dc) in the next st, skip the next st] × 39. Sc in the final st. Turn. (81 sts)
Row 3: Repeat Row 2. (81 sts)
Row 4: Repeat Row 2. (81 sts)
Row 5: Repeat Row 2. (81 sts)
Row 6: Repeat Row 2. (81 sts)
Row 7: Repeat Row 2. Do not turn after completing the row. (81 sts)
Fasten off, leaving a long tail for joining.
🧶 Checkpoint: You should now have one long, narrow rectangle with seven clearly visible textured rows. The small paired stitch groups should form a dense repeating surface, while both short ends remain straight enough to align cleanly.
Join the short ends
Lay the rectangle flat and make sure it is not twisted. Bring the two short ends together with the RS remaining on the outside of the finished loop.
Match the seven rows carefully so Row 1 aligns with Row 1, Row 2 with Row 2, and so on through Row 7.
Thread the long yarn tail onto a yarn needle. Whip stitch through corresponding edge loops across the entire width of the band. Keep the seam firm and flat rather than pulling it tightly into a ridge.
Secure the tail on the WS and weave it in. The seam will later sit beneath the center wrap, so position this joined section at the front center of the headband.
Add the foundation-edge slip-stitch line
The finished band has a narrow chain-like line running along each long edge. Use loose slip stitches for this detail so the edging stays slim and does not add another bulky row.
With the RS facing you, join yarn beside the seam on the foundation-chain edge.
Edging Round 1: Ch 1. Working around the complete loop, sl st loosely into the remaining loop of each of the 81 foundation chains that support Row 1. Join with a sl st to the first edging stitch. (81 sl sts)
Fasten off and weave in the ends.
Add the upper slip-stitch line
Join yarn beside the seam on the Row 7 edge.
Edging Round 2: Ch 1. Sl st loosely into the back loop of each st around Row 7. Join with a sl st to the first edging stitch. (81 sl sts)
Fasten off and weave in the ends.
The two edges should now show slim, smooth chain-like ridges rather than wide borders. They define the band without hiding the seven main textured rows.
🧶 Watch for: Slip stitches can tighten dramatically. Keep the working loop slightly taller than usual and check the band after every few inches. If the edge begins pulling inward, undo that section and remake the slip stitches more loosely.
Crochet the ribbed center wrap
The small center wrap is made separately. Back-loop single crochet produces the narrow raised lines that run vertically across the front of the finished center section.
Ch 22.
Row 1: Sc in the 2nd ch from the hook and in each ch across. Turn. (21 sc)
Row 2: Ch 1, sc BLO in each st across. Turn. (21 sc)
Row 3: Ch 1, sc BLO in each st across. Turn. (21 sc)
Row 4: Ch 1, sc BLO in each st across. Turn. (21 sc)
Row 5: Ch 1, sc BLO in each st across. Turn. (21 sc)
Row 6: Ch 1, sc BLO in each st across. Do not turn. (21 sc)
Fasten off, leaving a long tail for sewing.
The finished piece should be a long, narrow ribbed rectangle. Its 21-stitch length wraps vertically around the gathered headband, while the six rows create the narrow visible width of the center band.
Shape and attach the center wrap
Move the main joining seam to the exact front center of the headband. The center wrap will sit directly over this seam.
Hold the headband with the upper and lower edged sides aligned. At the seam, gently bring the upper and lower edges toward the middle. Do not make several hard accordion folds. The goal is one smooth compressed center with the wider fabric on either side sloping naturally inward.
Place the ribbed rectangle over the front of the gathered section with its long rows running vertically from the upper edge toward the lower edge. The raised BLO lines should therefore also appear vertical across the front.
Take the two ends of the wrap over the upper and lower edges and around to the inside of the band. Pull the wrap snugly enough to hold the center narrow without crushing the surrounding crochet.
Overlap the wrap ends slightly on the inside. Using the long yarn tail, sew the overlapping ends together securely.
Add two or three small anchoring stitches through the back of the center wrap and directly into the hidden main-band seam. Keep these stitches on the inside so the front remains clean.
🧶 Checkpoint: From the front, the center wrap should form one narrow vertical rectangle reaching from the upper edge to the lower edge. The two sides of the headband should curve gently into the center without deep pleats or a bulky twisted knot.
Finishing the band
Weave all remaining yarn ends securely into the WS. Because a headband stretches during wear, weave each tail through several stitches, change direction once, and then trim.
Shape the band gently by hand. The seven textured rows should remain full through the sides, while the center wrap holds only the seam area in a narrower shape.
If your yarn benefits from blocking, lightly dampen or steam the wide sections without pressing the fabric flat. Avoid flattening the ribbed center wrap because its raised texture is part of the finished look.
Adjusting the fit
To change the circumference while preserving the same appearance, adjust the starting chain by multiples of 2. The seven main rows, seam, edging, and center-wrap construction can remain unchanged.
Make the foundation chain slightly shorter than the wearer’s head circumference because the textured fabric stretches. How much negative ease you need depends on the yarn: springy acrylic can stretch more comfortably than firm cotton.
If you change the starting-chain count, keep the woven repeat consistent: work (sc, dc) into one chain, skip the next chain, and continue across, finishing with one sc in the last chain. Each following row is worked in the same paired-stitch arrangement.
Troubleshooting
- The texture looks too open: the hook is probably too large or the stitches are too loose. Move down slightly in hook size while keeping enough flexibility for the center gather.
- The rows are drifting sideways: check that every paired sc and dc is worked into one stitch and that the following stitch is skipped completely.
- The edges curl inward: the slip-stitch edging is too tight. Rework it with taller, looser working loops.
- The center looks like a hard knot: release the wrap and gather the main band more gently. Bring only the upper and lower edges inward rather than folding the fabric several times.
- The wrap shifts away from the center: add two or three hidden anchoring stitches through its back and into the main seam underneath.
Final project check
- The main body has seven dense textured rows running around the circumference.
- A separate slim chain-like slip-stitch line finishes both long edges.
- The short-end seam sits beneath the center wrap rather than remaining visible.
- The wrap shows narrow vertical ribbing across its front.
- The center is smoothly narrowed while the two side sections remain wide and softly curved.
The finished woven stitch band should feel simple and wearable while still having a distinct polished center detail. If you make one, share your finished version or leave a question if you need help with the stitch repeat, edging, or center wrap.












