
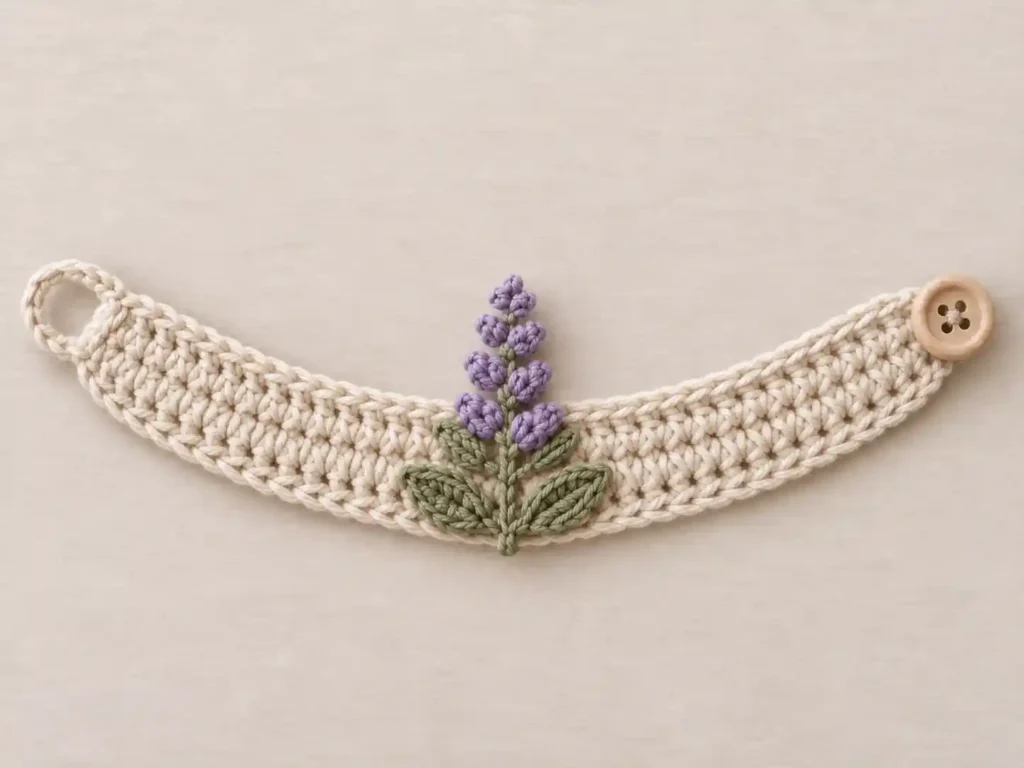
This cottage-style crochet bracelet has a softly curved cream band, four sage-green leaves, and a dimensional lavender sprig rising from the center. Seven individual lavender buds create the flower spike, with three paired levels and one smaller bud at the top.
The cream bracelet is worked in gradually shortened half-double-crochet rows. This makes the middle of the bracelet broad enough to support the botanical decoration while allowing both ends to taper naturally toward the button-and-loop closure. A separate single-crochet edging gives the entire band the clean braided outline visible around the finished piece.
Project at a glance
| Skill level | Confident beginner |
|---|---|
| Terminology | US crochet terms |
| Construction | Shaped flat band with separately crocheted botanical appliqué |
| Main stitches | ch, sl st, sc, hdc, puff |
| Yarn | Smooth DK-weight cotton or cotton blend |
| Hook | 3.25–3.5 mm |
Materials
- DK-weight smooth cotton or cotton-blend yarn in warm cream, ivory, or oatmeal for the bracelet band
- Small amount of muted sage or olive-green DK yarn for the stem and leaves
- Small amount of dusty lavender or soft lilac DK yarn for the flower buds
- 3.25–3.5 mm crochet hook
- One small round four-hole natural wooden button
- Yarn needle
- Scissors
- Optional removable stitch markers
A smooth, softly twisted yarn works best because the individual stitches remain visible in such a small project. Avoid fuzzy yarn for the leaves and flowers; it can hide the center ridge of each leaf and blur the rounded shape of the lavender buds.
The button is a functional part of the bracelet closure. If the bracelet is intended for a young child, treat the button as a small removable part.
Stitches and abbreviations
- ch – chain
- sl st – slip stitch
- sc – single crochet
- hdc – half-double crochet
- st(s) – stitch(es)
- MR – magic ring
- RS – right side
- WS – wrong side
3-loop puff
Yarn over, insert the hook into the indicated ring, yarn over and pull up a loop to approximately hdc height. Repeat this two more times in the same place. You will have 7 loops on the hook. Yarn over and pull through all 7 loops, then ch 1 to close the puff.
2-loop puff
Yarn over, insert the hook into the indicated ring, yarn over and pull up a loop. Repeat once more in the same place. You will have 5 loops on the hook. Yarn over and pull through all 5 loops, then ch 1 to close the puff.
The 3-loop puff is used for the six fuller lavender buds. The smaller 2-loop puff is used only for the terminal bud at the top of the sprig.
Before you start
The bracelet begins along its longer outer edge. Each following row is two stitches shorter than the row below it: one stitch is removed from each end. This creates the tapered ends and makes the upper edge shorter than the lower edge, encouraging the band to settle into a gentle crescent rather than a plain rectangle.
The turning ch 1 does not count as a stitch. At the beginning of shortened Rows 2–5, the slip stitch simply moves the working yarn one stitch inward and does not count toward the hdc total.
The instructions use ch 34 for the foundation. Check the length against the intended wrist after Row 1. If you adjust the starting chain, keep an odd number of hdc stitches in Row 1 so the center of the band remains easy to identify.
🧶 Crochet Tip: Keep the foundation chain relaxed. It forms the longer outside edge of the bracelet, so a tight foundation will make the band curl more sharply than intended.
Crochet pattern
Shaped cream bracelet band
With cream yarn, ch 34.
Row 1: Hdc in the 2nd ch from the hook and in each ch across. Ch 1, turn. (33 hdc)
Row 2: Sl st in the first hdc to move one stitch inward. Ch 1. Hdc in each of the next 31 sts. Leave the final hdc unworked. Ch 1, turn. (31 hdc)
Row 3: Sl st in the first hdc. Ch 1. Hdc in each of the next 29 sts. Leave the final hdc unworked. Ch 1, turn. (29 hdc)
Row 4: Sl st in the first hdc. Ch 1. Hdc in each of the next 27 sts. Leave the final hdc unworked. Ch 1, turn. (27 hdc)
Row 5: Sl st in the first hdc. Ch 1. Hdc in each of the next 25 sts. Leave the final hdc unworked. (25 hdc)
Fasten off.
The center of the band should now be about five hdc rows deep. At each end, the successive shortened rows should form four small steps leading from the long foundation edge toward the shorter Row 5 edge.
🧶 Checkpoint: Lay the band flat before edging it. Both ends should taper at approximately the same angle, while the deepest section remains centered. Small staircase edges are expected; the border will smooth them into the finished outline.
Single-crochet outer edging
With the RS facing, join cream yarn at one end of the long foundation edge.
Border R1: Work 1 sc into each of the 33 foundation stitches along the long outer edge. Continue around the first tapered end, placing 1 sc into each of the 5 visible hdc row-end spaces and 1 sc into each of the 4 horizontal step sections between those rows. Work 1 sc in each of the 25 hdc across Row 5. Work around the second tapered end in the same manner: 1 sc in each of the 5 row-end spaces and 1 sc in each of the 4 horizontal step sections. Join with a sl st to the first sc. (76 sc)
Fasten off and weave in the tail.
The edging should form one continuous narrow chain-like outline around the entire cream band. Do not add extra stitches at the tapered ends unless your personal tension requires it; too many stitches will make those ends flare.
Button loop
At one tapered end, locate the middle two border stitches along the sloping end edge.
Join cream yarn with a sl st in the first middle stitch. Ch 12, then sl st into the second middle stitch to form the loop. (12 ch)
Fasten off securely.
Test the loop around the wooden button before fully weaving in the ends. It should slide over the button with a small amount of stretch without hanging loosely. Add or remove one or two chains if your particular button requires it.
Green central stem
With sage-green yarn, ch 18.
Stem Row 1: Sl st in the 2nd ch from the hook and in each remaining ch across. (17 sl sts)
Fasten off, leaving a long tail for sewing.
Keep these slip stitches relaxed enough that the cord stays straight. The finished stem should show a clear chain-like ridge rather than twisting into a tight spiral.
Large leaves
Make 2 in sage green.
Ch 7.
Leaf R1: Beginning in the 2nd ch from the hook, sl st in the first ch, sc in the next ch, hdc in the next ch, hdc in the next ch, hdc in the next ch, then work sc, ch 1, sc into the final ch. Rotate the work and continue along the unused loops on the opposite side of the foundation chain: hdc in the next ch, hdc in the next ch, hdc in the next ch, sc in the next ch, sl st in the final ch. Join with a sl st at the base. (12 sts, 1 ch-1 tip)
Fasten off, leaving a sewing tail.
Gently shape the leaf so the original foundation chain remains visible as a raised center ridge. The outside stitch tops should form a clear braided-looking outline around the almond-shaped leaf.
Small leaves
Make 2 in sage green.
Ch 5.
Leaf R1: Beginning in the 2nd ch from the hook, sl st in the first ch, sc in the next ch, hdc in the next ch, then work sc, ch 1, sc into the final ch. Rotate to work along the opposite side of the foundation chain. Hdc in the next ch, sc in the next ch, sl st in the final ch. Join with a sl st at the base. (8 sts, 1 ch-1 tip)
Fasten off, leaving a sewing tail.
The small pair should repeat the same pointed almond silhouette as the lower leaves but at a noticeably smaller scale.
Full lavender flower buds
Make 6 in dusty lavender.
Bud R1: Make an MR. Ch 1. Work [3-loop puff in the ring, sl st in the ring] × 3. Pull the MR firmly closed. (3 puffs)
Fasten off, leaving a sewing tail.
Gently cup the three puffs toward one another instead of spreading them flat. Each finished piece should resemble a small rounded three-lobed lavender bud.
Small terminal lavender bud
Make 1 in dusty lavender.
Bud R1: Make an MR. Ch 1. Work [2-loop puff in the ring, sl st in the ring] × 3. Pull the MR firmly closed. (3 small puffs)
Fasten off, leaving a sewing tail.
This smaller bud is used at the very top of the flower spike and creates the slight taper visible at the tip.
Assemble the botanical motif
Place the bracelet RS up with the longer curved edge at the bottom and the shorter edge at the top. Mark the midpoint of the band.
Attach the stem
Center the green stem vertically on the bracelet. Its bottom tip should meet the middle of the lower cream edging. Run the stem upward through the center of the band and allow its upper section to extend beyond the top cream edge.
Sew the portion lying over the bracelet securely through the WS with the long green tail. Use small stitches that disappear between the stem stitches. Leave the upper flowering portion free rather than sewing it directly to the background.
Allow a short rounded green stem tip to remain visible at the bottom center beneath the leaf bases.
Attach the two large leaves
Place one large leaf on each side of the lower stem. Angle the left leaf toward the lower left and the right leaf toward the lower right, forming a broad V.
The leaf bases should meet close to the stem at approximately the same height. Keep the foundation-chain ridge facing upward.
Secure each leaf at its base first. Then make two or three discreet stitches through the raised center chain and into the cream bracelet. Leave most of the outer edge free so the leaf retains the slight three-dimensional lift seen in the finished motif.
Attach the two small leaves
Place one small leaf above each large leaf, close to the central stem. Angle them upward and outward, but keep their tips inside the width established by the larger pair.
Sew each small leaf through its base and center ridge. The small leaves should sit slightly behind the lowest lavender flowers rather than covering them.
🧶 Checkpoint: Before adding the flowers, the greenery should form four clearly separate leaves: two broad lower leaves and two smaller leaves immediately above them. A narrow section of stem should remain visible through the center.
Attach the seven lavender buds
The lavender spike uses the six full-size buds as three paired levels, followed by the single smaller terminal bud.
- Place two full-size buds immediately above the small leaves, one on the left side of the stem and one on the right. These form the widest flower pair.
- Place another pair slightly higher on the stem. Bring them a little closer together than the first pair.
- Place the final two full-size buds above the second pair. Keep these closer to the stem again so the flower spike narrows toward its tip.
- Center the single smaller terminal bud at the very top of the stem.
Leave short sections of green stem visible between the paired levels. The lavender should look like separate rounded buds growing along one central stem rather than one continuous purple mass.
Sew each flower through its lower back and into the green stem with its lavender tail. Two or three secure stitches are enough. Do not sew through the outer puff loops; leaving them free preserves their plump rounded shape.
The lowest pair should sit near the upper edge of the cream band. Most of the remaining flower spike should extend freely above the bracelet, giving the finished piece its distinctive vertical lavender silhouette.
Add the wooden button
Place the four-hole wooden button on the tapered end opposite the chain loop. Position it on the RS, slightly inward from the cream edging so the stitches beneath it provide a firm base.
Thread a yarn needle with cream yarn or strong matching thread. Sew diagonally through one pair of opposite holes several times, then through the second diagonal pair so the thread forms a small X across the face of the button.
Pass through several different crochet stitches on the WS rather than repeatedly pulling against a single stitch. Secure firmly and weave in the ends without tightening enough to pucker the end of the bracelet.
Finishing the bracelet
Weave in all remaining yarn tails on the WS. For the green and lavender pieces, change direction once while weaving so the small appliqué components remain securely attached during wear.
If the cream band needs shaping, lightly dampen it and arrange it into a shallow symmetrical crescent. Smooth both tapered ends and allow the bracelet to dry flat.
Do not press the lavender flowers flat. The three-puff construction is intended to remain dimensional. The leaf edges may also lift very slightly from the bracelet while their center ridges stay secured.
Troubleshooting
- The bracelet is too wide through the center: Make sure only five hdc rows were worked. Adding another shortened row noticeably increases the depth of this small band.
- One end tapers differently from the other: Recheck the hdc totals. They should decrease evenly from 33 to 31, 29, 27, and 25 stitches.
- The edging does not lie flat: Check the tapered ends carefully. Each end uses five row-end stitches and four stitches across the small horizontal steps, for nine edging stitches on each side.
- The leaves look flat and featureless: Keep the original foundation chain facing upward and sew mainly through that center ridge instead of stitching around the entire outside edge.
- The lavender buds look like flat flowers: Do not spread the three puffs apart. Cup them gently toward the center and secure each bud only through its lower back.
- The lavender spike looks too wide at the top: Move each successive pair slightly closer to the stem and use the smaller 2-loop-puff bud for the terminal flower.
Adjusting the fit
Change the bracelet length at the foundation chain rather than altering the botanical motif. Add or remove an even number of foundation chains so Row 1 still contains an odd number of hdc stitches.
After adjusting Row 1, shorten each following row by exactly two stitches: one stitch at each end. For example, if your first row contains 35 hdc, the following rows should contain 33, 31, 29, and 27 hdc.
Keep the bracelet five hdc rows deep so the central proportions remain similar. Center the completed four-leaf, seven-bud lavender sprig on the finished band before sewing it down.
If you change the button size, adjust only the chain loop. The loop should stretch over the button comfortably and then close around its base without excess slack.
The finished bracelet should have five visible rows through the cream center, a narrow cream edging, two tapered closure ends, four distinct sage leaves, six full lavender buds, and one slightly smaller terminal bud. The raised flower spike and leaf ridges give the small bracelet its soft cottage-style texture without making the construction unnecessarily complicated.
If you make your own bracelet, feel free to share the finished result or leave a question if you need help with the shaping or appliqué placement.












