
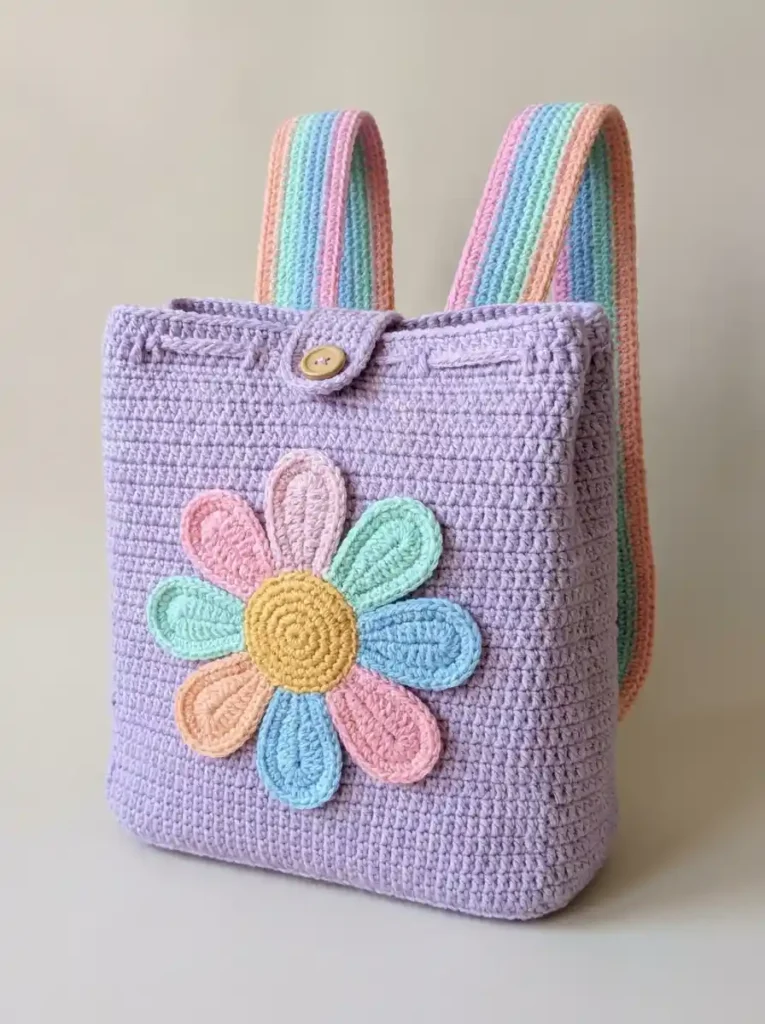
This pastel rainbow daisy backpack is a cheerful handmade crochet bag with a structured shape, colorful striped straps, and a large daisy appliqué that makes the design instantly recognizable. The backpack is built with sturdy crochet fabric, a simple gusset for depth, and reinforced attachments so it works as a practical everyday bag.
The bag uses basic crochet stitches with simple shaping. The main body is made from matching front and back panels joined with a bottom and side gusset, while the flower and straps are added afterward. The result is a soft but stable crochet backpack with a cute pastel rainbow style.
In this pattern
Project at a glance
| Item | Details |
|---|---|
| Skill level | Easy to intermediate |
| Construction | Two panels with a crochet gusset, flap, straps, and flower appliqué |
| Terms | US crochet terminology |
Materials
- Medium-weight cotton or acrylic blend yarn.
- 5 mm crochet hook or a size that creates firm fabric.
- Lavender yarn for the backpack body.
- Pastel pink, mint, blue, and peach yarn for rainbow strap stripes.
- Pastel pink, mint, blue, peach, and lavender yarn for flower petals.
- Yellow yarn for the flower center.
- Yarn needle.
- Scissors.
- Stitch markers.
- One small button for the flap closure.
🧶 Crochet Tip: Use a hook size that creates a dense fabric. A backpack needs firm stitches so the body keeps its shape instead of stretching like a loose tote.
Stitches and abbreviations
- ch — chain
- sc — single crochet
- hdc — half double crochet
- dc — double crochet
- sl st — slip stitch
- st — stitch
- sc2tog — single crochet two stitches together
Before you start
The backpack body is worked in rows. The turning chain does not count as a stitch. Keep your tension consistent because matching panels will create the cleanest finished shape.
The front and back panels are made separately, then connected with a side and bottom gusset that gives the backpack its depth.
Crochet pattern
Front and back backpack panels (make 2)
With lavender yarn, ch 46.
Row 1: Sc in 2nd ch from hook and across. (45 sts)
Row 2: Ch 1, turn. Sc across. (45 sts)
Rows 3–42: Repeat Row 2. Fasten off after Row 42.
Make a second identical panel.
Side and bottom gusset
With lavender yarn, ch 11.
Row 1: Sc in 2nd ch from hook and across. (10 sts)
Rows 2–80: Ch 1, turn. Sc across. (10 sts)
Fasten off.
This long narrow strip creates the bottom and side depth of the backpack.
Front flap
With lavender yarn, ch 43.
Row 1: Sc in 2nd ch from hook and across. (42 sts)
Rows 2–10: Ch 1, turn. Sc across. (42 sts)
Row 11: Ch 1, turn. Sc2tog, sc across until 2 stitches remain, sc2tog. (40 sts)
Row 12: Ch 1, turn. Sc across. (40 sts)
Fasten off.
Rainbow backpack straps (make 2)
Each strap is worked in narrow rows with pastel stripes.
With lavender yarn, ch 8.
Row 1: Sc in 2nd ch from hook and across. (7 sts)
Rows 2–10: Lavender sc rows.
Change colors every 5 rows using this sequence:
- Lavender
- Pink
- Mint
- Blue
- Peach
- Lavender
Continue until the strap measures approximately the height needed to sit comfortably over the shoulders.
Make the second strap identical.
Daisy flower center
Use yellow yarn.
R1: Make a magic ring. Ch 1, work 12 sc into the ring. Join with a sl st. (12 sts)
R2: Ch 1. Work 2 sc in each stitch around. Join with a sl st. (24 sts)
Fasten off and leave a long sewing tail.
Daisy petals (make 8)
Make eight rounded petals using pastel pink, mint, blue, peach, and lavender yarn. The petals are worked separately and sewn around the yellow center to create the raised flower detail.
With one petal color, ch 8.
R1: Sc in 2nd ch from hook, hdc in next stitch, 2 dc in next stitch, 3 dc in next stitch, 2 dc in next stitch, hdc in next stitch, sc in last stitch. Working around the opposite side of the foundation chain, repeat the same stitch sequence back along the chain. Join with a sl st. (18 sts)
R2: Ch 1. Sc evenly around the entire petal edge, placing 2 sc at each rounded end to maintain the oval shape. Join with a sl st.
Fasten off and leave a sewing tail.
Repeat until you have eight petals.
🧶 Checkpoint: Arrange all petals around the yellow center before sewing. The petals should create a balanced eight-point flower with similar spacing around the center.
Attach the daisy
Place the yellow flower center over the inner ends of the petals. Sew the center securely while catching each petal underneath so the flower becomes one stable appliqué piece.
Position the finished daisy in the middle of the front backpack panel. Leave an even lavender border around the flower so it remains clearly visible.
Assembly
Join the backpack panels
Place the front and back panels together with the right sides facing outward.
Position the gusset strip between the two panels. Start at the bottom center and sew the gusset along the bottom edge of the backpack.
Continue sewing the gusset upward along both side edges until the body is completely joined.
The gusset should create a small amount of depth so the backpack can hold items without becoming completely flat.
Attach the flap
Center the flap along the top back edge of the backpack.
Sew only the upper edge of the flap securely to the back panel, allowing the rest of the flap to fold naturally over the front.
Sew a small button to the front of the backpack and create a crochet loop or yarn loop on the flap for closing.
Attach the rainbow straps
Place one strap on each side of the upper back panel.
Attach the top ends several stitches inward from each side so the straps sit evenly.
Attach the lower ends near the bottom corners of the back panel.
Use several rows of reinforcement stitches when sewing the straps because these areas carry the weight of the backpack.
🧶 Watch for: Before securing the straps permanently, place the backpack flat and check that both straps are the same height and distance from the side seams.
Finishing your backpack
Weave in all yarn ends inside the backpack body. Gently reshape the corners and flap so the bag keeps its structured silhouette.
If desired, lightly steam block the panels before use, but avoid stretching the straps or flattening the raised flower petals.
Troubleshooting
- The backpack loses its shape: The fabric may be too loose. Use a smaller hook size or add a simple fabric lining for extra structure.
- The sides pull inward: The gusset may have been sewn too tightly. Remove the side seam and reattach with a little more ease.
- The daisy looks uneven: Space the petals around the center before sewing them permanently.
- The straps twist: Lay each strap completely flat before attaching and make sure the color stripes face outward.
FAQ
Can I make this backpack larger?
Yes. Increase the foundation chain length of the front and back panels while keeping both panels identical. Adjust the gusset length to match the new perimeter.
Can I change the flower colors?
Yes. The petal construction stays the same, so you can use fewer colors or create a single-color daisy while keeping the same shape.
Can I use a different yarn weight?
You can, but the backpack size and stiffness will change. Choose a hook size that creates a firm fabric suitable for carrying small items.
Optional customization
The daisy can be replaced with another simple crochet appliqué using the same attachment method. You can also make the straps solid colored instead of striped while keeping the same construction.
Final check
- The backpack should have a firm rectangular shape with visible depth from the gusset.
- The flap should cover the upper opening evenly.
- The rainbow straps should match in width, length, and stripe order.
- The daisy should sit centered and securely attached to the front panel.
I hope you enjoy making this pastel rainbow daisy backpack. Share your finished project and feel free to leave a question if you need help with any step.












