
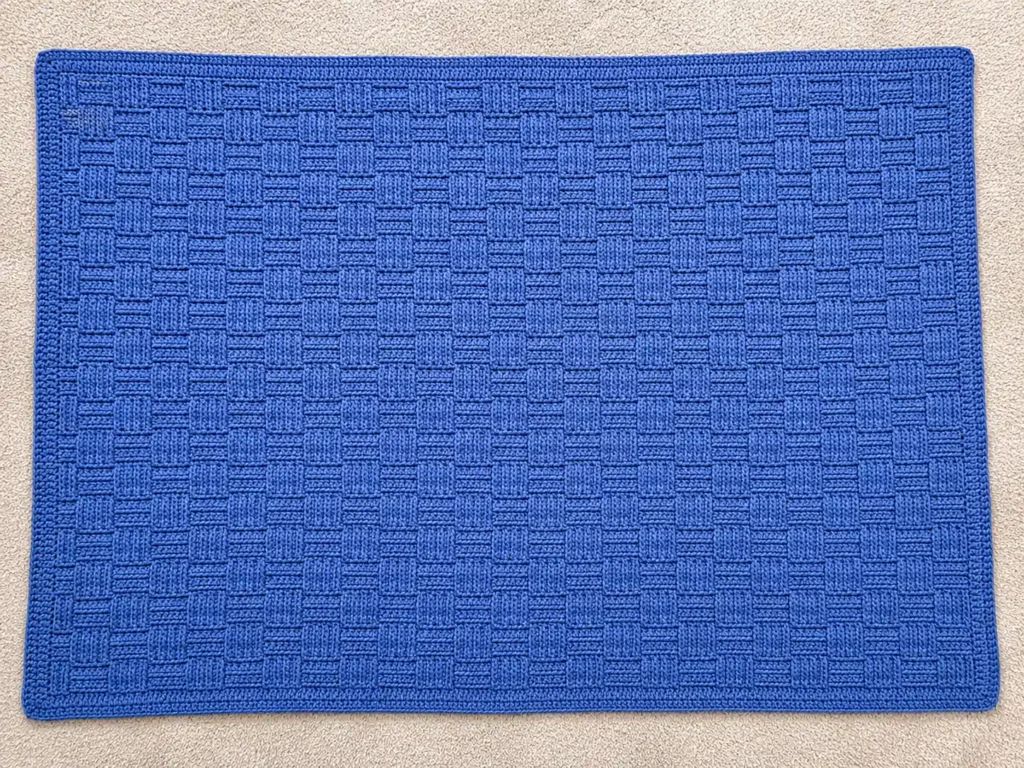
This crochet blue basket weave blanket is a cozy textured throw made from one continuous rectangular panel. The entire blanket is worked flat in rows, using simple crochet stitches combined with front-post and back-post double crochet to create the raised woven blocks across the surface.
The design focuses on a clean handmade look: one rich blue yarn color, a structured basket weave texture, straight edges, and a simple matching border. The repeating texture creates a classic blanket fabric that looks detailed while using a predictable row pattern.
In this pattern
Materials and project details
| Detail | Information |
|---|---|
| Skill level | Confident beginner. The texture uses basic stitches with repeating post stitch sections. |
| Construction | One continuous rectangular panel worked back and forth in rows. |
| Terminology | US crochet terms. |
| Main texture | Basket weave blocks created with alternating FPdc and BPdc stitches. |
Materials
- Medium-weight yarn (category 4 worsted weight works well) in one solid medium blue color.
- 5 mm crochet hook, or the hook size needed to create a dense but flexible blanket fabric.
- Yarn needle.
- Scissors.
Finished size
The blanket size can be customized by changing the foundation chain length and the number of basket weave repeats. Using medium-weight yarn with the suggested starting chain creates a wide throw-style blanket proportion similar to this design.
Stitches and abbreviations
- ch — chain
- sc — single crochet
- dc — double crochet
- FPdc — front-post double crochet
- BPdc — back-post double crochet
- sl st — slip stitch
- st — stitch
Before you start
The blanket is worked in rows with a repeating 8-row basket weave cycle. Each texture block stays in one direction for several rows before switching, creating the raised rectangular sections that give the blanket its woven appearance.
The first and last 4 stitches of every row remain regular double crochet stitches. These plain edge sections help maintain straight sides while the center develops the basket weave texture.
For a blanket with proportions similar to the example, begin with 172 chains. To change the width, add or remove groups of 8 chains while keeping the extra 4 chains at the end.
🧶 Checkpoint: After the first 8-row texture repeat, the blanket should show clear raised rectangular blocks. The side edges should remain flat with a smooth line of regular stitches.
Crochet pattern
Blanket body
Foundation chain: Ch 172.
Row 1: Dc in the 4th chain from hook and dc in each chain across. Turn. (170 dc)
Row 2: Ch 2, turn. Dc in each stitch across. Turn. (170 dc)
Row 3: Ch 2, turn. Dc in first 4 stitches. Work 4 FPdc around the next 4 dc posts, then 4 BPdc around the next 4 dc posts. Repeat the 4 FPdc, 4 BPdc pattern across until 4 stitches remain. Dc in last 4 stitches. (170 sts)
Row 4: Ch 2, turn. Dc in first 4 stitches. Work FPdc around each FPdc post and BPdc around each BPdc post from the previous row. Repeat across the textured section. Dc in last 4 stitches. (170 sts)
Row 5: Ch 2, turn. Repeat Row 4. (170 sts)
Row 6: Ch 2, turn. Repeat Row 4. (170 sts)
Row 7: Ch 2, turn. Dc in first 4 stitches. Work 4 BPdc around the next 4 dc posts, then 4 FPdc around the next 4 dc posts. Repeat the 4 BPdc, 4 FPdc pattern across until 4 stitches remain. Dc in last 4 stitches. (170 sts)
Row 8: Ch 2, turn. Dc in first 4 stitches. Work BPdc around each BPdc post and FPdc around each FPdc post from the previous row. Repeat across the textured section. Dc in last 4 stitches. (170 sts)
Row 9: Ch 2, turn. Repeat Row 8. (170 sts)
Row 10: Ch 2, turn. Repeat Row 8. (170 sts)
Rows 11–18: Repeat Rows 3–10.
Continue repeating Rows 3–10 until the blanket reaches the desired length. Finish after completing a full basket weave cycle so the raised blocks remain aligned.
🧶 Checkpoint: The finished blanket body should have a consistent grid-like texture with raised blocks flowing naturally from one row section into the next.
Simple border
Do not fasten off after the final row.
Border Round 1: Ch 1. Work sc evenly around the entire blanket. Place 3 sc in each corner to help the corners turn smoothly. Join with a sl st to the first sc.
Border Round 2: Ch 1. Work sc in every stitch around. Place 3 sc in each corner. Join with a sl st to the first sc.
Fasten off and weave in all ends.
Finishing your blanket
Secure the yarn tails by weaving them through the back of the stitches following the direction of the crochet fabric.
If needed, gently block the blanket by laying it flat and shaping the corners. Avoid stretching strongly because the basket weave texture is designed to keep its raised structure.
Troubleshooting
- The basket blocks look like ribs instead of woven squares: The FPdc and BPdc sections may not have switched direction correctly. Check that the texture changes after the full 8-row cycle.
- The sides are uneven: The first and last 4 double crochet stitches may have been missed. Keep these edge stitches plain throughout the blanket.
- The texture is not raised: Make sure the hook is inserted around the stitch post, not through the normal stitch loops.
- The border pulls the blanket inward: Work the border stitches more loosely and add enough stitches around the sides to keep the rectangle flat.
Optional customization
To make a wider blanket, add foundation chains in groups of 8. To make a longer blanket, continue adding complete 8-row basket weave cycles before finishing the border.
Final check
- The blanket should remain one continuous rectangular crochet panel.
- The basket weave blocks should repeat evenly across the surface.
- The border should frame the blanket without changing the shape.
- The texture should show crochet post stitches rather than knitted V-shaped rows.
Enjoy making your blue basket weave blanket. If you create your own version, feel free to share your finished project or leave a question if you need help with any step.












