
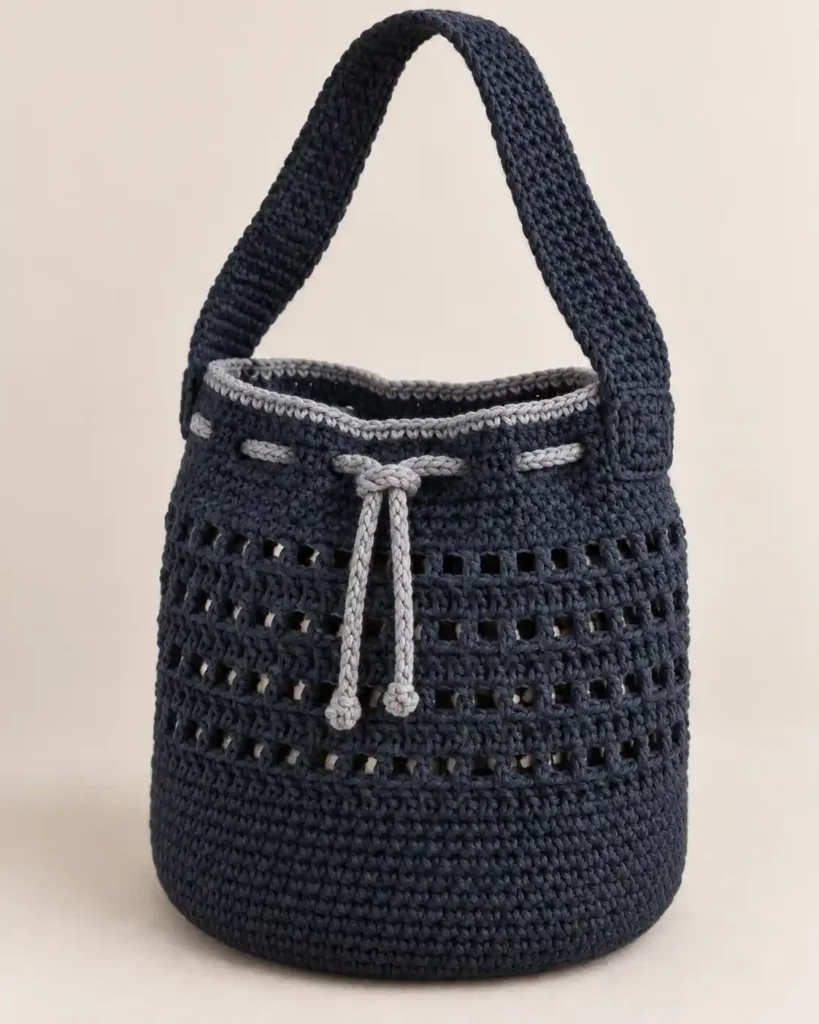
This Midnight Silver Lace Bucket Bag combines a firm rounded base, a dense lower body, four clearly separated rows of open crochet mesh, a structured drawstring band, and one broad shoulder strap. Deep midnight navy forms the entire bag and strap, while a soft silver-gray cord and narrow upper edging provide the contrasting finish.
The main bag is worked from the bottom upward in joined rounds. The round base flows directly into the cylindrical sides, the openwork alternates with solid separator rounds, and the upper section returns to compact single crochet before the drawstring openings are added. The shoulder strap and silver crochet cord are made separately and attached at the end.
Project at a glance
| Skill level | Confident beginner to intermediate |
|---|---|
| Terminology | US crochet terms |
| Construction | Base and body worked bottom-up in joined rounds; strap and drawstring made separately |
| Main stitches | Single crochet, double crochet, chains, slip stitches |
| Yarn | Worsted-weight #4 cotton or firm cotton-blend yarn |
| Hook | 4 mm crochet hook |
| Approximate size | About 8–10 in wide and 9–11 in tall, excluding the strap, depending on yarn and tension |
A smooth cotton or cotton-blend yarn is a good choice because the lower body needs enough firmness to support the bucket silhouette while the open stitches in the middle remain clearly defined. Aim for compact single crochet that still has a little flexibility rather than an extremely rigid fabric.
Materials
- Worsted-weight #4 cotton or cotton-blend yarn in deep midnight navy or very dark navy-charcoal: approximately 450–600 yd
- Worsted-weight #4 yarn in soft silver-gray: approximately 50–70 yd
- 4 mm crochet hook
- Tapestry needle
- Scissors
- Removable stitch markers
Use yarns of similar thickness for both colors. The silver yarn should behave like normal crochet yarn rather than metallic thread so the edging and drawstring remain soft and substantial.
Stitches and abbreviations
- ch — chain
- sl st — slip stitch
- sc — single crochet
- dc — double crochet
- inc — 2 sc in the same stitch
- st/sts — stitch/stitches
- sp — space
- BLO — back loop only
- RS — right side
Before you start
The main bag is worked in joined rounds without turning. Keep the RS facing outward. Beginning chains do not count as stitches, and the slip stitch used to join a round does not count as a stitch.
Place a marker in the first actual stitch of every round. Keeping the join in the same general position creates a discreet seam that can later be treated as the back center of the bag.
The circular base uses six evenly distributed increases per round. This produces a flatter single-crochet circle than using eight increases per round and gives the bottom a more reliable foundation before the sides are worked vertically.
🧶 Crochet Tip: Dark yarn can make the first stitch difficult to distinguish from the joining slip stitch. Move your marker into the first stitch immediately after making it so the 96-stitch body count stays consistent.
Crochet pattern
Round base
Using midnight yarn, make an adjustable magic ring.
R1: Ch 1, work 6 sc into the ring. Pull the ring closed and join with sl st to the first sc. (6 sts)
R2: Ch 1, inc in each st around. Join. (12 sts)
R3: Ch 1, [sc in next st, inc in next st] × 6. Join. (18 sts)
R4: Ch 1, [sc in next 2 sts, inc in next st] × 6. Join. (24 sts)
R5: Ch 1, [sc in next 3 sts, inc in next st] × 6. Join. (30 sts)
R6: Ch 1, [sc in next 4 sts, inc in next st] × 6. Join. (36 sts)
R7: Ch 1, [sc in next 5 sts, inc in next st] × 6. Join. (42 sts)
R8: Ch 1, [sc in next 6 sts, inc in next st] × 6. Join. (48 sts)
R9: Ch 1, [sc in next 7 sts, inc in next st] × 6. Join. (54 sts)
R10: Ch 1, [sc in next 8 sts, inc in next st] × 6. Join. (60 sts)
R11: Ch 1, [sc in next 9 sts, inc in next st] × 6. Join. (66 sts)
R12: Ch 1, [sc in next 10 sts, inc in next st] × 6. Join. (72 sts)
R13: Ch 1, [sc in next 11 sts, inc in next st] × 6. Join. (78 sts)
R14: Ch 1, [sc in next 12 sts, inc in next st] × 6. Join. (84 sts)
R15: Ch 1, [sc in next 13 sts, inc in next st] × 6. Join. (90 sts)
R16: Ch 1, [sc in next 14 sts, inc in next st] × 6. Join. (96 sts)
🧶 Checkpoint: The base should form a broad, reasonably flat circle. Correct strong cupping or ruffling before beginning the side wall because the shape of the finished bucket depends on a flat foundation.
Turn the base into the bag body
R17: Ch 1, working in the BLO only, sc in each st around. Join. (96 sts)
This round creates a subtle turning line between the flat base and the vertical body.
R18–R28: Ch 1, sc in each st around. Join after every round. (96 sts per round)
The lower body should now be dense and substantial with no decorative holes. Keep these rounds compact so the lower third of the bag supports the softer openwork above it.
Four-row openwork section
The center of the bag contains four distinct rows of rectangular openings. Each mesh round is followed by a solid single-crochet separator round. Do not work the mesh rounds consecutively, because the solid horizontal separators are part of the finished appearance.
R29 — Mesh: Ch 2, dc in the first st, ch 1, skip the next st, [dc in next st, ch 1, skip next st] × 47. Join with sl st to the first dc. (48 dc, 48 ch-1 spaces)
R30 — Solid separator: Ch 1, sc in the first dc, sc in the next ch-1 sp, [sc in next dc, sc in next ch-1 sp] × 47. Join. (96 sts)
R31 — Mesh: Ch 2, dc in the first st, ch 1, skip next st, [dc in next st, ch 1, skip next st] × 47. Join. (48 dc, 48 ch-1 spaces)
R32 — Solid separator: Ch 1, sc in the first dc, sc in the next ch-1 sp, [sc in next dc, sc in next ch-1 sp] × 47. Join. (96 sts)
R33 — Mesh: Ch 2, dc in the first st, ch 1, skip next st, [dc in next st, ch 1, skip next st] × 47. Join. (48 dc, 48 ch-1 spaces)
R34 — Solid separator: Ch 1, sc in the first dc, sc in the next ch-1 sp, [sc in next dc, sc in next ch-1 sp] × 47. Join. (96 sts)
R35 — Mesh: Ch 2, dc in the first st, ch 1, skip next st, [dc in next st, ch 1, skip next st] × 47. Join. (48 dc, 48 ch-1 spaces)
R36 — Solid separator: Ch 1, sc in the first dc, sc in the next ch-1 sp, [sc in next dc, sc in next ch-1 sp] × 47. Join. (96 sts)
🧶 Checkpoint: You should see exactly four horizontal rows of open rectangular spaces. Each open row should be separated from the next by a compact solid line of single crochet, and the final edge should again contain 96 stitches.
Upper solid band
R37–R41: Ch 1, sc in each st around. Join after every round. (96 sts per round)
This section creates the dense navy band immediately above the openwork and provides enough fabric to support both the drawstring and the wide strap attachments.
Large drawstring eyelets
R42: Ch 1, [sc in next 5 sts, ch 3, skip next 3 sts] × 12. Join to the first sc. (60 sc, 12 ch-3 spaces)
The twelve openings should be clearly visible and wide enough for the substantial silver crochet cord. They are intentionally larger than tiny buttonhole-style eyelets.
R43: Ch 1, [sc in next 5 sc, 3 sc in next ch-3 sp] × 12. Join. (96 sts)
R44–R46: Ch 1, sc in each st around. Join after every round. (96 sts per round)
Fasten off the midnight yarn after R46.
Silver-gray upper edging
Join silver-gray yarn at the back center.
R47: Ch 1, sc in each st around. Join to the first sc. (96 sts)
Fasten off and weave the tail into the inside of the bag. This should remain one narrow silver-gray finishing line rather than a wide contrasting band.
Wide shoulder strap
Using midnight yarn, ch 10.
Row 1: Sc in the second ch from the hook and in each remaining ch. Turn. (9 sts)
Row 2: Ch 1, sc in each st across. Turn. (9 sts)
Rows 3–110: Repeat Row 2. (9 sts per row)
The strap should look broad and substantial, not like a narrow cord. Before fastening off, hold the strap against the bag and check the carrying length. Add or remove complete rows if needed while keeping every row exactly 9 sc wide.
Fasten off, leaving a long yarn tail at each end for sewing.
Thick silver crochet drawstring
The drawstring is worked as a compact crochet cord rather than as a plain chain. This produces the rounded, braided-looking silver cord needed for the finished bag.
Start: Ch 2. Sc in the second ch from the hook. Do not turn the work like a normal row.
Cord repeat: Rotate the small piece clockwise so the side loop of the previous stitch faces upward. Insert the hook under that side loop and work 1 sc. Rotate the cord clockwise again. From this point onward, two horizontal side loops will be visible along the edge. Insert the hook beneath both loops and work 1 sc.
Continue rotating the cord clockwise after every stitch and working 1 sc beneath the two visible side loops. Repeat until the cord measures approximately 40–42 in / 102–107 cm.
The completed cord should be firm, rounded, and flexible. Fasten off securely at both ends.
🧶 Crochet Tip: Do not pull the cord stitches extremely tight. The finished cord should be thick enough to fill the eyelets visually but flexible enough to slide through them when the bag is opened and closed.
Assembly and finishing
Attach the shoulder strap
Position the joining seam at the back center. Count approximately one-quarter of the way around the 96-stitch circumference in each direction to locate the two side centers, around stitch 24 and stitch 72.
Center one 9-stitch-wide strap end over the first side position. Lay approximately the final 8–10 strap rows vertically against the outside of the upper navy section. The lower edge of the attachment should reach close to the top edge of the mesh section, while the upper edge reaches nearly to the silver edging.
Sew down one long side of the overlapping strap end, across the lower edge, up the opposite side, and across the top. Work through strong stitch loops from both layers so the attachment forms a broad reinforced rectangle rather than a single narrow seam.
Repeat at the opposite side, making sure the second attachment begins and ends at the same rounds as the first.
Where the strap overlaps the drawstring-eyelet round, avoid closing the nearby ch-3 opening with your sewing stitches. The cord must still be able to pass freely behind the strap attachment.
🧶 Checkpoint: The two strap attachments should form broad vertical navy panels on opposite sides of the upper bag. Hold the bag by the strap before weaving in the sewing tails to confirm that the strap is centered and not twisted.
Thread the silver drawstring
Place the joining seam at the back so the opposite side becomes the front center. Identify two neighboring ch-3 eyelets positioned symmetrically around that front-center point.
Leave one drawstring end hanging outside the first eyelet. Feed the other end through the first opening and then weave it around the entire circumference, passing alternately from outside to inside and inside to outside through all twelve eyelets.
After completing the full circuit, bring the moving end out through the neighboring front-center opening. The exposed silver sections should form short horizontal bars across the outside of the navy eyelet band.
Adjust the cord until the two front tails are the same length and the bag opening is only lightly gathered.
Make the front drawstring knot
Bring the two silver cord ends together directly beneath the center of the eyelet band. Tie them once in a relaxed overhand knot, keeping the knot close to the upper band.
The knot should be substantial enough to remain visible but should not permanently cinch the bag closed. The two cords continue separately downward from beneath this center knot.
Leave approximately 5–6 in / 13–15 cm of cord hanging below the center knot.
At the end of each tail, tie a compact double-overhand stopper knot. Tighten each stopper carefully so it forms a small rounded decorative end rather than a long loose knot.
Trim only if necessary and weave the final yarn ends back into the stopper knots.
🧶 Checkpoint: From the front, the finished drawstring should show alternating silver sections across the eyelet band, one central knot, two straight hanging cords, and one small rounded knot at the bottom of each tail.
Final shaping
Shape the bottom into a smooth circle and gently round the lower sides with your hands. Straighten the four mesh rows so the openings sit in clean horizontal bands.
Smooth the upper rim without pulling the eyelets wider. If you are using cotton yarn, light damp blocking or gentle steam held above the fabric can help settle uneven stitches.
Do not flatten the bag completely during blocking. Allow it to dry in its upright bucket shape.
Troubleshooting
- The circular base cups upward: your single crochet tension may be too tight. Relax your stitches slightly or use a slightly larger hook for the base.
- The base develops strong waves: the fabric may be too loose. Try a slightly smaller hook and keep the six increases evenly spaced.
- The mesh section looks too tall: make sure you have only four mesh rounds. Each mesh round is followed by one solid separator round.
- The openwork becomes one continuous grid: the solid sc separator rounds have been omitted. Restore one full 96-sc round after every mesh round.
- The upper band narrows: verify that every mesh separator round and R43 return to exactly 96 stitches.
- The drawstring eyelets look too small: R42 should use ch 3 and skip 3 stitches for each opening rather than a narrow ch-1 or ch-2 space.
- The drawstring appears thin and flat: use the rotating crochet-cord method rather than a plain foundation chain.
- The strap looks too narrow: keep all 9 stitches in every strap row and avoid pulling the strap stitches tighter than the bag body.
Safe adjustments
The shoulder strap is the easiest part to adjust. Keep the strap 9 sc wide and add or remove complete rows until it reaches the carrying length you prefer.
If the finished bag is slightly wider or narrower because of yarn choice, adjust the drawstring by length rather than by stitch count. It should circle the complete upper band and still leave enough length for the front knot and two hanging tails.
For a taller bag, add extra 96-stitch single-crochet rounds to the lower body before R29. Keep the openwork section at four mesh rows if you want to preserve the same proportions.
The contrast color can be changed without affecting construction. Keep it limited to the top edging and drawstring for the same restrained two-color appearance.
Final project check
- The base is broad and rounded with dense vertical single-crochet sides above it.
- The center contains exactly four rows of open rectangular mesh separated by solid horizontal rows.
- The upper band has twelve large, evenly distributed drawstring openings.
- The silver cord is thick and braided-looking, exits at the front center, and ends in two small stopper knots.
- The broad shoulder strap is securely attached on opposite sides, and one narrow silver-gray crochet round finishes the upper rim.
Once all yarn tails are woven in securely and the shape has settled, your Midnight Silver Lace Bucket Bag is ready to use. Feel free to share your finished version or leave a question if you need help with any step.












