
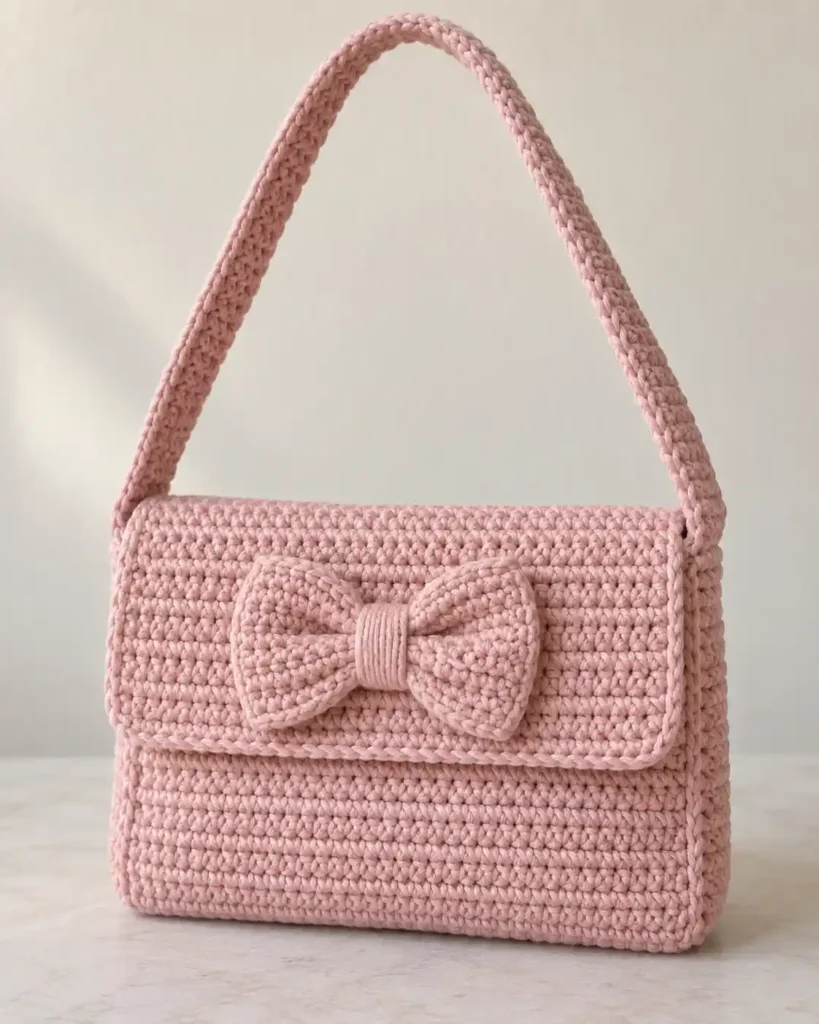
This blush-pink crochet purse has a compact rectangular body, softly rounded lower corners, a generous fold-over flap, and one oversized matching crochet bow. The narrow shoulder strap and slim raised edging keep the design delicate while the firm crochet fabric gives the bag enough structure to hold its shape.
The bag is built from a separate front panel, one continuous back-and-flap panel, and a narrow gusset that runs down both sides and across the bottom. That gusset is important: it gives the finished purse the visible side depth instead of producing a flat envelope-style bag. Raised slip-stitch joins outline the front edges, while a separate slip-stitch edging defines the flap.
Project at a glance
| Skill level | Confident beginner |
|---|---|
| Terminology | US crochet terms |
| Construction | Front panel, continuous back/flap, bottom-and-side gusset, separate bow and strap |
| Main stitch | Single crochet |
| Suggested yarn | Smooth light-worsted or worsted cotton/cotton-blend |
| Suggested hook | 4 mm crochet hook |
| Finished style | Small structured shoulder purse, approximately 8 inches wide and 6 inches tall at the suggested gauge |
Materials
- Smooth light-worsted or worsted-weight cotton or cotton-blend yarn in one soft blush-pink color; allow approximately 275–350 yards / 250–320 meters
- 4 mm crochet hook, or the hook size needed to produce firm compact single crochet
- Yarn needle
- Scissors
- Several stitch markers
A smooth cotton-rich yarn is a good choice because the individual stitches stay clearly defined and the purse retains its rectangular shape. The finished crochet should feel dense and substantial rather than soft and drapey.
Stitches and abbreviations
- ch – chain
- sc – single crochet
- sl st – slip stitch
- st – stitch
- RS – right side
- WS – wrong side
- BLO – back loop only
The ch 1 used for turning does not count as a stitch. Slip-stitch joins and edging stitches also do not count as part of the panel stitch totals.
Before you start
A useful gauge target for this construction is approximately 18 sc stitches and 18 sc rows over 4 inches / 10 cm. This nearly square stitch-and-row gauge is especially helpful because the side rows and bottom stitches can be matched directly to the gusset during assembly.
If your row gauge differs slightly, prioritize a dense handbag fabric and keep the front and back panels identical. The finished purse should stand neatly when lightly supported and should not collapse like a soft pouch.
🧶 Crochet Tip: Make a small single-crochet swatch before beginning. If large spaces appear between stitches or the fabric folds very easily, move down a hook size.
Crochet pattern
Front panel
With blush-pink yarn, ch 37.
Row 1: Sc in the 2nd ch from the hook and in each remaining ch across. Ch 1 and turn. (36 sc)
Rows 2–26: Sc in each st across. Ch 1 and turn. (36 sc each row)
Row 27: Sc in each st across. Do not turn. (36 sc)
Fasten off.
The panel should be a firm rectangle approximately 8 inches wide and 6 inches tall at the suggested gauge. Keep the foundation edge easy to identify because it becomes the lower edge of the bag.
Back panel and flap
Ch 37.
Row 1: Sc in the 2nd ch from the hook and in each remaining ch across. Ch 1 and turn. (36 sc)
Rows 2–27: Sc in each st across. Ch 1 and turn after every row. (36 sc each row)
Rows 1–27 form the back of the purse. Continue without fastening off to make the flap.
Rows 28–40: Sc in each st across. Ch 1 and turn. (36 sc each row)
Row 41: Sc in each st across. Do not turn. (36 sc)
Fasten off.
Rows 28–41 form the fold-over flap. The flap is approximately half the height of the main bag and remains the same width as the back panel.
Flap edging
The narrow raised outline around the flap is worked separately after the main panel is complete. Use relaxed slip stitches so the edge remains smooth instead of curling.
With the RS facing you, join the yarn at the junction between Rows 27 and 28 on the right side of the flap.
Work 1 loose sl st into each of the 14 flap row-end spaces along the first side. (14 sl sts)
At the first lower corner, work 2 loose sl sts into the corner stitch.
Work 1 loose sl st in each of the next 34 stitches across Row 41, then work 2 loose sl sts into the final corner stitch. (38 sl sts across the lower edge including both corner increases)
Work 1 loose sl st into each of the 14 row-end spaces along the opposite side. (14 sl sts)
Fasten off. (66 edging sl sts total)
🧶 Checkpoint: The finished flap should have one slim cord-like line down each side and across its lower edge. The two lower corners should curve gently rather than forming sharp points.
Bottom and side gusset
The gusset creates the visible depth along the right and left sides of the finished purse and continues underneath the bottom as one uninterrupted strip.
Ch 91.
Row 1: Sc in the 2nd ch from the hook and in each remaining ch across. Ch 1 and turn. (90 sc)
Rows 2–5: Sc in each st across. Ch 1 and turn. (90 sc each row)
Row 6: Sc in each st across. Do not turn. (90 sc)
Fasten off.
The strip should be approximately 1¼–1½ inches wide. Lay it flat and place a marker after stitch 27 and another marker after stitch 63 along each long edge.
This divides each long edge into three exact sections:
- Stitches 1–27: first side of the purse
- Stitches 28–63: bottom of the purse
- Stitches 64–90: second side of the purse
Do not remove these markers until both main panels are attached.
Crochet ribbon bow
The bow uses one compact crochet rectangle with a narrow outer edging. Gathering the rectangle firmly in the center creates the two broad rounded loops.
Ch 21.
Row 1: Sc in the 2nd ch from the hook and in each remaining ch across. Ch 1 and turn. (20 sc)
Rows 2–10: Sc in each st across. Ch 1 and turn. (20 sc each row)
Row 11: Sc in each st across. Do not turn. (20 sc)
Do not fasten off.
Bow edging: Ch 1 and rotate the piece. Work 1 loose sl st in each of the 11 row-end spaces along the first short side. Work 1 loose sl st in each of the 20 foundation stitches across the lower edge. Work 1 loose sl st in each of the 11 row-end spaces along the second short side. Work 1 loose sl st in each of the 20 stitches across Row 11. Join with a sl st to the first edging stitch. (62 edging sl sts)
Fasten off, leaving a yarn tail approximately 36 inches / 90 cm long.
Lay the bow rectangle horizontally with the RS facing you. Pinch the center into three shallow accordion folds, keeping the upper and lower edges slightly toward the back.
Wrap the long tail around the center approximately 12–14 times. Place the wraps immediately beside one another so they form a neat smooth band rather than a bulky knot.
Secure the yarn firmly on the back of the bow. Leave the remaining tail for attachment.
Spread the left and right portions outward with your fingers. Each side should form one broad softly rounded loop with the crochet edging clearly visible around its perimeter.
Shoulder strap
Ch 127.
Row 1: Sc in the 2nd ch from the hook and in each remaining ch across. Ch 1 and turn. (126 sc)
Row 2: Working BLO, sc in each st across. Ch 1 and turn. (126 sc)
Row 3: Working BLO, sc in each st across. (126 sc)
Fasten off, leaving a long sewing tail at each end.
The three narrow rows produce a firm strap approximately ⅝–¾ inch wide. The back-loop rows create subtle lengthwise ridges while keeping the handle narrow enough for the proportions of the purse.
Assemble the purse
Attach the gusset to the front panel
Place the front panel RS facing you with Row 27 at the top and the foundation-chain edge at the bottom.
Position one long edge of the gusset around the left side, bottom, and right side of the front panel. Keep the gusset itself extending backward from the front panel rather than lying across the face of the bag.
Beginning at the upper left corner, match gusset stitches 1–27 with the 27 row-end spaces along the left edge of the front panel.
Join blush-pink yarn at the upper corner. Working from the outside so the seam remains visible, make 1 loose sl st through one gusset stitch and the corresponding front-panel row end. Continue downward in this way. (27 joining sl sts)
At the lower left corner, continue directly onto the foundation edge. Match gusset stitches 28–63 one-for-one with the 36 foundation stitches along the bottom of the front panel. Work 1 sl st through each matched pair. (36 joining sl sts)
Turn the lower right corner and match gusset stitches 64–90 with the 27 row-end spaces along the right side of the front panel. Work 1 sl st through each matched pair from the bottom upward. (27 joining sl sts)
Fasten off. The complete front-to-gusset seam contains 90 slip stitches.
The seam should create a narrow raised crochet line around both sides and across the lower edge of the front panel. Keep the joining stitches relaxed so the corners stay softly rounded.
Attach the back panel
Turn the work so the unjoined long edge of the gusset is accessible.
Position the back-and-flap panel with its RS facing outward. Only Rows 1–27 of this piece are attached to the gusset; Rows 28–41 must remain completely free to form the flap.
Match the first 27 gusset stitches with the 27 row-end spaces along the first side of the back panel.
Using the same outside slip-stitch joining method, work 27 sl sts down the first side.
Match the next 36 gusset stitches one-for-one with the 36 foundation stitches along the bottom of the back panel and work 36 sl sts across.
Match the final 27 gusset stitches with the 27 row-end spaces along the opposite side and work 27 sl sts upward.
Fasten off. (90 joining sl sts)
The upper edges of the front and back panels remain open, while the gusset now creates a continuous side-bottom-side wall between them.
🧶 Checkpoint: Set the purse upright before adding the bow or strap. You should see a rectangular front, matching back, softly rounded lower corners, and a narrow but clearly visible side wall. If the bag is completely flat, the gusset has been folded into the seam instead of extending between the two panels.
Shape the flap
Fold Rows 28–41 of the back panel forward over the opening and onto the front of the bag.
Crease the transition gently by hand rather than making a sewn fold. The flap should fall naturally from the upper edge of the back and cover roughly the upper half of the front panel.
Smooth the slip-stitch edging so it forms one continuous narrow outline along both flap sides and the lower edge.
Attach the bow
Find the horizontal center of the flap. With 36 stitches across, the center lies between stitches 18 and 19.
Position the wrapped center of the bow directly over this centerline. Place the bow vertically around the middle of the flap so the loops leave a visible band of crochet above and below them.
Using the long bow tail, sew through the back of the center wrapping and through the flap several times. Keep these stitches hidden underneath the wrapped center band.
Add one small hidden tack behind the inner portion of the left loop and one behind the inner portion of the right loop, approximately ¾–1 inch / 2–2.5 cm from the center band.
Do not sew around the outer perimeter of the bow. The outer halves of both loops should remain slightly raised from the flap so the bow retains its soft dimensional appearance.
Attach the shoulder strap
Place one strap end against the outside of the left gusset near the upper opening. Center the strap between the front and back seam lines rather than attaching it directly to the front panel.
Allow approximately the first 1 inch / 2.5 cm of the strap to extend downward against the gusset.
Using the long sewing tail, stitch securely around the perimeter of this overlap. Pass through both the strap and gusset fabric and add several reinforcing stitches through the center of the attachment area.
Repeat with the opposite strap end on the right gusset at exactly the same height.
Before securing the second end completely, check that the strap forms one smooth untwisted arch above the purse.
Finishing
Weave all remaining yarn tails into the inside of the bag, the gusset seams, or the back of the bow. At the strap attachments, weave each tail through several neighboring stitches before trimming because these areas receive the most stress during use.
Shape the body with your hands so the front and back remain flat while the gusset opens evenly between them. Round the two lower corners slightly rather than forcing them into sharp square points.
Fold the flap forward and smooth it gently so the lower edge sits evenly across the front. Adjust the bow by spreading both loops outward and lightly rounding the outer corners with your fingers.
If your yarn responds well to wet blocking, lightly dampen the bag and stuff the interior temporarily with a folded towel while it dries. This helps establish the rectangular silhouette and side depth. Remove the towel only after the crochet is completely dry.
Do not press or flatten the bow during blocking. Reshape the two loops afterward so they remain softly raised.
Troubleshooting
- The bag looks flat instead of boxy: open the gusset between the front and back panels and reshape it. The gusset should form the bottom and side walls rather than being folded into either panel.
- The lower corners pucker: the joining slip stitches are probably too tight. Remake the corner area with looser joins and allow the gusset to curve naturally around the turn.
- The front or back looks wavy: the panel and gusset were not matched one-for-one during assembly. Check the 27-side, 36-bottom, 27-side placement.
- The flap edging curls inward: the slip stitches are too tight. Undo the affected edging and remake it more loosely.
- The flap looks too short: make sure all 14 flap rows, Rows 28–41, were completed before edging.
- The bow looks flat: deepen the accordion folds at the center and keep the outer halves of the loops unattached.
- The bow center looks bulky: place the yarn wraps neatly beside one another rather than stacking them in the same spot.
- The strap leans toward the front or back: reposition its end so it is centered across the width of the gusset between the two raised seam lines.
Adjusting the strap
The strap length can be changed without altering the bag construction. For a shorter handbag handle, reduce the foundation chain before Row 1. For a longer shoulder or crossbody strap, add chains and work all three rows across the new stitch count.
Keep the strap three rows wide if you want to preserve the narrow proportions of this design. A wider strap will work structurally, but it will give the finished purse a noticeably heavier appearance.
Once the gusset is shaped, the flap lies smoothly, and the bow loops are rounded, the blush-pink ribbon bow purse is complete. If you make one, feel free to share your finished project or leave a question if you need help with a step.












