
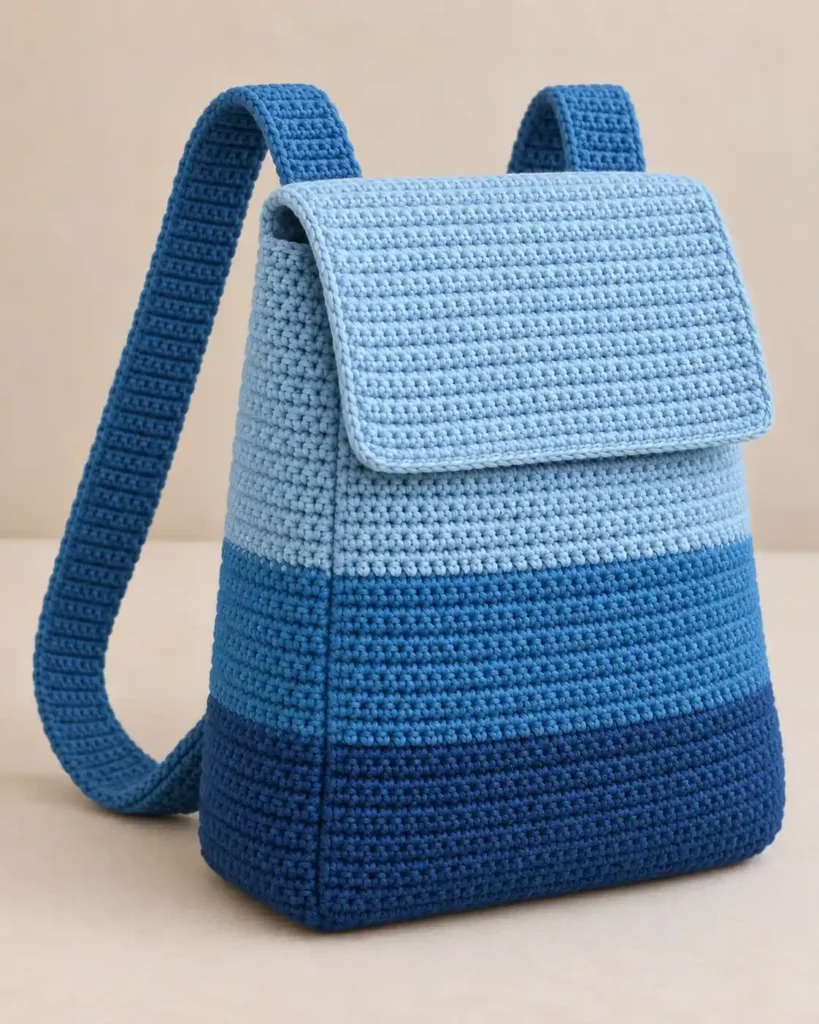
This ocean-blue ombre crochet backpack has a softly structured rectangular body, three broad blue color sections, a generously sized fold-over flap, and two wide matching shoulder straps. Dense single crochet gives the bag its compact handmade texture, while narrow slip-stitch edging creates the distinctive braided-looking lines visible around the flap and along both straps.
The main body is made from one long rectangular panel with a mirrored color sequence. After the panel is folded at the bottom, the front and back both progress from deep ocean blue through medium marine blue to pale sea blue. Raised side joins and lightly boxed lower corners provide depth without requiring a separate gusset or bottom panel.
Project at a glance
| Skill level | Confident beginner |
|---|---|
| Terminology | US crochet terms |
| Main fabric | Single crochet |
| Edging | Slip stitch |
| Construction | One folded body panel, one flap, two straps |
| Yarn | Medium-weight #4 yarn |
| Hook | 4.5 mm crochet hook |
| Approximate size | 11½–12 inches wide, 13–14 inches tall, about 3 inches deep |
A smooth cotton, cotton-blend, or low-fuzz acrylic yarn works especially well for this backpack. The goal is a dense fabric with clearly defined rows that can hold the upright shape without becoming rigid.
Materials
- Medium-weight #4 yarn in deep ocean blue
- Medium-weight #4 yarn in medium marine blue
- Medium-weight #4 yarn in light sea blue
- Approximately 170–220 yards deep ocean blue
- Approximately 280–340 yards medium marine blue
- Approximately 240–300 yards light sea blue
- 4.5 mm crochet hook, or hook needed to produce a firm fabric
- Yarn needle
- Scissors
- Stitch markers
Gauge and fabric
Approximately 14 sc and 16 rows = 4 inches.
The exact gauge can vary slightly, but the fabric should remain dense. When gently stretched, there should not be large openings between the stitches.
🧶 Crochet Tip: If the fabric collapses very easily or large spaces appear between stitches, use a smaller hook. The finished backpack should feel firm enough to hold its soft rectangular shape.
Stitches and abbreviations
- ch – chain
- sc – single crochet
- sl st – slip stitch
- st(s) – stitch(es)
- RS – right side
- WS – wrong side
Before you start
The body, flap, and shoulder straps are worked back and forth in rows. Ch 1 at the beginning of a row does not count as a stitch.
Change colors while completing the final stitch of the row before the new color begins. Work the final single crochet until two loops remain on the hook, yarn over with the new color, and pull the new color through both loops.
The body contains two matching 60-row halves. Keeping these row counts identical is important because the color boundaries must meet cleanly when the sides are joined.
Slip-stitch edging is used around the visible edges of the flap and straps. Keep these stitches relaxed so the edging forms a neat chain-like line without pulling the fabric inward.
Crochet pattern
Main backpack body
Begin at the upper edge of the back panel.
With light sea blue, ch 43.
Row 1: Sc in the second ch from hook and in each ch across. Ch 1, turn. (42 sts)
Rows 2–19: Sc in each st across. Ch 1, turn. (42 sts)
Row 20: Sc in each st across, changing to medium marine blue while completing the final st. Ch 1, turn. (42 sts)
Rows 21–39: With medium marine blue, sc in each st across. Ch 1, turn. (42 sts)
Row 40: Sc in each st across, changing to deep ocean blue while completing the final st. Ch 1, turn. (42 sts)
Rows 41–59: With deep ocean blue, sc in each st across. Ch 1, turn. (42 sts)
Row 60: Sc in each st across. Ch 1, turn. (42 sts)
Rows 1–60 form the back half.
Rows 61–79: Continue with deep ocean blue, sc in each st across. Ch 1, turn. (42 sts)
Row 80: Sc in each st across, changing to medium marine blue while completing the final st. Ch 1, turn. (42 sts)
Rows 81–99: With medium marine blue, sc in each st across. Ch 1, turn. (42 sts)
Row 100: Sc in each st across, changing to light sea blue while completing the final st. Ch 1, turn. (42 sts)
Rows 101–119: With light sea blue, sc in each st across. Ch 1, turn. (42 sts)
Row 120: Sc in each st across. (42 sts)
Fasten off.
🧶 Checkpoint: Fold the panel between Rows 60 and 61. From the bottom fold upward, both halves should show the same sequence of deep blue, medium blue, and light blue. The color-change lines should meet at both side edges.
Fold-over flap
With light sea blue, ch 43.
Row 1: Sc in the second ch from hook and in each ch across. Ch 1, turn. (42 sts)
Rows 2–25: Sc in each st across. Ch 1, turn. (42 sts)
Row 26: Sc in each st across. (42 sts)
Do not fasten off.
Row 26 becomes the straight attachment edge. The foundation edge and both side edges remain visible and receive the border.
Flap border
Turn the flap so the RS faces you and rotate the work to crochet down the first side edge.
Work [sc in each of the next 7 row ends, skip the next row end] × 3, then sc in each of the final 2 row ends. (23 sc)
Across the foundation edge, work 3 sc into the first foundation-chain stitch, sc in each of the next 40 foundation-chain stitches, then 3 sc into the final foundation-chain stitch. (46 sc)
Work up the opposite side edge: [sc in each of the next 7 row ends, skip the next row end] × 3, then sc in each of the final 2 row ends. (23 sc)
Do not work across Row 26. Fasten off. (92 border sts)
Join light sea blue in the first border stitch at one upper corner.
Slip-stitch edging: Work 1 relaxed sl st in each of the 92 border sts around the three free edges. (92 sl sts)
Fasten off.
The final slip-stitch row should sit visibly along the outside edge as a narrow chain-like braid. The extra stitches at the two lower corners soften the flap into gently rounded corners instead of sharp square points.
Shoulder straps
Make two identical straps with medium marine blue.
Ch 9.
Row 1: Sc in the second ch from hook and in each ch across. Ch 1, turn. (8 sts)
Rows 2–99: Sc in each st across. Ch 1, turn. (8 sts)
Row 100: Sc in each st across. (8 sts)
Fasten off.
Each strap should measure approximately 2¼ inches wide and about 25 inches long at the stated gauge.
Strap edging
The two long edges of each shoulder strap receive a narrow slip-stitch finish. Leave the short ends unbordered because they will be hidden inside the reinforced attachment areas.
With medium marine blue, join yarn at one corner of the first long edge.
First long edge: Work 1 relaxed sl st into each row end from one short end to the other. (100 sl sts)
Fasten off.
Join yarn at the corresponding corner of the opposite long edge.
Second long edge: Work 1 relaxed sl st into each row end from one short end to the other. (100 sl sts)
Fasten off.
Repeat the same edging on the second strap.
🧶 Watch for: The slip-stitch edges should look like narrow braided chains running evenly along both sides of each strap. If the strap begins to curve or shorten, the slip stitches are too tight; loosen them or use a slightly larger hook for the edging only.
Assembly
Mark the front, back, and bottom
Lay the main body panel flat.
Rows 1–60 form the back. Rows 61–120 form the front. The fold between Rows 60 and 61 becomes the center of the bottom.
Attach the flap
Position the unbordered Row 26 edge of the flap directly along the foundation edge of the back panel.
Match the 42 flap stitches to the 42 body stitches across the upper back edge.
The bordered portion of the flap should extend away from the body so it can fold over the opening and lie across the front after assembly.
Using light sea blue and a yarn needle, whipstitch through each matched stitch across the entire 42-stitch attachment edge.
Keep this seam firm but flexible. Fasten securely and weave the ends into the WS.
Attach the upper strap ends
Keep the back panel flat with its RS facing you.
Position the upper end of the left strap across body stitches 5–12. Allow approximately 7 strap rows to overlap body Rows 4–10.
Position the upper end of the right strap across body stitches 31–38, also overlapping body Rows 4–10.
Both straps should sit vertically and symmetrically, with matching spacing from the side edges.
Using medium marine blue and a yarn needle, sew around all four sides of each rectangular overlap. Add one diagonal reinforcement seam across the center of each attachment.
Attach the lower strap ends
Bring the free end of the left strap down toward the lower back without twisting it.
Position it across body stitches 5–12 and overlap approximately 7 strap rows across body Rows 49–55.
Position the lower end of the right strap across body stitches 31–38 and body Rows 49–55.
Sew around each rectangular overlap and reinforce each attachment with one diagonal seam.
🧶 Checkpoint: Before securing the lower ends permanently, hold the panel upright and check both straps. They should be the same length, lie flat, and show their narrow slip-stitch edging along both outer sides without any twist.
Fold the backpack body
Fold the main panel between Rows 60 and 61 with the WS together so the RS remains on the outside.
Align the two long side edges carefully. The deep-blue, medium-blue, and light-blue sections on the front and back should meet at the same heights.
Join the first side
The side seams are intentionally worked on the outside so they form the narrow raised vertical crochet lines visible on the finished backpack.
Begin at the bottom fold and insert the hook through corresponding row-edge loops of both layers.
With deep ocean blue, work 1 relaxed sl st through each matched row-end pair across the 20 deep-blue rows. (20 sl sts)
Change to medium marine blue and work 1 sl st through each matched row-end pair across the next 20 rows. (20 sl sts)
Change to light sea blue and work 1 sl st through each matched row-end pair across the final 20 rows. (20 sl sts)
Fasten off. (60 sl sts total)
Join the second side
Repeat the same outside seam on the opposite side:
- 20 deep-ocean-blue sl sts
- 20 medium-marine-blue sl sts
- 20 light-sea-blue sl sts
Fasten off.
The completed joins should form narrow raised ridges running vertically up both sides. Keep the slip stitches relaxed enough that the side edges remain straight rather than puckering inward.
Create the bottom depth
Turn the backpack WS out.
At one lower corner, flatten the corner so the side seam lies directly over the center bottom fold. This forms a triangular point.
Measure across the triangle until the crosswise line is approximately 3 inches wide. Mark both ends of this line.
Using deep ocean blue and a yarn needle, sew securely across the marked line through both layers.
Repeat at the opposite lower corner, positioning the second seam the same distance from the tip.
Fold each triangular tip flat against the inside bottom and tack it down with several secure stitches.
Turn the backpack RS out and gently shape both lower corners.
🧶 Checkpoint: The bottom should now have shallow rectangular depth with softly rounded lower corners. The front should remain broad and smooth rather than narrowing sharply toward the base.
Arrange the flap
Bring the flap forward over the top opening and let it curve naturally over the upper edge of the backpack.
The flap should extend almost the full width of the front. Its pale-blue body and narrow slip-stitch outline should remain clearly visible, and the lower edge should cover much of the pale-blue upper body section while leaving the medium and dark bands exposed below.
No button, zipper, buckle, drawstring, or separate closure is required.
Finishing the backpack
Weave in all remaining ends securely on the WS. Pay particular attention to the four strap attachment areas, flap seam, color-change points, side seams, and boxed lower corners.
If needed, lightly wet block the backpack. Avoid aggressive stretching because the dense handmade shape should remain softly structured rather than perfectly rigid.
Shape the bottom corners while damp, smooth the front and side panels, and let the flap curve naturally over the opening.
Lay both shoulder straps flat while drying. Straighten their slip-stitch edges but do not stretch the straps lengthwise.
Troubleshooting
- The three color bands do not line up at a side seam: one half of the body has an incorrect row count. Each half must contain exactly 20 light-blue rows, 20 medium-blue rows, and 20 deep-blue rows.
- The raised side seam puckers: the slip stitches are too tight. Remake the seam more loosely or use a slightly larger hook for the joining stitches.
- The flap border looks bulky instead of narrow: keep the final slip-stitch edging relaxed and close to the preceding single crochet border rather than pulling large loops through each stitch.
- The flap corners look too square: confirm that 3 sc were placed in each outer foundation corner before the final slip-stitch edging.
- The straps curl sideways: the long-edge slip stitches are too tight. Redo those edges with looser tension so the straps remain flat.
- The straps look narrower than the finished backpack requires: confirm that each strap contains 8 sc across before adding the two slip-stitch edge lines.
- The bottom remains completely flat: the boxed-corner seams are too close to the tips. A crosswise seam of approximately 3 inches creates the shallow rectangular depth.
Adjusting the strap length
The 100-row straps measure approximately 25 inches at the stated row gauge. For shorter straps, remove the same number of rows from each piece. For longer straps, add the same number of rows to both.
At approximately four rows per inch, adding 4 rows increases each strap by about 1 inch.
After changing the length, work the slip-stitch edging over every row end on both long sides. For example, a 108-row strap receives 108 slip stitches along each long edge.
Keep both straps identical because even a small difference becomes noticeable once they are attached to the back.
Final project check
- The front and back both progress from deep ocean blue at the bottom through medium marine blue to pale sea blue at the top.
- The two outside side seams form narrow raised vertical lines without puckering.
- The flap is broad, softly rounded at its lower corners, and surrounded on three visible edges by a narrow chain-like slip-stitch line.
- Both shoulder straps are wide, matching, untwisted, and have the same narrow slip-stitch edging along both long sides.
- The bottom has shallow rectangular depth with gently rounded handmade corners.
Once every end is secure and the backpack has settled into shape, it is ready to use. If you make this ocean-blue version, feel free to share your finished backpack or leave a question if you need help with one of the assembly steps.












