
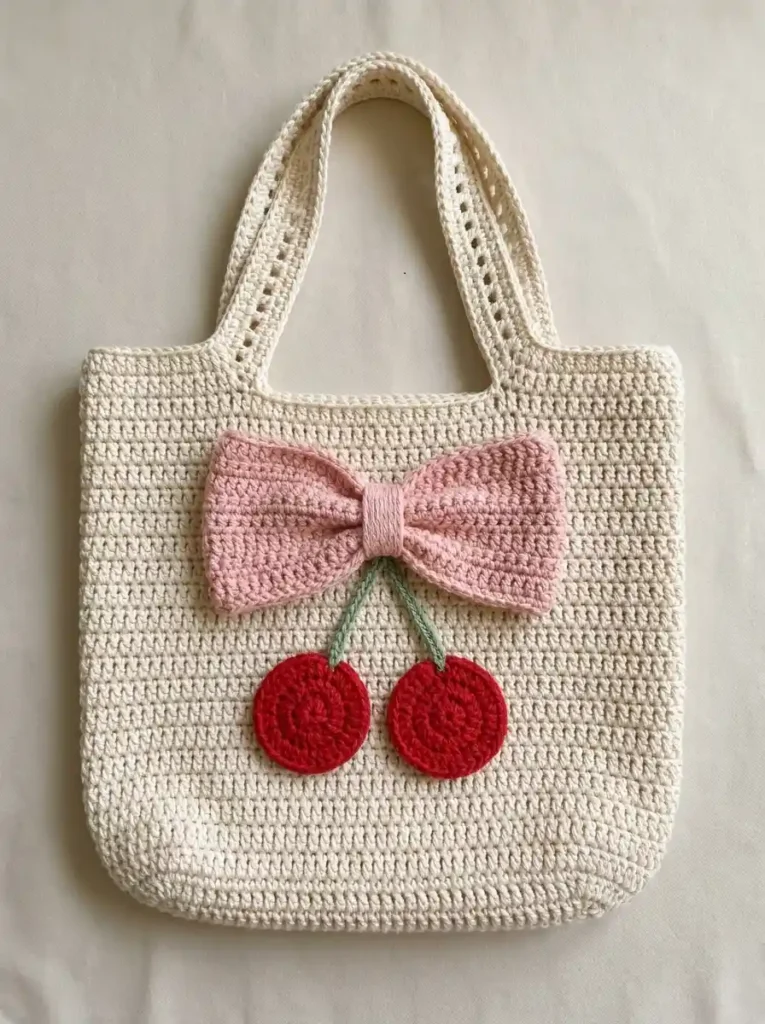
This cream crochet tote has a softly rounded base, tall matching handles, and a sweet cherry-and-bow motif across the front. The oversized blush-pink bow has two broad fan-shaped loops with a visible center ridge, while two red crochet cherries hang below on short sage-green stems.
The tote is worked as one continuous piece from an oval base upward in joined rounds. The handles, bow loops, center band, cherries, and stems are made separately and attached afterward, keeping the shapes clean and easy to position.
Project at a glance
| Skill level | Advanced beginner |
|---|---|
| Terminology | US crochet terms |
| Construction | Oval-base tote worked upward in joined rounds with sewn-on handles and appliqués |
| Main stitch | Half-double crochet |
| Yarn | DK or light-worsted smooth cotton or cotton blend |
| Hook | 3.5–4 mm |
Materials
- DK or light-worsted smooth cotton or cotton-blend yarn in warm cream or natural ivory for the tote and handles
- Blush-pink yarn for the bow
- Cherry-red yarn for the two cherries
- Muted sage-green yarn for the two stems
- 3.5–4 mm crochet hook, choosing the size that gives a firm but flexible fabric
- Yarn needle
- Scissors
- Removable stitch markers
A smooth cotton or cotton-blend yarn works well because the tote needs enough structure to hold its shape while the bow and cherries need clearly defined stitches. Keep all four colors in the same yarn-weight family so the appliqués remain proportional to the bag.
Stitches and abbreviations
- ch – chain
- sc – single crochet
- hdc – half-double crochet
- dc – double crochet
- sl st – slip stitch
- st – stitch
- sts – stitches
- BLO – back loop only
- RS – right side
Before you start
The tote begins with a flat oval. After the base is complete, one BLO round creates a clean turning line so the bag walls can rise vertically. The body rounds that follow are worked without increases.
The beginning ch 1 does not count as a stitch. Each joined round is closed with a sl st to the first actual stitch.
The pink bow loops are worked around both sides of a short foundation chain rather than as plain rectangles. That foundation forms the visible ridge through the middle of each loop while the increases at the outer end create the broad fan shape.
Crochet pattern
Cream oval tote base
With cream yarn, ch 38.
R1: Starting in the second ch from the hook, work 2 hdc in the first ch, hdc in each of the next 35 ch, then 5 hdc in the final ch. Rotate the foundation chain so you can work along the unused loops on the opposite side. Hdc in each of the next 35 ch, then work 3 hdc into the same first foundation ch that already contains the first 2 hdc. Join with a sl st to the first hdc. (80 hdc)
The first and last stitches of the round together form one five-stitch rounded end. The 5 hdc worked into the opposite end form the second rounded end.
Sl st into the next hdc, then sl st into the following hdc so the hook is positioned at the first stitch of one long straight side.
R2: Ch 1, hdc in the same st and in each of the next 34 sts, work 2 hdc in each of the next 5 sts around the first rounded end, hdc in each of the next 35 sts, then work 2 hdc in each of the final 5 sts around the second rounded end. Join to the first hdc. (90 hdc)
R3: Ch 1, hdc in each of the next 35 sts, [hdc in the next st, 2 hdc in the next st] × 5 around the first end, hdc in each of the next 35 sts, then [hdc in the next st, 2 hdc in the next st] × 5 around the second end. Join to the first hdc. (100 hdc)
R4: Ch 1, hdc in each of the next 35 sts, [hdc in each of the next 2 sts, 2 hdc in the next st] × 5 around the first end, hdc in each of the next 35 sts, then [hdc in each of the next 2 sts, 2 hdc in the next st] × 5 around the second end. Join to the first hdc. (110 hdc)
🧶 Checkpoint: The base should form a flat elongated oval with two broad rounded ends. If one end cups upward, check that all five increase points were completed on that end.
Turn the base upward
R5: Ch 1, working in the BLO, hdc in each st around. Join to the first hdc. (110 hdc)
The unused front loops form the narrow turning line around the lower edge of the tote.
Tote body
R6–R29: Ch 1, hdc in each of the 110 sts around. Join to the first hdc after every round. Do not turn. (110 hdc each round)
Keep the join line traveling as straight upward as possible and position it toward one side of the tote rather than across the middle of the front panel.
R30: Ch 1, sc in each st around. Join to the first sc. (110 sc)
R31: Ch 1, sc in each st around. Join to the first sc. (110 sc)
Fasten off and weave in the cream tail.
Flatten the tote naturally. The two long sections form a front panel of 55 stitches and a back panel of 55 stitches. Mark both side folds.
Make the two cream handles
Make two identical handle strips. One is attached to the front of the tote and the second to the back.
With cream yarn, ch 70.
Row 1: Starting in the second ch from the hook, hdc in each ch across. Turn. (69 hdc)
Row 2: Ch 1, sc in each st across. Turn. (69 sc)
Row 3: Ch 1, sc in each of the first 3 sts, [ch 1, skip the next st, sc in the next st] × 31, sc in each of the final 4 sts. Turn. (38 sc, 31 ch-1 spaces)
Row 4: Ch 1, sc in each sc and in each ch-1 space across. Turn. (69 sc)
Row 5: Ch 1, hdc in each st across. (69 hdc)
Fasten off, leaving tails long enough for attachment.
The strip should have one straight line of small eyelets through its middle with a solid crochet band on either side.
Make the second handle exactly the same way.
Attach the front handle
With the front of the flattened tote facing up, number the 55 top-edge stitches from left to right.
Center the first handle so one short end sits across approximately stitches 13–18 and the opposite end across stitches 38–43. Keep both ends at the same depth below the top edge.
Make sure the handle is not twisted. Sew each short end firmly through the final two tote rounds, spreading the seam across the full width of the handle rather than concentrating the stitches at one point.
Attach the back handle
Repeat with the second strip on the back panel, matching the spacing and height of the front handle.
🧶 Checkpoint: Lift both handles together before securing the tails. Their upper curves should reach approximately the same height, and the four attachment areas should be symmetrical.
Make the oversized pink bow
The two loops are made separately and use the same construction. Each loop is worked around both sides of a short foundation chain. The foundation chain becomes the horizontal ridge through the middle of the loop, while extra stitches around the outer end create the broad rounded fan shape.
First bow loop
With blush-pink yarn, ch 9.
R1: Starting in the second ch from the hook, sc in the first ch, hdc in the next ch, dc in each of the next 5 ch, then work 6 dc in the final ch. Rotate the work and continue along the unused loops on the opposite side of the foundation chain: dc in each of the next 5 ch, hdc in the next ch, then work 2 sc into the same foundation ch that contains the first sc. Join with a sl st to the first sc. Do not turn. (21 sts)
R2: Ch 1, sc in each of the first 2 sts, hdc in each of the next 5 sts, work 2 hdc in each of the next 6 sts around the broad outer end, hdc in each of the next 5 sts, then sc in each of the final 3 sts. Join to the first sc. (27 sts)
R3: Ch 1, sc in each of the first 2 sts, hdc in each of the next 5 sts, [hdc in the next st, 2 hdc in the next st] × 6 around the outer end, hdc in each of the next 5 sts, then sc in each of the final 3 sts. Join to the first sc. (33 sts)
R4: Ch 1, sc in each st around. Join to the first sc. (33 sc)
Fasten off, leaving a long tail for assembly.
The completed piece should have a narrow rounded inner end, a broad outer edge, and a clear foundation-chain ridge through its center. The top and bottom halves should mirror one another.
Second bow loop
Make a second loop using R1–R4 exactly as written above.
🧶 Checkpoint: Place the two loops side by side before joining them. Their outer ends should be equally broad, their narrow ends should match, and the foundation ridges should run in one horizontal line through the future bow.
Join the bow loops
Lay both loops with the RS facing up and their narrow ends touching. Position the broad rounded ends in opposite directions.
Use one pink tail to stitch the two narrow ends together securely. Pull the center slightly inward so the loops form a clear bow silhouette, but keep the broad ends open and softly dimensional.
Pink center band
With blush-pink yarn, ch 7.
Row 1: Starting in the second ch from the hook, sc in each ch across. Turn. (6 sc)
Rows 2–8: Ch 1, sc in each st across. Turn after Rows 2–7. (6 sc)
Fasten off, leaving a long sewing tail.
Wrap the band vertically around the joined narrow ends of the bow loops. Bring the two ends together on the back and sew them securely.
The band should cover the loop join and create the distinct narrow pink center while leaving the central foundation ridge visible through each loop.
Make the twin red cherries
Make two identical cherries.
With cherry-red yarn, make a magic ring.
R1: Ch 1, work 8 hdc into the ring. Tighten the ring and join with a sl st to the first hdc. (8 hdc)
R2: Ch 1, work 2 hdc in each st around. Join to the first hdc. (16 hdc)
R3: Ch 1, [hdc in the next st, 2 hdc in the next st] × 8. Join to the first hdc. (24 hdc)
R4: Ch 1, sc in each st around. Join to the first sc. (24 sc)
Fasten off, leaving a long red tail for sewing.
Repeat for the second cherry. Both circles should lie flat with matching diameters, tight centers, and narrow single-crochet outer edges.
Make the two green cherry stems
Make two matching narrow crochet cords.
With sage-green yarn, ch 18.
Starting in the second ch from the hook, sl st in each ch back toward the beginning. (17 sl sts)
Fasten off, leaving sewing tails.
Repeat for the second stem.
The finished stems should be short, slim, and firm enough to keep a clean diagonal line between the bow and cherries.
Position the cherry bow motif
Lay the tote flat with the front panel facing up and identify its vertical centerline.
Place the pink bow across the upper-middle portion of the front. Keep the center band directly on the tote centerline and leave several complete cream body rounds between the bow and the handle opening.
Position the cherries side by side beneath the bow. Leave a narrow strip of cream background between them and keep their centers equally spaced to the left and right of the tote centerline.
Angle one green stem upward and inward from the top of each cherry. The two stems should form a clean V and meet beneath the lower edge of the pink center band without crossing one another.
Attach the stems, cherries, and bow
Attach the stems first, the cherries second, and the bow last. This order hides the upper stem ends naturally beneath the bow.
Attach the stems
Position the lower end of the first green stem at the upper edge of the left cherry location. Angle it upward and inward toward the bow center.
Mirror that placement with the right stem. Bring the upper ends together beneath the bow center without twisting or crossing them.
Sew along each stem with small sage stitches spaced closely enough to keep the cord securely against the tote. Leave a little natural relief so the stems still read as narrow crocheted cords.
Attach the cherries
Place each red circle over the lower end of its stem so the green cord appears to emerge naturally from behind the top of the cherry.
Using the red sewing tail, whipstitch around the complete outer sc round of each cherry.
Keep the seam relaxed so the circles stay flat and round without puckering the cream background.
Attach the bow
Place the pink bow over the upper stem ends. The lower edge of the center band should conceal the point where the two green cords meet.
Center the bow horizontally and check that the two broad outer loop edges extend approximately the same distance to the left and right.
Secure the bow through the pink center band first. Then add small stitches around selected areas of the outer loop edges.
Do not sew every part of the loops completely flat. Leave the upper and lower edges with a small amount of natural lift so the bow keeps the softly dimensional appearance created by its fan-shaped construction.
🧶 Watch for: Step back before finishing the sewing. The center of the bow, meeting point of the green stems, gap between the cherries, and vertical center of the tote should all align.
Finishing the tote
Weave every remaining yarn tail into the wrong side of the work, keeping each tail within matching-colored stitches whenever practical.
Light blocking can help straighten the tote body and settle the handles. Avoid stretching the top edge wider than the oval base; the finished tote should retain a softly rectangular silhouette with rounded lower corners.
If using cotton yarn, lightly dampen the tote and shape it flat. Arrange the handles symmetrically, smooth the lower oval, and allow the bag to dry completely.
Do not press the bow flat. The bow edges, green stems, and red cherries should retain a little natural appliqué relief.
Troubleshooting
- The tote base cups instead of lying flat: Recheck all five increase points at both rounded ends of R2–R4. A missing increase will pull that end upward.
- The tote body flares outward: Make sure no increases are added after R4. R5 through the top edge should remain at 110 stitches.
- The two handles sit at different heights: Check that both handle strips contain 69 stitches across and that their attachment positions match on the front and back panels.
- One bow loop looks narrower or flatter: Check the 21, 27, and 33-stitch progression and make sure all increases remain concentrated around the broad outer end.
- The bow loses its center ridge: Do not flatten or heavily sew through the foundation-chain line running from the narrow center toward the outer edge of each loop.
- The cherries look uneven: Confirm that both pieces use the same 8, 16, and 24 hdc progression followed by the same 24-sc edging.
A few final details to check
- The cream tote has a rounded oval base, straight walls, and two matching eyelet handles.
- The pink bow has two broad fan-shaped loops with visible horizontal center ridges and one narrow center band.
- There are exactly two matching red circular cherries.
- Two short green crochet stems form a V between the cherries and disappear beneath the bow center.
- The complete motif is centered on the front panel with visible cream crochet surrounding it.
Once the tote is lightly blocked and the appliqués are secure, the blush bow and twin cherries should sit clearly against the cream crochet body while keeping the bag practical and uncluttered. If you make this tote, feel free to share your finished version or leave a question if you need help with the oval base, bow shaping, or assembly.












