
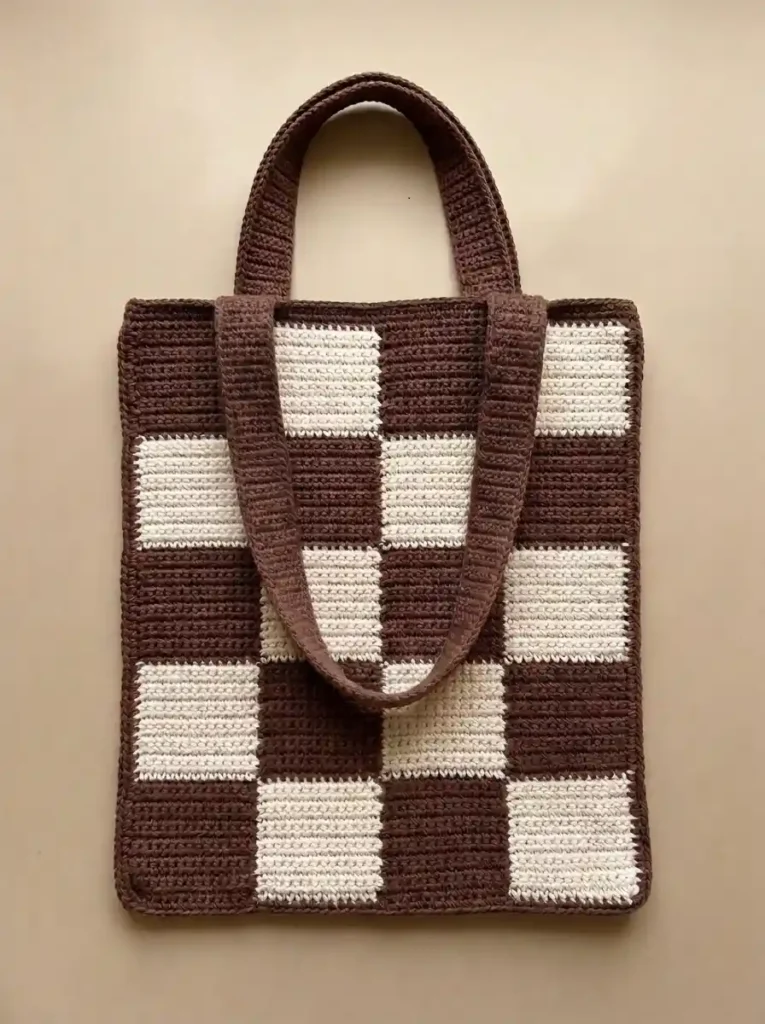
This two-tone checkerboard tote keeps the construction simple while letting the bold cream-and-cocoa pattern do most of the work. The bag has a clean rectangular body, five rows of large checker blocks, a narrow dark edging, and two broad solid-brown crochet handles.
The front and back are made as matching flat panels using single-crochet intarsia, so the checkerboard is built directly into the fabric instead of assembling twenty separate squares. The two panels are joined along the sides and bottom, then the top edge and matching handles are added in cocoa brown.
Project at a glance
| Skill level | Easy intermediate |
|---|---|
| Terminology | US crochet terms |
| Construction | Two checkerboard panels, visible crochet seam, and two separate handles |
| Yarn | Medium worsted cotton or cotton-blend |
| Hook | About 4 mm, or a size that produces firm, clearly defined single crochet |
Exact gauge is not essential, but both panels must be made with the same yarn, hook, and tension. The finished fabric should feel sturdy enough to hold a rectangular tote shape without becoming stiff or board-like.
Materials
- Medium worsted-weight cotton or cotton-blend yarn in deep cocoa brown
- Medium worsted-weight cotton or cotton-blend yarn in warm cream
- 4 mm crochet hook, or a hook that gives a firm single-crochet fabric
- Yarn bobbins or several small yarn balls for intarsia
- Yarn needle
- Scissors
- Stitch markers
Use the same yarn line or a very similar yarn in both colors. A noticeable difference in strand thickness can make the cream blocks wider or taller than the cocoa blocks and distort the checkerboard.
Stitches and abbreviations
- ch – chain
- sl st – slip stitch
- sc – single crochet
- RS – right side
- WS – wrong side
Before you start
Each checker block is 8 stitches wide and 10 rows tall. Four blocks across give a 32-stitch-wide panel, and five checker rows create the tall rectangular body.
Work the panels in turned single-crochet rows. Ch 1 at the beginning of a row does not count as a stitch.
For the cleanest checkerboard, use a separate yarn source for each color section across the row. Change color on the final yarn-over of the stitch immediately before the new block. Do not carry the unused color behind an entire 8-stitch block, because long floats can show through or pull the fabric.
🧶 Crochet Tip: When changing colors, keep the four yarn sources in the same left-to-right order and turn the panel in alternating directions. This keeps the strands easier to manage and helps prevent tangling at the block boundaries.
Crochet pattern
Front checkerboard panel
With cocoa brown, ch 33.
Row 1: Beginning in the second ch from the hook, sc in the next 8 ch with cocoa. Change to cream and sc in the next 8 ch. Change to a second cocoa yarn source and sc in the next 8 ch. Change to a second cream yarn source and sc in the final 8 ch. Turn. (32 sc)
Rows 2–10: Ch 1, turn. Sc in the first 8 sts with cocoa, sc in the next 8 sts with cream, sc in the next 8 sts with cocoa, sc in the final 8 sts with cream, changing yarn on the final yarn-over before each new 8-stitch section. (32 sc)
After Row 10, fasten off all four yarn sources.
Row 11: With cream, ch 1 and join in the first stitch. Sc in the next 8 sts. Change to cocoa and sc in the next 8 sts. Change to a second cream yarn source and sc in the next 8 sts. Change to a second cocoa source and sc in the final 8 sts. Turn. (32 sc)
Rows 12–20: Ch 1, turn. Sc in the first 8 sts with cream, the next 8 sts with cocoa, the next 8 sts with cream, and the final 8 sts with cocoa. (32 sc)
Fasten off all four yarn sources after Row 20.
Row 21: Join cocoa in the first stitch. Ch 1. Sc in the first 8 sts with cocoa, the next 8 sts with cream, the next 8 sts with cocoa, and the final 8 sts with cream. Turn. (32 sc)
Rows 22–30: Ch 1, turn. Repeat the same cocoa, cream, cocoa, cream arrangement across the four 8-stitch blocks. (32 sc)
Fasten off all yarn sources after Row 30.
Row 31: Join cream in the first stitch. Ch 1. Sc in the first 8 sts with cream, the next 8 sts with cocoa, the next 8 sts with cream, and the final 8 sts with cocoa. Turn. (32 sc)
Rows 32–40: Ch 1, turn. Repeat the same cream, cocoa, cream, cocoa arrangement. (32 sc)
Fasten off all yarn sources after Row 40.
Row 41: Join cocoa in the first stitch. Ch 1. Sc in the first 8 sts with cocoa, the next 8 sts with cream, the next 8 sts with cocoa, and the final 8 sts with cream. Turn. (32 sc)
Rows 42–50: Ch 1, turn. Repeat the cocoa, cream, cocoa, cream arrangement. (32 sc)
Fasten off and weave in the color-change ends securely on the WS.
The completed panel has exactly four checker columns and five checker rows. From the RS, the bottom and top checker rows both begin with cocoa on the left.
Back checkerboard panel
Make a second panel exactly the same as the front panel, repeating Rows 1–50 with the same color order.
Before assembly, lay the two panels on top of one another. Their width, height, checker boundaries, and outer edges should align without stretching either piece.
🧶 Checkpoint: Each panel should show twenty large checks: four across and five high. The vertical boundaries should form three straight lines from bottom to top, and every horizontal checker change should occur after the same ten-row depth.
Join the bag body
Place the two panels together with WS touching and RS facing outward. Match the checker boundaries and pin or clip the edges together.
With cocoa brown, join yarn at the upper-left corner through both layers.
Work 1 sc through both panels into each row-end space down the first side. (50 sc)
Work 2 sc into the lower-left corner to turn.
Work 1 sc through both layers in each of the 32 foundation-stitch positions across the bottom. (32 sc)
Work 2 sc into the lower-right corner.
Work 1 sc through both layers into each of the 50 row-end spaces up the second side. Fasten off at the top-right corner. (136 sc total around the joined sides and bottom)
This exposed cocoa seam creates the narrow dark outline around the side and bottom edges while keeping the bag body flat and rectangular.
Top edging
Keep the bag RS out.
Join cocoa yarn at one side seam along the top opening. Ch 1.
R1: Sc in each of the 32 stitches across the front top edge, work 1 sc into the opposite side seam, sc in each of the 32 stitches across the back top edge, then work 1 sc into the starting side seam. Join with a sl st to the first sc. Fasten off. (66 sc)
Keep this round relaxed. A tight top edging will pull the bag opening inward and change the clean rectangular silhouette.
Wide cocoa handles — make 2
Both handles use the same solid cocoa-brown yarn and the same construction.
With cocoa, ch 7.
Row 1: Beginning in the second ch from the hook, sc in each ch across. Turn. (6 sc)
Rows 2–80: Ch 1, turn, sc in each of the 6 sts across. (6 sc)
Fasten off with a long sewing tail.
Make the second handle exactly the same way.
The straps should be broad, flat rectangles with consistent edges. If your straps twist easily, lightly block them flat before attaching them to the tote.
Attach the handles
The bag has one handle attached to the front panel and one matching handle attached to the back panel. Their actual crochet length and construction are the same, although one handle may naturally fall forward when the finished tote is set down.
Front handle
Lay the tote flat with the front panel facing up. Count across the 32 stitches along the top edge.
Place the left end of the first handle over front-panel stitches 6–11 and the right end over stitches 22–27. Keep both ends vertical and make sure the handle is not twisted.
Overlap approximately the first 7 rows of each strap end onto the outside of the front panel.
Using cocoa yarn and a yarn needle, sew each strap end securely around both long sides and across its lower edge. Add a horizontal line of stitches across the upper part of the overlap for extra support.
Keep the sewing tension firm but not tight enough to gather the checkerboard beneath the handle.
Back handle
Turn the tote over and attach the second handle to the back panel in exactly the same positions: stitches 6–11 for the left attachment and stitches 22–27 for the right attachment.
Overlap approximately 7 strap rows and sew the two ends using the same attachment path as the front handle.
When the tote stands upright, both straps should form broad matching loops. When the bag is laid or photographed flat, the front strap can naturally fall forward across the checkerboard while the rear strap remains standing behind it.
🧶 Checkpoint: Before finishing the handle seams, hold the tote by both straps. The attachment points should be mirrored front to back, both handles should carry the weight evenly, and the top edge should remain straight instead of folding sharply inward.
Finishing the tote
Weave in every remaining yarn end on the inside of the tote. At checkerboard color changes, weave each end back into its own color area so cream yarn does not show through a cocoa block or vice versa.
Lightly block the bag body if needed. Shape the side edges into straight vertical lines and square the lower corners gently. Avoid stretching individual checker blocks because the main goal is to keep all twenty checks visually similar in size.
Lay the handles flat while damp if they have developed a twist. Allow the tote to dry completely before using it.
Troubleshooting
- The checker blocks look rectangular instead of square: your row gauge and stitch gauge are not balanced. If the blocks are too short, add an equal number of rows to every 10-row checker band; if they are too tall, use fewer rows consistently in all five bands.
- The vertical checker boundaries lean: color changes are probably moving by one stitch. Count each section carefully so every block remains exactly 8 stitches wide.
- The side edges look wavy: make sure you work one joining sc into each row-end space and keep the seam tension even from top to bottom.
- The top opening pulls inward: the cocoa edging round is too tight. Rework it more loosely or use a slightly larger hook for that round only.
- One handle looks longer when the tote is lying flat: first compare the actual row counts. If both have 80 rows, the difference is usually caused by one handle standing upright while the other has fallen forward rather than by a construction error.
Final check
- Each panel has exactly four checker columns and five checker rows.
- The front and back checkerboards use the same alternating cream-and-cocoa arrangement.
- The sides and bottom are joined with one continuous cocoa crochet seam.
- There are exactly two solid cocoa handles, both 6 stitches wide and 80 rows long.
- The finished tote keeps a clean rectangular body with a straight open top and broad secure strap attachments.
Once the seams and handles are finished, the large checker blocks should give the tote a bold graphic look while the cocoa edging and wide straps keep the shape clean and practical. If you make this checkerboard tote, feel free to share your finished version or leave a question if you get stuck on the color changes or assembly.












