
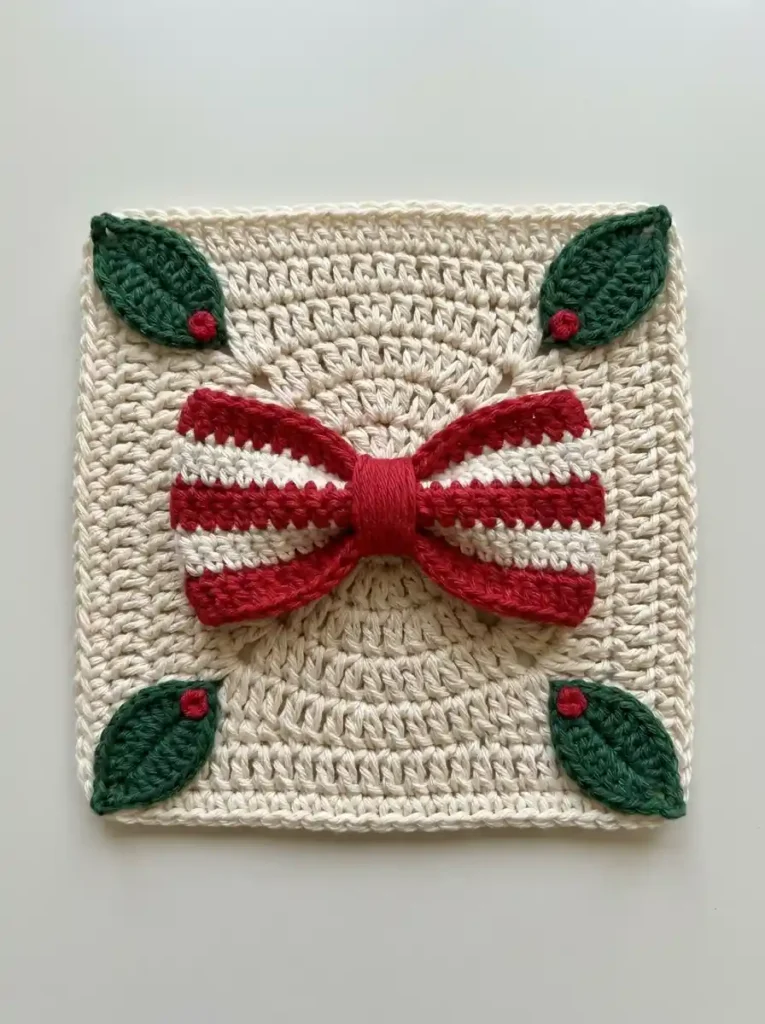
This festive crochet square combines a warm cream background with a dimensional red-and-ivory striped bow and four simple evergreen corner leaves. Tiny red berries beside the leaves repeat the bow color without making the design feel crowded.
The cream background begins as a round center and then transitions into a square, which creates the softly radiating stitch lines around the bow before the sides straighten toward the outer edge. The bow is made separately as one five-band striped panel, gathered through the middle, and finished with a red center band. Four individually crocheted leaves complete the corners.
Project at a glance
| Skill level | Confident beginner |
|---|---|
| Terminology | US crochet terms |
| Construction | Round-to-square base with separate striped bow, center band, and four leaf appliqués |
| Yarn | DK or light-worsted cotton or cotton blend |
| Hook | 3.5 mm crochet hook |
| Finished size | Usually about 5.5 to 6.5 inches square with the suggested yarn and hook |
Materials
- DK or light-worsted cotton yarn in warm cream for the square
- DK or light-worsted yarn in candy red for the bow stripes, center band, and berries
- DK or light-worsted yarn in soft ivory for the bow stripes
- DK or light-worsted yarn in deep evergreen for the four leaves
- 3.5 mm crochet hook
- Yarn needle
- Scissors
- Four stitch markers, useful for marking the square-conversion corners
- Blocking mat and pins, optional
Use the same general yarn weight for the square, bow, and leaves. A smooth cotton or cotton-rich yarn gives the cream background enough structure to keep the round-to-square shaping clear while preserving good definition in the striped bow and leaves.
Exact gauge is not essential for a decorative motif. Aim for a firm but flexible fabric that lies flat. The bow panel should also be dense enough to hold its folds after the center is gathered.
Stitches and abbreviations
- ch — chain
- ch-sp — chain space
- dc — double crochet
- hdc — half double crochet
- sc — single crochet
- sl st — slip stitch
- st/sts — stitch/stitches
- RS — right side
- WS — wrong side
Before you start
The first five cream rounds form a flat circle. The sixth round changes that circle into a square by combining four corner groups with shorter stitches through the middle of each side. The remaining cream rounds continue as ordinary square rounds.
The cream rounds are joined and are not turned. The beginning ch 2 does not count as a stitch. Join each round to the first actual stitch unless another join is stated.
The bow is worked in turned sc rows with five broad horizontal bands: red, ivory, red, ivory, red. Each band is two rows deep.
Block the cream square before attaching the decorative pieces. A flat base makes the bow easier to center and helps all four leaves sit at matching angles.
Crochet pattern
Warm cream round center
With cream yarn, make a magic ring. Keep the RS facing you and do not turn.
R1: Ch 2; this does not count as a stitch. Work 12 dc in the ring. Pull the ring closed and join with a sl st to the first dc. (12 dc)
R2: Ch 2, work 2 dc in each stitch around. Join to the first dc. (24 dc)
R3: Ch 2, [1 dc in the next stitch, 2 dc in the next stitch] × 12. Join. (36 dc)
R4: Ch 2, [1 dc in each of the next 2 stitches, 2 dc in the next stitch] × 12. Join. (48 dc)
R5: Ch 2, [1 dc in each of the next 3 stitches, 2 dc in the next stitch] × 12. Join. (60 dc)
The piece should now be a flat cream circle with five clearly readable concentric rounds.
Convert the circle into a square
R6 creates the four corners. The first stitch of the round becomes the first corner anchor. The other three corner anchors are spaced evenly around the circle with 14 stitches between one corner anchor and the next.
R6: Ch 2; this does not count as a stitch. Work (2 dc, ch 2, 2 dc) in the same first stitch.
Across the next 14 stitches, work 1 dc in each of the next 2 stitches, 1 hdc in each of the next 2 stitches, 1 sc in each of the next 6 stitches, 1 hdc in each of the next 2 stitches, and 1 dc in each of the next 2 stitches.
Work (2 dc, ch 2, 2 dc) in the next stitch.
Repeat the 14-stitch side sequence followed by the corner group two more times. Work the same 14-stitch side sequence across the final 14 stitches and join with a sl st to the first dc of the starting corner. (72 sts, 4 ch-2 corner spaces; 18 sts per side)
🧶 Checkpoint: The center should still look round, but four definite corners should now extend outward around it. The sc sections sit near the middle of each side, while the taller stitches lead toward the corners.
Build out the cream square
After each of the following rounds, sl st into the next dc and then into the next ch-2 corner space before beginning the new round.
R7: Ch 2; this does not count as a stitch. Work (2 dc, ch 2, 2 dc) in the same corner space, 1 dc in each of the next 18 stitches, [(2 dc, ch 2, 2 dc) in the next corner space, 1 dc in each of the next 18 stitches] × 3. Join to the first dc. (88 dc, 4 ch-2 corner spaces; 22 dc per side)
R8: Move into the next corner space. Ch 2, work (2 dc, ch 2, 2 dc) in the same corner space, 1 dc in each of the next 22 dc, [(2 dc, ch 2, 2 dc) in the next corner space, 1 dc in each of the next 22 dc] × 3. Join. (104 dc, 4 ch-2 corner spaces; 26 dc per side)
R9: Move into the next corner space. Ch 2, work (2 dc, ch 2, 2 dc) in the same corner space, 1 dc in each of the next 26 dc, [(2 dc, ch 2, 2 dc) in the next corner space, 1 dc in each of the next 26 dc] × 3. Join. (120 dc, 4 ch-2 corner spaces; 30 dc per side)
Outer cream edging
Move into the next ch-2 corner space.
R10: Ch 1; this does not count as a stitch. Work 3 sc in the same corner space, 1 sc in each of the next 30 dc, [3 sc in the next ch-2 corner space, 1 sc in each of the next 30 dc] × 3. Join with a sl st to the first sc. Fasten off. (132 sc)
Lightly block the square. Keep the outer sides straight while allowing the concentric circular center to remain visible inside the square shaping.
Five-band striped bow panel
The bow starts as one rectangular panel. The five horizontal bands remain visible after the panel is gathered into two loops.
With candy red yarn, ch 31.
Row 1: Beginning in the second ch from the hook, sc in each ch across. Turn. (30 sc)
Row 2: Ch 1; this does not count as a stitch. Sc in each stitch across. Turn. (30 sc)
Change to ivory.
Row 3: Ch 1, sc in each stitch across. Turn. (30 sc)
Row 4: Ch 1, sc in each stitch across. Turn. (30 sc)
Change to red.
Row 5: Ch 1, sc in each stitch across. Turn. (30 sc)
Row 6: Ch 1, sc in each stitch across. Turn. (30 sc)
Change to ivory.
Row 7: Ch 1, sc in each stitch across. Turn. (30 sc)
Row 8: Ch 1, sc in each stitch across. Turn. (30 sc)
Change to red.
Row 9: Ch 1, sc in each stitch across. Turn. (30 sc)
Row 10: Ch 1, sc in each stitch across. Fasten off. (30 sc)
The finished panel should show exactly five bands in this order: red, ivory, red, ivory, red. Each band is two rows deep. Weave in the color-change tails on the WS before gathering the panel.
Shape the bow
Lay the striped panel horizontally with the RS facing up. Fold it gently in half from side to side to locate the exact midpoint, then open it again.
At the midpoint, pinch the panel vertically into two or three compact accordion folds. Bring the top and bottom edges toward one another while keeping the five colored bands running horizontally.
Thread a length of red yarn onto a yarn needle. Wrap the yarn firmly around the pinched center several times, keeping all the wraps inside one narrow central area. Secure the yarn on the back.
Spread the striped fabric outward on both sides. Shape each half into one broad loop, allowing the upper portion to angle slightly upward and the lower portion slightly downward.
The top and bottom red bands form the outer edges of the bow. The middle red band runs horizontally through the center of both loops, with one ivory band above it and another below it.
🧶 Checkpoint: Before covering the gathered center, make sure both loops are similar in size and all five stripes remain readable. The outer ends should stay broad and softly curved rather than narrowing into points.
Red center band
With red yarn, ch 5.
Row 1: Beginning in the second ch from the hook, sc in each ch across. Turn. (4 sc)
Rows 2–9: Ch 1, sc in each stitch across. Turn after Rows 2–8. Do not turn after Row 9. (4 sc)
Fasten off, leaving a long sewing tail.
Wrap this strip vertically around the gathered middle of the bow with the RS facing outward. Overlap the short ends at the back and sew them together securely.
The band should completely cover the gathering wraps while remaining narrow enough that the striped loops begin immediately beside it.
Evergreen leaves
Make four identical leaves.
With evergreen yarn, ch 9.
R1: Beginning in the second ch from the hook, sl st in the first ch, sc in the next ch, hdc in the next ch, dc in each of the next 2 ch, hdc in the next ch, sc in the next ch, then work (sc, ch 2, sc) in the final ch.
Rotate the work and continue along the unused loops on the opposite side of the foundation chain: sc in the next ch, hdc in the next ch, dc in each of the next 2 ch, hdc in the next ch, sc in the next ch, sl st in the final ch. Join with a sl st to the first sl st. (16 sts, 1 ch-2 tip space)
R2: Ch 1; this does not count as a stitch. Sc in the same stitch as the join and in each of the next 7 stitches, work (sc, ch 2, sc) in the ch-2 tip space, then sc in each of the remaining 8 stitches. Join with a sl st to the first sc. Fasten off, leaving a long sewing tail. (18 sc, 1 ch-2 tip space)
Finger-shape each leaf into a broad oval with a definite pointed tip. Keep the foundation chain visible as the raised center ridge and allow the second round to create a clearly defined outer edge.
Repeat until you have exactly four leaves.
Assembling the motif
Attach the bow
Place the blocked cream square RS up. Position the striped bow horizontally over the circular center, with the red center band directly over the middle of the square.
The bow should cover much of the central circle while leaving the curved cream rounds clearly visible above and below it. Keep plenty of open cream background between the bow ends and the four leaves.
Using red yarn, sew the back of the center band firmly to the cream base. Add several small hidden stitches through the inner sections of the two loops immediately beside the center.
Leave most of each outer loop free. The striped outer ends should lift away from the cream square, giving the bow its dimensional gathered appearance.
Shape the upper halves of the loops slightly upward and the lower halves slightly downward. Keep both outer ends broad and softly rounded.
Position the corner leaves
Place one evergreen leaf diagonally across each corner. The pointed end of each leaf should aim toward the nearest outside corner, while its broad rounded base points inward toward the bow.
Keep the leaves close to the outer cream edge. The pointed tips can approach the corners closely, but the green crochet should stay inside the finished perimeter.
Using each green sewing tail, stitch the leaf securely around its outer edge with small hidden stitches. Keep the seam relaxed enough that the raised center ridge remains visible.
Add the red berries
Place exactly one tiny red berry beside the inward-facing base of every leaf.
Thread a yarn needle with candy-red yarn. Bring the yarn through beside the leaf base and make several compact overlapping stitches within the same small area.
Pass the yarn through the center of the stitched group once or twice to draw it into a small raised round dot. Secure the yarn on the WS.
The berry should remain much smaller than the leaf. Repeat the same placement for all four corners.
Finishing your square
Weave in all remaining yarn tails on the WS. Keep darker red and green tails within matching-color areas whenever possible before weaving them into the cream fabric.
Finger-shape both bow loops after sewing. The center band should remain firmly anchored while the striped outer ends curve gently forward.
If the square needs a final adjustment, lightly mist the cream background and pin only the outer sides and corners. Avoid flattening the raised bow while blocking.
Troubleshooting
- The cream center ruffles before it becomes square: Check the increase count in R2–R5. Each circle round should add exactly 12 dc.
- The center forms a bowl: A circle increase is probably missing or the tension is unusually tight. Recheck the round count before working the square conversion.
- The square conversion looks lopsided: Make sure exactly 14 original circle stitches separate each pair of corner-anchor stitches in R6.
- The outer square cups at the corners: Keep the ch-2 corner spaces relaxed so the later dc rounds have enough room to turn.
- The bow looks too tall: The bow panel should contain only five color bands and ten rows total.
- The bow stays rectangular: Gather the center into two or three deeper accordion folds before adding the center band.
- One bow loop is larger than the other: The gather is not positioned at the true midpoint. Fold the panel in half first to locate the center.
- A leaf looks narrow or twisted: The foundation chain is probably too tight. Remake it more loosely so the taller middle stitches can spread into a broad leaf.
Once the bow, four leaves, and tiny berries are secured, the square is ready to use alone or alongside other coordinated motifs. If you make one, feel free to share your finished square or leave a question if you get stuck on any part of the pattern.












