
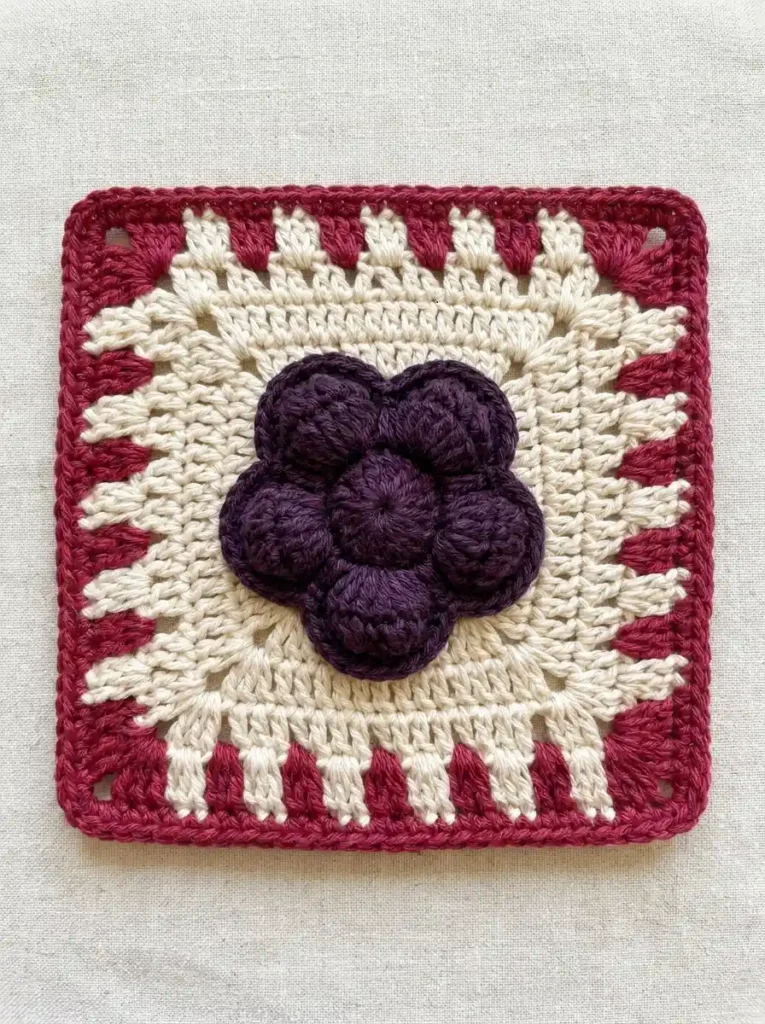
This blackberry-inspired granny square pairs a creamy solid center with a deep berry-red border and a raised plum-purple berry cluster. The center motif is built from five rounded outer lobes with a smaller circle layered over their meeting point, giving the berry a soft dimensional look without stuffing.
The border is the detail that gives this square its picnic feel. A cream openwork round creates five vertical cream blocks along each side, then berry-red clusters fill the spaces between them before a final red edging ties everything together. The result is a simple two-color checker effect with clearly defined corners.
Project at a glance
| Skill level | Advanced beginner |
|---|---|
| Terminology | US crochet terms |
| Construction | Center-out square with separately crocheted berry appliqué pieces |
| Yarn | DK or light-worsted smooth cotton or cotton-blend yarn |
| Hook | 3.5 mm or size needed for a firm, defined fabric |
Materials
- DK or light-worsted yarn in warm cream for the center square and cream border blocks
- DK or light-worsted yarn in muted blackberry or berry red for the checker border and outer edging
- A small amount of deep plum-purple yarn for the raised berry cluster
- 3.5 mm crochet hook
- Yarn needle
- Stitch marker
- Scissors
- Blocking mat and pins if desired
A smooth cotton or cotton-blend yarn works well here because the double-crochet posts in the square and the rounded shapes of the blackberry lobes stay clearly defined. Use the same yarn weight for all three colors so the border blocks remain even and the berry does not become disproportionately bulky.
Stitches and abbreviations
- ch – chain
- ch-sp – chain space
- sl st – slip stitch
- sc – single crochet
- hdc – half double crochet
- dc – double crochet
- MR – adjustable magic ring
- RS – right side
- st(s) – stitch(es)
Before you start
The main square is worked in joined rounds with the RS facing. The beginning ch 3 counts as the first dc. Slip-stitch joins do not count as stitches.
The berry lobes are worked separately in continuous rounds. Mark the first stitch of each round and do not turn. The final sc round on each lobe is worked without increases; this gives the pieces their slightly cupped, raised appearance.
The cream and red checker border is made in two stages. First, cream blocks are separated by open chain spaces. The red round then fills those spaces while chaining across the cream blocks. Keep those chains relaxed so the border does not pull inward.
🧶 Crochet Tip: Before starting the checker border, make sure the cream square lies flat. The alternating cream and red sections will be much easier to keep even if the foundation rounds are not already cupping or rippling.
Crochet pattern
Cream center square
With cream yarn, make an MR.
R1: Ch 3, 2 dc in ring, ch 2, [3 dc in ring, ch 2] × 3. Pull the ring closed. Join with a sl st to the top of the beginning ch 3. (12 dc total; 3 dc per side; 4 ch-2 corner spaces)
R2: Sl st in each of the next 2 dc and into the next ch-2 corner space. Ch 3, dc, ch 2, 2 dc in the same corner space. [Dc in each of the next 3 dc, work 2 dc, ch 2, 2 dc in the next corner space] × 3. Dc in each of the remaining 3 dc. Join to the top of the beginning ch 3. (28 dc total; 7 dc per side; 4 ch-2 corner spaces)
R3: Sl st across to the next corner space. Ch 3, dc, ch 2, 2 dc in the same space. [Dc in each of the next 7 dc, work 2 dc, ch 2, 2 dc in the next corner space] × 3. Dc in each of the remaining 7 dc. Join. (44 dc total; 11 dc per side; 4 ch-2 corner spaces)
R4: Sl st across to the next corner space. Ch 3, dc, ch 2, 2 dc in the same space. [Dc in each of the next 11 dc, work 2 dc, ch 2, 2 dc in the next corner space] × 3. Dc in each of the remaining 11 dc. Join. (60 dc total; 15 dc per side; 4 ch-2 corner spaces)
R5: Sl st across to the next corner space. Ch 3, dc, ch 2, 2 dc in the same space. [Dc in each of the next 15 dc, work 2 dc, ch 2, 2 dc in the next corner space] × 3. Dc in each of the remaining 15 dc. Join. (76 dc total; 19 dc per side; 4 ch-2 corner spaces)
R6: Sl st across to the next corner space. Ch 3, dc, ch 2, 2 dc in the same space. [Dc in each of the next 19 dc, work 2 dc, ch 2, 2 dc in the next corner space] × 3. Dc in each of the remaining 19 dc. Join. (92 dc total; 23 dc per side; 4 ch-2 corner spaces)
R7: Sl st across to the next corner space. Ch 3, dc, ch 2, 2 dc in the same space. [Dc in each of the next 23 dc, work 2 dc, ch 2, 2 dc in the next corner space] × 3. Dc in each of the remaining 23 dc. Join. (108 dc total; 27 dc per side; 4 ch-2 corner spaces)
Fasten off. The next cream round uses the same color, but rejoining at the first stitch after a corner makes the checker repeat much easier to follow.
Cream checker foundation
With the RS facing, join cream yarn in the first dc immediately after any ch-2 corner space.
R8: Ch 3, dc in each of the next 2 dc. [Ch 3, skip the next 3 dc, dc in each of the next 3 dc] × 4. Ch 4 across the next ch-2 corner space without working into it.
On the next side, dc in each of the next 3 dc, [ch 3, skip the next 3 dc, dc in each of the next 3 dc] × 4, then ch 4 across the corner space.
Repeat the same side sequence around the remaining two sides. After the fourth side, ch 4 across the final corner space and join to the top of the beginning ch 3. (20 cream 3-dc blocks, 16 ch-3 side spaces, 4 ch-4 corner spaces; 5 cream blocks along each side)
The five cream blocks on each side should project outward from the solid center, with four even chain spaces separating them.
Berry-red checker round
Join berry-red yarn in any ch-4 corner space.
R9: Ch 3, 2 dc, ch 2, 3 dc in the same ch-4 corner space.
Across the first side, [ch 3 over the next cream 3-dc block, 3 dc in the next cream ch-3 space] × 4. Ch 3 over the final cream 3-dc block. Work 3 dc, ch 2, 3 dc in the next ch-4 corner space.
Repeat the same side sequence around the next three sides, working the same 3 dc, ch 2, 3 dc construction in each remaining corner. After the fourth side, join to the top of the beginning ch 3 instead of working into the starting corner again. (72 red dc, 20 ch-3 side spaces, 4 ch-2 corner spaces; 18 red dc and 5 ch-3 spaces between adjacent corner spaces)
The red clusters should now sit between the five cream blocks on every side. The ch-3 sections travel across the tops of the cream blocks without covering them, so both colors remain clearly visible.
🧶 Checkpoint: Each side should show five cream vertical blocks separated by four red sections, with a wider red corner at both ends. If one side has a different number of cream blocks, correct the repeat before adding the final edging.
Final berry-red edging
Keep the berry-red yarn attached. Sl st across the next 2 dc and into the next ch-2 corner space.
R10: Ch 1, work sc, ch 2, sc in the corner space.
Across the side, sc in each of the next 3 dc, [3 sc in the next ch-3 space, sc in each of the next 3 dc] × 4, 3 sc in the final ch-3 space, then sc in each of the next 3 dc. In the next corner space work sc, ch 2, sc.
Repeat around all four sides. Join with a sl st to the first sc. (140 sc, 4 ch-2 corner spaces; 35 sc per side when one corner sc at each end is included)
Fasten off and weave in the ends. This final round creates the narrow uninterrupted red outline around the square while leaving the cream blocks visible beneath it.
Five large blackberry lobes
Make five identical pieces with deep plum-purple yarn. Work continuously and do not turn.
R1: Make an MR and work 10 hdc into the ring. (10 sts)
R2: Work 2 hdc in each st around. (20 sts)
R3: Sc in each st around without increasing. (20 sts)
Sl st loosely in the next st and fasten off, leaving a sewing tail.
The final round intentionally has no increases. Rather than lying completely flat, each piece should curl upward very slightly around its edge. Do not stuff the lobes.
Smaller center berry lobe
With deep plum-purple yarn, work continuously.
R1: Make an MR and work 8 hdc into the ring. (8 sts)
R2: Work 2 hdc in each st around. (16 sts)
R3: Sc in each st around without increasing. (16 sts)
Sl st in the next st and fasten off, leaving a long tail for sewing.
Assemble the blackberry cluster
The blackberry is assembled from six separately crocheted pieces: five larger outer lobes and one smaller center lobe. Arrange the five large circles first, then cover their inner meeting point with the smaller circle.
Lay the square RS up and find its center. Position the first large lobe slightly above and left of center, roughly at the 11 o’clock position. Place a second lobe above and right at about 1 o’clock.
Place the third lobe at the lower-right side around 4 o’clock, the fourth at the bottom around 6 o’clock, and the fifth at the lower-left side around 8 o’clock. The five pieces should form a compact rounded cluster with their inner edges meeting or overlapping slightly.
The outer lobes should not form a perfect five-point flower. Push them close enough together that the boundaries touch and the overall silhouette reads as one plump berry cluster.
Pin the pieces temporarily and look at the arrangement from directly above. The upper pair should sit side by side, one lobe should project at each lower side, and the bottom lobe should extend slightly lower than the others.
Using the matching purple tails, sew each outer lobe to the cream square around its outer edge. Catch the back strands of the final sc round where practical so the visible front edge stays clean. Keep the seam snug enough to hold the lobe securely but do not stretch the circle flat; the small amount of cupping from R3 should remain visible.
Where two outer lobes overlap, allow the later piece to sit slightly over the neighboring edge. This small amount of layering creates the compact raised appearance of the finished cluster.
Once all five outer lobes are secured, position the smaller purple circle directly over their central meeting point. It should overlap the inner edge of every surrounding lobe and hide the small gaps between them.
Sew around the complete edge of the center lobe using its purple tail. Keep the center round and softly raised rather than pulling the seam tightly into the cream background.
🧶 Checkpoint: When the cluster is finished, you should be able to distinguish five larger outer lobes and one smaller center lobe, but there should be no obvious cream gap at their meeting point.
Finishing your square
Weave the purple sewing tails into the backs of the berry pieces before hiding the remaining ends in the cream square. Keep purple yarn within the area covered by the appliqué so dark strands do not show through the pale background.
Lightly block the square rather than stretching it aggressively. Shape the four corners so the ch-2 spaces remain visible and the outer red edge forms a soft square with gently rounded corners.
Keep the center berry away from direct pressure while blocking. The five larger lobes and smaller center should retain their slightly domed shape instead of being pressed completely flat.
Troubleshooting
- The solid cream center is cupping: the corner chains may be too tight. Relax each ch-2 corner space and keep the dc tension even before moving on to the checker rounds.
- The checker border pulls inward: the ch-3 strands worked across the cream blocks are probably too tight. Remake those chains more loosely so they span the full width of each three-stitch cream block.
- The cream border blocks lean to one side: make sure each block is worked over three consecutive base stitches and that every skipped section contains exactly three stitches.
- The red and cream repeat does not match on all four sides: each side of R8 must contain five cream blocks and four ch-3 spaces before the corner chain.
- The blackberry looks like six unrelated circles: move the five outer lobes closer together and let their edges overlap slightly, then place the smaller center piece over the complete inner junction.
Once everything is assembled, the square should have a broad cream center, a red-and-cream picnic-style border, a narrow berry-red outside edge, and a compact raised purple cluster with five rounded outer lobes surrounding one smaller center.
If you make your own blackberry square, feel free to share how it turned out or leave a question if you need help keeping the checker border even or arranging the berry cluster.












