
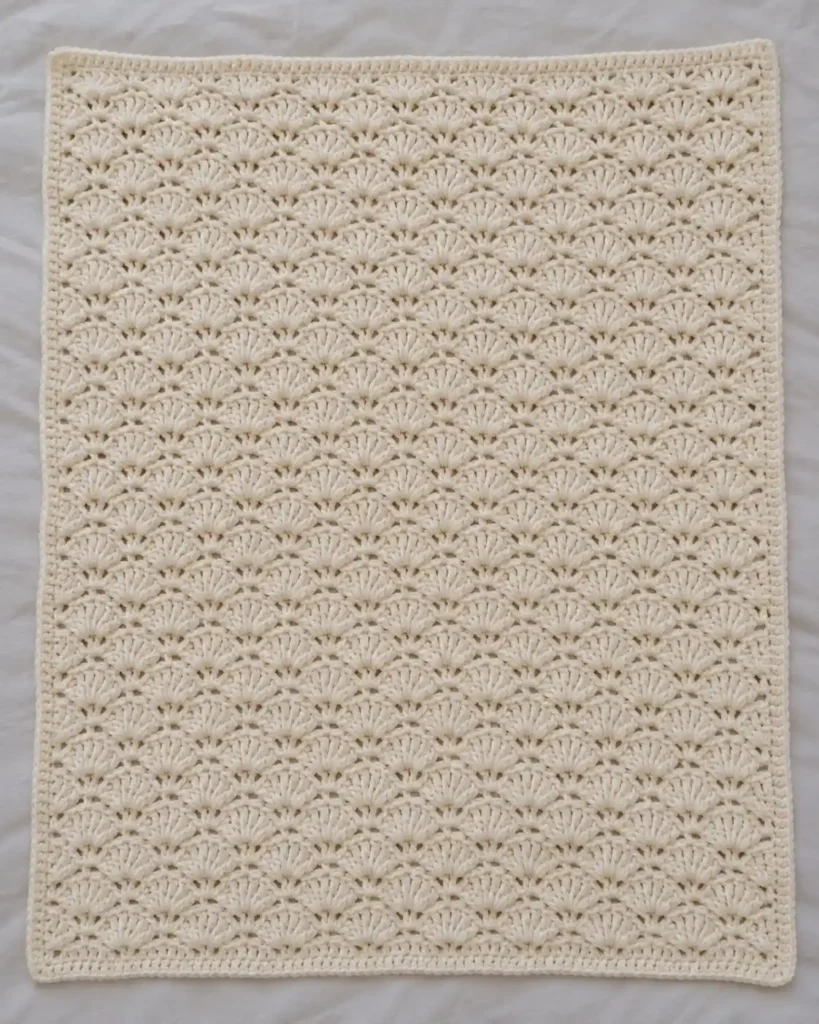
This crochet shell stitch baby blanket has a soft, timeless texture made from closely staggered rows of five-double-crochet fans. Worked entirely in warm cream yarn, the simple color lets the shell structure stand out while giving the finished blanket the gentle, classic appearance of a cherished baby wrap.
The blanket is one continuous rectangular panel worked back and forth in rows. There are no motifs or separate pieces to assemble. Eighteen full shells span the main repeat, alternating rows offset the fans, and two narrow rounds of single crochet create the clean framed edge.
Project at a glance
| Skill level | Easy to intermediate; suitable for crocheters comfortable with sc, dc, turning rows, and repeating stitch placement. |
|---|---|
| Terminology | US crochet terms |
| Construction | One rectangular panel worked back and forth in staggered shell-stitch rows, followed by two single-crochet border rounds. |
| Yarn | Medium-weight #4 smooth baby acrylic or acrylic-cotton blend. |
| Hook | 5 mm crochet hook, or the size needed to produce a soft fabric with clearly separated shell posts. |
| Finished size | Approximately 30 inches wide by 36 inches long with the suggested yarn, hook, and row count. |
The shell pattern contracts slightly compared with the unworked foundation chain, so the chain may initially look wider than the finished blanket. Once several rows are complete, the staggered fans settle into a dense but flexible fabric with small, regular spaces between neighboring shells.
Materials
- Medium-weight #4 yarn in one warm cream or ivory color, approximately 900–1,100 yards
- 5 mm crochet hook
- Yarn needle
- Scissors
- Optional stitch markers for the side edges
Choose a smooth yarn with enough twist to keep the individual double-crochet posts visible. A very fuzzy yarn can obscure the shell structure, while a stiff yarn may keep the fans from spreading naturally.
🧶 Crochet Tip: The five dc in each shell should fan outward without feeling crowded. If the fabric cups or the shells remain tightly bunched, loosen your tension or move up one hook size.
Stitches and abbreviations
- ch – chain
- sc – single crochet
- dc – double crochet
- sl st – slip stitch
- st – stitch
- sts – stitches
- RS – right side
Full shell
Work 5 dc into the same stitch. All five posts share one insertion point and spread outward to create one complete fan.
Half shell
Work 3 dc into the same stitch. Half shells appear at both edges of alternate rows and keep the staggered repeat balanced.
Before you start
The shell pattern uses a starting-chain multiple of 6 plus 2. For this blanket, ch 110.
Work the first row into the back bumps of the foundation chain. This leaves the two normal chain loops visible along the lower edge, giving the border a cleaner place to be worked later.
Turn after every body row. Ch 1 does not count as a stitch. On the alternate half-shell rows, the beginning ch 3 counts as the first dc of the opening 3-dc half shell.
When the pattern says to work into the center dc of a shell, use the third dc of the five-dc group. Correctly locating this center stitch is the key to keeping every row evenly staggered.
The blanket should remain flexible rather than tightly packed. Exact gauge is less important than producing a flat fabric with clear shell definition, but the suggested yarn and hook should give a finished size close to 30 by 36 inches.
Crochet pattern
Foundation and first shell row
Foundation: Ch 110.
Row 1: Working in the back bumps, sc in 2nd ch from hook. [Skip next 2 ch, 5 dc in next ch, skip next 2 ch, sc in next ch] × 18. Turn. (109 sts: 18 full shells and 19 sc)
You should now have 18 complete five-post fans across the blanket. Every shell shares one foundation chain, and one sc sits between each pair of neighboring shells.
Row 2 — offset the shells
Row 2: Ch 3; this counts as the first dc. Work 2 dc in the same first sc to complete the opening half shell.
[Sc in the center dc of the next 5-dc shell, 5 dc in the next sc] × 17.
Sc in the center dc of the final 5-dc shell. Work 3 dc in the final sc. Turn. (109 sts: 17 full shells, 2 half shells and 18 sc)
Each new full shell is worked into an sc from the previous row. Each new sc is worked into the center dc of a shell. This shifts the full shells sideways by half a repeat.
Row 3 — return to the full-shell edge
Row 3: Ch 1; ch 1 does not count as a stitch. Sc in the first dc.
Skip the next 2 dc of the opening half shell.
[5 dc in the next sc, sc in the center dc of the next 5-dc shell] × 17.
Work 5 dc in the next sc. Skip the next 2 dc of the final half shell and sc in the top of the beginning ch-3. Turn. (109 sts: 18 full shells and 19 sc)
🧶 Checkpoint: After Row 3, the shells should form two clearly staggered horizontal lines. Row 2 begins and ends with half shells, while Row 3 returns to full shells across the width. Small openings between the fans are normal, but the posts themselves should remain firmly connected to their foundation stitches.
Continue the shell-stitch body
Rows 4–57: Repeat Rows 2 and 3 in sequence 27 more times. Row 57 is worked as a Row-3-style row. (109 sts in every row)
Keep the placement consistent throughout the blanket. When working an sc over a full shell, always insert it into the third dc of that five-dc group. When making a new shell, work all five dc into the indicated sc rather than distributing them across several stitches.
If your blanket reaches the desired length slightly earlier or later because of yarn or tension differences, add or remove complete two-row repeats. Ending after a Row-3-style row preserves the same full-shell appearance along the upper edge.
Add the border
The finished blanket uses a narrow two-round single-crochet frame. The first round straightens the shell-stitch edges, and the second creates the clean outer line.
Fasten off the body. With the RS facing, join the cream yarn in the first stitch at either upper corner of Row 57.
Do not turn during the border rounds.
Border R1 — top: Work 3 sc in the first stitch. Sc in each of the next 107 sts across. Work 3 sc in the final stitch. (113 sc across the top including both corner groups)
First side: Rotate the blanket. Row 57 is already incorporated into the upper corner. Work down the remaining row ends as follows:
- 2 sc around the end of each tall half-shell row: Rows 56, 54, 52 and every even-numbered row through Row 2.
- 1 sc into the end of each short sc row: Rows 55, 53, 51 and every odd-numbered row through Row 1.
This gives 28 tall row ends and 28 short row ends. (84 sc along the side)
Bottom: Work 3 sc under the two unused loops of the first worked foundation-chain position. Work 1 sc under the two unused loops of each of the next 107 foundation positions. Work 3 sc under the two unused loops of the final foundation position. (113 sc across the bottom including both corner groups)
Second side: Rotate the blanket and work upward using the same spacing: 1 sc into every short sc row end and 2 sc around every tall half-shell row end, finishing immediately below the upper corner. (84 sc along the side)
Join with a sl st to the first sc. (394 sc)
Border R2: Ch 1; ch 1 does not count as a stitch. Sc in the same stitch and in every sc around. At each of the four corners, work 3 sc into the middle sc of the previous round’s 3-sc corner group. Join with a sl st to the first sc. (402 sc)
Fasten off.
🧶 Checkpoint: The border should form a narrow, continuous frame rather than a wide decorative band. The sides should lie nearly straight, and the three-sc corner increases should create softly rounded right-angle corners without large holes or ruffles.
Finishing the blanket
Weave all yarn tails securely into the back of the fabric, changing direction at least once so they are less likely to work loose with washing.
Lay the blanket flat and gently arrange the shell rows so the fans sit evenly. The finished surface should retain a little natural dimensional texture; do not stretch the shells completely flat.
Light blocking is useful for straightening the border and settling the corners. Smooth each edge into a straight line and gently shape the four corners rather than aggressively stretching the rectangle.
For acrylic yarn, follow the yarn manufacturer’s washing instructions and avoid direct high heat. Cotton-acrylic yarn can generally be gently wet blocked to help the stitches relax.
Troubleshooting
- The fans begin drifting sideways: Check the sc anchors. Each one should be placed in the third dc of the five-dc shell beneath it.
- A shell appears narrower or incomplete: Make sure all 5 dc were worked into the same sc. Do not divide a shell between neighboring stitches.
- The blanket gradually becomes narrower: Check both row ends. Row 2 must finish with 3 dc in the final sc, while Row 3 must finish with sc in the top of the previous row’s beginning ch-3.
- The outer edges of Row 3 look crowded: Make sure the two unused dc of each half shell are skipped before working the edge sc.
- The fabric cups: The shell stitches are probably too tight. Relax the dc tension or move to a slightly larger hook.
- The shells look floppy or poorly defined: Try a slightly smaller hook while keeping enough flexibility for a baby blanket.
- The border pulls the long sides inward: Check the side spacing. Tall half-shell row ends need 2 sc, while short sc row ends need 1 sc.
- The border ruffles: Make sure additional stitches have not been inserted between row ends and that only the four corners receive the 3-sc increases.
Adjusting the blanket size
To change the width while keeping the same shell arrangement, use any foundation-chain count that is a multiple of 6 plus 2.
Each additional 6 chains adds one shell repeat. For example, adding 12 chains adds two more full shells across the first row.
To change the length, add or remove complete pairs of Rows 2 and 3. Ending after a Row-3-style row keeps full shells along the upper edge and preserves the same appearance before the border is added.
If the row count changes, adjust the border side count rather than using the written total of 84. Continue the same spacing rule: 2 sc for every tall half-shell row end and 1 sc for every short sc row end, with the uppermost body row incorporated into the top corner.
Keeping the finished texture consistent
The defining feature of this blanket is the repeated five-post fan. Each shell should emerge visibly from one shared stitch, while the single crochet between shells pulls the neighboring fans together into a compact staggered pattern.
The alternating rows should not form straight vertical columns. Instead, the full shells in one row sit between those in the row below, creating the overlapping scale-like texture across the entire blanket.
Minor differences in shell width are normal in handmade crochet. Concentrate on maintaining the five-dc count, using the correct center stitch for each anchor sc, and keeping the same relaxed tension from one row to the next.
The two border rounds should remain visually simpler and flatter than the main blanket. Once lightly blocked, the finished wrap should have evenly staggered warm-cream shells, a softly rectangular 30-by-36-inch proportion, straight framed edges, and gently rounded handmade corners.
If you make this crochet shell stitch baby blanket, feel free to share your finished version or leave a question if you need help with one of the shell rows.












