
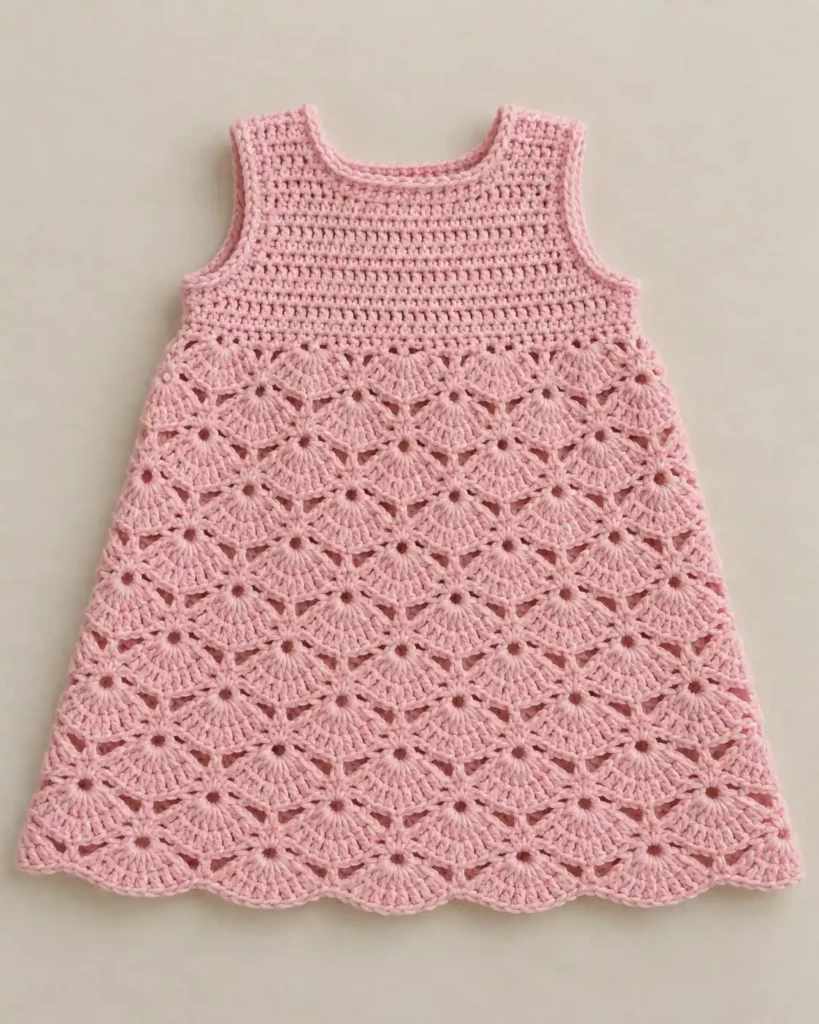
This blush pink baby dress combines a compact sleeveless crochet bodice with a long openwork skirt made from large radiating fans and staggered diamond-shaped spaces. The bodice stays fairly short and fitted while the lace occupies most of the dress length, giving the finished piece the soft A-line shape and decorative texture of the finished project.
The dress is made from two matching flat panels. Each panel begins at the waist and is worked upward for the bodice. The yarn is then rejoined along the opposite side of the foundation chain and the skirt is crocheted downward. The skirt uses eleven visible tiers of alternating fans, with progressively longer chain arches toward the lower half so the dress widens naturally without adding separate skirt pieces.
Project at a glance
| Skill level | Intermediate; simple garment shaping with repeating lace |
|---|---|
| Terminology | US crochet terms |
| Construction | Two matching flat panels joined at shoulders and sides |
| Yarn | DK / light #3 smooth baby yarn |
| Hooks | 3.5 mm for bodice; 4 mm for skirt |
| Fit | Newborn to approximately 0–3 months at the stated gauge |
At the suggested gauge, the finished chest is roughly 16–17 inches around. Depending on yarn, tension, and blocking, the shoulder-to-hem length will generally fall within about 13–15 inches.
The proportions matter more than an exact finished measurement: the solid bodice should occupy only about the upper third of the dress, while the long lace section forms the remaining length and widens steadily toward the scalloped hem.
Materials
- Approximately 300–400 yards of DK / light #3 baby acrylic, cotton-acrylic, or another soft smooth yarn
- One solid blush-pink color
- 3.5 mm crochet hook
- 4 mm crochet hook
- Yarn needle
- Scissors
- Stitch markers
- Blocking mat and rust-resistant pins if available
A smooth yarn with clear stitch definition works best for this design. The skirt depends on clearly visible double-crochet posts radiating from each fan center, while the chain arches need enough definition to preserve the open diamond structure.
Gauge
With the 3.5 mm hook in half double crochet, aim for approximately 20 stitches and 15 rows over 4 inches after light blocking.
Match the bodice gauge before making the second panel. The skirt is worked with the larger hook and is intentionally more relaxed.
Stitches and abbreviations
- ch – chain
- dc – double crochet
- hdc – half double crochet
- hdc2tog – half double crochet two stitches together
- sc – single crochet
- sl st – slip stitch
- st(s) – stitch(es)
- sp – space
- RS – right side
- WS – wrong side
Lace fan stitches
Full fan: Work 11 dc into the indicated stitch. The sixth dc is the center stitch.
Edge half fan: Work 5 dc into the indicated stitch. The third dc is the center stitch.
The large 11-dc fan is one of the most important features of the dress. Each fan should spread broadly from one clearly defined anchor rather than forming a narrow conventional shell.
Before you start
Make two identical panels. Begin each panel at the waist, crochet the solid bodice upward, then return to the unused loops of the foundation chain to work the lace skirt downward.
Ch 2 at the beginning of a bodice row does not count as a stitch. Turn after every bodice and lace row unless stated otherwise.
🧶 Crochet Tip: Mark the RS of the first panel before beginning the lace. Keep the same orientation when making the second panel so the bodice texture, fan direction, and side seams match.
Crochet pattern
Panel 1: lower bodice
Using the 3.5 mm hook, ch 45.
Row 1: Hdc in the third ch from hook and in each remaining ch. Turn. (43 hdc)
Rows 2–5: Ch 2, hdc in each st across. Turn. (43 hdc)
These five compact rows form the straight lower portion of the bodice. The unused loops along the opposite side of the foundation chain will later become the starting edge of the skirt.
Shape the armholes
Row 6: Sl st loosely across the first 3 sts. Ch 2, hdc in the next st and in each st across until 3 sts remain. Leave the final 3 sts unworked. Turn. (37 hdc)
Row 7: Ch 2, hdc2tog over the first 2 sts, hdc in each st across until 2 sts remain, hdc2tog over the final 2 sts. Turn. (35 hdc)
Row 8: Ch 2, hdc2tog over the first 2 sts, hdc in each st across until 2 sts remain, hdc2tog over the final 2 sts. Turn. (33 hdc)
Rows 9–10: Ch 2, hdc in each st across. Turn. (33 hdc)
Shape the neckline
Row 11: Ch 2, hdc in the first 9 sts. Fasten off. Leave the center 15 sts unworked for the neckline. Join yarn in the next st, ch 2, hdc in that st and in each of the final 8 sts. Fasten off. (9 hdc on each shoulder section, 15 unworked center sts)
First shoulder
With WS facing, join yarn at the neckline edge of the first shoulder section.
Row 12: Ch 2, hdc2tog over the first 2 sts, hdc in the remaining 7 sts. Turn. (8 hdc)
Row 13: Ch 2, hdc2tog over the first 2 sts, hdc in the remaining 6 sts. Turn. (7 hdc)
Rows 14–16: Ch 2, hdc in each st across. Turn. (7 hdc)
Fasten off.
Second shoulder
With WS facing, join yarn at the outside armhole edge of the second 9-stitch shoulder section.
Row 12: Ch 2, hdc in the first 7 sts, hdc2tog over the final 2 sts at the neckline edge. Turn. (8 hdc)
Row 13: Ch 2, hdc in the first 6 sts, hdc2tog over the final 2 sts at the neckline edge. Turn. (7 hdc)
Rows 14–16: Ch 2, hdc in each st across. Turn. (7 hdc)
Fasten off.
🧶 Checkpoint: The bodice should now look compact rather than long, with gently curved armholes, a broad shallow U-shaped neckline, and two matching 7-stitch shoulders.
Begin the lace skirt
Turn the panel so the original foundation chain forms the upper edge of the skirt and the completed bodice extends away from you.
With RS facing and the 4 mm hook, join yarn to the first unused foundation loop directly below the first hdc of Row 1. Work only into the 43 foundation loops corresponding to the 43 hdc stitches. Do not use the two original turning chains.
Upper lace: compact fan tiers
Lace Row 1: Ch 1, sc in the first foundation loop, [ch 3, skip 2 foundation loops, 11 dc in the next loop, ch 3, skip 2 loops, sc in the next loop] × 7. Turn. (7 full fans, 8 sc, 14 ch-3 spaces)
Lace Row 2: Ch 3; this counts as the first dc. [Ch 3, sc in the sixth dc of the next fan, ch 3, dc in the next sc] × 7. Turn. (8 dc, 7 sc, 14 ch-3 spaces)
Lace Row 3: Ch 3; this counts as the first dc of the first edge half fan. Work 4 more dc in the first dc. [Sc in the next sc, 11 dc in the next dc] × 6. Sc in the next sc, 5 dc in the final dc. Turn. (6 full fans, 2 half fans, 7 sc)
Lace Row 4: Ch 1, sc in the third dc of the first half fan. [Ch 3, dc in the next sc, ch 3, sc in the sixth dc of the next full fan] × 6. Ch 3, dc in the next sc, ch 3, sc in the third dc of the final half fan. Turn. (7 dc, 8 sc, 14 ch-3 spaces)
Lace Row 5: Ch 1, sc in the first sc, [ch 3, 11 dc in the next dc, ch 3, sc in the next sc] × 7. Turn. (7 full fans, 8 sc, 14 ch-3 spaces)
These first three visible fan tiers sit fairly close together directly beneath the bodice.
Middle lace: begin the A-line flare
The next section uses ch-4 arches. The stitch count does not change, but the longer arches increase the horizontal distance between fan anchors so the skirt begins to widen.
Lace Row 6: Ch 3; this counts as the first dc. [Ch 4, sc in the sixth dc of the next full fan, ch 4, dc in the next sc] × 7. Turn. (8 dc, 7 sc, 14 ch-4 spaces)
Lace Row 7: Ch 3; this counts as the first dc of the edge half fan. Work 4 more dc in the first dc. [Sc in the next sc, 11 dc in the next dc] × 6. Sc in the next sc, 5 dc in the final dc. Turn. (6 full fans, 2 half fans, 7 sc)
Lace Row 8: Ch 1, sc in the third dc of the first half fan. [Ch 4, dc in the next sc, ch 4, sc in the sixth dc of the next full fan] × 6. Ch 4, dc in the next sc, ch 4, sc in the third dc of the final half fan. Turn. (7 dc, 8 sc, 14 ch-4 spaces)
Lace Row 9: Ch 1, sc in the first sc, [ch 4, 11 dc in the next dc, ch 4, sc in the next sc] × 7. Turn. (7 full fans, 8 sc, 14 ch-4 spaces)
Lace Row 10: Ch 3; this counts as the first dc. [Ch 4, sc in the sixth dc of the next full fan, ch 4, dc in the next sc] × 7. Turn. (8 dc, 7 sc, 14 ch-4 spaces)
Lace Row 11: Ch 3; this counts as the first dc of the edge half fan. Work 4 more dc in the first dc. [Sc in the next sc, 11 dc in the next dc] × 6. Sc in the next sc, 5 dc in the final dc. Turn. (6 full fans, 2 half fans, 7 sc)
Lace Row 12: Ch 1, sc in the third dc of the first half fan. [Ch 4, dc in the next sc, ch 4, sc in the sixth dc of the next full fan] × 6. Ch 4, dc in the next sc, ch 4, sc in the third dc of the final half fan. Turn. (7 dc, 8 sc, 14 ch-4 spaces)
Lace Row 13: Ch 1, sc in the first sc, [ch 4, 11 dc in the next dc, ch 4, sc in the next sc] × 7. Turn. (7 full fans, 8 sc, 14 ch-4 spaces)
🧶 Checkpoint: Five alternating fan tiers are now complete below the first three tiers. The centers should continue to stagger evenly while the skirt is noticeably wider than it was at Lace Row 1.
Lower lace: broader diamonds and deeper flare
The lower section changes to ch-5 arches. Keep these chains relaxed and even. They create the larger open diamonds and broader lower silhouette without changing the number of fan positions.
Lace Row 14: Ch 3; this counts as the first dc. [Ch 5, sc in the sixth dc of the next full fan, ch 5, dc in the next sc] × 7. Turn. (8 dc, 7 sc, 14 ch-5 spaces)
Lace Row 15: Ch 3; this counts as the first dc of the edge half fan. Work 4 more dc in the first dc. [Sc in the next sc, 11 dc in the next dc] × 6. Sc in the next sc, 5 dc in the final dc. Turn. (6 full fans, 2 half fans, 7 sc)
Lace Row 16: Ch 1, sc in the third dc of the first half fan. [Ch 5, dc in the next sc, ch 5, sc in the sixth dc of the next full fan] × 6. Ch 5, dc in the next sc, ch 5, sc in the third dc of the final half fan. Turn. (7 dc, 8 sc, 14 ch-5 spaces)
Lace Row 17: Ch 1, sc in the first sc, [ch 5, 11 dc in the next dc, ch 5, sc in the next sc] × 7. Turn. (7 full fans, 8 sc, 14 ch-5 spaces)
Lace Row 18: Ch 3; this counts as the first dc. [Ch 5, sc in the sixth dc of the next full fan, ch 5, dc in the next sc] × 7. Turn. (8 dc, 7 sc, 14 ch-5 spaces)
Lace Row 19: Ch 3; this counts as the first dc of the edge half fan. Work 4 more dc in the first dc. [Sc in the next sc, 11 dc in the next dc] × 6. Sc in the next sc, 5 dc in the final dc. Turn. (6 full fans, 2 half fans, 7 sc)
Lace Row 20: Ch 1, sc in the third dc of the first half fan. [Ch 5, dc in the next sc, ch 5, sc in the sixth dc of the next full fan] × 6. Ch 5, dc in the next sc, ch 5, sc in the third dc of the final half fan. Turn. (7 dc, 8 sc, 14 ch-5 spaces)
Lace Row 21: Ch 1, sc in the first sc, [ch 5, 11 dc in the next dc, ch 5, sc in the next sc] × 7. Do not turn. (7 full fans, 8 sc, 14 ch-5 spaces)
The skirt now contains eleven visible fan tiers: six rows of complete fans alternating with five offset rows. This longer repeat gives the lace section the dominant proportion seen in the finished dress.
Scalloped hem edging
The final fan row already creates the rounded hem. The edging should follow each fan rather than flattening the lower edge.
Lace Row 22: Ch 1, sc in the first sc, [3 sc in the next ch-5 sp, sc in each of the 11 dc of the fan, 3 sc in the next ch-5 sp, sc in the next sc] × 7. Fasten off. (127 sc)
Keep every sc relaxed so the edge follows the seven broad fan curves naturally.
Panel 2
Make a second panel exactly the same as Panel 1, including all 16 bodice rows, 21 lace-pattern rows, and Lace Row 22 edging.
Assembly
Place the two panels together with RS facing inward. Match the waistlines, armholes, shoulders, lace tiers, and lower scallops before beginning the seams.
Join the shoulders
Using a yarn needle and matching yarn, seam the 7 stitches of the first front shoulder to the corresponding 7 stitches of the back shoulder.
Repeat for the second shoulder. Use a flexible mattress seam or neat whipstitch and do not pull the seam tight.
Join the sides
Beginning at one lower hem edge, match the two panels row-for-row.
Seam upward through Lace Row 22 and along the side edges of Lace Rows 21 through 1. Keep every fan tier aligned with the corresponding tier on the opposite panel.
Continue through the side edges of Bodice Rows 1–5. Stop at the beginning of the Row 6 armhole shaping.
Repeat on the second side.
🧶 Watch for: Do not stretch one skirt panel while seaming it to the other. Match fan tier to fan tier and connector row to connector row so the diagonal diamond lines remain continuous at the sides.
Finish the neckline and armholes
Neckline edging
Using the 3.5 mm hook, join yarn at one shoulder seam.
Neckline R1: Ch 1. Work 1 sc in each of the 15 unworked center neckline stitches on the front panel. Work 1 sc evenly into each of the 6 row-end positions along each shaped neckline side. Continue around the back neckline in the same manner: 15 sc across the center and 6 sc along each side. Join with sl st to the first sc. (54 sc)
Neckline R2: Ch 1, sl st loosely in each sc around. Join to the first sl st and fasten off. (54 sl sts)
The second round should remain loose. It creates the slim raised line around the neckline without producing a heavy collar.
Armhole edging
Repeat the following around each armhole.
Armhole R1: Join yarn at the underarm seam. Ch 1. Work 1 sc in each of the 3 horizontal stitches at the base of the front armhole, then 1 sc into each of the 11 row-end positions from Bodice Rows 6–16. Continue around the back armhole with 1 sc in each of its 11 row-end positions and 1 sc in each of the 3 horizontal underarm stitches. Join with sl st to the first sc. (28 sc)
Armhole R2: Ch 1, sl st loosely in each sc around. Join to the first sl st and fasten off. (28 sl sts)
Repeat around the second armhole.
If either opening begins to cup inward, use the 4 mm hook for the slip-stitch round instead of adding extra stitches.
Weave in and block
Weave all yarn tails securely into the WS.
Wet the finished dress gently and remove excess water without twisting. Lay it flat with the bodice centered, shoulders level, and both armholes symmetrical.
Arrange the skirt into a clear A-line. Begin at the waist and gently open each diamond with your fingers. Allow the ch-3 section to remain relatively compact, spread the ch-4 section slightly wider, and open the ch-5 section most generously.
Shape all seven lower fans on each panel into smooth rounded scallops. Do not stretch the neckline or shoulder area. Allow the dress to dry completely before moving it.
Troubleshooting the lace skirt
- The skirt looks too short: Check that all 21 lace-pattern rows were completed before the final edging. The longer lace section is necessary for the skirt to dominate the dress length.
- The skirt hangs almost straight: Lace Rows 6–13 must use ch-4 arches and Lace Rows 14–21 must use ch-5 arches. Keeping every connector at ch 3 removes much of the intended A-line flare.
- The fans look too narrow: Confirm that every complete fan contains 11 dc worked into the same anchor stitch.
- The diamond pattern is uneven: Every connector sc must be placed in the sixth dc of an 11-dc fan or the third dc of a 5-dc edge half fan.
- The lace shifts sideways: Complete fan rows must contain 7 full fans. Offset fan rows must contain 6 full fans plus one 5-dc half fan at each edge.
- The hem curls upward: Work the final sc edging more loosely or use the 4 mm hook for Lace Row 22.
Adjusting the skirt length
For a slightly longer dress, insert another four-row repeat after Lace Row 17. Work the same alternating connector and fan sequence using ch-5 spaces, then finish on a complete-fan row before adding the hem edging.
For a shorter dress, stop after Lace Row 17 and work the hem edging there. Keep the bodice unchanged so the neckline, armholes, and shoulder proportions remain balanced.
Final check
- The solid bodice is compact and occupies substantially less height than the lace skirt.
- Each full fan contains 11 distinct double-crochet posts radiating from one anchor.
- Eleven fan tiers alternate consistently from the waist to the hem.
- The chain diamonds become broader toward the lower skirt.
- The lower edge finishes with seven broad rounded scallops across each panel.
After blocking, the dress should have a smooth fitted blush-pink bodice above a long flared lace skirt with dense repeating fan motifs, open staggered diamonds, and a softly rounded scalloped hem. If you make the dress, feel free to share your finished project or leave a question if you get stuck on one of the lace rows.












