
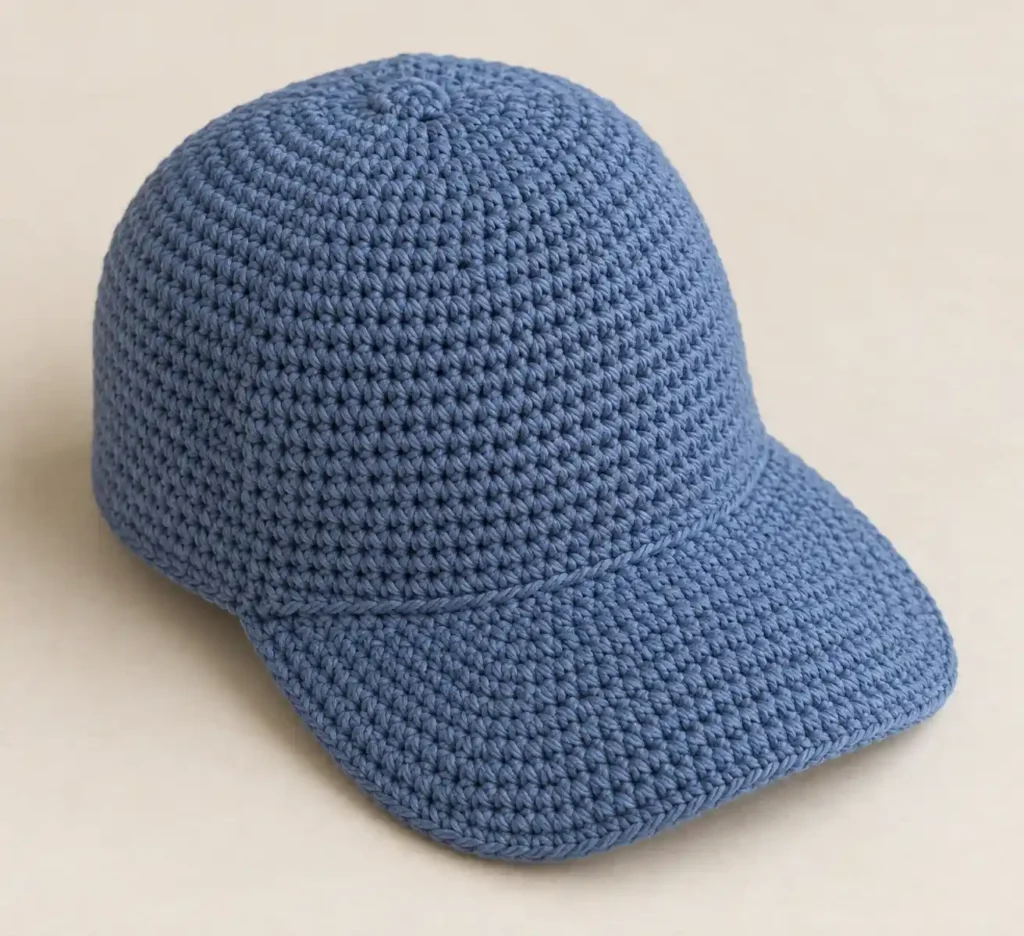
This crochet baseball cap has a smoothly rounded crown, dense single-crochet texture, a narrow raised line around the lower edge, and a broad structured visor with softly rounded corners. The design uses one solid yarn color and keeps the familiar baseball-cap silhouette without decorative panels, buttons, straps, or appliqués.
The crown is crocheted from the top down in joined rounds. A loose slip-stitch round creates the narrow raised line around the lower edge while leaving loops available for the visor. The visor is then worked directly from the center front of the crown in short turned rows and finished with a firm twisted crochet edging.
Project details
| Skill level | Comfortable beginner to intermediate |
|---|---|
| Terminology | US crochet terms |
| Construction | Top-down joined rounds with a directly crocheted visor |
| Main stitch | Single crochet |
| Finished crown circumference | About 20.5–21 inches before stretching |
| Designed to fit | Approximately 22–23 inch adult head |
The crown measures roughly 6.5–7 inches from the top center to the lower edge. The visor attaches across approximately 7.5 inches of the front crown, grows slightly wider through its shaping rows, and finishes close to 8 inches wide and about 3 inches deep.
The small amount of negative ease in the crown helps the cap sit securely rather than hanging loosely around the head. Cotton and cotton-blend single crochet have some natural give, but far less stretch than a knitted ribbed hat, so matching the stitch gauge is important.
Materials
- Yarn: smooth worsted-weight #4 cotton or cotton-blend yarn
- Color: one solid muted denim blue
- Amount: approximately 200–250 yards
- Hook: 4 mm crochet hook, or size needed to obtain gauge
- Stitch marker
- Yarn needle
- Scissors
A smooth cotton-rich yarn works especially well because it keeps the compact single-crochet stitches clearly defined and gives the visor enough body to hold its shape. Choose yarn with a reasonably firm twist rather than something very fuzzy or lofty.
Gauge
Aim for approximately 15 single crochet stitches and 16 rows over 4 inches in firm single crochet.
The stitch gauge is particularly important. At approximately 15 sc per 4 inches, the 78-stitch crown measures about 20.8 inches around before stretching, giving useful negative ease for an adult head around 22–23 inches.
🧶 Crochet Tip: Aim for a compact fabric with clearly defined stitches and very small spaces between them. The cap should feel supportive but still flexible enough to conform comfortably around the head.
Stitches and abbreviations
- ch – chain
- sc – single crochet
- inc – work 2 sc in the same stitch
- sc2tog – single crochet 2 stitches together
- sl st – slip stitch
- BLO – back loop only
- FLO – front loop only
- RS – right side
- WS – wrong side
- st(s) – stitch(es)
Crab stitch: Insert the hook into the next stitch or edge space to the right instead of the left, yarn over and pull up a loop, yarn over again and pull through both loops. Continue in this reverse direction. The resulting twisted edge gives the visor a clean, firm outline.
Before you start
The crown is worked with the RS facing in joined rounds. Do not turn between crown rounds.
At the beginning of each single-crochet round, ch 1. The beginning ch 1 does not count as a stitch. Join each round with a sl st to the first sc of that round. The joining slip stitch does not count as a stitch either.
Place a marker in the first sc of each round if needed. Keep the joins aligned because this creates an easy center-back reference for positioning the visor later.
The crown starts with six stitches and adds six evenly distributed stitches in every increase round. This keeps the top circular while producing the compact concentric shaping needed for the rounded crown.
Crochet pattern
Crochet the crown top
Make a magic ring.
R1: Ch 1, work 6 sc into the magic ring. Pull the ring firmly closed and join with a sl st to the first sc. Do not turn. (6 sts)
R2: Ch 1, inc in each st around. Join. (12 sts)
R3: Ch 1, [sc in next st, inc in next st] × 6. Join. (18 sts)
R4: Ch 1, [sc in next 2 sts, inc in next st] × 6. Join. (24 sts)
R5: Ch 1, [sc in next 3 sts, inc in next st] × 6. Join. (30 sts)
R6: Ch 1, [sc in next 4 sts, inc in next st] × 6. Join. (36 sts)
R7: Ch 1, [sc in next 5 sts, inc in next st] × 6. Join. (42 sts)
R8: Ch 1, [sc in next 6 sts, inc in next st] × 6. Join. (48 sts)
R9: Ch 1, [sc in next 7 sts, inc in next st] × 6. Join. (54 sts)
R10: Ch 1, [sc in next 8 sts, inc in next st] × 6. Join. (60 sts)
R11: Ch 1, [sc in next 9 sts, inc in next st] × 6. Join. (66 sts)
R12: Ch 1, [sc in next 10 sts, inc in next st] × 6. Join. (72 sts)
R13: Ch 1, [sc in next 11 sts, inc in next st] × 6. Join. (78 sts)
🧶 Checkpoint: The crown top should now measure approximately 6.5–6.75 inches across at the listed gauge. It should lie mostly flat with only a gentle tendency to curve downward at the outer edge.
Form the rounded crown sides
Stop increasing after R13. The remaining crown rounds maintain 78 stitches, allowing the flat circle to transition smoothly into the rounded sides of the cap.
R14: Ch 1, sc in each st around. Join. (78 sts)
R15: Ch 1, sc in each st around. Join. (78 sts)
R16: Ch 1, sc in each st around. Join. (78 sts)
R17: Ch 1, sc in each st around. Join. (78 sts)
R18: Ch 1, sc in each st around. Join. (78 sts)
R19: Ch 1, sc in each st around. Join. (78 sts)
R20: Ch 1, sc in each st around. Join. (78 sts)
R21: Ch 1, sc in each st around. Join. (78 sts)
R22: Ch 1, sc in each st around. Join. (78 sts)
R23: Ch 1, sc in each st around. Join. (78 sts)
R24: Ch 1, sc in each st around. Join. (78 sts)
R25: Ch 1, sc in each st around. Join. (78 sts)
R26: Ch 1, sc in each st around. Join. (78 sts)
R27: Ch 1, sc in each st around. Join. (78 sts)
The crown should now have a smooth domed top and relatively straight lower sides. At the listed gauge, the top-center-to-lower-edge depth should fall close to 6.5–7 inches.
For a shallower fit, stop one or two rounds earlier. For additional depth, add one or two more rounds of 78 sc before working the lower ridge.
Create the raised lower ridge
The narrow braided-looking line around the lower crown is made with a loose slip-stitch round worked through the back loops of R27. This creates a distinct finishing line while leaving the front loops of R27 available for the visor.
R28: Do not ch. Sl st loosely in the BLO of each stitch from R27 around. Join with a sl st to the first slip stitch. (78 sl sts)
Fasten off.
🧶 Watch for: Keep R28 loose enough that it lies smoothly around the crown. Tight slip stitches can pull the lower edge inward and make both the fit and the visor attachment too narrow.
Crochet the visor
Place the cap with the R1–R28 joining line centered at the back. The center front is directly opposite this joining line.
On R27, count from the first stitch of the round. The visor attaches to stitches 26 through 53 inclusive. This uses 28 consecutive front loops and leaves 25 unused stitches between each side of the visor and the center-back join.
With the RS facing, join yarn in the unused FLO of stitch 26.
The visor is worked in turned rows. Ch 1 before each row; the ch 1 does not count as a stitch.
Row 1, RS: Ch 1, sc in the unused FLO of stitch 26 and in the unused FLO of each stitch through stitch 53. Turn. (28 sts)
Row 2, WS: Ch 1, inc in first st, sc in next 26 sts, inc in last st. Turn. (30 sts)
Row 3, RS: Ch 1, sc in each st across. Turn. (30 sts)
Row 4, WS: Ch 1, inc in first st, sc in next 28 sts, inc in last st. Turn. (32 sts)
Row 5, RS: Ch 1, sc in each st across. Turn. (32 sts)
Row 6, WS: Ch 1, inc in first st, sc in next 30 sts, inc in last st. Turn. (34 sts)
Row 7, RS: Ch 1, sc in each st across. Turn. (34 sts)
Row 8, WS: Ch 1, sc in each st across. Turn. (34 sts)
Row 9, RS: Ch 1, sc in each st across. Turn. (34 sts)
Row 10, WS: Ch 1, sc2tog over first 2 sts, sc in next 30 sts, sc2tog over final 2 sts. Turn. (32 sts)
Row 11, RS: Ch 1, sc in each st across. Turn. (32 sts)
Row 12, WS: Ch 1, sc2tog over first 2 sts, sc in next 28 sts, sc2tog over final 2 sts. Turn. (30 sts)
Fasten off.
At the listed gauge, the visor begins approximately 7.5 inches wide, broadens to approximately 9 inches through the center rows, and settles to approximately 8 inches across the final edge. This creates the rounded baseball-cap visor shape rather than a narrow rectangular flap.
🧶 Checkpoint: Before adding the edging, the visor should extend about 3 inches from the crown. It should be symmetrical, gently wider through the middle, and softly rounded toward both front corners.
Add the visor edging
The finished visor has a distinct twisted outline around its free perimeter. Work this edge firmly enough to define the shape but not so tightly that the brim cups.
With the RS facing, join yarn at one base corner of the visor.
Work crab stitch around the three free sides only: 1 crab stitch in each of the 12 row ends along the first side, 1 crab stitch in each of the 30 stitches across Row 12, then 1 crab stitch in each of the 12 row ends along the opposite side. Do not work across the visor-to-crown attachment edge. (54 crab sts)
Fasten off securely.
Finishing and shaping the cap
Weave all yarn tails into the inside of the crown and underside of the visor. Spread each tail through several stitches rather than burying several ends in one spot, which can create a visible lump in dense cotton crochet.
Light blocking helps the crown settle into its rounded shape and gives the visor the smooth curve expected from a baseball cap.
Lightly dampen the finished cap. Place the crown over a rounded bowl, hat form, or other smooth object close to the intended head size. Smooth the rounds downward from the center top toward the lower edge.
Shape the visor separately with your hands. Keep the center slightly lower while gently curving the two side sections downward. The brim should form one broad continuous curve rather than bending sharply at the center.
Pay particular attention to the first two visor rows while shaping. They should stay flat against the front of the crown so the visor appears to grow naturally from the hat rather than hanging from a narrow attachment line.
Allow the cap to dry completely in shape.
🧶 Checkpoint: From a three-quarter front view, you should see a smoothly rounded crown, compact horizontal single-crochet rounds, the narrow raised line around the lower crown, and a broad visor centered directly beneath it.
Troubleshooting
- The crown top ripples: Your stitches are probably wider than the listed gauge. Use a smaller hook or firmer tension so the six increases in each shaping round can lie flat.
- The crown cups too early: Your stitches are too tight or narrow. Move up slightly in hook size or loosen your tension before continuing the increase section.
- The finished cap is loose around the head: Check the stitch gauge. With 78 stitches, a gauge substantially looser than 15 sc per 4 inches produces too much circumference.
- The lower edge pulls inward: R28 was worked too tightly. Undo the slip-stitch round and remake it with visibly relaxed loops.
- The visor is off-center: Check its attachment span. It must occupy stitches 26 through 53 of the 78-stitch crown, leaving 25 stitches on each side toward the back.
- The visor looks too narrow: Make sure the increases were worked at both ends of Rows 2, 4, and 6. The widest section should contain 34 stitches.
- The visor curls severely: The outer edging may be too tight. Redo the crab stitch with relaxed tension, then reshape the visor while damp.
- The visor feels too soft: Work the visor with a hook approximately 0.5 mm smaller while preserving the same stitch counts, or use a firmer cotton-rich yarn.
Adjusting the fit
The 78-stitch crown is designed to finish around 20.5–21 inches in circumference at the listed gauge and stretch comfortably over an adult head around 22–23 inches.
For a slightly smaller or larger cap, changing the hook size by about 0.25–0.5 mm is usually smoother than removing or adding an entire increase round. Always keep the finished fabric dense enough that the crown holds its rounded silhouette.
If you want to change only the crown depth, add or remove one or two plain 78-stitch rounds between R14 and R27. Work R28 and the visor afterward as written.
For substantial size changes, recalculate the final crown stitch count rather than simply adding another increase round and keeping the same visor placement. The visor must always remain centered on the front half of the finished crown.
Final result
The completed crochet baseball cap should have a compact closed center, smoothly expanding single-crochet crown, dense rounded sides, one narrow braided ridge around the lower edge, and a broad visor extending directly from the front of the crown.
The visor should look substantial without appearing padded or separately sewn on. Its middle section is slightly wider than its attachment edge, while the final decreases and twisted edging produce softly rounded front corners and the firm outline of a traditional baseball-cap brim.
If you make this cap, feel free to share your finished project or leave a question if you need help with the crown fit, lower ridge, or visor shaping.












