
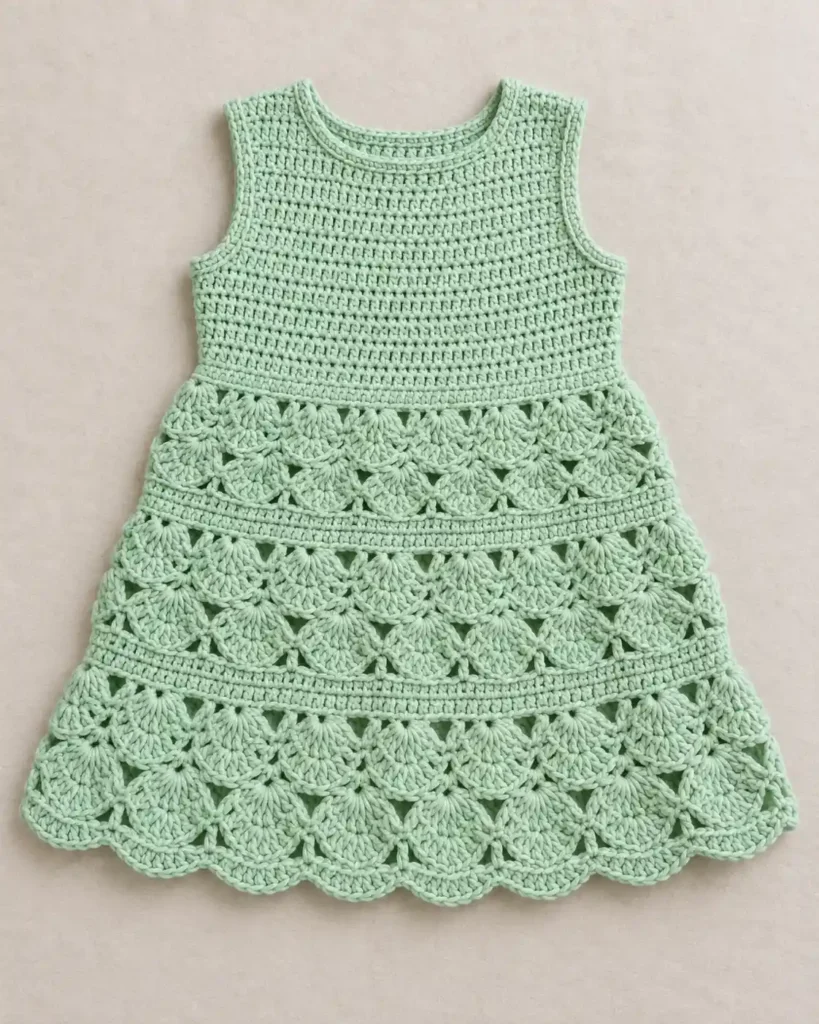
This sleeveless toddler dress combines a compact mint-green crochet bodice with three increasingly wide sections of large overlapping shell fans. Narrow solid bands separate the three shell sections, while the last row of shells forms the softly scalloped lower edge.
The bodice is worked as separate front and back pieces so the neckline and armholes can be shaped cleanly. After the shoulder and side seams are completed, the skirt is crocheted directly around the lower edge. The decorative skirt uses two offset shell rounds in each tier rather than many stacked shell rows, which keeps the broad fan-and-diamond appearance clear.
Project at a glance
| Skill level | Intermediate |
|---|---|
| Terminology | US crochet terms |
| Construction | Two seamed bodice panels with skirt worked directly from the waist |
| Yarn | DK / light #3 smooth cotton or cotton-blend yarn |
| Hook | 4 mm, or size needed to obtain gauge |
| Approximate fit | Small toddler, around 2T–3T at the stated gauge |
| Chest | Approximately 22–23 in / 56–58 cm |
Aim for approximately 17 hdc and 13 rows = 4 in / 10 cm after light blocking. The exact vertical length of the skirt varies more because the tall shell stitches can change noticeably with tension.
The bodice should feel structured but flexible. The skirt needs a little more drape so the large fans can open and the three tiers can flare gradually rather than standing stiffly away from the body.
Materials
- DK / light #3 smooth cotton or cotton-blend yarn in one soft pastel mint-green shade
- Approximately 650–800 yd / 595–730 m for a small toddler dress
- 4 mm crochet hook
- Yarn needle
- Scissors
- Stitch markers
- Flexible measuring tape
A smooth yarn is important for this design. The bodice should show tidy horizontal crochet rows, and the tall shell stitches should remain individually recognizable instead of disappearing into a fuzzy surface.
🧶 Crochet Tip: Check the bodice fabric before beginning the full dress. If the half-double crochet feels stiff enough to stand by itself, move up 0.5 mm in hook size. A toddler garment needs comfortable drape even though the stitches should remain well defined.
Stitches and abbreviations
- ch – chain
- sc – single crochet
- hdc – half double crochet
- hdc2tog – half double crochet two stitches together
- tr – treble crochet
- sl st – slip stitch
- st(s) – stitch(es)
- sk – skip
- RS – right side
- WS – wrong side
7-tr shell
Work 7 tr into the same stitch. The seven tall stitches spread from one foundation point to make a broad fan. The center tr is the fourth treble crochet of the shell.
Before you start
The front and back bodice pieces are worked upward from the waist in turned rows. Ch 1 at the beginning of a bodice row does not count as a stitch.
The skirt is worked downward in joined rounds with the RS facing throughout. Do not turn the skirt rounds. Ch 1 does not count as a stitch. When a shell round begins with ch 4, that ch 4 does count as the first treble crochet of the first 7-tr shell. Slip-stitch joins do not create additional stitches.
Each shell repeat contains eight actual stitches: one sc plus seven tr. This is important because the first tier begins with 96 stitches, the second with 112, and the third with 128. Those totals divide evenly into 12, 14, and 16 shell repeats.
Place a marker in the first real stitch of every solid skirt round. On the shell rounds, mark the first sc or the top of the beginning ch 4 so the join stays at the side of the dress.
Crochet pattern
Front bodice
Ch 49.
Row 1: Hdc in 2nd ch from hook and in each remaining ch across. Turn. (48 sts)
Rows 2–8: Ch 1, hdc in each st across. Turn. (48 sts)
Row 9: Ch 1, turn. Sl st loosely in first 2 sts, ch 1, hdc in next 44 sts, leaving final 2 sts unworked. Turn. (44 hdc)
Row 10: Ch 1, hdc2tog over first 2 sts, hdc in next 40 sts, hdc2tog over final 2 sts. Turn. (42 sts)
Rows 11–18: Ch 1, hdc in each st across. Turn. (42 sts)
First front shoulder
Row 19: Ch 1, hdc in first 8 sts. Leave remaining 34 sts unworked. Turn. (8 sts)
Row 20: Ch 1, hdc2tog over first 2 sts, hdc in remaining 6 sts. Turn. (7 sts)
Row 21: Ch 1, hdc in next 5 sts, hdc2tog over final 2 sts. Turn. (6 sts)
Rows 22–24: Ch 1, hdc in each st across. Turn. (6 sts)
Fasten off.
Second front shoulder
With RS facing, return to the 34 stitches left unworked after Row 19. Skip the first 26 stitches for the neckline and join the yarn in the next stitch. Eight stitches remain for this shoulder.
Row 19B: Ch 1, hdc in the same st and in next 7 sts. Turn. (8 sts)
Row 20B: Ch 1, hdc in first 6 sts, hdc2tog over final 2 sts. Turn. (7 sts)
Row 21B: Ch 1, hdc2tog over first 2 sts, hdc in remaining 5 sts. Turn. (6 sts)
Rows 22B–24B: Ch 1, hdc in each st across. Turn. (6 sts)
Fasten off.
🧶 Checkpoint: The front should have two matching 6-stitch shoulders, a broad curved neckline area, and two armholes that taper inward near the underarms. Both shoulder sections should be the same height before you continue.
Back bodice
Ch 49.
Row 1: Hdc in 2nd ch from hook and in each remaining ch across. Turn. (48 sts)
Rows 2–8: Ch 1, hdc in each st across. Turn. (48 sts)
Row 9: Ch 1, turn. Sl st loosely in first 2 sts, ch 1, hdc in next 44 sts, leaving final 2 sts unworked. Turn. (44 hdc)
Row 10: Ch 1, hdc2tog over first 2 sts, hdc in next 40 sts, hdc2tog over final 2 sts. Turn. (42 sts)
Rows 11–20: Ch 1, hdc in each st across. Turn. (42 sts)
First back shoulder
Row 21: Ch 1, hdc in first 8 sts. Leave remaining 34 sts unworked. Turn. (8 sts)
Row 22: Ch 1, hdc2tog over first 2 sts, hdc in remaining 6 sts. Turn. (7 sts)
Row 23: Ch 1, hdc in next 5 sts, hdc2tog over final 2 sts. Turn. (6 sts)
Row 24: Ch 1, hdc in each st across. (6 sts)
Fasten off.
Second back shoulder
With RS facing, return to the 34 stitches left unworked after Row 21. Skip 26 stitches for the back neckline and join yarn in the next stitch.
Row 21B: Ch 1, hdc in same st and next 7 sts. Turn. (8 sts)
Row 22B: Ch 1, hdc in first 6 sts, hdc2tog over final 2 sts. Turn. (7 sts)
Row 23B: Ch 1, hdc2tog over first 2 sts, hdc in remaining 5 sts. Turn. (6 sts)
Row 24B: Ch 1, hdc in each st across. (6 sts)
Fasten off.
Join the bodice
Place the front and back together with RS facing each other. Seam each shoulder across all 6 stitches using a flexible mattress stitch or whip stitch.
Seam each side beginning at the waist and working upward through Row 8. Stop at the top of Row 8. The shortened and decreased rows above this point remain open to form the armhole.
Turn the bodice RS out.
Neckline edging
Join yarn at one end of the horizontal back neckline.
Neck R1: Ch 1. Work 26 sc across the back neckline. Work 4 sc evenly over the first 3 back-neckline row-end spaces. Work 7 sc evenly over the next 5 front-neckline row-end spaces. Work 26 sc across the horizontal front neckline. Work 7 sc evenly over the opposite 5 front-neckline row-end spaces, then 4 sc evenly over the final 3 back-neckline row-end spaces. Join with sl st to first sc. (74 sc)
Neck R2: Ch 1, sc in each st around. Join with sl st to first sc. (74 sc)
Fasten off.
🧶 Watch for: The finished neckline should lie flat but still stretch comfortably over a toddler’s head. If the second single-crochet round noticeably contracts the opening, redo that round with a hook 0.5 mm larger.
Armhole edging
Both armholes are finished in the same way. At each underarm there are 2 exposed stitches from the front and 2 from the back, plus 16 row-end spaces along each side of the armhole.
Armhole R1: Join yarn at the underarm. Ch 1, sc in each of the 4 underarm stitches. Working upward over the 16 front row-end spaces, [1 sc in each of next 3 row-end spaces, 2 sc in next row-end space] × 4. Repeat the same placement over the 16 back row-end spaces. Join with sl st to first sc. (44 sc)
Armhole R2: Ch 1, sc in each st around. Join with sl st to first sc. (44 sc)
Fasten off and repeat around the second armhole.
Waist band
Turn the bodice so the original foundation edges are at the bottom. Join yarn at one side seam. Work into the unused loops of the two foundation chains. There are 48 stitches across the front and 48 across the back.
Skirt R1: Ch 1, sc in each foundation st around. Join with sl st to first sc. (96 sts)
Skirt R2: Ch 1, hdc in each st around. Join with sl st to first hdc. (96 sts)
Skirt R3: Ch 1, hdc in each st around. Join with sl st to first hdc. (96 sts)
First shell tier
Skirt R4: Ch 1, [sc in next st, sk next 3 sts, 7 tr in next st, sk next 3 sts] × 12. Join with sl st to first sc. (12 shells, 12 sc; 96 sts total)
Skirt R5: Ch 4; this counts as the first tr of the first shell. Work 6 tr in the same sc as the join. [Sk next 3 tr, sc in the next tr, which is the center tr of the shell below, sk next 3 tr, 7 tr in next sc] × 11. Sk next 3 tr, sc in the next tr, sk final 3 tr. Join with sl st to top of beginning ch 4. (12 shells, 12 sc; 96 sts total)
The second set of fans is now offset from the first. The curved tops of the first-round shells remain visible between the lower fans, while the skipped stitches create the open triangular spaces between motifs.
First separator band
Skirt R6: Ch 1, hdc in every tr and sc around. Join with sl st to first hdc. (96 sts)
Skirt R7: Ch 1, hdc in each st around. Join with sl st to first hdc. (96 sts)
Skirt R8: Ch 1, [hdc in next 5 sts, 2 hdc in next st] × 16. Join with sl st to first hdc. (112 sts)
Second shell tier
Skirt R9: Ch 1, [sc in next st, sk next 3 sts, 7 tr in next st, sk next 3 sts] × 14. Join with sl st to first sc. (14 shells, 14 sc; 112 sts total)
Skirt R10: Ch 4; this counts as the first tr of the first shell. Work 6 tr in the same sc as the join. [Sk next 3 tr, sc in the center tr of the shell below, sk next 3 tr, 7 tr in next sc] × 13. Sk next 3 tr, sc in the center tr of the final shell, sk final 3 tr. Join with sl st to top of beginning ch 4. (14 shells, 14 sc; 112 sts total)
Second separator band
Skirt R11: Ch 1, hdc in every tr and sc around. Join with sl st to first hdc. (112 sts)
Skirt R12: Ch 1, hdc in each st around. Join with sl st to first hdc. (112 sts)
Skirt R13: Ch 1, [hdc in next 6 sts, 2 hdc in next st] × 16. Join with sl st to first hdc. (128 sts)
🧶 Checkpoint: Lay the dress flat before beginning the lowest tier. The two completed shell sections should be separated by narrow, clearly visible horizontal bands. The skirt should flare gradually rather than forming a gathered ruffle.
Third shell tier
Skirt R14: Ch 1, [sc in next st, sk next 3 sts, 7 tr in next st, sk next 3 sts] × 16. Join with sl st to first sc. (16 shells, 16 sc; 128 sts total)
Skirt R15: Ch 4; this counts as the first tr of the first shell. Work 6 tr in the same sc as the join. [Sk next 3 tr, sc in the center tr of the shell below, sk next 3 tr, 7 tr in next sc] × 15. Sk next 3 tr, sc in the center tr of the final shell, sk final 3 tr. Join with sl st to top of beginning ch 4. (16 shells, 16 sc; 128 sts total)
Scalloped outer edging
The second shell round creates the actual scalloped hem, so the finishing round should follow that shape rather than pulling it into a straight band.
Skirt R16: Ch 1, sl st loosely in each tr and sc around, following the complete curve of every shell. Join with sl st to first sl st. (128 sl sts)
Fasten off.
This final slip-stitch round creates the narrow cord-like line around the outside of the scallops. Keep every slip stitch relaxed. If your normal slip-stitch tension is firm, use a hook 0.5–1 mm larger for this round only.
Finishing the dress
Weave all yarn ends securely into the WS. Pay particular attention to the shoulder seams, underarms, waist join, and the beginning and end of the six shell rounds.
Lightly wet-block the dress according to the care instructions for your yarn. Begin with the bodice, centering the neckline and making sure both armholes have the same shape.
Spread the skirt into a gentle A-line silhouette. Straighten the waist and the two narrow separator bands, then arrange the shell fans individually so the offset rows remain easy to distinguish.
Do not stretch the decorative sections completely flat. The overlapping fan rows should retain a little depth. Smooth the bottom scallops into rounded curves and allow the dress to dry completely before moving it.
Troubleshooting
- The shell motifs look flat and ordinary: check that all 7 treble crochets are worked into the same foundation stitch. Splitting them between stitches removes the strong fan shape.
- The second row of fans sits directly below the first: make sure its shells are worked into the single crochets between the previous shells. That offset placement creates the overlapping fan-and-diamond texture.
- The open triangular spaces disappear: verify that all 3 treble stitches on each side of the center treble are skipped. Working into those stitches makes the fabric too solid.
- A separator band puckers inward: the first hdc round after the shells is probably too tight. Work one hdc into every individual treble and single crochet and loosen your tension slightly.
- The skirt ruffles strongly after an increase round: the increases are being added too quickly for your tension. Recheck the repeat before continuing; the first increase round must end with 112 stitches and the second with 128.
- The lower scallops curl upward: the slip-stitch edging is too tight. Remove only the final edging and redo it loosely with a larger hook.
Final check
- The bodice has one centered rounded neckline and two matching sleeveless armholes.
- The waist is smooth and the skirt is crocheted directly from the bodice rather than sewn on separately.
- The skirt contains exactly three decorative shell sections with narrow solid bands between them.
- Each decorative section contains two offset fan rounds, with 12, 14, and 16 shells around the successive tiers.
- The lower shell row remains visibly scalloped and is finished with one narrow, relaxed slip-stitch outline.
Once the dress is dry and all ends are secure, it is ready to wear. If you make this mint-green tiered shell dress and run into a tricky section, feel free to leave a question.












