
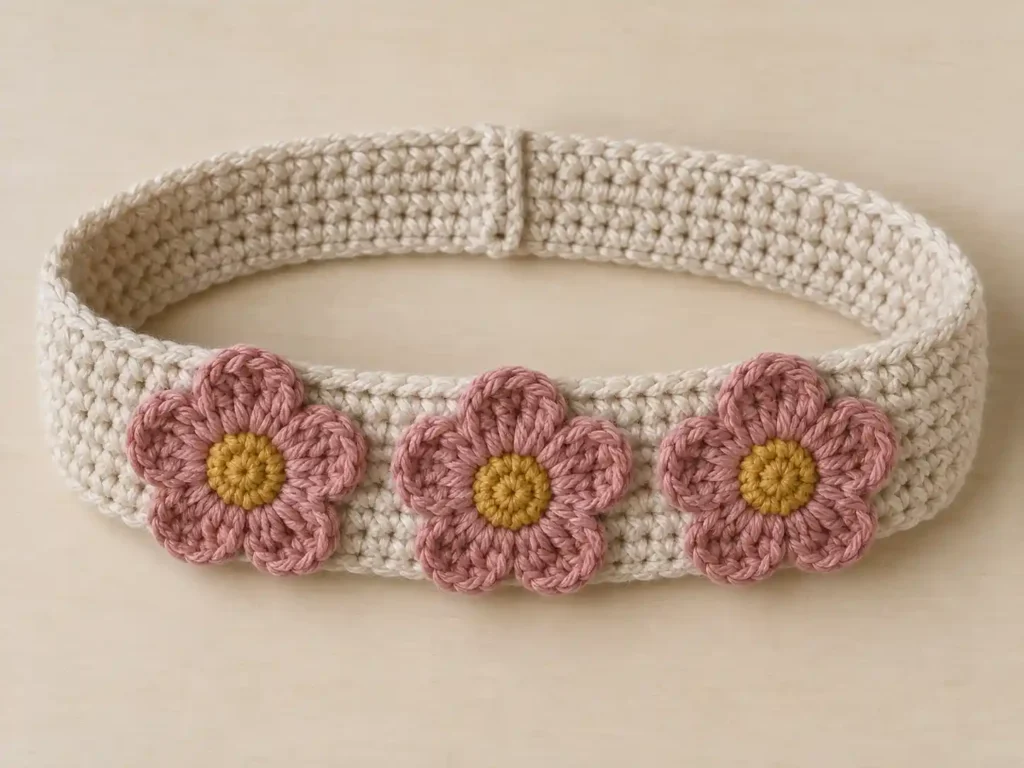
This crochet boho flower headband combines a softly structured cream band with three raised dusty-rose flowers and warm mustard centers. Each flower has six broad rounded petals, giving the hair band a full floral look without requiring layered petals or complicated assembly.
The headband itself is one simple rectangle worked lengthwise in half-double crochet. The foundation edge and the top loops of the final row create the neat braided-looking edges, so no separate border is needed. The short ends are joined at the center back with a small raised slip-stitch seam, and the three flowers are sewn to the front through their centers so the petal edges remain slightly dimensional.
Project at a glance
| Skill level | Advanced beginner |
|---|---|
| Terminology | US crochet terms |
| Construction | One flat band with three separate flower motifs |
| Yarn | DK or light-worsted smooth cotton or cotton blend |
| Hook | 4 mm crochet hook |
| Finished circumference | Approximately 19–20 in / 48–51 cm |
| Band width | Approximately 1.5–1.75 in / 4–4.5 cm |
The band should feel compact and softly flexible rather than loose or lace-like. The flowers are wider than the cream band, allowing the upper and lower petals to extend beyond its edges.
Materials
- DK or light-worsted smooth cotton or cotton-blend yarn in warm oatmeal or soft cream for the headband
- Small amount of dusty rose yarn for the flower petals
- Small amount of muted mustard or golden-yellow yarn for the flower centers
- 4 mm crochet hook
- Yarn needle
- Scissors
- A few removable stitch markers
Use the same yarn weight for all three colors. Smooth plied yarn gives the clearest result because the half-double-crochet rows remain easy to see and the individual flower stitches stay well defined.
Gauge and fit
A useful starting gauge is approximately 16 hdc and 9–10 rows per 4 in / 10 cm in unblocked half-double crochet. Circumference is more important than matching the row gauge exactly.
With this stitch gauge, 78 hdc gives a strip close to the intended adult circumference. Before joining the ends, wrap the strip around the intended wearer’s head. The ends should meet with gentle stretching rather than hanging loosely.
Because the band contains only four full hdc rows, a very tight row gauge will make it noticeably narrower. If your four rows measure much less than about 1.5 in / 4 cm, move up slightly in hook size while keeping the fabric firm enough to support the flowers.
Stitches and abbreviations
- ch – chain
- dc – double crochet
- hdc – half-double crochet
- MR – magic ring
- R – round
- RS – right side
- sc – single crochet
- sl st – slip stitch
- st(s) – stitch(es)
- WS – wrong side
Beginning chains do not count as stitches. Slip-stitch joins do not count as stitches. Flower rounds are worked without turning.
Before you start
The cream band is worked lengthwise from one long foundation chain. Work the first row into the back bumps of the chains. This leaves the two normal chain loops visible along the lower edge and creates the clean braided-looking foundation line.
The upper edge needs no added border either. The top loops of Row 4 naturally form a matching crochet edge. Keeping both edges structural rather than adding extra edging rows is important for maintaining the compact width and proportions of this headband.
The flowers are made separately. Each begins with a small mustard disk containing 12 stitches. Six rose chain loops are then distributed evenly around that disk, and each loop is filled with the same nine-stitch petal sequence.
🧶 Crochet Tip: Keep the foundation chain relaxed. Because it becomes the visible lower edge of the finished headband, a tight chain can make that edge shorter than the top and cause the band to curve.
Crochet pattern
Cream headband
With cream yarn, ch 79.
Row 1: Working into the back bump of the foundation chain, hdc in the 2nd ch from hook and in each ch across. Ch 1, turn. (78 hdc)
Row 2: Hdc in each st across. Ch 1, turn. (78 hdc)
Row 3: Hdc in each st across. Ch 1, turn. (78 hdc)
Row 4: Hdc in each st across. (78 hdc)
Fasten off.
🧶 Checkpoint: The strip should show four compact horizontal rows. The untouched foundation-chain loops form one neat braided edge, and the top loops of Row 4 form the matching edge on the opposite side. Do not add a separate border.
Join the back seam
Bring the short ends together with the WS touching and the RS facing outward. Check carefully that the strip is not twisted.
Join cream yarn through both layers at the lower foundation-edge corner. Working upward through corresponding points on both short ends, make 5 relaxed sl sts evenly across the seam: one at the lower corner, one through each of the three internal row-boundary areas, and one through the upper Row 4 corner. (5 sl sts)
Fasten off and weave the tails into the inside of the band.
The slip stitches should form a small raised vertical chain at the center back. Keep them loose enough that the seam remains the same height as the surrounding fabric instead of drawing the band inward.
Mustard flower center
Make three identical flowers.
With mustard yarn, make an MR.
R1: Ch 1, work 6 sc into the MR. Pull the ring firmly closed and join with a sl st to the first sc. (6 sc)
R2: Ch 1, work 2 sc in each st around. Join with a sl st to the first sc. (12 sc)
Fasten off mustard, leaving a long finishing tail for attaching the flower to the band. Weave in the original MR tail securely.
The finished center should be a compact circular disk with no large opening in the middle.
Create the six petal foundations
With the RS of the mustard center facing you, join dusty rose yarn with a sl st in any sc of R2.
R3: [Ch 6, skip the next sc, sl st in the next sc] × 6. The sixth repeat finishes with its sl st in the same center stitch where the rose yarn was originally joined. (6 ch-6 spaces)
Do not turn.
The six loops should be evenly distributed around the mustard disk. Each loop spans one skipped center stitch and becomes the foundation for one petal.
Shape the six petals
R4: Working around the first ch-6 space rather than into the individual chains, work 1 sc, 1 hdc, 5 dc, 1 hdc, 1 sc. Sl st into the center stitch anchoring the far end of that loop.
Continue around each of the remaining five ch-6 spaces with [1 sc, 1 hdc, 5 dc, 1 hdc, 1 sc around the ch-6 space, sl st in the center anchor at the end of the loop] × 5. (6 petals; 9 sts per petal)
Fasten off the rose yarn and weave the rose tails into the WS of the flower.
Make two more flowers using exactly the same center and petal instructions.
🧶 Checkpoint: Each flower should have one dense mustard disk surrounded by exactly six rounded rose petals. Five taller dc posts form the broad central section of each petal, while the shorter stitches at both ends create the curved outline.
Attach the flowers
Lay the finished band flat with the raised seam centered at the back. The point directly opposite that seam is the center front.
The top loops of Row 4 provide a convenient placement guide. There are 78 stitches around this edge before the seam, so the center front falls approximately halfway around the band.
- Position the middle flower at the center front, with the mustard disk vertically centered across the four hdc rows.
- Position the left flower with its center approximately 12 Row 4 stitches to the left of the middle flower’s center.
- Position the right flower approximately 12 Row 4 stitches to the right.
Check the arrangement before sewing. The three centers should form a straight, balanced line across the front. The neighboring rose petals may come close together or lightly touch, but the mustard centers should remain distinctly separated.
The top and bottom petals should extend beyond the cream band. Do not try to fit the complete flowers inside the band’s width.
Sew each flower in place
Thread the long mustard finishing tail onto a yarn needle.
With the flower held in position, take six small anchoring stitches around the back of the mustard disk, spacing one attachment approximately behind each petal base. Pass each stitch through the cream band directly beneath the flower, catching enough fabric to make the center secure without pulling the band out of shape.
After the six anchors are complete, bring the tail to the inside of the headband, secure it, and weave it through several cream stitches.
Repeat for the remaining two flowers.
🧶 Watch for: Keep the rose outer edges free. The mustard centers and the immediate petal bases need to be secure, but sewing around the entire petal perimeter will flatten the flowers and remove their softly raised appearance.
Finishing the headband
Weave in all remaining yarn tails on the inside of the band. Keep rose and mustard tails within matching-colored stitches whenever possible so darker yarn does not show through the cream background.
Arrange the six petals of each flower with your fingers. The petals should spread evenly from the center with a gentle curve at the outer edge. Small differences between petals are perfectly natural and help maintain the handmade appearance.
If a flower curls more than desired, lightly dampen it and shape the individual petals. Pin only the outer petal curves if necessary and allow the piece to dry completely.
Aggressive blocking is not recommended for the headband itself. The cream fabric should retain its compact texture and enough elasticity to stay comfortably in place.
Troubleshooting
- The band is too wide: Make sure only four hdc rows were worked. The braided-looking lines along the top and bottom are the natural crochet edges and should not be followed by extra edging rows.
- The lower edge is shorter than the upper edge: The foundation chain is too tight. Remake the starting chain more loosely or use a slightly larger hook for the chain only.
- The band twists after joining: The short ends were rotated before seaming. Lay the strip completely flat, match foundation edge to foundation edge and Row 4 edge to Row 4 edge, then remake the seam.
- The back seam puckers: The joining slip stitches are too tight. Remake the five seam stitches with relaxed tension.
- A flower has the wrong number of petals: R3 must contain exactly six ch-6 spaces around the 12-stitch mustard center. Each loop skips one sc and anchors in the following sc.
- The petals look narrow instead of broad and rounded: Keep the ch-6 loops relaxed and spread all nine petal stitches evenly around each loop.
- The petals curl tightly inward: The chain loops or dc stitches are too tight. Loosen the petal tension slightly rather than adding more stitches.
- The flowers flop away from the band: Add one or two extra hidden anchoring stitches close to the mustard center, while leaving the broad petal edges free.
Adjusting the fit
The starting-chain length controls the headband circumference. To make another size, change the number of foundation chains, then keep the resulting Row 1 stitch count unchanged through Rows 2–4.
For example, if your adjusted Row 1 contains 72 hdc, Rows 2, 3, and 4 should each also contain 72 hdc.
For the closest proportions to this design, keep the band at four hdc rows rather than adding extra rows for width. The flowers are intended to extend above and below the cream band, and making the band significantly wider changes that relationship.
The flower construction can remain unchanged when only the circumference changes. Find the new center front after joining the band, place the middle flower there, then position the two side flowers at equal distances from it.
Final check
- The cream band consists of four full hdc rows with no separate top or bottom border.
- The foundation loops and Row 4 top loops form the two clean braided-looking long edges.
- The center-back join is a short raised slip-stitch seam and the band is not twisted.
- There are exactly three flowers, each with one mustard center and six broad dusty-rose petals.
- The flowers are secured through their centers while the rounded outer petal edges remain slightly raised.
Once the flowers are shaped and all ends are secure, the crochet boho flower headband is ready to wear. If you make one, feel free to share your finished version or leave a question if you need help with the petals, placement, or fit.












