
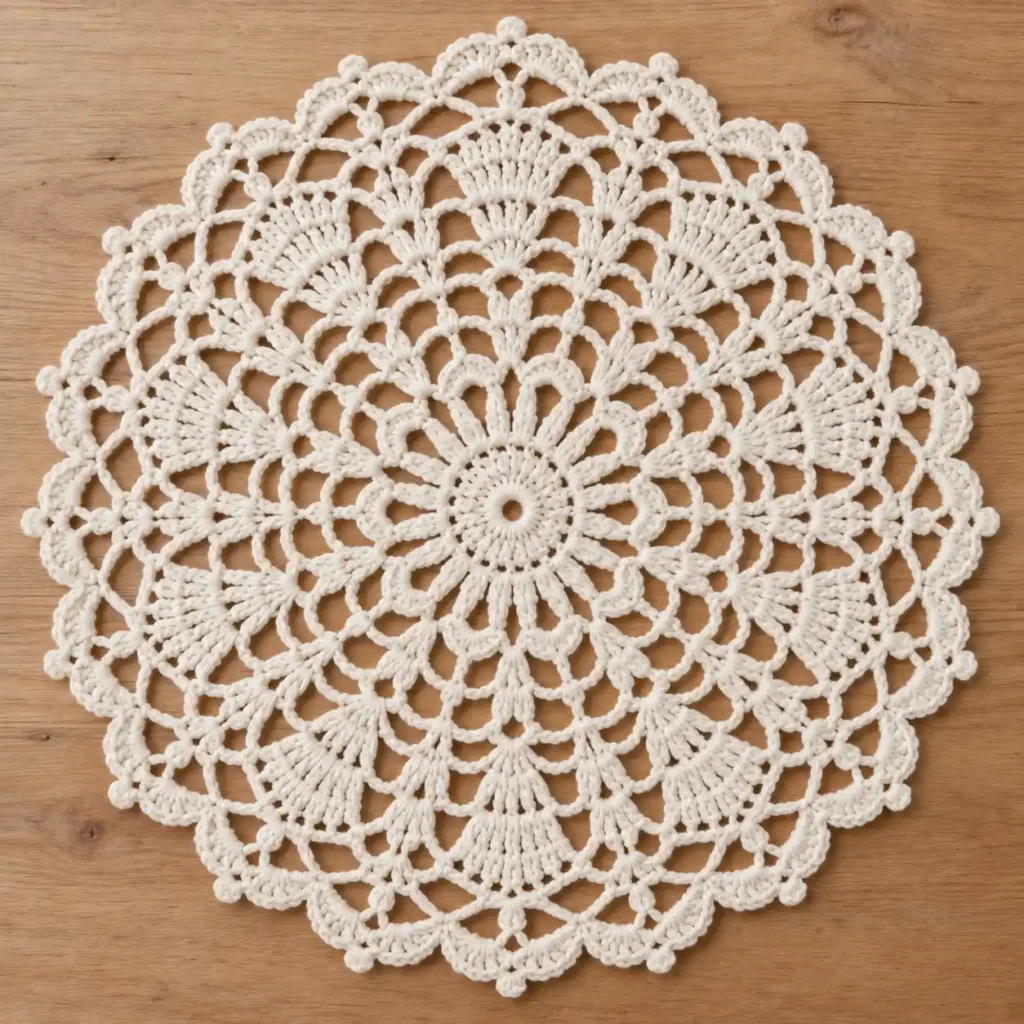
This decorative round doily begins with a small open center and a ring of twelve narrow looped petals, then expands into several increasingly broad fan motifs, curved chain arches, tiny raised connector clusters, and a deeply scalloped outer border. The alternating solid and open sections are what give the finished piece its layered floral-lace appearance.
The entire design uses twelve repeating radial sections. The center petals are formed first, their tips are joined into a new working ring, and the remaining rounds build outward from that ring. Keeping those twelve sections aligned is the key to getting the large outer fans and scallops to radiate cleanly from the center.
Project at a glance
| Skill level | Intermediate |
|---|---|
| Terminology | US crochet terms |
| Construction | Center-out lace worked in joined rounds |
| Main repeat | 12 radial sections |
| Yarn | Smooth sport or light DK cotton |
| Hook | About 3 to 3.25 mm |
The finished diameter depends strongly on yarn thickness, hook size, and chain tension. Use a smooth cotton and aim for crisp but flexible stitches; the doily should spread naturally rather than needing aggressive stretching to become flat.
Materials
- Smooth sport or light DK weight cotton yarn in warm ivory, natural cream, or soft off-white
- 3 to 3.25 mm crochet hook, adjusted if necessary to keep the lace flat
- 12 removable stitch markers for the petal tips
- Yarn needle
- Scissors
- Blocking mat and rust-resistant pins
A tightly twisted smooth cotton gives the clearest result because the design relies on visible tall posts, slender chain arches, and sharply defined fan sections. Very fuzzy yarn will soften those details and make the openwork less distinct.
Stitches and abbreviations
- ch — chain
- ch-sp — chain space
- sl st — slip stitch
- sc — single crochet
- dc — double crochet
- st — stitch
- sts — stitches
- sp — space
- cl3 — 3-double-crochet cluster
3-double-crochet cluster
Yarn over, insert the hook in the indicated stitch, yarn over and pull up a loop, yarn over and pull through 2 loops. Repeat this partial dc twice more in the same stitch. Yarn over and pull through all 4 loops on the hook. The completed cluster counts as one cluster.
Picot
Ch 3, then sl st into the first of those 3 chains. The picot does not count as a stitch.
Before you start
Work with the right side facing throughout and do not turn. Beginning ch 3 counts as the first dc whenever it is used. Beginning ch 1 and ch 2 do not count as stitches. Slip-stitch joins do not count as stitches.
The center petals are intentionally different from ordinary solid fans. Each petal begins as a chain loop attached at one point near the center, then the chain is covered with sc so the middle of the petal remains open. The twelve petal tips are later joined together to establish the next circular working line.
Keep all chain spaces relaxed. This design uses increasingly long arches as it grows, and tight chains will pull the radial sections inward and make the doily cup.
Crochet pattern
Center ring
Foundation: Ch 8. Join with sl st to the first ch to form a small ring. Leave the center visibly open.
R1: Ch 3, work 23 dc into the center ring. Join with sl st to the top of beginning ch 3. (24 dc)
R2: Ch 1, sc in the same st. [Ch 3, skip next dc, sc in next dc] × 11. Ch 3, skip the final dc, join with sl st to the first sc. (12 sc, 12 ch-3 spaces)
Looped center petals
R3: From the first sc, ch 10 and sl st back into the same sc to form the first petal loop. [Sl st in each of the next 3 chains of the ch-3 space, sl st in the next sc, ch 10, sl st in the same sc] × 11. After the twelfth loop, sl st in each of the final 3 chains back to the first sc. (12 ch-10 petal loops)
R4: Sl st into the first ch-10 loop and work 13 sc evenly around that loop. Sl st in its base sc. [Sl st in each of the next 3 chains, sl st in the next base sc, sl st into the next ch-10 loop, work 13 sc evenly around the loop, sl st in the same base sc] × 11. Sl st across the final ch-3 space to return to the first petal base. (12 petals, 13 sc around each petal)
Place a removable marker in the seventh sc of each petal. This is the outermost point of the petal and will be used as the foundation for the next round.
🧶 Checkpoint: You should have twelve slender open petals surrounding the small center. Their rounded stitched edges should be visible, while the interior of every petal remains open.
Fasten off. Rejoin the yarn with a sl st in the marked seventh sc at the tip of any petal.
R5: Ch 1, sc in the same marked st. [Ch 7, sc in the marked tip of the next petal] × 11. Ch 7, join with sl st to the first sc. Remove the markers. (12 sc, 12 ch-7 spaces)
Small fan ring
R6: Sl st into the first ch-7 sp. Ch 3, work 4 dc into the same sp, ch 3. [Work 5 dc into the next ch-7 sp, ch 3] × 11. Join with sl st to the top of beginning ch 3. (12 5-dc fans, 12 ch-3 spaces)
The five-stitch fans create the first narrow wedges outside the flower. Spread each fan evenly across its chain space rather than allowing the stitches to gather in a tight bundle.
First arch transition
R7: Sl st in the next 2 dc to reach the third dc, the center of the first 5-dc fan. Ch 1, sc in the same dc. [Ch 5, sc in the next ch-3 sp, ch 5, sc in the center dc of the next 5-dc fan] × 11. Ch 5, sc in the final ch-3 sp, ch 5, join with sl st to the first sc. (24 sc, 24 ch-5 spaces)
This round creates two curved arches for every radial section: one arch travels from the center of a fan to the space beside it, and the next travels from that space to the following fan.
Second fan ring
R8: Sl st into the first ch-5 sp. Ch 3, work 6 dc into the same sp, ch 4, sc in the next ch-5 sp, ch 4. [Work 7 dc into the next ch-5 sp, ch 4, sc in the next ch-5 sp, ch 4] × 11. Join with sl st to the top of beginning ch 3. (12 7-dc fans, 12 sc, 24 ch-4 spaces)
R9: Sl st in the next 3 dc to reach the center dc of the first 7-dc fan. Ch 1, sc in the same dc. [Ch 5, sc in the next separating sc, ch 5, sc in the center dc of the next fan] × 11. Ch 5, sc in the final separating sc, ch 5, join with sl st to the first sc. (24 sc, 24 ch-5 spaces)
Third fan ring
R10: Sl st into the first ch-5 sp. Ch 3, work 8 dc into the same sp, ch 4, sc in the next ch-5 sp, ch 4. [Work 9 dc into the next ch-5 sp, ch 4, sc in the next ch-5 sp, ch 4] × 11. Join with sl st to the top of beginning ch 3. (12 9-dc fans, 12 sc, 24 ch-4 spaces)
The fans are now visibly broader than those in R8. This gradual increase is important: the wedges should widen as they move away from the center rather than repeating at one constant size.
R11: Sl st in the next 4 dc to reach the center dc of the first 9-dc fan. Ch 1, sc in the same dc. [Ch 6, sc in the next separating sc, ch 6, sc in the center dc of the next fan] × 11. Ch 6, sc in the final separating sc, ch 6, join with sl st to the first sc. (24 sc, 24 ch-6 spaces)
🧶 Watch for: The centers of the fans in R6, R8, and R10 should remain on the same twelve radial lines. If one section drifts sideways, check the preceding arch round for a missed separating sc before continuing.
Large outer fan ring
R12: Sl st into the first ch-6 sp. Ch 3, work 12 dc into the same sp, ch 5, sc in the next ch-6 sp, ch 5. [Work 13 dc into the next ch-6 sp, ch 5, sc in the next ch-6 sp, ch 5] × 11. Join with sl st to the top of beginning ch 3. (12 13-dc fans, 12 sc, 24 ch-5 spaces)
These thirteen-stitch fans form the dominant elongated wedges in the outer half of the doily. Spread the stitches into a broad fan, keeping the seventh dc visually centered above the narrower fan sections underneath.
Raised bud and outer arch round
R13: Sl st in the next 6 dc to reach the seventh dc, the center of the first 13-dc fan. Ch 2, work cl3 in the same dc. [Ch 6, sc in the next separating sc, ch 6, work cl3 in the center dc of the next 13-dc fan] × 11. Ch 6, sc in the final separating sc, ch 6, join with sl st to the top of the first cl3. (12 cl3, 12 sc, 24 ch-6 spaces)
The cl3 stitches form the small raised buds positioned above the center of the large fans. Each bud is surrounded by two long ch-6 arches, producing the open lace framework directly beneath the scalloped edge.
Deep scalloped outer edging
R14: Ch 1, sc in the same cl3; this is the first outer anchor. [Work 5 dc, picot, 4 dc in the next ch-6 sp, sc in the next anchor] × 23. Work 5 dc, picot, 4 dc in the final ch-6 sp. Join with sl st to the first sc. (24 9-dc scallops, 24 picots, 24 sc anchors)
The anchors alternate between a separating sc and the top of a cl3. This gives the outer edge twenty-four smaller rounded scallops rather than twelve oversized shells. The denser scalloped border should appear finely detailed while still following the twelve larger radial sections underneath.
Fasten off securely.
Blocking and finishing
Weave the yarn tails through the dense stitches on the wrong side. Avoid carrying an end along an exposed chain arch because it can remain visible after blocking.
Soak the doily in cool or lukewarm water until the cotton is evenly wet. Lift it carefully and press out excess moisture between towels without twisting or wringing.
Place the doily right side up on a blocking surface. Begin by locating the twelve raised cl3 buds above the large fans. These are useful reference points for keeping the entire design radial and symmetrical.
Pin the outer scallops evenly around the circumference. Do not pull only on the picots; shape the whole nine-stitch shell into a rounded arch, then use the picot to define its small decorative point.
Work inward after the perimeter is balanced. Spread each thirteen-stitch outer fan, then shape the nine-stitch and seven-stitch fan rings. Finally, arrange the center petals so all twelve have a similar width and length.
The chain arches should form smooth open curves. They do not need to be pulled into perfectly rigid geometric shapes; a little natural softness helps the lace retain its handmade appearance.
🧶 Checkpoint: After blocking, the design should show a small open center, twelve clearly open looped petals, three progressively broader fan levels, twelve dominant outer fans, raised buds above those fans, and a fine ring of twenty-four scallops around the absolute edge.
Leave the doily pinned until it is completely dry.
Troubleshooting
- The center petals look like solid blobs: Make sure R3 creates actual ch-10 loops and R4 works around those chains rather than filling the entire space underneath them. The interior of each petal must remain open.
- The petal ring twists when R5 is added: Check that every R5 sc is worked into the seventh sc at the outer tip of a petal. Joining different points on neighboring petals will twist them sideways.
- The doily begins to cup: The long chain arches are probably too tight. Relax the ch-5 and ch-6 spaces, or increase the hook size slightly.
- The middle is flat but the edge ruffles: Your outer chains may be too loose relative to the dc fans. Work the ch-6 spaces slightly more firmly without changing the fan stitch counts.
- The large fans lean left or right: Check that R11 anchors alternate precisely between the center dc of a fan and the separating sc. A shifted anchor will move every later fan.
- The outer edge looks too coarse: R14 should make one nine-stitch shell in every ch-6 space, giving twenty-four smaller scallops. Do not combine two neighboring spaces into a single oversized shell.
- The raised details disappear: Keep the cl3 stitches in R13 slightly firm and avoid flattening them completely when blocking.
Changing the size safely
Changing yarn weight is safer than inserting extra lace rounds because the proportions depend on the relationship between the center petals, progressively widening fans, outer buds, and scalloped edge.
For a finer doily, use crochet thread or a lighter cotton with a suitably smaller hook. For a larger table doily, use a slightly heavier cotton and increase the hook size enough to keep the chain arches flexible. Keep the complete fourteen-round structure unchanged.
Final check
- The center opening remains visible and is surrounded by 24 dc.
- The center contains exactly 12 open looped petals with stitched outer edges.
- All later fan sections stay aligned with the same 12 radial divisions.
- Each large 13-dc fan has one raised cl3 centered above it.
- The absolute perimeter contains 24 rounded nine-stitch scallops with small picot points.
Once dry, the doily should have a clearly layered floral center, open lace arches, long radiating fan motifs, small raised outer details, and a richly scalloped perimeter. If you make this pattern, feel free to share your finished doily or leave a question if one of the transitions gives you trouble.












