
DIY Crochet Gifts: Strawberry Shortcake Turtle Amigurumi Doll Free Crochet Pattern
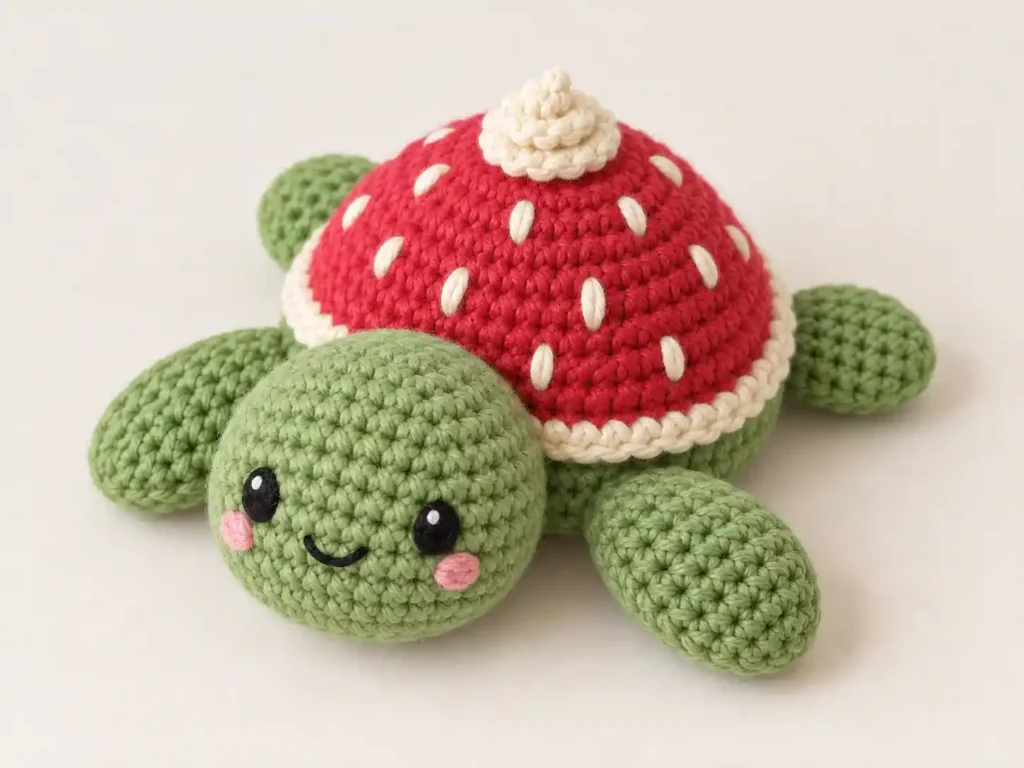
This Strawberry Shortcake Turtle pairs a plump sage-green turtle with a large strawberry-red shell, two cream edging layers, little embroidered strawberry seeds, raised pink cheeks, and a small whipped-cream dollop on top. Its oversized round head and softly stuffed paddle-shaped flippers are what give the finished doll its especially cute, squishy proportions.
The turtle is made as separate amigurumi components and assembled in layers. The head, body, shell, four flippers, cheeks, and topping all use simple crochet construction, with the face and strawberry seeds embroidered at the end.
Project at a glance
| Skill level | Advanced beginner to intermediate |
|---|---|
| Terminology | US crochet terms |
| Construction | Separate amigurumi pieces worked mainly in continuous rounds |
| Yarn | Smooth worsted-weight #4 cotton or cotton-blend yarn |
| Hook | 3.5 mm crochet hook, or size needed for dense amigurumi fabric |
| Finished size | A small plush turtle, usually around 7–9 inches long with the suggested yarn |
Exact gauge is not important. Aim for dense, clearly defined stitches that hide the fiberfill while still allowing the head, shell, and flippers to remain softly rounded.
Materials
- Smooth worsted-weight #4 yarn in soft sage or leafy green for the head, body, and four flippers
- Strawberry-red worsted-weight yarn for the shell
- Warm cream worsted-weight yarn for the shell edging, strawberry seeds, and whipped-cream topping
- Small amount of blush-pink worsted-weight yarn for the two cheeks
- Small amount of black yarn or embroidery floss for the eyes and smile
- Small amount of white yarn or embroidery floss for the eye highlights
- 3.5 mm crochet hook
- Polyester fiberfill
- Stitch marker
- Yarn needle
- Scissors
- Sewing pins or locking stitch markers
Stitches and abbreviations
- MR – magic ring
- ch – chain
- sc – single crochet
- sl st – slip stitch
- inc – work 2 sc in the same stitch
- dec – single crochet decrease over the next 2 stitches
- rev sc – reverse single crochet, also called crab stitch
- st/sts – stitch/stitches
Reverse single crochet
Insert the hook into the stitch immediately to the right instead of the left, yarn over, pull up a loop, yarn over, and pull through both loops. Continue moving to the right. This creates the rounded cord-like outer edge used around the cream shell border.
Before you start
Work the main amigurumi pieces in continuous spiral rounds unless stated otherwise. Do not turn. Mark the first stitch of each round and move the marker upward as you work.
Use an invisible decrease where possible. Keep the head firmly stuffed, the body moderately stuffed, and the flippers only lightly stuffed so their broad paddle shape remains visible.
Crochet pattern
Flattened green body
The green body forms the support underneath the large shell. It should be broad and low rather than spherical.
R1: Work 6 sc into an MR. (6 sts)
R2: Inc in each st around. (12 sts)
R3: [Sc in next st, inc in next st] × 6. (18 sts)
R4: [Sc in next 2 sts, inc in next st] × 6. (24 sts)
R5: [Sc in next 3 sts, inc in next st] × 6. (30 sts)
R6: [Sc in next 4 sts, inc in next st] × 6. (36 sts)
R7: [Sc in next 5 sts, inc in next st] × 6. (42 sts)
R8–R10: Sc in each st around. (42 sts)
R11: [Sc in next 5 sts, dec] × 6. (36 sts)
R12: [Sc in next 4 sts, dec] × 6. (30 sts)
R13: [Sc in next 3 sts, dec] × 6. (24 sts)
R14: [Sc in next 2 sts, dec] × 6. (18 sts)
Add fiberfill. Spread it evenly toward the sides instead of packing it into the center.
R15: [Sc in next st, dec] × 6. (12 sts)
R16: Dec around. (6 sts)
Fasten off, close the opening, and gently flatten the body into a low rounded cushion.
Oversized round green head
The head is intentionally large and round. Its width should be close to the width of the green body underneath the shell.
R1: Work 6 sc into an MR. (6 sts)
R2: Inc in each st around. (12 sts)
R3: [Sc in next st, inc in next st] × 6. (18 sts)
R4: [Sc in next 2 sts, inc in next st] × 6. (24 sts)
R5: [Sc in next 3 sts, inc in next st] × 6. (30 sts)
R6: [Sc in next 4 sts, inc in next st] × 6. (36 sts)
R7: [Sc in next 5 sts, inc in next st] × 6. (42 sts)
R8–R12: Sc in each st around. (42 sts)
R13: [Sc in next 5 sts, dec] × 6. (36 sts)
R14: [Sc in next 4 sts, dec] × 6. (30 sts)
R15: [Sc in next 3 sts, dec] × 6. (24 sts)
Begin stuffing firmly, concentrating some filling along the front and sides so the head stays broad and chubby.
R16: [Sc in next 2 sts, dec] × 6. (18 sts)
R17: [Sc in next st, dec] × 6. (12 sts)
R18: Dec around. (6 sts)
Finish stuffing. Fasten off and close the remaining opening.
🧶 Checkpoint: The finished head should look almost spherical from the front, with a broad cheek area. Do not squeeze it into a narrow oval.
Large front flippers – make 2
The front flippers are broad, plump paddles with rounded tips. They are lightly stuffed rather than completely flat.
R1: Work 6 sc into an MR. (6 sts)
R2: Inc in each st around. (12 sts)
R3: [Sc in next st, inc in next st] × 6. (18 sts)
R4–R7: Sc in each st around. (18 sts)
R8: [Sc in next st, dec] × 6. (12 sts)
R9–R10: Sc in each st around. (12 sts)
Place a small amount of fiberfill into the rounded outer two-thirds of the flipper. Keep the final edge almost unstuffed so it can be sewn flat against the body.
Flatten the opening so 6 stitches sit on the front layer and 6 on the back layer.
Sc through both layers across the opening. (6 sts)
Fasten off, leaving a long tail for sewing.
Rear flippers – make 2
The rear flippers are also softly three-dimensional but are slightly shorter than the front pair.
R1: Work 6 sc into an MR. (6 sts)
R2: Inc in each st around. (12 sts)
R3: [Sc in next 2 sts, inc in next st] × 4. (16 sts)
R4–R6: Sc in each st around. (16 sts)
R7: [Sc in next 2 sts, dec] × 4. (12 sts)
R8: Sc in each st around. (12 sts)
Add a small pinch of fiberfill to the rounded end. Leave the base unstuffed.
Flatten the opening and sc through both layers across the top. (6 sts)
Fasten off with a long sewing tail.
Large strawberry-red shell
The shell needs to be noticeably larger than the head and body. It begins as a broad circle, then several straight rounds curve the outer portion downward to form the full strawberry dome.
R1: With strawberry-red yarn, work 6 sc into an MR. (6 sts)
R2: Inc in each st around. (12 sts)
R3: [Sc in next st, inc in next st] × 6. (18 sts)
R4: [Sc in next 2 sts, inc in next st] × 6. (24 sts)
R5: [Sc in next 3 sts, inc in next st] × 6. (30 sts)
R6: [Sc in next 4 sts, inc in next st] × 6. (36 sts)
R7: [Sc in next 5 sts, inc in next st] × 6. (42 sts)
R8: [Sc in next 6 sts, inc in next st] × 6. (48 sts)
R9: [Sc in next 7 sts, inc in next st] × 6. (54 sts)
R10: [Sc in next 8 sts, inc in next st] × 6. (60 sts)
R11–R14: Sc in each st around. (60 sts)
First cream shell edging
Change to warm cream. This first edging round creates the clear cream band directly beneath the red shell.
R15: Sc in each st around. Join with a sl st to the first sc. (60 sts)
Outer cream cord edging
Do not turn.
R16: Ch 1, work 1 rev sc in each st around, moving from left to right. Join with a sl st to the first rev sc. (60 rev sc)
Fasten off, leaving a long tail for attaching the shell.
🧶 Checkpoint: The shell edge should now show two cream layers: a regular cream single-crochet round directly under the red shell and a narrower cord-like reverse-single-crochet line at the absolute outer edge.
Strawberry seeds
Add the seeds before attaching the shell.
Thread a yarn needle with cream yarn. Make 12 short vertical seed shapes across the red section of the shell.
For each seed, bring the yarn up through the shell, span approximately one crochet round vertically, and take the yarn back down. Repeat once over the same path so the seed becomes thick and softly oval.
Stagger the seeds around the shell instead of placing them in straight rows. Keep a small clear circle at the very top center for the whipped-cream topping.
Raised pink cheeks – make 2
With blush-pink yarn, work 6 sc into an MR. (6 sts)
Pull the ring closed, join with a sl st in the first sc, and fasten off with a sewing tail.
Flatten each tiny circle gently between your fingers. The cheeks should remain slightly raised when sewn to the head.
Whipped-cream topping
The topping is a small three-tier cone. Keep the stitches slightly softer than the main amigurumi fabric so the rounds form a gentle piped-cream shape.
R1: With cream yarn, work 6 sc into an MR. (6 sts)
R2: Sc in each st around. (6 sts)
R3: Inc in each st around. (12 sts)
R4: Sc in each st around. (12 sts)
R5: [Sc in next st, inc in next st] × 6. (18 sts)
R6: Sc in each st around. (18 sts)
Fasten off with a long sewing tail.
Add only a small amount of fiberfill. Shape the piece so the 18-stitch round forms a broad lower tier, the 12-stitch section forms the middle tier, and the 6-stitch tip remains visibly smaller.
Do not pack the topping firmly. It should remain soft and rounded, with a small pointed curl at the top rather than becoming a rigid cone.
Assembly
Pin all of the large components before sewing permanently. The shell, head, and flippers overlap visually, so their relative placement is important to the finished proportions.
1. Attach the head
Place the green body with its flatter side downward. Choose one side as the front.
Position the head against the front edge of the body so approximately the lower back quarter of the head overlaps the widest body rounds.
Pin a broad attachment area approximately 9–10 stitches wide. The head should sit low enough that it looks supported by the body instead of hanging from a narrow neck.
Sew around the entire contact area with green yarn, taking alternating small stitches through the head and body.
2. Attach the two front flippers
Place one large flipper on each side of the body near the head. Angle each one diagonally forward and outward.
Sew the complete flattened 6-stitch edge of each flipper to the body. Keep the softly stuffed rounded portion free.
The front pair should extend well beyond the eventual shell edge.
3. Attach the rear flippers
Position one smaller rear flipper on each side of the back half of the body.
Angle them slightly outward and backward, then sew each flattened 6-stitch edge securely to the body.
🧶 Checkpoint: Before the shell is added, all four flippers should look softly plump rather than flat, and each one should have a clearly rounded free end with a broad sewn base.
4. Attach the strawberry shell
Place the red shell over the body with the cream edging toward the bottom.
Center it so the shell sits behind the head and overhangs the green body slightly on both sides and at the back. The four flippers should remain clearly visible outside the shell silhouette.
Pin the shell at the front, back, left, and right first. Add additional pins between those points until the border follows one smooth oval around the body.
Sew through the lower portion of the first cream single-crochet edging and into the body underneath. Do not sew over the outer reverse-single-crochet cord; that final cream edge should remain completely visible.
Leave approximately 2 inches open near the back. Add a thin, evenly distributed layer of fiberfill beneath the red shell, concentrating it toward the center and upper sides.
The shell should become a full rounded dome while remaining wider than it is tall. Remove stuffing if the shell begins to look spherical.
Finish sewing the opening closed and secure the yarn.
5. Sew on the whipped-cream topping
Place the cream topping directly over the center of the strawberry shell.
Using its long tail, sew around the complete 18-stitch base into the red shell. Keep the lower tier broad and the smaller upper tiers upright.
Do not flatten the topping while sewing. The tip should remain visibly raised.
6. Embroider the large oval eyes
Use black yarn or embroidery floss to make two compact vertical oval eyes on the front of the head.
Position the eyes approximately across R9–R11 of the head, with roughly 8–9 stitches between their inner edges. Pin or mark both positions before embroidering so the eyes sit at the same height.
Build each eye with several closely packed vertical satin stitches until it forms a smooth black oval approximately two stitches wide and two to three rounds tall.
With a tiny amount of white yarn or embroidery floss, add one small oval highlight near the upper inner area of each black eye. Make both highlights face the same direction.
7. Add the pink cheeks
Position one pink crochet circle immediately below and slightly outside each eye.
The top of each cheek should sit close to the lower edge of its eye without touching it.
Sew around the outer edge of each cheek with matching pink yarn. Do not pull the stitches so tightly that the cheek becomes completely flat.
8. Embroider the smile
Using black yarn or embroidery floss, make a short curved smile centered between the two cheeks and approximately one round below the lower edge of the eyes.
Form the smile with one curved horizontal stitch and secure its center with one tiny couching stitch if needed. Keep the curve shallow and symmetrical.
Finishing the turtle
Weave every remaining yarn tail securely into the nearest stuffed component.
Roll the head gently between your palms to restore its round shape. Press the body slightly flatter underneath the shell, then spread the shell filling so the strawberry dome remains broad and smooth.
Shape the front flippers into long rounded paddles pointing slightly forward. Shape the rear pair into shorter rounded paddles pointing slightly backward.
Run your fingers around the cream shell edge and make sure both cream layers remain visible: the regular single-crochet band against the red shell and the rounded reverse-single-crochet cord around the outside.
No blocking is needed.
Troubleshooting
- The shell is too small compared with the head: Make sure you completed all ten increase rounds through 60 stitches before working the straight shell rounds.
- The shell looks flat: Add a thin layer of stuffing underneath the red center and spread it evenly toward the sides.
- The shell looks like a ball: Remove some stuffing and flatten the filling near the lower cream edge.
- The flippers look flat and floppy: Add a small amount of fiberfill into the rounded outer portion while leaving only the sewn base unstuffed.
- The cream edge does not have the thick corded appearance: Make sure R15 is regular single crochet and R16 is a separate reverse-single-crochet edging rather than another ordinary sc round.
Final check
- The turtle has one oversized round head, one low body, two larger front flippers, and two shorter rear flippers.
- The red shell is distinctly larger than the head and has a high, broad strawberry dome.
- The shell perimeter shows two separate cream finishing layers.
- Twelve cream strawberry seeds are distributed across the red shell around one centered cream topping.
- The face has two large black oval eyes with white highlights, two raised pink cheeks, and one small curved smile.
Once the shell is smoothly rounded, the flippers are evenly positioned, and the facial details sit symmetrically, your Strawberry Shortcake Turtle is complete. If you make one, feel free to share your finished turtle or leave a question if you get stuck on any step.












