
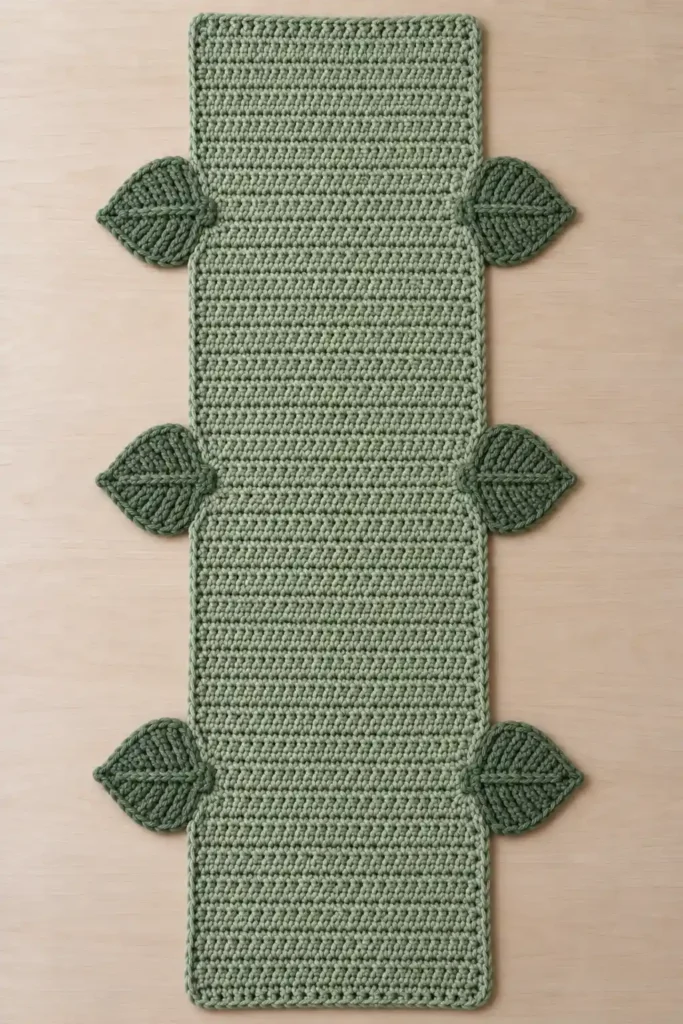
This sage green botanical table runner is built from one long, compact crochet rectangle with six broad leaves extending beyond the two long sides. Three matching leaf pairs create the distinctive botanical outline while keeping the entire center of the runner open and usable.
The body is worked in dense single crochet rows for a small, softly pebbled texture. A separate reverse-single-crochet edging creates the raised corded perimeter. Each darker leaf is worked separately around a center foundation, shaped with progressively taller stitches, finished with its own corded outer edging, given a raised center spine, and attached through a small hidden tab so almost the entire leaf projects outside the runner.
Project at a glance
| Skill level | Confident beginner to intermediate |
|---|---|
| Terminology | US crochet terms |
| Construction | Single-crochet rectangle with six separately crocheted leaves |
| Yarn | Worsted-weight cotton or cotton blend |
| Hook | 4.5 mm crochet hook |
| Approximate body size | About 12 inches wide and 42 inches long at the stated gauge |
A useful target gauge is approximately 14 single crochet stitches and 16 rows over 4 inches after light blocking. Exact gauge is not critical for table fit, but staying reasonably close keeps the runner long and narrow and gives the side edges enough firmness to support the projecting leaves.
Materials
- Worsted-weight smooth cotton or cotton-blend yarn in soft muted sage green for the runner
- Worsted-weight yarn in a deeper eucalyptus or woodland sage green for all six leaves
- 4.5 mm crochet hook
- Yarn needle
- Scissors
- Stitch markers
- Blocking mats and rustproof pins if available
Choose a smooth yarn with clearly defined strands rather than a fuzzy yarn. The body should feel substantial but flexible, while the leaf fabric needs enough firmness to hold the broad pointed shapes without becoming stiff.
🧶 Crochet Tip: If large gaps are appearing between the single crochet stitches, move down one hook size. The runner should have a compact surface with individual crochet stitches still clearly visible.
Stitches and abbreviations
- ch — chain
- sl st — slip stitch
- sc — single crochet
- hdc — half double crochet
- dc — double crochet
- tr — treble crochet
- rsc — reverse single crochet, also called crab stitch
- st(s) — stitch(es)
- RS — right side
- WS — wrong side
To work reverse single crochet, insert the hook into the next stitch to the right, yarn over and pull up a loop, then yarn over and pull through both loops. Continue moving from left to right. The result is a raised, slightly twisted cord-like edge.
Before you start
The main runner is worked back and forth in straight rows. Ch 1 at the beginning of a body row does not count as a stitch. Turn after every row.
The pattern uses 42 stitches across and 168 rows. The six leaves are positioned as three horizontal pairs near the lower fifth, center, and upper fifth of the finished runner.
Keep the first and last stitch of every body row easy to identify. Straight side edges are important because the border follows those row ends and the leaves are later aligned directly with the finished side edging.
Crochet pattern
Main runner
With the light sage yarn, ch 43.
Row 1: Sc in the 2nd ch from the hook and in each remaining ch across. Ch 1, turn. (42 sc)
Rows 2–168: Sc in each st across. Ch 1, turn. (42 sc)
After Row 168, fasten off.
🧶 Checkpoint: The body should be a long, narrow rectangle with compact horizontal rows. Both long sides should remain straight and approximately parallel from one end to the other.
Add the runner border
Place the runner RS facing you. Join the light sage yarn at one corner of a short edge.
R1: Sc in each of the 42 sts across the first short edge, ch 1 for the corner, work 168 sc evenly down the first long edge with approximately one sc in each row end, ch 1, work 42 sc across the foundation edge, ch 1, work 168 sc evenly up the second long edge, ch 1. Join with a sl st to the first sc. (420 sc, 4 ch-1 corner spaces)
Lay the runner flat before beginning the final edging. The first border round should follow the rectangle without obvious waves or inward pulling.
R2: Working in reverse single crochet, make 1 rsc in each of the 420 sc from R1 and 2 rsc in each of the four ch-1 corner spaces. Join to the first rsc. (428 rsc)
Fasten off and weave the ends into the WS.
Broad botanical leaf
Make six identical leaves with the darker eucalyptus-green yarn.
Each leaf begins along one central foundation chain. Short stitches at the two ends and progressively taller stitches through the middle create the plump almond shape. The outer point is shaped more strongly than the attachment end so the finished leaf has a clear outward-facing tip.
Ch 13.
Leaf R1, first side: Beginning in the 2nd ch from the hook, work sc in the first ch, hdc in the next ch, dc in each of the next 2 ch, tr in the next ch, 2 tr in the next ch, 2 tr in the next ch, tr in the next ch, dc in each of the next 2 ch, hdc in the next ch, sc in the final ch. Ch 2. (14 sts)
Rotate the foundation so the unused loops along the opposite side of the chain are accessible.
Leaf R1, second side: Work sc in the first unused foundation loop, hdc in the next, dc in each of the next 2 loops, tr in the next, 2 tr in the next, 2 tr in the next, tr in the next, dc in each of the next 2 loops, hdc in the next, sc in the final unused loop. Ch 1 and join with a sl st to the first sc of the first side. (28 sts, 1 ch-2 tip space, 1 ch-1 base space)
The ch-2 space is the outer tip of the leaf. The smaller ch-1 space marks the end that will eventually connect to the runner.
Leaf R2: Ch 1. Sc in each of the first 14 sts, work (sc, ch 1, sc) in the ch-2 tip space, sc in each of the next 14 sts, sc in the ch-1 base space. Join with a sl st to the first sc. (31 sc, 1 ch-1 tip space)
The leaf should now have a broad rounded middle, one clearly pointed end, and a slightly fuller rounded base.
Add the corded leaf edging
The leaves have their own raised outer edging so their outlines remain clearly defined against the tabletop.
Keep the RS facing you. Ch 1.
Leaf R3: Work 1 rsc in each of the 31 sc around the leaf. When you reach the ch-1 space at the outer tip, work 2 rsc into that space. Continue around and join to the first rsc. (33 rsc)
Fasten off.
🧶 Checkpoint: The finished outline should be plump and leaf-shaped rather than long and narrow. The reverse-single-crochet round should form one continuous raised cord around the outside edge, including the pointed tip.
Add the raised center spine
Place the leaf RS facing you with the rounded attachment end nearest you and the pointed tip facing away.
Join the darker yarn at the center of the base. Working directly over the line of the original foundation chain, make 12 relaxed surface slip stitches from the base toward the tip.
Place approximately one surface slip stitch over each original foundation-chain section. Keep the loops loose enough that the leaf remains flat.
Fasten off at the tip and take the yarn tail through to the WS.
The completed spine should look like a raised chain running through the middle of the leaf. The taller stitches on both sides angle naturally away from this center line, creating the strong radiating texture of the leaf.
🧶 Watch for: If the leaf folds or cups sharply along the center, the surface slip stitches are too tight. Remove the spine and repeat it with looser loops rather than trying to stretch the leaf afterward.
Hidden attachment tab
The attachment should remain narrow so the broad body of the leaf stays outside the rectangle. The tab is worked from the WS and disappears behind the runner border during assembly.
Turn the leaf WS up with the base toward you. Locate the sc worked into the base ch-1 space during Leaf R2. Place a marker in that stitch. The marked stitch together with one R2 sc immediately on each side forms a three-stitch attachment area.
Join the darker yarn in the first of these three stitches.
Tab Row 1: Ch 1, sc through each of the 3 marked base-area sts. Turn. (3 sc)
Tab Row 2: Ch 1, sc in each st across. Turn. (3 sc)
Tab Row 3: Ch 1, sc in each st across. (3 sc)
Fasten off, leaving a long tail for sewing.
The tab should be much narrower than the leaf itself. When viewed from the RS, the leaf should still appear to narrow naturally into a small central attachment point.
Repeat the complete leaf, corded edging, center spine, and hidden-tab instructions until you have six matching leaves.
Attach the leaves
Lightly block the runner and all six leaves separately before sewing. Straighten each center spine, smooth the broad sides, and gently shape the outer tip into a rounded point.
Place the runner RS up with one short edge nearest you.
Along each finished long edge, identify only the 168 reverse-single-crochet stitches corresponding to the long side between the two corner sections. Starting from the lower end of each side, place markers at approximately the 34th, 84th, and 134th long-edge stitches.
The markers establish three matching horizontal levels. One pair sits in the lower section, one pair sits at the center, and one pair sits in the upper section.
Lower leaf pair
Place the first leaf outside the left edge with the pointed tip facing directly away from the runner. Its raised center spine should run approximately perpendicular to the long side of the rectangle.
Slip the three-stitch attachment tab behind the runner border on the WS. Center it behind long-edge stitches 33–35, with the base of the leaf meeting the outside of the corded border.
Using the long sewing tail, whipstitch the three stitches of the tab firmly to the WS of the three corresponding border stitches. Keep all sewing behind the raised outer border as much as possible.
Add one small securing stitch through the base of the leaf immediately above the tab and one immediately below it. Catch only the nearest border stitch with each securing stitch.
Do not continue sewing around the sides of the leaf. The leaf body must remain free and completely outside the rectangular runner.
Attach the matching right-hand leaf in the same way, centered behind long-edge stitches 33–35 on the opposite side.
Middle leaf pair
Attach the second left and right leaves in the same manner, centering the tabs behind long-edge stitches 83–85.
Upper leaf pair
Attach the final pair with each tab centered behind long-edge stitches 133–135.
🧶 Checkpoint: View the runner directly from above before securing the final knots. You should see one uninterrupted rectangular center with exactly three matching leaf pairs projecting from its sides. Only the narrow bases should meet the border; the broad portions of all six leaves should remain outside the rectangle.
Finishing
Weave all remaining yarn tails securely into the WS. Keep the leaf-attachment tails firm enough to hold the motifs level, but do not pull so tightly that the runner border curves inward at the six attachment points.
Give the completed runner a final light wet block. Shape the rectangle first, keeping the long sides parallel and the corners softly rounded.
Then shape each leaf separately. Pull the outer point gently away from the runner, smooth the rounded upper and lower edges, straighten the center spine, and make sure the leaf’s corded edging remains visible around the complete outline.
Compare each left leaf with the leaf directly opposite it. The paired tips should project approximately the same distance from the runner and sit at the same level.
Allow the project to dry completely while lying flat. Do not place heavy objects over the leaves because the raised center spine and corded outer edging are intended to remain slightly dimensional.
Troubleshooting
- The runner gradually becomes wider: An extra stitch is probably being worked into the turning chain. Every body row must remain at 42 sc.
- The runner looks too open: The hook is too large or the tension is too loose. Move down a hook size so the single crochet fabric becomes compact without turning stiff.
- The long border ripples: Too many stitches were placed along the row ends. Aim for approximately one R1 sc in each of the 168 body-row ends.
- The border pulls inward: The first edging round is too tight. Rework the side stitches with slightly looser tension before adding the reverse-single-crochet round.
- The leaves are long and skinny: Check the two central increase positions on each side. Both center foundation chains must receive 2 tr so the middle expands outward.
- A leaf is too open between the tall stitches: Work the treble stitches with slightly firmer tension or move down one hook size for the leaves only.
- The leaf outline looks flat instead of corded: Make sure Leaf R3 is reverse single crochet rather than ordinary single crochet.
- The leaf curls along its middle: The surface-slip-stitch spine is too tight. Remove it and repeat the 12 surface slip stitches more loosely.
- A leaf sits noticeably on top of the runner: Move the attachment tab farther behind the finished side border. Only the small base junction should overlap the border.
- The leaf attachment looks bulky: Sew only through the three-stitch hidden tab and the two small base securing points. Do not sew the broad side edges of the leaf to the runner.
- A pair is not level: Check that both leaves in the pair are centered on the same numbered long-edge stitches before weaving in the sewing tails.
Adjusting the runner length
To make the runner longer or shorter, add or remove complete single crochet rows while keeping the width at 42 stitches.
If you change the total number of rows, do not keep the fixed leaf-placement numbers. Instead, divide each finished long edge into four approximately equal sections and place the three pairs near the one-quarter, halfway, and three-quarter positions.
Keep all six leaves the same size and use the same three-stitch tab on every motif. Changing only the body length preserves the broad leaf proportions and the balanced botanical outline.
Final project check
- The central runner is one continuous long rectangle worked in compact single crochet rows.
- The rectangle has a separate raised reverse-single-crochet edging around its entire perimeter.
- There are exactly six darker broad leaves arranged as three matching left-and-right pairs.
- Every leaf has a raised center spine and a separate corded outer edging.
- Only the narrow base of each leaf meets the runner; the broad leaf body extends outside the long edge.
Once the runner is completely dry, it is ready for the table. If you make your own version, feel free to share the finished project or leave a question if you need help with any step.












