
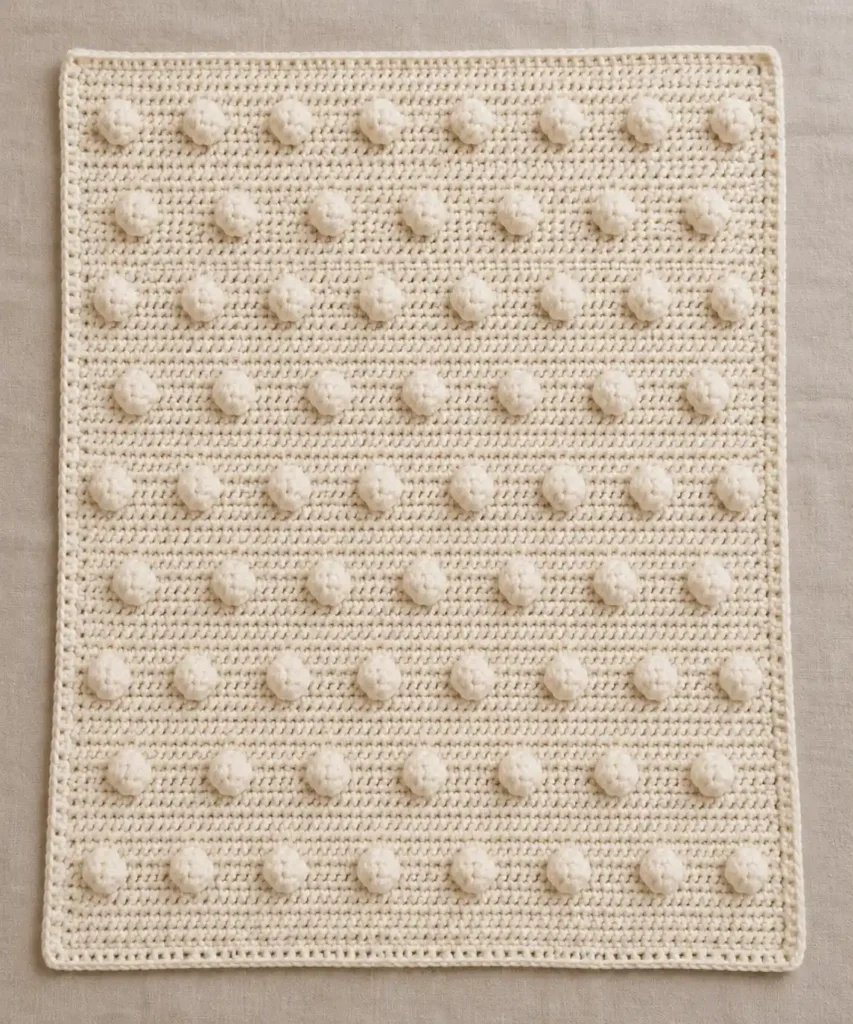
This crochet bobble baby blanket combines a simple solid background with rows of oversized raised bobbles for the soft, playful texture that defines the design. The bobbles are intentionally large and generously spaced, creating the chunky dotted look across the entire cream blanket without requiring separate pieces or complicated assembly.
The blanket is worked as one continuous rectangle in turned half double crochet rows. Every bobble is crocheted directly into the fabric, with alternating rows of 8 and 7 bobbles creating the slightly staggered arrangement. A narrow single-crochet border finishes the rectangle while keeping the focus on the large textured dots.
Project at a glance
| Skill level | Advanced beginner |
|---|---|
| Terminology | US crochet terms |
| Construction | One rectangle worked back and forth in rows |
| Main stitch | Half double crochet |
| Texture | 68 oversized raised bobbles arranged in 9 rows |
| Yarn weight | Medium worsted or aran weight, #4 |
| Hook | 5 mm crochet hook |
| Approximate size | About 30 × 36 in / 76 × 91 cm at the suggested gauge |
Materials
- Medium worsted or aran weight #4 yarn in one soft cream, ivory, or natural shade
- Approximately 1,400–1,600 yd / 1,280–1,465 m, allowing extra yarn for the oversized bobbles
- 5 mm crochet hook, or the hook needed to obtain the suggested fabric
- Yarn needle
- Scissors
- Removable stitch markers, optional
A smooth, softly twisted yarn gives the clearest result because both the horizontal crochet rows and the rounded bobbles remain visible. A washable acrylic, cotton-acrylic blend, or another soft baby-friendly #4 yarn works well.
Avoid very fuzzy or heavily textured yarn. The design depends on seeing the individual crochet stitches surrounding each bobble.
Gauge and finished fabric
Aim for approximately 13 hdc stitches and 9 rows over 4 in / 10 cm before blocking. This gives a blanket close to the stated dimensions with 99 stitches across and 80 body rows.
The fabric should be compact enough to support the large bobbles but still flexible enough for a baby blanket. If the fabric feels stiff, move up slightly in hook size. If the stitches have large gaps around the bobbles, move down slightly.
🧶 Crochet Tip: Make a small swatch containing one oversized bobble before starting the full blanket. The bobble should project clearly from the right side and look noticeably larger than an ordinary five-stitch bobble while the surrounding fabric remains flat.
Stitches and abbreviations
- ch – chain
- sc – single crochet
- hdc – half double crochet
- dc – double crochet
- sl st – slip stitch
- st(s) – stitch(es)
- RS – right side
- WS – wrong side
Oversized 7-dc bobble
The larger bobble is important for reproducing the chunky rounded texture of this blanket.
Yarn over, insert the hook into the indicated stitch, yarn over and pull up a loop, yarn over and pull through 2 loops. Leave the remaining loops on the hook.
Repeat that partial double crochet into the same stitch 6 more times. You will have 8 loops on the hook. Yarn over and pull through all 8 loops to close the bobble.
The completed bobble counts as 1 stitch.
All bobble rows are worked from the WS. This naturally pushes the bobbles toward the RS of the blanket. After completing each bobble, use a fingertip to push it firmly toward the front if necessary.
Before you start
Chain 2 at the beginning of every row. The turning chain does not count as a stitch. Work the first hdc into the first actual stitch and the last hdc into the final stitch of every row.
The blanket body always contains 99 stitches. A bobble replaces one ordinary hdc, so every bobble row still ends with 99 stitches.
The design alternates between a row containing 8 large bobbles and a slightly narrower row containing 7 large bobbles. The changing edge spacing shifts the second row inward and creates the gentle stagger visible across the blanket.
Seven ordinary hdc rows separate one textured row from the next. This gives the large bobbles enough room to remain visually distinct while still covering the blanket generously.
Crochet pattern
Foundation and lower section
Ch 101.
Row 1, RS: Hdc in the 3rd ch from the hook and in each remaining ch across. Turn. (99 sts)
Rows 2–7: Ch 2, hdc in each st across. Turn. (99 sts)
Bobble Row 1
Row 8, WS: Ch 2, hdc in first 7 sts, [oversized bobble in next st, hdc in next 11 sts] × 7, oversized bobble in next st, hdc in last 7 sts. Turn. (99 sts; 8 bobbles)
Rows 9–15: Ch 2, hdc in each st across. Turn. (99 sts)
Bobble Row 2
Row 16, WS: Ch 2, hdc in first 10 sts, [oversized bobble in next st, hdc in next 12 sts] × 6, oversized bobble in next st, hdc in last 10 sts. Turn. (99 sts; 7 bobbles)
Rows 17–23: Ch 2, hdc in each st across. Turn. (99 sts)
Continue the bobble pattern
Row 24, WS: Ch 2, hdc in first 7 sts, [oversized bobble in next st, hdc in next 11 sts] × 7, oversized bobble in next st, hdc in last 7 sts. Turn. (99 sts; 8 bobbles)
Rows 25–31: Ch 2, hdc in each st across. Turn. (99 sts)
Row 32, WS: Ch 2, hdc in first 10 sts, [oversized bobble in next st, hdc in next 12 sts] × 6, oversized bobble in next st, hdc in last 10 sts. Turn. (99 sts; 7 bobbles)
Rows 33–39: Ch 2, hdc in each st across. Turn. (99 sts)
Row 40, WS: Ch 2, hdc in first 7 sts, [oversized bobble in next st, hdc in next 11 sts] × 7, oversized bobble in next st, hdc in last 7 sts. Turn. (99 sts; 8 bobbles)
Rows 41–47: Ch 2, hdc in each st across. Turn. (99 sts)
Row 48, WS: Ch 2, hdc in first 10 sts, [oversized bobble in next st, hdc in next 12 sts] × 6, oversized bobble in next st, hdc in last 10 sts. Turn. (99 sts; 7 bobbles)
Rows 49–55: Ch 2, hdc in each st across. Turn. (99 sts)
Row 56, WS: Ch 2, hdc in first 7 sts, [oversized bobble in next st, hdc in next 11 sts] × 7, oversized bobble in next st, hdc in last 7 sts. Turn. (99 sts; 8 bobbles)
Rows 57–63: Ch 2, hdc in each st across. Turn. (99 sts)
Row 64, WS: Ch 2, hdc in first 10 sts, [oversized bobble in next st, hdc in next 12 sts] × 6, oversized bobble in next st, hdc in last 10 sts. Turn. (99 sts; 7 bobbles)
Rows 65–71: Ch 2, hdc in each st across. Turn. (99 sts)
Row 72, WS: Ch 2, hdc in first 7 sts, [oversized bobble in next st, hdc in next 11 sts] × 7, oversized bobble in next st, hdc in last 7 sts. Turn. (99 sts; 8 bobbles)
Rows 73–80: Ch 2, hdc in each st across. Turn after Rows 73–79. Fasten off after Row 80. (99 sts)
🧶 Checkpoint: With the RS facing upward, you should have 9 horizontal rows of chunky bobbles. The first, third, fifth, seventh, and ninth textured rows contain 8 bobbles. The four alternating rows contain 7 bobbles and sit slightly farther inward at both edges.
Add the border
The blanket uses a single narrow round of single crochet so the edge stays simple and does not compete with the bobble texture.
With the RS facing, join yarn at one corner and ch 1.
Border Round 1: Work 3 sc in the corner. Sc evenly across the first horizontal edge. Work 3 sc in the next corner. Continue down the long side, distributing approximately 3 sc across every 2 hdc row ends. Work 3 sc in the next corner. Sc evenly across the opposite horizontal edge. Work 3 sc in the final corner. Work evenly up the remaining long side at the same rate and join with a sl st to the first sc.
The exact number of stitches along the two long edges can vary slightly with tension. What matters most is that both sides contain the same number of border stitches and that the finished edge lies completely flat.
🧶 Watch for: One sc in every hdc row end is usually too sparse for this fabric and can make the long edges pull inward. Begin with roughly 3 sc for every 2 row ends, then adjust slightly if your personal row gauge requires it.
Fasten off and weave in the remaining ends.
Finishing the blanket
Lay the blanket flat with the bobbles facing upward. Gently straighten the edges and check that all 68 bobbles are projecting toward the RS.
Light blocking helps settle the horizontal rows and makes the spacing between the raised dots look cleaner. Shape the blanket into an even rectangle without stretching it aggressively.
For acrylic yarn, gentle steam blocking can be used, but keep the steamer above the fabric rather than pressing directly onto the stitches. For suitable cotton or wool blends, wet blocking is another option.
Do not press or flatten the bobbles. Shape only the surrounding fabric and allow the raised texture to remain dimensional.
How to keep the bobbles big and rounded
The most important difference in this version of the blanket is the size of the bobbles. A standard small five-stitch bobble produces a much subtler texture. Using seven partial double crochets gives each dot substantially more volume and creates the fuller appearance across the blanket.
Keep all seven partial dc stitches in exactly the same foundation stitch. Pull each loop to approximately the same height before closing the bobble so one side does not become smaller than the other.
After pulling through all 8 loops, gently press the bobble toward the RS with your fingertip. The following hdc helps lock the bobble into its raised position.
Do not add chains between the bobble and the following hdc. The bobble itself counts as one stitch and should remain directly integrated into the surrounding row.
Keeping the staggered layout neat
The alternating bobble counts are intentional. The rows containing 8 bobbles begin and end with 7 ordinary hdc stitches, while the rows containing 7 bobbles have wider 10-stitch margins.
This causes the 7-bobble rows to sit slightly inward instead of placing every raised dot in one rigid vertical column. Continue following the two layouts separately rather than trying to place the bobbles by eye.
If you use stitch markers, place them in the foundation stitches where the next bobble row will be worked. This is especially useful because the bobbles are large enough to obscure some of the nearby stitch tops.
Troubleshooting
- The bobbles are too small: check that you are working 7 partial dc stitches into the same foundation stitch before closing the bobble. A five-stitch bobble will create a noticeably smaller result.
- The bobbles look long instead of round: your partial dc loops may be too tall. Keep them relaxed but consistent, then push the finished bobble firmly toward the RS.
- The bobbles disappear toward the back: confirm that every bobble row is being worked from the WS and push each finished bobble toward the RS before continuing.
- The blanket begins narrowing: count 99 stitches after each row. The turning ch 2 does not count as a stitch, and every completed bobble counts as exactly 1 stitch.
- The texture is forming straight columns: check the beginning of the textured row. The 8-bobble row begins with 7 hdc while the 7-bobble row begins with 10 hdc.
- The border pulls inward: increase the number of sc worked along the hdc row ends. Approximately 3 border stitches for every 2 body rows is a useful starting rate.
- The border ripples: remove a few side-edge stitches and redistribute the remaining sc evenly.
Adjusting the blanket length
To make the blanket longer while preserving the same visual rhythm, continue in complete eight-row sections before adding the border.
After a bobble row, work 7 plain hdc rows, then work the next scheduled bobble row. Continue alternating the 8-bobble and 7-bobble layouts. Keeping this eight-row rhythm preserves the same vertical spacing between the raised dots.
For a shorter blanket, remove complete eight-row sections rather than reducing the number of plain rows between individual bobble rows. This keeps the bobble spacing consistent from top to bottom.
Final project check
- The main body contains 99 stitches across every row.
- The blanket contains 9 horizontal bobble rows.
- Five textured rows contain 8 bobbles and four contain 7 bobbles.
- There are 68 oversized bobbles in total.
- Seven plain hdc rows separate each textured row.
- The bobbles project clearly toward the RS instead of sitting flat inside the fabric.
- The narrow single-crochet border lies flat around all four sides.
Once the blanket is lightly blocked, the oversized cream bobbles should remain the dominant feature, creating the full, soft dotted texture while the simple half double crochet background keeps the design clean. If you make this bobble baby blanket, feel free to share your finished project or leave a question if you get stuck on any step.












