
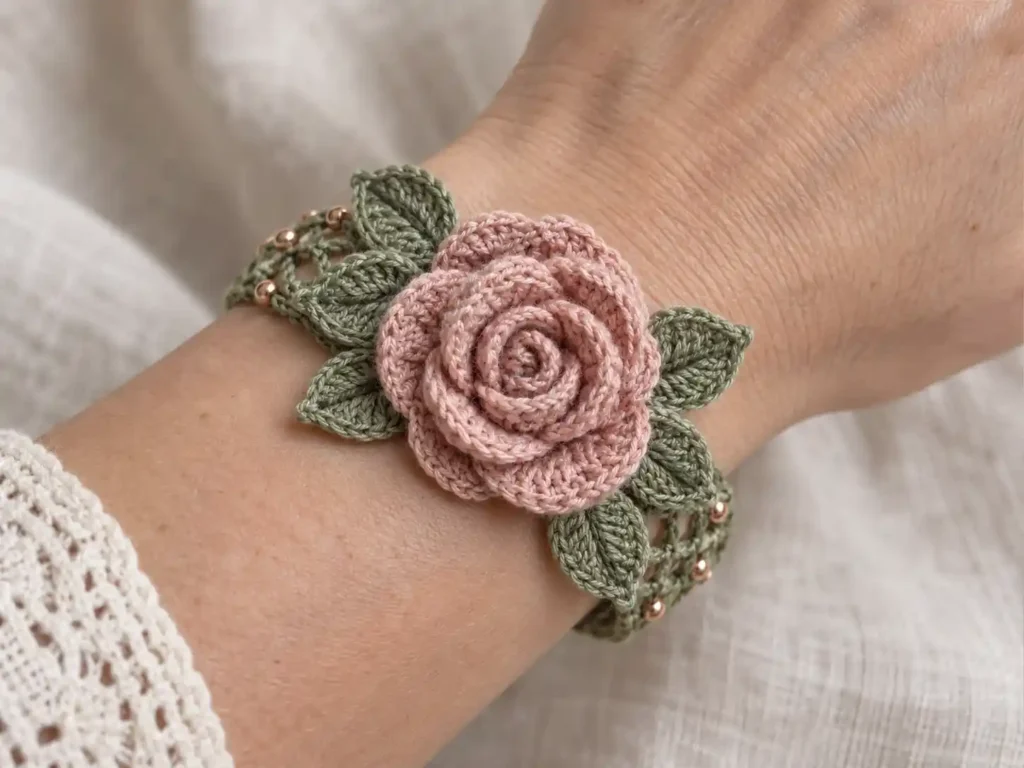
This blush pink rose vine bracelet combines one dimensional spiral rose with six pointed sage-green leaves, a delicate openwork `and, and restrained rose-gold bead accents. The finished bracelet has a soft botanical jewelry look, with the large flower centered over the wrist and the leaves spreading naturally around it.
The rose is made from one continuous crocheted strip that changes from smaller inner petals to broader outer petals before being rolled into shape. The six leaves are worked separately around short foundation chains, and the bracelet band uses three simple rows of open chain mesh. Keeping these parts separate makes it easier to control the flower depth, leaf placement, and overall symmetry during assembly.
Project at a glance
| Skill level | Advanced beginner |
|---|---|
| Terminology | US crochet terms |
| Construction | Openwork band, rolled spiral rose, and six separate leaves |
| Suggested yarn | Fingering-weight mercerized cotton |
| Hook | 2.25 mm crochet hook |
| Colors | Dusty blush pink and muted sage green |
The bracelet band is easy to resize because its mesh repeat uses groups of three foundation chains. Check the foundation chain around the intended wrist before beginning the first row. It should sit comfortably without needing to stretch.
Materials
- Small amount of fingering-weight mercerized cotton in dusty blush pink for the rose
- Small amount of matching fingering-weight cotton in muted sage green for the band and leaves
- 2.25 mm crochet hook
- Eight small rose-gold beads, approximately 3–4 mm, for the visible decorative accents
- One rose-gold bead approximately 6 mm for the closure
- Yarn needle
- Fine sewing needle that fits through the bead holes
- Strong matching sewing thread or divided crochet cotton for securing the beads
- Scissors
- Two removable stitch markers
Mercerized cotton is particularly suitable here because it gives the small stitches crisp definition and helps the leaves hold their pointed shape without making the bracelet stiff. Use the same yarn thickness for the rose and leaves so the botanical pieces remain visually balanced.
If the bracelet will be used by a young child, omit the beads because they are small removable parts.
Stitches and abbreviations
- ch – chain
- ch-sp – chain space
- sc – single crochet
- hdc – half double crochet
- dc – double crochet
- sl st – slip stitch
- st(s) – stitch(es)
- RS – right side
- WS – wrong side
V-stitch: Work dc, ch 1, dc in the same stitch or chain.
Before you start
Use an even but relaxed tension for the bracelet mesh. Tight chain stitches will shorten the band and make the open spaces pull out of shape when the bracelet curves around the wrist.
The rose begins with its smallest petals and progresses toward larger outer petals. This difference is important: when the strip is rolled, the beginning forms a compact spiral center while the later sections open into the wider outer layers.
🧶 Crochet Tip: Crochet one leaf before making the full set of six. Place it beside the unfinished rose strip to check the scale. The finished leaves should frame the flower rather than extend much farther than the outer petals.
Crochet pattern
Sage-green openwork bracelet band
The written version produces 15 mesh openings across the bracelet length. To resize the band, add or remove foundation chains in multiples of 3 while keeping an odd number of mesh openings whenever possible. An odd number gives you one clear center opening for positioning the rose.
Foundation: Ch 47.
Before continuing, wrap the foundation chain loosely around the wrist. If more length is needed, add chains in multiples of 3. If it is too long, remove chains in multiples of 3.
Row 1: Sc in 2nd ch from hook. [Ch 3, skip next 2 ch, sc in next ch] × 15. Turn. (16 sc, 15 ch-3 sps)
Row 2: Ch 1; this chain does not count as a stitch. Sc in first sc. [Ch 3, sc in next sc] × 15. Turn. (16 sc, 15 ch-3 sps)
Row 3: Ch 1; this chain does not count as a stitch. Sc in first sc. [Ch 3, sc in next sc] × 15. Fasten off. (16 sc, 15 ch-3 sps)
The finished band should have three parallel rows of open crochet mesh. The spaces may appear slightly rectangular while the band lies flat, but they soften into a more diamond-like shape once the bracelet curves around the wrist.
Blush pink spiral rose
The rose is worked as one long strip containing 17 petals. The first five petals are small, the next six are medium, and the final six are larger.
Foundation: Ch 53.
Row 1: Sc in 2nd ch from hook. [Skip next 2 ch, work (dc, ch 1, dc) in next ch, ch 1] × 17. Turn. (1 sc, 34 dc, 17 V-st ch-1 sps, 17 separator ch-1 sps)
The ch-1 space between the two dc of each V-stitch forms the foundation of one petal. The separate ch-1 spaces between V-stitches are used as anchoring points between the petals.
Row 2: Sl st in the first separator ch-1 sp.
For the first 5 petals: [work 5 hdc in the next V-st ch-1 sp, sl st in the next separator ch-1 sp] × 5.
For the next 6 petals: [work 6 dc in the next V-st ch-1 sp, sl st in the next separator ch-1 sp] × 6.
For the next 5 petals: [work 7 dc in the next V-st ch-1 sp, sl st in the next separator ch-1 sp] × 5.
For the final petal: Work 7 dc in the final V-st ch-1 sp, then sl st into the sc at the beginning of Row 1. (17 petals total: 5 small, 6 medium, 6 large; 25 hdc, 78 dc, 18 anchoring sl sts)
Fasten off, leaving a long sewing tail of approximately 18–24 inches.
Shape the rose
Place the strip with the petals facing upward and the foundation edge along the bottom.
Beginning at the end containing the five smaller hdc petals, curl the first petal inward tightly. Wrap the next few small petals around this center to create a compact spiral.
Continue rolling the six medium petals around the center, allowing each new petal to overlap the previous layer slightly.
When you reach the final six larger petals, loosen the roll. These petals should create broader outer curves instead of wrapping tightly against the center.
Turn the flower over while holding the rolled shape securely. Thread the long tail through a yarn needle and sew back and forth through the foundation edge of every rolled layer. Make several passes across the underside in different directions so the rose remains firmly assembled.
Keep the sewing confined to the foundation edge and lower portion of the petals. The upper petal edges should remain free and slightly raised.
🧶 Checkpoint: The center should look like a tight crochet spiral, with the surrounding petals becoming progressively broader and more open. If the whole flower looks like a tight cylinder, unroll the outer section slightly before finishing the underside stitches.
Sage-green pointed leaves
Make 6 identical leaves. Each leaf is crocheted around both sides of one foundation chain, creating a visible center line and a tapered point.
Foundation: Ch 10.
R1: Sc in 2nd ch from hook, hdc in next ch, dc in next 5 ch, hdc in next ch, then work (sc, ch 2, sc) in the final ch.
Rotate the work so the unused loops on the opposite side of the foundation chain are facing you. Do not turn the work.
Working back along the opposite side of the foundation chain, hdc in next ch, dc in next 5 ch, hdc in next ch, sc in final ch. Join with sl st to the first sc. (18 sts, 1 ch-2 tip sp)
Fasten off, leaving an approximately 8-inch tail for sewing.
Gently pinch the ch-2 tip between your fingers to emphasize the point. The original foundation chain should remain visible through the center of the leaf, with the taller dc stitches forming the broadest middle section.
Repeat until you have exactly six leaves.
Assembly
Find the bracelet center
Lay the bracelet band flat with the RS facing upward.
For the written 15-space version, count along the mesh and mark the eighth ch-3 space. This is the center of the bracelet.
The rose will cover approximately the center three mesh openings. Arrange and attach the six leaves before sewing down the flower so the inner ends of the leaves disappear naturally beneath the rose.
Arrange the leaves
Place three leaves on the left side of the center and three on the right.
- Position one upper-left leaf diagonally toward approximately the 11 o’clock direction.
- Position the second left leaf outward toward approximately 9 o’clock.
- Position the lower-left leaf diagonally toward approximately 7 o’clock.
- Position one upper-right leaf diagonally toward approximately 1 o’clock.
- Position the second right leaf outward toward approximately 3 o’clock.
- Position the lower-right leaf diagonally toward approximately 5 o’clock.
The arrangement does not need to be mathematically rigid. Allow small differences in the angles so the leaves look naturally handmade, but keep three clearly visible leaves on each side of the rose.
Tuck approximately the lower quarter of every leaf beneath the future position of the flower. Most of each leaf, including the pointed tip and broad middle section, should remain visible.
Sew the leaves to the band
Using the long sage-green tail from each leaf, sew the bottom 3–4 stitches of the leaf to the bracelet band.
Pass the needle through solid sc junctions in the mesh rather than relying only on a long chain loop. Make two or three secure passes through each leaf base.
Leave the outer half of each leaf unattached. This lets the leaf edge rise slightly from the wrist while keeping the base secure.
Weave the sewing tail into the underside of the bracelet.
Attach the rose
Place the finished rose over the center of the bracelet, covering the six leaf bases and approximately the center three mesh openings.
All six leaf tips should remain visible around the flower. Adjust the leaves before attaching the rose if any one leaf is almost completely hidden.
Using the blush-pink assembly tail, sew through the firm foundation edge on the underside of the rose and then through nearby solid sc junctions of the green bracelet band.
Make attachment stitches around several different points of the rose base rather than sewing only through the center. This prevents the heavy flower from tilting to one side when the bracelet is worn.
Do not sew through the upper petal edges.
🧶 Watch for: Hold the bracelet around the wrist before tying off the rose. If the flower leans noticeably toward one side, add one attachment stitch through the opposite edge of the flower base. The petals themselves should remain free.
Add the rose-gold beads
Use the eight small rose-gold beads as restrained accents on the exposed green mesh.
Attach four beads along the visible band to the left of the botanical centerpiece and four along the band to the right.
Place the beads at solid mesh junctions, spacing them through alternating upper and lower points so they do not form one rigid straight line.
For each bead, bring the sewing thread through a solid sc junction, pass through the bead, return through the same crochet area, and repeat once more. Tie securely on the underside and bury the thread end through nearby crochet stitches.
Keep every bead close to the crochet surface. There should be no visible loose thread between a bead and the green band.
Finishing and fit
Make the closure loop
The closure sits on the underside of the wrist so it does not compete visually with the rose and leaves.
At one short end of the bracelet, locate the middle row-end sc. Join the sage-green yarn to this stitch.
Ch 8 and sl st back into the same row-end sc to create one compact loop.
Before fastening off, test the loop over the 6 mm closure bead. It should pass over the bead with gentle pressure but should not be loose enough to slip off by itself.
If needed, remove or add one chain and test again. Fasten off and weave in both ends securely.
Add the closure bead
At the opposite short end of the bracelet, sew the 6 mm rose-gold bead securely to the middle row-end sc.
Pass through the bead and the crochet several times with strong sewing thread. The closure receives more movement than the decorative beads, so secure it firmly.
Try on the bracelet before tying the final knot. If the band is slightly loose, the closure bead can be moved one mesh junction inward without disturbing the floral centerpiece.
Shape the leaves
Lightly dampen the six leaves and smooth them between your fingers. Encourage each tip into a gentle point and arrange the leaves into an even botanical fan around the flower.
Do not stretch the leaves lengthwise. The broad middle and slightly raised edge are part of their shape.
Shape the rose
Do not press or flatten the rose during finishing.
If one outer petal has folded inward, gently roll its upper edge outward with your fingertip. Keep the center compact and allow the outer petals to sit progressively farther away from the center.
Weave in every remaining yarn end on the underside of the bracelet and trim only after checking that the flower, six leaves, closure, and beads are secure.
Troubleshooting
- The band feels stiff or too short: The chain stitches are probably too tight. Work the foundation and ch-3 spaces more loosely, or use a slightly larger hook for the band only.
- The rose looks like a flat spiral: The strip was rolled without enough overlap. Reopen it and wrap the first five small petals more tightly around the center.
- The rose looks cylindrical: The outer petals were rolled too tightly. Loosen the final six petals and allow their edges to open outward before securing the base.
- The leaves curl strongly: The foundation chain is tighter than the stitches worked around it. Lightly dampen the leaves and smooth them flat before assembly.
- The leaves disappear behind the rose: Too much of each leaf base has been tucked under the flower. Only the lower quarter needs to be concealed.
- The flower tilts when worn: Add another sewing point through the opposite side of the rose base and a solid sc junction in the bracelet band.
Adjusting the bracelet size
To make the bracelet longer or shorter, change the foundation chain in multiples of 3.
Each additional group of 3 chains creates one more mesh opening in every row. Whenever practical, keep an odd number of mesh openings so there is one obvious central space for positioning the flower.
The written version creates 15 openings, making the eighth opening the center. If you make 17 openings, the ninth is the center; if you make 13 openings, the seventh is the center.
Do not resize the rose or leaves simply because the bracelet length changes. Keeping the same central flower and six-leaf arrangement preserves the bold botanical proportions of the design.
When finished, the bracelet should have one prominent blush-pink spiral rose, exactly six pointed sage-green leaves, a narrow three-row openwork band, and small rose-gold accents distributed along the exposed mesh. The flower should sit securely over the top of the wrist while the leaf tips and outer petal edges remain slightly raised rather than being sewn completely flat.
If you make this rose bracelet, feel free to share your finished version or leave a question if you need help with the spiral rose or leaf placement.












