
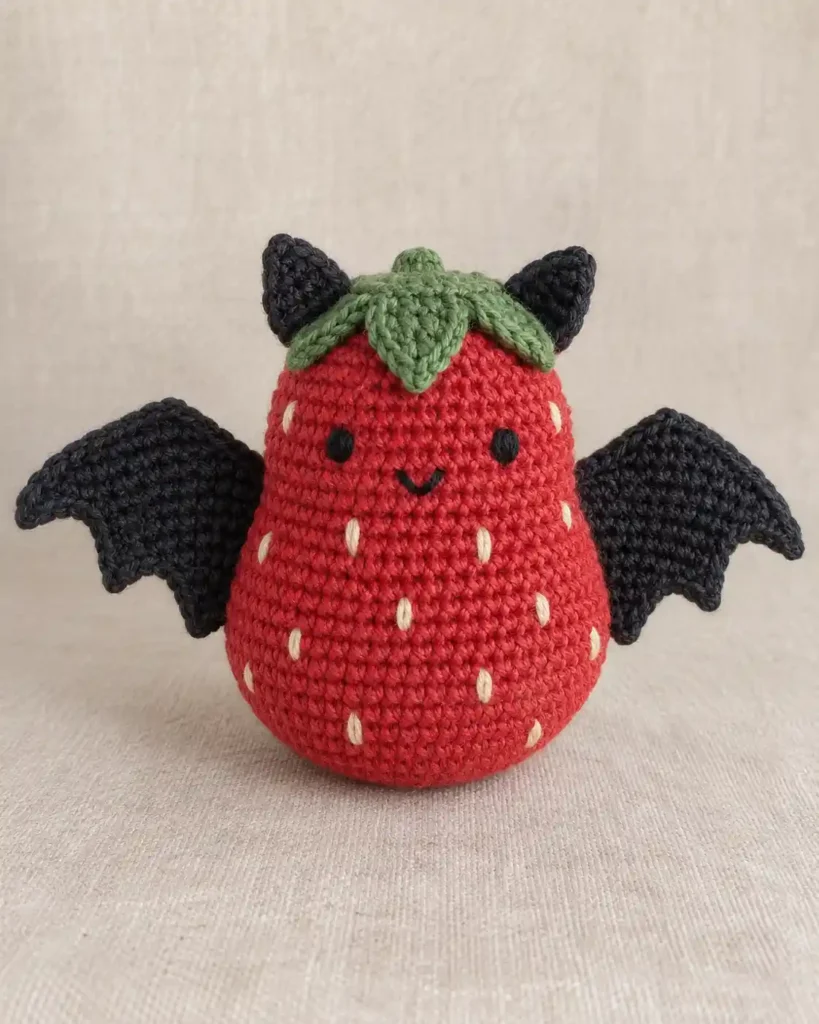
This strawberry bat amigurumi combines a broad, plump strawberry-red body with two dark bat wings, compact pointed ears, a leafy green strawberry cap, a tiny embroidered face, and scattered cream seed stitches. The body and head are worked as one continuous stuffed piece, while the wings, ears, and green cap are made separately and sewn securely in place.
The most important proportions are the rounded lower body, the gentle taper toward the crown, and the wide wings. Each wing has one projecting outer wingtip plus two lower rounded points, giving it the simple bat silhouette without complicated membrane construction.
Project at a glance
| Skill level | Confident beginner |
|---|---|
| Terminology | US crochet terms |
| Construction | Continuous-round stuffed body with separate flat wings, ears, and one unified leafy cap |
| Main stitch | Single crochet |
| Yarn | Medium-weight #4 yarn |
| Hook | 4 mm crochet hook |
| Finished size | Small amigurumi size; exact dimensions depend on yarn, hook, and tension |
Exact gauge is not important, but the crochet fabric should be dense enough that stuffing does not show between the stitches. The body should feel firm and flexible rather than stiff.
Materials
- Medium-weight #4 yarn in strawberry red for the body
- Medium-weight #4 yarn in charcoal black for the wings and ears
- Medium-weight #4 yarn in leafy green for the strawberry cap
- Small amount of cream yarn for the strawberry seeds
- Small amount of black yarn for the embroidered eyes and mouth
- 4 mm crochet hook
- Polyester fiberfill
- Stitch marker
- Yarn needle
- Scissors
- Pins for positioning the wings, ears, and cap before sewing
The red body requires most of the yarn. Only small leftover quantities are needed for the black, green, cream, and facial details.
Stitches and abbreviations
- MR – magic ring
- ch – chain
- sl st – slip stitch
- sc – single crochet
- hdc – half double crochet
- dc – double crochet
- tr – treble crochet
- inc – work 2 sc in the same stitch
- dec – single crochet decrease over the next 2 stitches
- sc2tog – single crochet 2 stitches together
- sc3tog – single crochet 3 stitches together
- RS – right side
- WS – wrong side
Invisible single crochet decrease
Insert the hook through the front loop of each of the next two stitches, yarn over and pull through both front loops, then yarn over and pull through the remaining two loops. Use this decrease throughout the red body for smoother shaping.
Before you start
The red body is worked continuously in a spiral. Do not join rounds. Place a stitch marker in the first stitch and move it upward at the beginning of each new round.
The wings and ears are worked flat in turned rows. A beginning ch 1 does not count as a stitch. The wings use identical instructions; turn one over during assembly so the two pieces mirror one another.
The green strawberry cap is one unified crocheted component. It begins with a small raised center, expands into a circular base, and then forms four short leaves directly from that base.
🧶 Crochet Tip: Add stuffing in small pieces rather than pushing in one large bundle. This makes it much easier to keep the lower body wide and rounded while preserving the gentle taper toward the top.
Crochet pattern
Strawberry body and head
Use strawberry-red yarn. Begin at the center of the lower body and work upward.
R1: Work 6 sc into MR. (6 sts)
R2: Inc in each stitch around. (12 sts)
R3: [Sc in next stitch, inc in next stitch] × 6. (18 sts)
R4: [Sc in next 2 stitches, inc in next stitch] × 6. (24 sts)
R5: [Sc in next 3 stitches, inc in next stitch] × 6. (30 sts)
R6: [Sc in next 4 stitches, inc in next stitch] × 6. (36 sts)
R7: [Sc in next 5 stitches, inc in next stitch] × 6. (42 sts)
R8: [Sc in next 6 stitches, inc in next stitch] × 6. (48 sts)
R9: [Sc in next 7 stitches, inc in next stitch] × 6. (54 sts)
R10: [Sc in next 8 stitches, inc in next stitch] × 6. (60 sts)
R11: [Sc in next 9 stitches, inc in next stitch] × 6. (66 sts)
R12: [Sc in next 10 stitches, inc in next stitch] × 6. (72 sts)
R13–R16: Sc in each stitch around. (72 sts each round)
R17: [Sc in next 10 stitches, dec] × 6. (66 sts)
R18–R19: Sc in each stitch around. (66 sts each round)
R20: [Sc in next 9 stitches, dec] × 6. (60 sts)
R21–R22: Sc in each stitch around. (60 sts each round)
R23: [Sc in next 8 stitches, dec] × 6. (54 sts)
R24–R25: Sc in each stitch around. (54 sts each round)
R26: [Sc in next 7 stitches, dec] × 6. (48 sts)
R27–R28: Sc in each stitch around. (48 sts each round)
R29: [Sc in next 6 stitches, dec] × 6. (42 sts)
R30: Sc in each stitch around. (42 sts)
R31: [Sc in next 5 stitches, dec] × 6. (36 sts)
R32: Sc in each stitch around. (36 sts)
R33: [Sc in next 4 stitches, dec] × 6. (30 sts)
Begin stuffing the body. Fill the bottom and lower sides firmly enough to create a broad rounded base. Keep the center filled, but avoid packing the upper section as tightly as the lower half.
R34: [Sc in next 3 stitches, dec] × 6. (24 sts)
Add more stuffing and shape the body with your fingers.
R35: [Sc in next 2 stitches, dec] × 6. (18 sts)
R36: [Sc in next stitch, dec] × 6. (12 sts)
Add the final amount of stuffing through the opening.
R37: Dec around. (6 sts)
Fasten off with a tail. Thread the tail through the front loops of the remaining six stitches, pull firmly to close the opening, secure it, and hide the yarn end inside the body.
🧶 Checkpoint: The red piece should look like one plump strawberry rather than a separate head and torso. It should be widest through the lower half, softly rounded at the bottom, and gradually narrower toward the crown.
Bat wings – make 2
Use charcoal-black yarn. Each wing is built as a broad tapering panel. The tall foundation edge is sewn to the body, the opposite end forms the main outer wingtip, and two broad lower points are added along the lower sloping edge.
Foundation: Ch 18.
Row 1: Beginning in the second ch from the hook, sc across. Turn. (17 sts)
Row 2: Ch 1, sc2tog, sc in next 13 stitches, sc2tog. Turn. (15 sts)
Row 3: Ch 1, sc across. Turn. (15 sts)
Row 4: Ch 1, sc2tog, sc in next 11 stitches, sc2tog. Turn. (13 sts)
Row 5: Ch 1, sc across. Turn. (13 sts)
Row 6: Ch 1, sc2tog, sc in next 9 stitches, sc2tog. Turn. (11 sts)
Row 7: Ch 1, sc across. Turn. (11 sts)
Row 8: Ch 1, sc2tog, sc in next 7 stitches, sc2tog. Turn. (9 sts)
Row 9: Ch 1, sc across. Turn. (9 sts)
Row 10: Ch 1, sc2tog, sc in next 5 stitches, sc2tog. Turn. (7 sts)
Row 11: Ch 1, sc2tog, sc in next 3 stitches, sc2tog. Turn. (5 sts)
Row 12: Ch 1, sc2tog, sc in next stitch, sc2tog. Turn. (3 sts)
Row 13: Ch 1, sc3tog. (1 st)
Do not fasten off. The remaining stitch at the end of Row 13 is the main outer wingtip.
Shape the lower wing edge
Rotate the wing so the lower sloping side faces you. Do not work into the wingtip itself. Work into the next 12 row ends along that lower edge, moving from the tip back toward the foundation edge.
Lower-edge repeat: Sc in next row end, hdc in next row end, work dc, tr, dc in next row end, hdc in next row end, sc in next row end, sl st in next row end.
Repeat the lower-edge sequence twice. This uses all 12 row ends and creates two broad rounded lower points beneath the main outer wingtip. (16 edging sts)
Fasten off, leaving a long tail at the inner foundation area for sewing.
The finished wing should have a straight tall attachment edge beside the body, a gently sloping upper edge, one projecting outer wingtip, and two lower points. Do not block the piece completely flat; a small amount of natural crochet texture helps the wing keep its shape.
Make the second wing from the same instructions. Turn one wing over during assembly so the two lower-point edges face downward and the pieces mirror one another.
🧶 Checkpoint: Each wing should have three visible points in total: one main point at the outer tip of the tapered panel and two broader points along the lower edge. The upper edge should remain comparatively smooth.
Bat ears – make 2
Use charcoal-black yarn. The ears are compact triangular pieces with a broad base.
Foundation: Ch 8.
Row 1: Beginning in the second ch from the hook, sc across. Turn. (7 sts)
Row 2: Ch 1, sc2tog, sc in next 3 stitches, sc2tog. Turn. (5 sts)
Row 3: Ch 1, sc across. Turn. (5 sts)
Row 4: Ch 1, sc2tog, sc in next stitch, sc2tog. Turn. (3 sts)
Row 5: Ch 1, sc3tog. (1 st)
Fasten off with a long sewing tail. Gently shape the ear with your fingers so it remains broad at the lower edge and softly pointed at the top.
Unified strawberry leaf cap
Use leafy-green yarn. The cap begins with a small raised center and then widens to support four short triangular leaves.
R1: Work 6 sc into MR. (6 sts)
R2: Sc in each stitch around. (6 sts)
R3: Inc in each stitch around. (12 sts)
R4: [Sc in next stitch, inc in next stitch] × 6. (18 sts)
R5: [Sc in next 2 stitches, inc in next stitch] × 6. (24 sts)
The narrow R1–R2 center creates the small raised green nub, while R3–R5 create the wider base beneath the leaves.
Divide R5 into four consecutive six-stitch sections. Work one leaf into each section.
Leaf 1
Continue with the working yarn.
Row 1: Ch 1, sc in each of the next 6 stitches of R5. Turn. (6 sts)
Row 2: Ch 1, sc2tog, sc in next 2 stitches, sc2tog. Turn. (4 sts)
Row 3: Ch 1, sc across. Turn. (4 sts)
Row 4: Ch 1, sc2tog twice. Turn. (2 sts)
Row 5: Ch 1, sc in each stitch across. Turn. (2 sts)
Row 6: Ch 1, sc2tog. (1 st)
Fasten off.
Leaves 2–4
Join the green yarn in the first unused stitch of the next six-stitch section of R5 and repeat Leaf Rows 1–6.
Repeat again across the next six stitches and once more across the final six stitches. All 24 stitches of R5 will now support one of the four leaf bases.
After the fourth leaf, leave a long green tail for sewing.
Gently spread the leaves outward. Each leaf should have a broad base, short tapered sides, and a clearly defined point. The leaves should remain chunky rather than long and narrow.
Assembly
Attach the ears
Place the stuffed body upright and choose the front centerline.
Position the two black ears near the crown, approximately across R30–R33. Angle their points slightly outward rather than straight upward.
Leave enough room between the inner ear bases for the green strawberry cap. Pin both ears and compare their height and angle from directly in front.
Using the black yarn tails, sew the complete seven-stitch foundation edge of each ear firmly to the body. Secure the yarn inside the amigurumi.
Attach the wings
The 17-stitch foundation edge of each wing is the attachment edge. The narrow Row 13 end points outward, and the two edged lobes belong along the lower side.
Position each wing against the side of the red body. Place the upper end of the attachment edge around R18–R20 and the lower end around R27–R29.
The main outer wingtip should extend almost horizontally from the body with a slight downward angle. The two smaller points should hang below it along the lower edge.
Pin both wings before sewing. View the toy from the front and check that both outer tips extend a similar distance from the body and that the lower points sit at similar heights.
Sew the complete straight foundation edge securely to the red body. Leave the rest of the wing free so the broad panels project visibly outward.
🧶 Watch for: Do not sew the broad face of the wing against the strawberry. Only the straight inner attachment edge is secured. The remaining wing must stay free so its outer tip and two lower points remain clearly visible.
Attach the leafy cap
Center the green cap directly over the closed top of the strawberry between the two ears. The small raised center should sit over the crown.
Arrange one leaf toward the front center of the face. Position one leaf toward the left ear, one toward the right ear, and the fourth toward the back.
The front leaf should overlap the upper forehead noticeably without reaching the eyes. The side leaves may overlap the inner ear bases slightly.
Sew the round center of the cap firmly to the red body first. Then secure the broad base of each leaf with several small stitches.
Leave the outer half of each leaf free so the points lift naturally away from the body instead of appearing completely flattened.
Add the face and strawberry seeds
Embroider the eyes
Use black yarn and a yarn needle. Place the eyes on the upper front of the red body around R21–R23.
Position one eye on each side of the centerline. Leave approximately 8–10 visible red stitches between their inner edges.
Build each eye from several short vertical satin stitches until it forms a small compact black oval. Keep the two eyes approximately the same height and width.
Do not pull the embroidery tightly enough to create deep dents in the body.
Embroider the mouth
Place the mouth approximately two rounds below the eyes.
Make one short diagonal stitch downward toward the center, then a second diagonal stitch upward from the center. This creates the small shallow V-shaped smile.
Keep the mouth narrow and centered between the eyes.
Add the strawberry seeds
Use cream yarn to embroider approximately 12–14 seed marks across the visible front and side areas of the red body.
Each seed is one short vertical or slightly diagonal yarn stitch placed directly over the crochet surface. Keep the seeds narrow and approximately one crochet round tall.
Place one cream seed near each upper side of the face, then distribute the remaining seeds below the mouth and over the lower body.
Use staggered spacing rather than perfectly straight columns. The lower half can hold slightly more seeds than the upper face area, but leave generous red space around every mark.
Troubleshooting
- The body looks too tall and narrow: Make sure R11 and R12 were completed so the body reaches the full 72-stitch width. Concentrate stuffing toward the lower sides rather than only through the vertical center.
- The body looks like a ball instead of a strawberry: The upper half may be overstuffed. Keep the lower half full and gently compress the area above R25 to emphasize the taper.
- The wings look like plain triangles: Check that the lower-edge repeat was worked twice. Those two raised sections create the two lower bat-wing points.
- The wing points are on the top edge: Turn the wing over before sewing so the shaped edging sits below the main outer wingtip.
- The wingtip looks too rounded: Shape the Row 13 end gently between your fingers after assembly. Do not stretch the entire wing.
- The cap looks like a green circle: Make sure all four six-row leaves are present and that only their bases are sewn flat.
- The green cap hides the eyes: Move the center slightly toward the back of the crown before sewing. Only the front leaf should extend onto the forehead.
Final shaping
Set the toy upright and inspect it from the front. The red strawberry body should remain the dominant shape, with a broad rounded lower half and a narrower crown.
The two wings should extend widely from the sides. Each should show one main outer wingtip and two lower points. The ears should remain clearly visible above the green leaves, while the front green leaf overlaps only the top of the forehead.
Massage the stuffing gently through the crochet fabric to smooth obvious lumps and create a subtly flatter resting area at the bottom. Avoid heavy steam or aggressive blocking on the stuffed body.
Weave in all remaining yarn ends. The finished strawberry bat should have one continuous red body and head, two matching broad black wings, two compact black ears, one unified four-leaf green strawberry cap with a small raised center, a tiny embroidered face, and scattered cream strawberry seeds.
If you make this strawberry bat, feel free to share your finished project or leave a question if you get stuck during the wing shaping, cap assembly, or finishing.












