
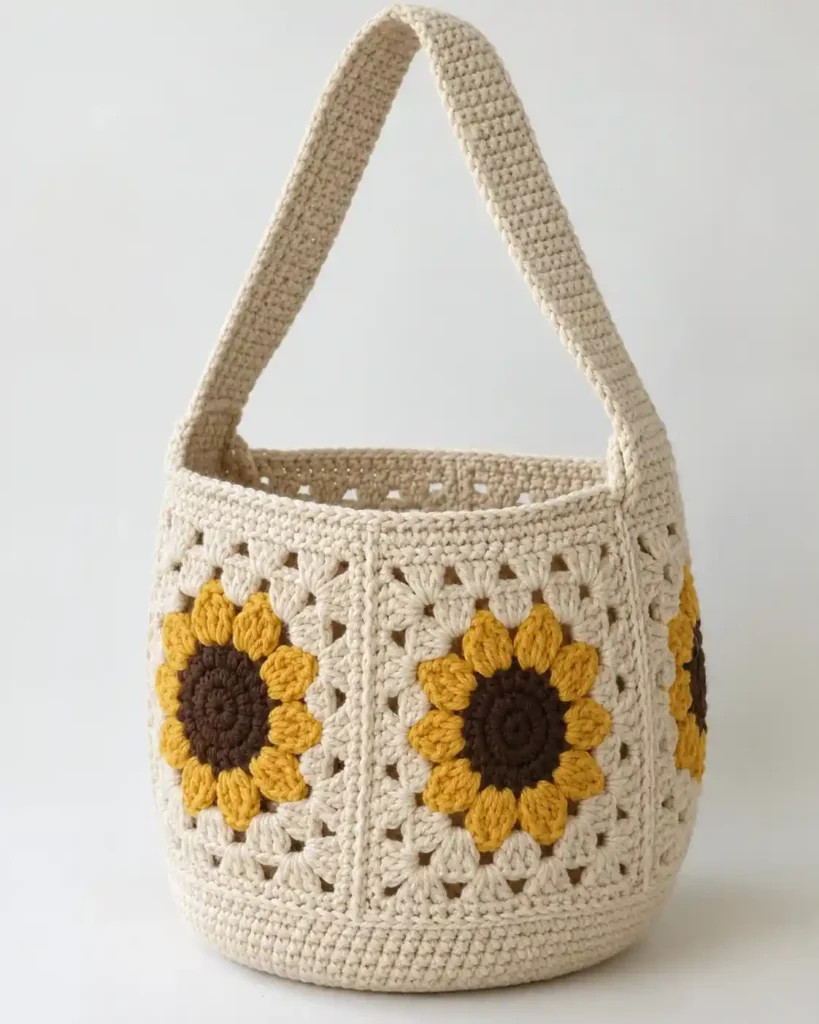
This sunflower granny square crochet bag combines compact chocolate-brown flower centers, twelve raised golden petals, and warm cream granny-square backgrounds in a softly rounded bucket shape. Four matching sunflower squares form the main wall, with narrow raised seams between the panels, a dense cream lower section, a flat circular base, an openwork upper band, and one broad crochet shoulder strap.
The sunflower takes up a generous portion of each square rather than sitting inside several wide background rounds. Two cream granny-style rounds are enough to square the flower and preserve the bold sunflower proportions. The lower section is worked more densely so the bag can stand upright while still keeping a soft handmade shape.
Project at a glance
| Skill level | Confident beginner to intermediate |
|---|---|
| Terminology | US crochet terms |
| Construction | 4 sunflower squares, raised joins, dense lower band, circular base, upper band, 1 strap |
| Yarn | Medium-weight #4 cotton or cotton-acrylic |
| Hook | 4.5 mm crochet hook |
| Finished shape | Small cylindrical bucket-style shoulder bag with a softly rounded base |
With medium-weight cotton and the hook listed below, squares around 5–5 1/2 inches wide make a practical small shoulder bag. Exact dimensions can vary with yarn and tension, so matching the four squares to one another matters more than reaching a particular measurement.
Materials
- Medium-weight #4 cotton or cotton-acrylic yarn in warm cream for the square backgrounds, joins, bands, base, and strap
- Medium-weight #4 yarn in mustard or sunflower yellow for the petals
- Medium-weight #4 yarn in dark chocolate brown for the flower centers
- 4.5 mm crochet hook
- Removable stitch marker
- Tapestry needle
- Scissors
- Blocking mat and rust-resistant pins, optional
Allow approximately 300–450 yards of cream yarn, depending on strap length and individual gauge, plus partial skeins of brown and yellow. A smooth cotton or cotton-rich yarn gives the petals good definition while keeping the base and strap firmer than a very soft acrylic would.
Stitches and abbreviations
- ch — chain
- sc — single crochet
- dc — double crochet
- sl st — slip stitch
- sc2tog — single crochet 2 stitches together
- st/sts — stitch/stitches
- sp — space
- MR — magic ring
- RS — right side
- WS — wrong side
- inc — work 2 sc in the same stitch
- 5-dc-cl — 5-double-crochet cluster
5-dc-cl: Yarn over, insert the hook into the indicated stitch, yarn over and pull up a loop, yarn over and pull through 2 loops. Repeat that partial double crochet four more times in the same stitch. With 6 loops remaining on the hook, yarn over and pull through all 6 loops. The completed cluster forms one raised sunflower petal.
Before you start
The flower centers are worked in joined rounds so they stay compact and clearly circular. The petal and cream square rounds are also joined and are not turned. Beginning chains count as stitches only where stated, and slip-stitch joins never count as stitches.
Fasten off at each major color change instead of carrying yarn through the motif. This keeps the dark center, yellow petals, and cream background visually separate.
🧶 Crochet Tip: Finish and lightly block one complete square before making the other three. Use that square as your size guide so all four panels join evenly.
Crochet pattern
Sunflower granny square — make 4
Dense brown center
Begin with dark chocolate-brown yarn. The center uses short single crochet stitches rather than tall stitches so it remains compact and visually dense.
R1: Make an MR. Ch 1, which does not count as a stitch. Work 6 sc into the ring. Pull the ring closed and join with a sl st to the first sc. Do not turn. (6 sc)
R2: Ch 1. Work 2 sc in each stitch around. Join to the first sc. (12 sc)
R3: Ch 1. Work 2 sc in each stitch around. Join to the first sc. Fasten off brown. (24 sc)
The center should be a dense, nearly flat chocolate-brown disk with three visible concentric crochet rounds.
Raised golden petals
Join yellow yarn in any stitch from R3.
R4: Ch 2, work one 5-dc-cl in the same stitch, ch 1, skip the next stitch. Continue with [5-dc-cl in the next stitch, ch 1, skip the next stitch] × 11. Join with a sl st to the top of the first cluster. Fasten off yellow. (12 petal clusters, 12 ch-1 spaces)
Gently spread the twelve petals outward with your fingers. They should form one complete ring around the brown center, with each cluster remaining clearly separate from the next.
Square the sunflower with cream yarn
Join cream yarn in any ch-1 space from the petal round. This becomes the first corner.
R5: Ch 3, which counts as the first dc. Work 2 dc, ch 2, 3 dc in the same space to make the first corner.
Work [ch 1, 3 dc in the next ch-1 space] × 2, ch 1, then (3 dc, ch 2, 3 dc) in the next ch-1 space.
Repeat the previous side-and-corner sequence 2 more times.
For the final side, work [ch 1, 3 dc in the next ch-1 space] × 2, ch 1. Join to the top of the beginning ch 3. (16 3-dc clusters, 12 ch-1 side spaces, 4 ch-2 corner spaces)
R6: Sl st across the next 2 dc and into the first ch-2 corner space. Ch 3, which counts as the first dc. Work 2 dc, ch 2, 3 dc in the same corner space.
Work [ch 1, 3 dc in the next ch-1 space] × 3, ch 1, then (3 dc, ch 2, 3 dc) in the next ch-2 corner space.
Repeat the previous side-and-corner sequence 2 more times.
For the final side, work [ch 1, 3 dc in the next ch-1 space] × 3, ch 1. Join to the top of the beginning ch 3. (20 3-dc clusters, 16 ch-1 side spaces, 4 ch-2 corner spaces)
These two cream rounds should leave the sunflower large and prominent inside the square rather than surrounding it with a wide field of cream crochet.
Firm square edging
R7: Ch 1, which does not count as a stitch. Work 1 sc in the same stitch and in every remaining dc. Work 1 sc into each ch-1 space. In every ch-2 corner space work 3 sc. Join to the first sc and fasten off. (88 sc)
Each side contains 23 edge stitches when counted from the center sc of one 3-sc corner to the center sc of the next corner, including both corner-center stitches.
🧶 Checkpoint: The brown center should look compact, the twelve yellow petals should occupy much of the square, and only two cream granny-style rounds should separate the flower from the narrow final edging.
Block the four squares
Lightly damp-block all four motifs to matching dimensions. Pin each corner first, then straighten the sides without stretching the sunflower. Let the squares dry completely before assembly.
Join the sunflower panels
Use visible cream slip-stitch seams so the joins create narrow raised ridges between the sunflower panels.
Place Square 1 and Square 2 with their WS together and RS facing outward. Align one vertical side of each square, matching all 23 edge stitches.
With cream yarn and the hook on the RS, insert the hook through the corresponding edge stitch of both squares and make a sl st. Continue with one relaxed sl st through every matching pair along the complete edge. (23 joined stitch pairs)
Fasten off. Join Square 2 to Square 3 and Square 3 to Square 4 the same way.
Bring the free vertical edge of Square 4 around to the free edge of Square 1 and make the fourth raised seam. The four panels now form one cylindrical wall.
🧶 Watch for: Keep the joining slip stitches loose enough that the panel edges stay flat. A visible ridge is desirable, but a tight seam will make the bag fold inward between the flowers.
Dense lower cream band
Keep the bag RS out. Join cream yarn at the lower edge beside one vertical seam.
Each square contributes 23 stitches along its lower edge, giving 92 stitches around the complete bag before shaping.
R1: Ch 1, which does not count as a stitch. Work [sc in the next 44 sts, sc2tog] × 2. Join to the first sc. (90 sc)
The two decreases sit roughly opposite one another and create only a slight inward taper toward the circular base.
R2: Ch 1, sc in every stitch around. Join. (90 sc)
R3: Ch 1, sc in every stitch around. Join. (90 sc)
R4: Ch 1, sc in every stitch around. Join. (90 sc)
R5: Ch 1, sc in every stitch around. Join. (90 sc)
R6: Ch 1, sc in every stitch around. Join and fasten off. (90 sc)
The completed band should form a visibly dense strip beneath the sunflower squares. It should remain almost vertical at the top and begin to soften toward the base rather than flaring outward.
Flat circular base
With cream yarn, work the circular base in a continuous spiral. Place a stitch marker in the first stitch and move it upward after each round. Do not join or turn.
R1: Make an MR and work 6 sc into the ring. (6 sc)
R2: Inc in each stitch around. (12 sc)
R3: [Sc in next st, inc in next st] × 6. (18 sc)
R4: [Sc in next 2 sts, inc in next st] × 6. (24 sc)
R5: [Sc in next 3 sts, inc in next st] × 6. (30 sc)
R6: [Sc in next 4 sts, inc in next st] × 6. (36 sc)
R7: [Sc in next 5 sts, inc in next st] × 6. (42 sc)
R8: [Sc in next 6 sts, inc in next st] × 6. (48 sc)
R9: [Sc in next 7 sts, inc in next st] × 6. (54 sc)
R10: [Sc in next 8 sts, inc in next st] × 6. (60 sc)
R11: [Sc in next 9 sts, inc in next st] × 6. (66 sc)
R12: [Sc in next 10 sts, inc in next st] × 6. (72 sc)
R13: [Sc in next 11 sts, inc in next st] × 6. (78 sc)
R14: [Sc in next 12 sts, inc in next st] × 6. (84 sc)
R15: [Sc in next 13 sts, inc in next st] × 6. (90 sc)
R16: Sc in each stitch around without increasing. Sl st in the next stitch to smooth the finish, then fasten off. (90 sc)
The base should remain flat through the center. A very slight upward curve near the outer edge is acceptable because that edge will become the bottom corner of the bag.
Attach the circular base
Turn the bag inside out. Place the circular base against the lower opening with the 90 outer base stitches aligned to the 90 stitches of the lower band.
Mark four approximately equal quarter points on both pieces before sewing. Match the remaining stitches one for one around the circumference.
Using cream yarn and a tapestry needle, whip stitch the base to the lower band through corresponding stitches. Keep the sewing firm without cinching the opening smaller.
Turn the bag RS out and shape the bottom with your hands. The dense lower band should flow into the circular base with a gently rounded bucket profile.
Upper openwork band
Join cream yarn beside one vertical seam along the top edge. Each square contributes 23 stitches, giving 92 stitches around the opening.
R1: Ch 1, which does not count as a stitch. Sc in every stitch around. Join to the first sc. (92 sc)
R2: Ch 3, which counts as the first dc. Dc in the next 2 stitches, ch 1, skip the next stitch. Work [dc in the next 3 sts, ch 1, skip the next st] × 22. Join to the top of the beginning ch 3. (69 dc, 23 ch-1 spaces)
R3: Ch 1, which does not count as a stitch. Sc in every dc and work 1 sc in every ch-1 space. Join to the first sc. (92 sc)
R4: Ch 1, sc in every stitch around. Join. (92 sc)
R5: Ch 1, sc in every stitch around. Join and fasten off. (92 sc)
The upper section should show one clear row of evenly spaced rectangular openings, with a compact cream band above it and a firm rounded rim. Leave the opening completely unobstructed; this bag does not require a drawstring, flap, button, or closure.
Broad crochet shoulder strap
With cream yarn, ch 8.
Row 1: Sc in the second ch from the hook and in every remaining chain. Turn. (7 sc)
Row 2: Ch 1, which does not count as a stitch. Sc in every stitch across. Turn. (7 sc)
Repeat Row 2 until the strap reaches the shoulder length you prefer. A length of roughly 28–32 inches gives a generous arch on a small bucket bag, but adjust this before attachment if you prefer a shorter carry.
Keep every row at 7 sc. The finished strap should be broad enough to look substantial but not so wide that it dominates the sunflower panels.
Fasten off, leaving a long sewing tail at both ends.
Attach the strap
Flatten the bag so one raised vertical seam sits at each side. The strap ends will be centered over two opposite seams.
Place the first strap end over one side seam with roughly half of the strap width on each side of the ridge. Let the end overlap the outside of the bag by approximately 1 1/4–1 1/2 inches, spanning the firm upper rim and the top of the panel area.
Using the cream sewing tail, stitch securely across the lower end of the overlap and then along both side edges. Reinforce the upper section with a second line of small stitches if needed.
Attach the second strap end directly opposite the first. Check that the strap is not twisted and that both attachments begin at the same height before securing the final seam.
🧶 Checkpoint: Set the bag upright before weaving in the strap tails. The sunflower panels should remain vertical, both strap ends should sit at matching heights, and the upper rim should stay level rather than pulling upward at either side.
Finishing and shaping the bag
Weave in every remaining yarn end on the WS. Secure the brown and yellow tails thoroughly around the flower centers, and weave the seam and strap tails through several dense cream stitches before trimming them.
Lightly damp-block the complete bag. Shape the base into a flat circle, smooth the lower band upward, and straighten the four narrow vertical panel joins.
Do not press the sunflower petals flat. Instead, lift and arrange the individual yellow clusters with your fingers so the flowers retain their slightly raised texture.
Shape the upper rim into an even oval while the bag dries. The final fabric should look structured enough to stand upright but still feel like flexible handmade crochet.
Troubleshooting
- The brown flower center looks loose or lacy: Work the single crochet rounds more firmly or use a slightly smaller hook for the center only.
- The sunflower center cups: The brown rounds or petal clusters are being worked too tightly. Relax your tension before starting the cream square.
- The cream square is much larger than the sunflower: Do not add another granny-square round. The design uses only two cream granny-style rounds before the edging.
- The square corners pull upward: The ch-2 corner spaces are probably too tight. Work those chains more loosely.
- The raised joins pucker: Remake the slip-stitch seam with relaxed loops so the squares lie flat beside the ridge.
- The lower section flares outward: Confirm that the first lower-band round decreases from 92 stitches to exactly 90.
- The circular base ripples: Check that each increase round adds exactly six stitches.
- The upper rim flares: Check that the upper band remains at exactly 92 stitches after the openwork round.
- The strap stretches too much: Work the single crochet more firmly or shorten the strap before sewing the second end permanently.
Final check
- Four matching sunflower panels form the cylindrical body.
- Each flower has a dense three-round brown center and twelve raised golden petals.
- Only two cream granny-style rounds surround each flower before the narrow edging.
- Raised cream slip-stitch seams visibly divide the four panels.
- A dense lower band curves into a flat circular cream base.
- The upper edge contains one openwork row beneath a firm cream rim.
- One broad single-crochet strap is secured over two opposite side seams.
Your sunflower granny square bucket bag is complete. If you make one, feel free to share your finished project or leave a question if you need help with the sunflower square, joining, base, or strap.












