
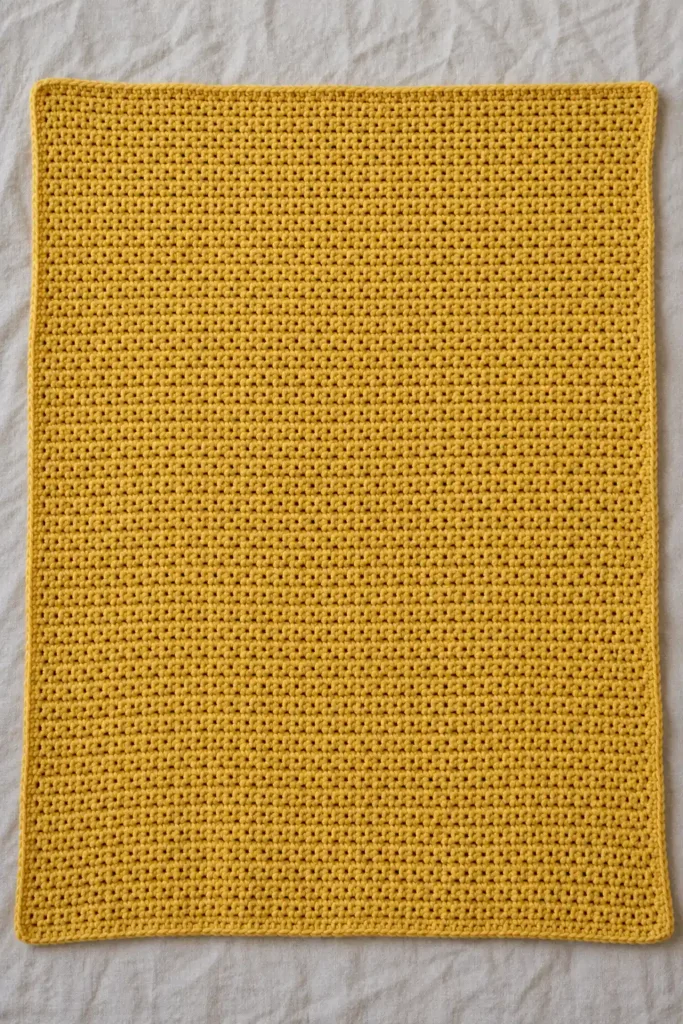
This woven stitch crochet blanket is worked as one continuous rectangular panel in a soft medium blue. Alternating single crochets and small chain spaces create the dense, lightly pebbled texture that gives woven stitch, also called linen stitch or moss stitch, its characteristic fabric-like appearance.
The body is worked back and forth in simple turned rows with the same repeat from beginning to end. A single narrow round of crochet finishes the perimeter without covering the textured body, while carefully distributed stitches along the long sides keep the border flat and create softly rounded corners.
Project at a glance
| Skill level | Easy |
|---|---|
| Terminology | US crochet terms |
| Construction | One rectangular panel worked flat in turned rows |
| Main stitch | Woven, linen, or moss stitch |
| Yarn | Smooth medium-weight #4 yarn |
| Hook | 4.5 mm, or size needed to match gauge |
| Finished size | Approximately 42 inches wide × 60 inches long |
Gauge
Approximately 14 stitch positions and 16 rows = 4 inches in established woven stitch before blocking.
When measuring horizontally, count both a single crochet and the following chain-1 space as separate stitch positions. The written body contains 147 stitch positions across and 240 rows, producing the tall rectangular throw proportion used here.
The fabric should feel compact and substantial but remain flexible enough to drape. The small chain spaces should be visible without opening into obvious mesh.
Materials
- Approximately 1,800–2,200 yd of smooth medium-weight #4 yarn in one muted medium-blue shade
- 4.5 mm crochet hook
- Scissors
- Yarn needle
- 4 removable stitch markers
A smooth acrylic, cotton-acrylic blend, or similar yarn with clear stitch definition works well for this texture. Very fuzzy yarn can hide the small chain spaces and make the woven pattern look less distinct.
If your fabric is stiff and the chain spaces nearly disappear, move up one hook size. If the openings become noticeably large and loose, move down one hook size.
Stitches and abbreviations
- ch — chain
- ch-1 sp — chain-1 space
- sc — single crochet
- sk — skip
- sl st — slip stitch
- st — stitch
- RS — right side
- WS — wrong side
How the woven stitch works
The woven texture is formed by placing each single crochet into a chain-1 space from the previous row and making a new ch 1 between neighboring single crochets. This offsets the stitches from one row to the next and produces the small interlocking texture across the entire blanket.
The ch 2 made at the end of each body row forms the edge space for the following row. It does not count as a single crochet. The last single crochet of the next row is worked into that turning-chain space.
🧶 Crochet Tip: Insert the hook through the whole ch-1 space rather than through one strand of the chain. Keep the chains relaxed but small so the surface remains dense and softly textured.
Before you start
The blanket turns after every body row. Row 1 is treated as the RS, although the finished woven texture is attractive on both sides.
Keep the foundation chain relaxed. A foundation that is tighter than the body will pull the lower edge inward even when all later rows are worked correctly.
The woven pattern begins directly in the foundation chain so the same staggered texture continues almost all the way to the lower finishing border.
Crochet pattern
Foundation
Foundation: Ch 150.
Blanket body
Row 1 (RS): Sc in the 4th ch from the hook. [Ch 1, sk the next ch, sc in the next ch] × 73. Ch 2 and turn. (74 sc, 73 ch-1 spaces, plus the beginning ch-3 edge space)
The first three unused chains at the beginning of the foundation form the edge space that receives the final single crochet of Row 2.
Row 2 (WS): Sc in the first ch-1 sp. [Ch 1, sc in the next ch-1 sp] × 72. Ch 1, sc in the beginning ch-3 edge space. Ch 2 and turn. (74 sc, 73 ch-1 spaces)
Row 3 (RS): Sc in the first ch-1 sp. [Ch 1, sc in the next ch-1 sp] × 72. Ch 1, sc in the turning ch-2 space. Ch 2 and turn. (74 sc, 73 ch-1 spaces)
🧶 Checkpoint: After the first few rows, each single crochet should sit inside an open chain space from the row below. The surface should show small staggered openings rather than straight vertical columns of stitches.
Rows 4–239: Repeat Row 3. Every row contains 74 sc and 73 ch-1 spaces.
Check the edges every few inches. The width should remain constant and both long sides should stay approximately straight without stepping inward.
Row 240 (WS): Sc in the first ch-1 sp. [Ch 1, sc in the next ch-1 sp] × 72. Ch 1, sc in the turning ch-2 space. Do not make another turning ch 2. (74 sc, 73 ch-1 spaces)
Ch 1 and turn so the RS faces you for the border.
Add the border
The finished blanket uses one narrow single crochet border. The edging should remain close to the body rather than forming a wide decorative frame.
The row gauge is slightly denser than the horizontal stitch gauge, so working one border stitch into every single row end can make the long edges ripple. For the written gauge, distribute seven single crochets over every eight row ends instead. This gives the border a flatter, smoother appearance.
Place a marker at each corner if needed.
Border Round 1
Top-left corner: Work 3 sc in the first sc of Row 240.
Across the top: [Sc in the next ch-1 sp, sc in the next sc] × 72. Sc in the final ch-1 sp. (145 sc between the corner groups)
Top-right corner: Work 3 sc in the final sc of Row 240.
First long side: There are 238 intermediate row ends between Row 240 and Row 1. [Work 1 sc around each of the next 7 row ends, sk the next row end] × 29, then work 1 sc around each of the final 6 intermediate row ends. (209 sc along the side)
Bottom-right corner: Work 3 sc around the foundation-chain area at the base of the final sc of Row 1.
Across the foundation edge: Work 1 sc into each of the next 146 foundation-chain loops between the two corner areas. (146 sc between corners)
Bottom-left corner: Work 3 sc around the beginning ch-3 edge space of Row 1.
Second long side: [Work 1 sc around each of the next 7 row ends, sk the next row end] × 29, then work 1 sc around each of the final 6 intermediate row ends. (209 sc along the side)
Join with a sl st to the first border sc. The joining slip stitch does not count as a stitch. (721 sc total)
Fasten off.
🧶 Checkpoint: Lay the blanket flat before fastening off completely. The border should sit close to the woven fabric with straight sides and softly rounded corners. It should not flare outward or pull the blanket inward.
Finishing the blanket
Weave the beginning and ending yarn tails through several dense single crochet sections on the WS. Change direction at least once before trimming the tails so they remain secure.
Avoid weaving a tail straight through the open chain spaces because it may remain visible from the front of the blanket.
Lay the blanket flat and smooth it gently into a rectangle. The three single crochets at each border corner create the subtle rounded shape rather than a sharp ninety-degree point.
Acrylic yarn generally needs only gentle shaping. Cotton and cotton-blend yarns can be lightly wet blocked if necessary. Do not stretch the blanket aggressively during blocking, because opening the chain spaces too much changes the dense woven appearance.
Troubleshooting
- The blanket becomes narrower: The final turning-chain space is probably being missed. Finish every body row with one sc in that edge space.
- The blanket becomes wider: Make sure you are not working into both the last body stitch and the turning-chain space. Each completed body row must contain 74 sc and 73 ch-1 spaces.
- The texture develops straight vertical columns: The single crochets are being worked into previous single crochets instead of chain spaces. Every body sc after Row 1 should be placed in a chain space.
- The chain openings are too large: Shorten the ch-1 stitches slightly or move down one hook size. The intended openings are tiny and regularly distributed.
- The fabric feels hard or stiff: Relax your tension or move up one hook size. The blanket should be dense but still flexible.
- The long sides bow inward: The turning chains are probably tighter than the interior chains. Keep every turning ch 2 relaxed.
- The border ripples: Check that you followed the seven-stitches-over-eight-row-ends distribution rather than placing one sc into every row end.
- The border pulls inward: Your side-border stitches may be too tight. Rework them with the same relaxed tension used for the body.
Adjusting the blanket size
This construction is easy to resize while preserving the same woven texture. Begin with any even-numbered foundation chain.
Work the first sc in the 4th ch from the hook, then repeat [ch 1, sk the next ch, sc in the next ch] across. The final stitch of Row 1 must be a single crochet.
On every following row, work one sc into each ch-1 space with a ch 1 between neighboring single crochets. Finish each row with one sc in the turning-chain edge space.
To change only the blanket length, work more or fewer complete body rows before adding the border. For the same tall throw shape, aim for a finished length roughly 1.4 times the finished width.
If you change the number of body rows or use a substantially different gauge, adjust the long-side border distribution rather than automatically using the written 209-stitch count. The border is correct when it lies flat without ruffling or cinching the blanket.
The completed blanket should have one uninterrupted medium-blue crochet surface, a consistent field of small staggered woven-stitch openings, straight sides, gently handmade corners, and one narrow border around the entire rectangle.
If you make your own woven stitch blanket, feel free to share the finished project or leave a question if you need help finding the turning-chain spaces or keeping the border flat.












