
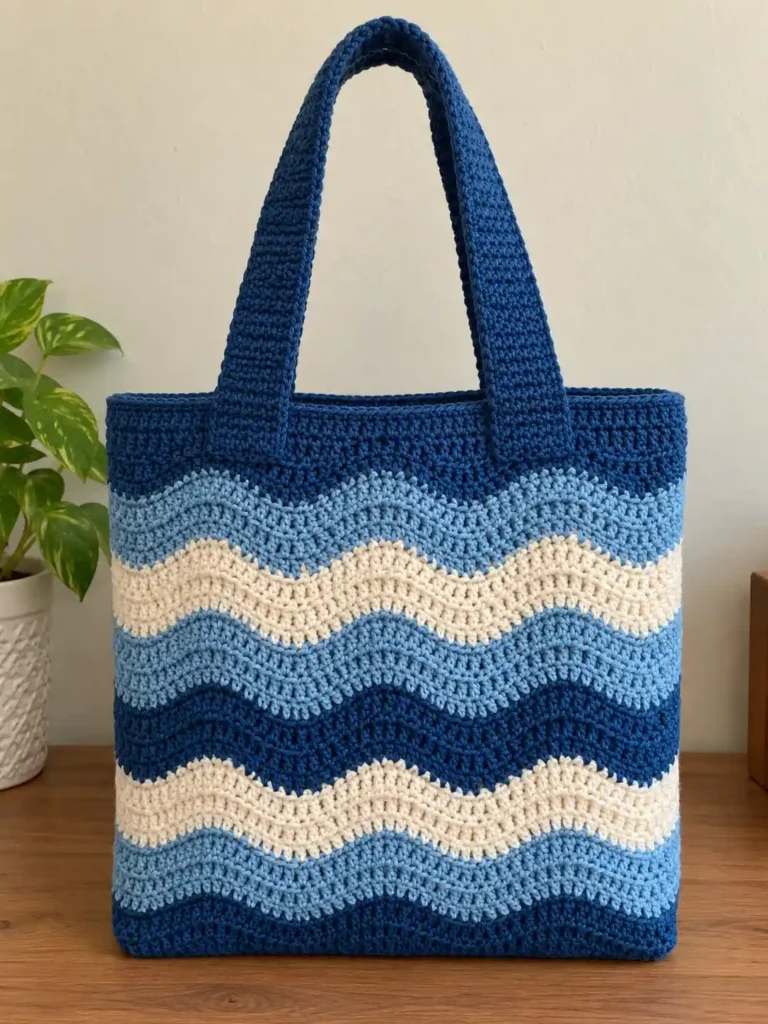
This ocean wave crochet tote combines broad ripple rows in deep ocean blue, light sea blue, and warm cream with a simple rectangular everyday-bag shape. The wave effect is formed directly by double-crochet increases and decreases, while each color is worked as a complete row, so there is no complicated carried-color tapestry technique.
The body is one continuous long crochet panel rather than separate front and back pieces. It is worked from the upper edge of the back, continues through the bottom of the bag, and then works upward to the front opening. The finished panel is folded at its exact center and joined only along the two vertical sides. Two broad single-crochet handles complete the tote.
Project details
| Skill level | Confident beginner |
|---|---|
| Terminology | US crochet terms |
| Construction | One continuous body panel, folded at the bottom, plus two handles |
| Body stitch | Double-crochet ripple |
| Handle stitch | Single crochet |
| Yarn | Medium-weight #4 cotton or cotton-acrylic |
| Hook | Approximately 5 mm |
| Finished body | Approximately 13 inches wide and 14 inches tall |
| Handles | Approximately 1½ inches wide and 18 inches long |
There are exactly three crocheted components: one long body panel, one front handle, and one back handle. There is no separate base piece and no bottom seam.
The finished size can vary slightly with yarn and tension. Aim for a firm but flexible fabric that can stand in a softly structured rectangular shape without feeling board-stiff.
Materials
- Medium-weight #4 cotton or cotton-acrylic yarn in deep ocean blue
- Medium-weight #4 yarn in light sea blue
- Medium-weight #4 yarn in warm cream
- Approximately 5 mm crochet hook, or size needed for firm fabric
- Yarn needle
- Scissors
- Stitch markers, optional
Allow roughly 500–700 yards of yarn for the complete tote. Deep ocean blue will require the largest amount because it is used repeatedly in the body as well as for both handles and the final upper edging.
A smooth cotton or cotton-rich yarn works especially well. It keeps the individual crochet stitches visible, gives the ripple pattern good definition, and reduces excessive stretching when the tote is carried.
Stitches and abbreviations
- ch – chain
- sc – single crochet
- hdc – half double crochet
- dc – double crochet
- tr – treble crochet
- dc3tog – double crochet 3 together
- sl st – slip stitch
- st / sts – stitch / stitches
- RS – right side
- WS – wrong side
dc3tog
Yarn over, insert the hook into the next stitch, yarn over and pull up a loop, yarn over and pull through 2 loops. Repeat this partial double crochet in each of the next 2 stitches. Yarn over and pull through all 4 loops remaining on the hook. Three stitches have been decreased into one.
Before you start
The beginning ch 2 does not count as a stitch. Turn the work after every ripple row. Work through both top loops unless another placement is stated.
The ripple contains four valleys across the width. The two stitches placed in each outside edge act as half peaks, while the three 3-dc increases create the full interior peaks. These increases balance the dc3tog decreases, so every standard ripple row finishes with 49 stitches.
Change colors only at row ends. On the final yarn-over of the last stitch, complete the stitch using the new color. There is no need to carry unused yarn across the body.
🧶 Crochet Tip: Keep the dc3tog valleys relaxed. Pulling the decrease stitches much tighter than the surrounding double crochets can make the panel narrow through the center.
Crochet pattern
Continuous body panel
The entire front, bottom, and back of the tote are worked as one continuous long panel. Begin at the upper edge of the back, work downward for 32 ripple rows, continue directly through the center of the panel, and then work another 32 rows upward for the front.
The color sequence is mirrored around the center so the visible front and back stripes line up after folding.
Foundation: With deep ocean blue, ch 51.
Row 1: Beginning in the 3rd ch from the hook, work 2 dc in first ch. [Dc in next 4 ch, dc3tog over next 3 ch, dc in next 4 ch, 3 dc in next ch] × 3. Dc in next 4 ch, dc3tog over next 3 ch, dc in next 4 ch, 2 dc in final ch. Turn. (49 sts)
Standard Ripple Row: Ch 2. Work 2 dc in first st. [Dc in next 4 sts, dc3tog over next 3 sts, dc in next 4 sts, 3 dc in next st] × 3. Dc in next 4 sts, dc3tog over next 3 sts, dc in next 4 sts, 2 dc in final st. Turn. (49 sts)
Back half
Rows 2–4: Repeat Standard Ripple Row in deep ocean blue. (49 sts)
Change to light sea blue.
Rows 5–8: Repeat Standard Ripple Row in light sea blue. (49 sts)
Change to warm cream.
Rows 9–12: Repeat Standard Ripple Row in warm cream. (49 sts)
Change to light sea blue.
Rows 13–16: Repeat Standard Ripple Row in light sea blue. (49 sts)
Change to deep ocean blue.
Rows 17–20: Repeat Standard Ripple Row in deep ocean blue. (49 sts)
Change to warm cream.
Rows 21–24: Repeat Standard Ripple Row in warm cream. (49 sts)
Change to light sea blue.
Rows 25–28: Repeat Standard Ripple Row in light sea blue. (49 sts)
Change to deep ocean blue.
Rows 29–32: Repeat Standard Ripple Row in deep ocean blue. (49 sts)
🧶 Checkpoint: Rows 1–32 form one complete side of the tote. The panel should show eight broad color sections, with the peaks and valleys stacked consistently and both side edges remaining approximately vertical.
Continue through the bottom
Do not fasten off, join a new panel, or make a separate base. Continue crocheting directly into the front half.
The transition between Rows 32 and 33 marks the center of the long panel. This area remains deep ocean blue so the eventual bottom fold sits entirely inside one dark section.
Rows 33–36: Continue the Standard Ripple Row in deep ocean blue. (49 sts)
Change to light sea blue.
Rows 37–40: Repeat Standard Ripple Row in light sea blue. (49 sts)
Change to warm cream.
Rows 41–44: Repeat Standard Ripple Row in warm cream. (49 sts)
Change to deep ocean blue.
Rows 45–48: Repeat Standard Ripple Row in deep ocean blue. (49 sts)
Change to light sea blue.
Rows 49–52: Repeat Standard Ripple Row in light sea blue. (49 sts)
Change to warm cream.
Rows 53–56: Repeat Standard Ripple Row in warm cream. (49 sts)
Change to light sea blue.
Rows 57–60: Repeat Standard Ripple Row in light sea blue. (49 sts)
Change to deep ocean blue.
Rows 61–64: Repeat Standard Ripple Row in deep ocean blue. (49 sts)
The front half now has the same stripe arrangement as the back when viewed upward from the future bottom fold: deep blue, light blue, cream, deep blue, light blue, cream, light blue, and deep blue.
Level the front opening
The final ripple row leaves the front opening with peaks and valleys. Work one shaping row that uses shorter stitches over the high points and taller stitches through the valleys.
Continue in deep ocean blue.
Row 65: Ch 1 and turn. Sc in first 2 sts. [Hdc in next 2 sts, dc in next 2 sts, tr in next st, dc in next 2 sts, hdc in next 2 sts, sc in next 3 sts] × 3. Hdc in next 2 sts, dc in next 2 sts, tr in next st, dc in next 2 sts, hdc in next 2 sts, sc in final 2 sts. Fasten off. (49 sts)
Finish the back upper edge
The original foundation edge at the opposite end of the panel is already straight. Add one matching finishing row before assembly.
With deep ocean blue and RS facing, join yarn at the corner of the foundation edge.
Back Top Row: Ch 1. Work 1 sc into each of the 49 foundation positions across. Fasten off. (49 sc)
🧶 Checkpoint: Lay the complete panel flat. The two ends should now be approximately straight, the two halves should be equal in length, and the stripe sequence should mirror around the center deep-blue section.
Handles
Make 2 identical handles in deep ocean blue. Each handle is worked in short rows of single crochet, creating the broad horizontal crochet texture visible on the finished straps.
Foundation: Ch 7.
Row 1: Sc in 2nd ch from hook and in each remaining ch across. Turn. (6 sc)
Rows 2–72: Ch 1, sc in each of the 6 sts across. Turn. (6 sc)
Fasten off, leaving a long tail for sewing.
The strap should be approximately 1½ inches wide and close to 18 inches long. If your single-crochet row gauge produces a different length, add or remove rows before fastening off. Make the second handle using exactly the same final row count.
Because the handles carry most of the weight of the tote, keep the single-crochet stitches firm and even. If the body fabric is quite soft, using a hook one size smaller for the handles is acceptable.
Assembly
Fold the continuous body
Lay the long body panel flat. Locate the center between Rows 32 and 33. Fold the panel exactly in half at this point so the two upper openings meet.
The deep-blue sections on Rows 29–32 and Rows 33–36 meet around the fold, creating the solid dark lower band visible at the bottom of the finished tote.
Do not cut the panel and do not sew across the bottom. The fold itself forms the bag base.
Gently shape the fold into a straight horizontal base rather than sharply creasing along every individual ripple peak and valley. Crochet fabric is flexible, and light blocking after assembly will help the lower edge settle into the softly squared shape.
Align the sides
Place the folded tote with the sides aligned. The front and back color boundaries should meet at approximately the same height.
Match the four-row bands carefully. The lower deep-blue section should meet deep blue, light blue should meet light blue, cream should meet cream, and so on all the way to the opening.
Seam the first side
With the tote turned WS outward, begin at the folded lower corner and seam upward toward the opening.
Use a small mattress stitch or whipstitch through the edge loops. Pair corresponding front and back rows rather than sewing according to visual distance.
For the least visible seam, change the sewing yarn to match each color band as you work upward.
Seam the second side
Repeat on the opposite edge, again beginning at the lower fold and working upward.
When both side seams are complete, turn the tote RS out. Push the bottom corners gently outward with your fingers and arrange the body into a clean rectangular shape.
🧶 Watch for: There should be no bottom seam. If you see a sewn horizontal line across the base, the body has been assembled incorrectly; only the two vertical side edges are joined.
Top edging
With the tote RS out, join deep ocean blue at one side seam along the opening.
Opening Round 1: Ch 1. Sc in each of the 49 stitches across the front opening, continue directly across the side join, then sc in each of the 49 stitches across the back opening. Join with a sl st to the first sc. Do not turn. (98 sc)
Fasten off and weave in the end.
This single uninterrupted round creates the narrow dark-blue finishing line around the top and visually connects the front and back openings.
Attach the front handle
Lay the tote flat with the front facing upward.
Across the 49 stitches of the front upper edge, position the left handle end over approximately stitches 10–16 and the right handle end over approximately stitches 34–40. The two ends should be symmetrical around the center of the tote.
Overlap each handle end onto the outside of the deep-blue upper section by approximately 2½–3 inches. The long attachment area is important: it creates the broad reinforced strap bases visible on the finished tote and distributes the weight better than attaching only the final few rows.
Keep both ends vertical and parallel. Do not angle them toward the center.
Using deep-blue yarn and a yarn needle, sew down one side of the first handle end, across its lower edge, and back up the opposite side. Add another secure horizontal line across the upper part of the overlap.
Repeat for the second end of the same handle.
Attach the back handle
Attach the second handle to the back using the same stitch positions and the same 2½–3 inch overlap.
Before securing the last end completely, stand the tote upright. Viewed directly from the front, the back handle should sit almost directly behind the front handle rather than visibly leaning to one side.
Check that both arches reach the same height and that neither handle is twisted.
Finishing the tote
Weave all remaining yarn ends securely into the inside of the tote. Pay particular attention to the handle attachment yarn and the ends at the side-seam color changes.
Light blocking is especially helpful for this construction. Dampen the tote lightly and place it upright or flat in its finished rectangular shape.
Straighten the side seams, gently square the two lower corners, and encourage the center fold to lie horizontally across the base. Arrange the upper opening so it remains straight.
Do not aggressively stretch the ripple pattern. The individual peaks and valleys should remain clearly visible rather than becoming flat stripes.
Allow the tote to dry fully before carrying anything heavy.
Troubleshooting
- The body gradually becomes narrower: A 3-dc peak increase has probably been missed or a dc3tog has consumed the wrong stitches. Every standard ripple row should finish with 49 stitches.
- The body becomes wider: Check the two-stitch edge increases and three-stitch interior peaks. An accidental extra stitch beside an increase will change the width.
- The wave pattern shifts sideways: One peak or valley has moved out of alignment. Each 3-dc peak should sit directly above the previous peak, and each dc3tog should sit above the previous valley.
- The front and back stripes do not meet at the seams: Recheck the fold between Rows 32 and 33. The panel must be folded exactly at its midpoint.
- The bottom has a visible seam: No bottom seam should be added. The base is formed entirely by folding the continuous panel.
- The bottom looks excessively wavy: Shape the fold through the center of the dark-blue section rather than forcing it to follow every ripple contour, then lightly block the base straight.
- The front opening remains strongly wavy: Check Row 65. The tallest stitches belong in the deepest valleys and the shortest stitches belong over the peaks.
- The side seam puckers: The seaming yarn is too tight. Undo the affected section and resew while pairing corresponding rows without stretching them.
- The handles lean inward: Recheck the attachment positions and overlap. Both ends must remain vertical and equally spaced from the side seams.
- One handle sits higher than the other: Count the single-crochet rows in both straps and confirm that all four ends overlap the body by the same amount.
Adjusting the size
The established body uses 49 working stitches and creates four valleys across the width. To change the width while keeping the same ripple construction, add or remove complete 12-stitch repeats.
A narrower tote can use 37 working stitches for three valleys. A wider tote can use 61 working stitches for five valleys. Add 2 turning chains to the chosen working-stitch count when making the foundation chain.
When changing the height, always add the same number of ripple rows to both halves of the long panel. The center fold must remain exactly halfway between the two openings.
For example, adding four rows to the back half means adding four corresponding rows to the front half. Keep the color order mirrored around the bottom.
To lengthen the handles, continue working additional 6-sc rows. Both straps must contain exactly the same final number of rows.
Final project check
- The tote body is one uninterrupted long crochet panel.
- The center between Rows 32 and 33 forms the bottom fold.
- Only two vertical side seams are present; there is no bottom seam.
- The front and back show the same deep-blue, light-blue, and cream wave sequence.
- The top opening is straight and finished with one uninterrupted deep-blue single-crochet edging round.
- Both handles are broad, equal in length, and attached with long reinforced overlap areas.
Once the side seams, edging, and handles are secure, the ocean wave tote is ready to use. If you make one, feel free to share your finished project or leave a question if you need help with any part of the ripple pattern.












