
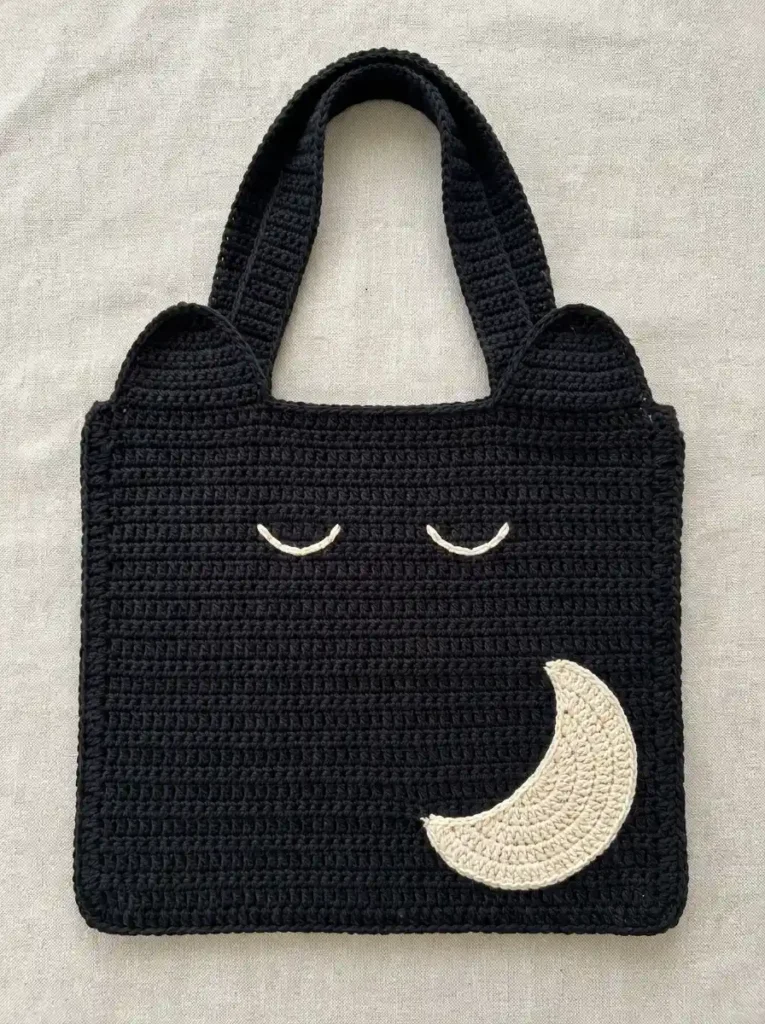
This sleepy black cat tote uses a simple, sturdy crochet construction with just enough shaping to give it its cat-like personality. The dense black body stays almost square, two low rounded ears rise above the front corners, and two tiny cream curves create the sleepy expression.
A separate cream crescent sits on the lower-right front of the bag. It is worked in curved rows so the stitches follow the moon shape, then attached along the broad outer curve while the shorter inner curve remains open as a shallow pocket.
Project details
| Skill level | Confident beginner to intermediate |
|---|---|
| Terminology | US crochet terms |
| Construction | Two flat panels, integrated front ears, two straps, separate crescent pocket |
| Main stitch | Half double crochet |
| Yarn | Medium-weight cotton or cotton-blend |
| Hook | 4 mm crochet hook |
Exact finished size depends on yarn and tension. Aim for a dense, flexible fabric that can hold the tote’s rectangular shape without becoming stiff. The front and back should finish at exactly the same width and body height before the ears are added.
Materials
- Medium-weight black cotton or cotton-blend yarn for the bag, ears, handles, and seams
- Small amount of warm cream yarn for the sleepy eyes and crescent pocket
- 4 mm crochet hook, or a hook that gives a firm but flexible fabric
- Tapestry needle
- Stitch markers
- Scissors
Smooth yarn is especially helpful here. It keeps the horizontal rows easy to see and gives the rounded ears and cream crescent cleaner edges.
Stitches and abbreviations
- ch – chain
- sl st – slip stitch
- sc – single crochet
- hdc – half double crochet
- dc – double crochet
- hdc2tog – half double crochet two stitches together
- RS – right side
- WS – wrong side
Before you start
The tote panels are worked back and forth in horizontal rows. Ch 2 at the beginning of an hdc row does not count as a stitch. Turn after every body row.
The front and back begin as matching rectangles. The front panel then receives two low rounded ears worked directly into its upper edge. The back stays rectangular.
The ears intentionally stop with a short four-stitch upper edge rather than decreasing to a sharp point. This gives them the soft rounded shape that suits this tote.
🧶 Crochet Tip: Black yarn can hide the first and last stitch of a row. Mark both edge stitches if needed so the body stays at 54 stitches from bottom to top.
Crochet pattern
Front tote panel
With black yarn, ch 56.
Row 1: Hdc in the third ch from the hook and in each remaining ch. Ch 2, turn. (54 hdc)
Rows 2–40: Hdc in each stitch across. Ch 2 and turn after Rows 2–39. Do not ch 2 after Row 40. (54 hdc)
The panel should be a dense rectangle with straight sides and clearly visible horizontal rows.
Top reinforcement
Row 41: Ch 1, sc in each stitch across. Fasten off. (54 sc)
This narrow sc row firms the upper opening and gives the ears and handles a stable attachment area.
Left rounded ear
Place the panel RS up with Row 41 at the top. Join black yarn in the first stitch at the upper-left corner.
Ear Row 1: Ch 2, hdc in the same stitch and in each of the next 11 stitches. Turn. (12 hdc)
Ear Row 2: Ch 2, hdc in each stitch across. Turn. (12 hdc)
Ear Row 3: Ch 2, hdc2tog, hdc in each of the next 8 stitches, hdc2tog. Turn. (10 hdc)
Ear Row 4: Ch 2, hdc2tog, hdc in each of the next 6 stitches, hdc2tog. Turn. (8 hdc)
Ear Row 5: Ch 2, hdc2tog, hdc in each of the next 4 stitches, hdc2tog. Turn. (6 hdc)
Ear Row 6: Ch 2, hdc2tog, hdc in each of the next 2 stitches, hdc2tog. (4 hdc)
Fasten off.
Do not decrease the ear any further. The four-stitch top forms a short blunt crest that rounds naturally once the ear is lightly shaped.
Right rounded ear
With the front panel RS up, count 12 stitches inward from the upper-right corner. Join black yarn at the first stitch of that 12-stitch section.
Repeat Ear Rows 1–6 exactly as written for the left ear. (12, 12, 10, 8, 6, 4 hdc)
Fasten off.
🧶 Checkpoint: Lay the front flat. Both ears should be low, broad, and rounded rather than tall or sharply pointed. A wide straight section of Row 41 should remain visible between them.
Back tote panel
With black yarn, ch 56.
Row 1: Hdc in the third ch from the hook and in each remaining ch. Ch 2, turn. (54 hdc)
Rows 2–40: Hdc in each stitch across. Ch 2 and turn after Rows 2–39. Do not ch 2 after Row 40. (54 hdc)
Row 41: Ch 1, sc in each stitch across. Fasten off. (54 sc)
The back panel remains rectangular with no ear shaping.
First black handle
With black yarn, ch 9.
Row 1: Sc in the second ch from the hook and in each remaining ch. Turn. (8 sc)
Rows 2–52: Ch 1, sc in each stitch across. Turn. (8 sc)
Fasten off, leaving a long tail for sewing.
Second black handle
Make the second handle exactly the same way. (8 sc for 52 rows)
Lay the two handles together before assembly. They should match closely in length and width and should both lie flat without twisting.
Crescent moon pocket
The crescent is made separately in cream yarn. The short first row becomes the inner concave edge of the moon. Each following row expands, forcing the opposite edge into a broader outer curve.
The short stitches placed at both ends keep the tips slimmer than the middle so the piece reads as a crescent rather than a thick semicircular band.
With cream yarn, ch 20.
Row 1: Sc in the second ch from the hook and in each remaining ch. Turn. (19 sc)
Row 2: Ch 1, sc in the first stitch, hdc in each of the next 2 stitches, dc in each of the next 13 stitches, hdc in each of the next 2 stitches, sc in the final stitch. Turn. (19 sts)
Row 3: Ch 1, sc in the first stitch, hdc in each of the next 2 stitches, [dc in the next stitch, 2 dc in the next stitch] × 6, dc in the next stitch, hdc in each of the next 2 stitches, sc in the final stitch. Turn. (25 sts)
Row 4: Ch 1, sc in the first stitch, hdc in each of the next 2 stitches, [dc in each of the next 2 stitches, 2 dc in the next stitch] × 6, dc in the next stitch, hdc in each of the next 2 stitches, sc in the final stitch. Turn. (31 sts)
Row 5: Ch 1, sc in the first stitch, hdc in each of the next 2 stitches, [dc in each of the next 3 stitches, 2 dc in the next stitch] × 6, dc in the next stitch, hdc in each of the next 2 stitches, sc in the final stitch. (37 sts)
Fasten off, leaving a long cream yarn tail.
Gently curve Row 1 inward and let Row 5 spread around it. The increasingly longer rows create the broad outside sweep of the crescent, while the sc and hdc sections keep both tips narrower than the center.
If needed, lightly dampen the crescent and pin it into shape before sewing. Keep the Row 1 inner edge distinctly concave, the Row 5 edge broadly convex, and bring the two tips slightly inward without folding the fabric.
Assembly
Add the sleepy eyes
Embroider the eyes before joining the front and back panels so the WS remains easy to reach.
Lay the front panel RS up. Place the eyes around the upper third of the rectangular body, below the straight top edge and between the ears.
For the left eye, use cream yarn to make a shallow closed-eye curve spanning about six stitches around stitches 17–22. Let the middle of the curve dip only slightly below the two outer ends.
Make the right eye at the same height around stitches 33–38.
Each eye can be formed with three short connected embroidery stitches. Keep the lines smooth, simple, and slightly curved downward. Do not add eyelashes, pupils, a nose, mouth, or whiskers.
Position the crescent
Place the cream crescent on the lower-right part of the front panel with the concave Row 1 edge facing inward toward the center of the bag.
Angle the crescent slightly so its upper tip points upward and a little inward, while the lower tip points toward the lower-left.
Keep roughly five or six complete body rows visible below the moon and leave a small black margin between the broad outer curve and the right side seam.
The crescent should occupy the lower-right area without touching the eyes, bottom seam, or side seam.
Sew the crescent pocket
Use the long cream yarn tail and small whip stitches to sew Row 5, the broad outer curved edge, securely to the black panel.
Continue around each tapered end for a short distance so both tips are firmly anchored.
Leave the complete Row 1 inner concave edge unsewn. This becomes the opening of the shallow crescent pocket.
Keep your sewing tension relaxed. Pulling too tightly can flatten the curve or make the black tote fabric pucker around the moon.
Join the front and back
Place the panels together with WS touching and RS facing outward. Match the two lower corners and all side row ends.
Join black yarn at the upper-left corner, directly below the left ear.
Work 41 sc evenly down the first side, placing approximately one stitch in each row end.
Work 3 sc into the first bottom corner.
Work 54 sc evenly across the bottom foundation edge.
Work 3 sc into the second bottom corner.
Work 41 sc evenly up the second side. Fasten off. (142 sc)
This seam remains visible as a narrow rounded black outline along both sides and across the bottom. The upper edge stays open.
Attach the front handle
Place one strap on the front panel with both ends inside the two ears.
Position the left strap end over approximately stitches 14–21 of Row 41 and the right strap end over stitches 34–41.
Allow about four handle rows to overlap the tote at each end.
Make sure the strap rises vertically from both attachment areas before curving naturally over the top. It should not cover either ear.
Using black yarn and a tapestry needle, sew around all four sides of each overlap area. Add several horizontal reinforcing stitches through the middle of each attachment.
Attach the back handle
Position the second handle on the back panel at the same stitch locations as the front handle.
Check that it is not twisted, overlap approximately four rows at each end, and sew both attachment areas securely.
🧶 Checkpoint: Hold the tote by both handles before hiding the sewing tails. The handles should rise evenly, both rounded ears should remain completely visible outside them, and the top opening should stay level rather than pulling toward one side.
Finishing the tote
Weave all remaining ends securely into the inside of the tote. Change direction at least once when weaving the handle and side-seam tails so they are less likely to loosen during use.
Use your fingers to soften the upper edge of each ear into a low dome. The four-stitch tops should curve gently rather than forming peaks.
If the tote body needs shaping, lightly damp-block it flat. Straighten the side seams and bottom edge without stretching the handles.
Shape the cream crescent at the same time if necessary. Keep its broad outer edge smooth and its inner edge deeply curved enough that the moon remains immediately recognizable.
Once dry, slide your fingers gently beneath the open inner edge of the crescent to make sure the pocket opening has not accidentally been caught by a sewing stitch.
Troubleshooting
- The ears look pointed: stop after the 4-stitch final ear row. Do not add another decrease row, and gently round the short upper edge during blocking.
- One side of the tote is shorter: check that both body panels contain all 41 rows and that the joining seam has 41 sc along each side.
- The crescent looks like a plain curved rectangle: make sure Rows 3–5 contain their evenly spaced increases. Those increases make the outer edge grow faster than the inner edge.
- The crescent tips look too thick: keep only sc and hdc near both ends of each shaping row and do not add increases in those edge sections.
- A handle twists: lay the entire strap flat before sewing its second end and confirm that the same surface faces outward at both attachment points.
Final details to check
- The black body is dense, nearly square, and surrounded by a narrow seam along the sides and bottom.
- Two matching low rounded ears rise from the upper front corners without sharp points.
- Two short cream sleepy-eye curves sit evenly across the upper front.
- The cream crescent has several visible curved crochet rows, tapered ends, and an open inner edge.
- Two broad black handles rise between the ears and are firmly attached to the front and back panels.
Once the last yarn tails are hidden, the sleepy black cat tote is ready to use. If you make one, feel free to share your finished bag or leave a question if you need help with the rounded ears, crescent shaping, or handle placement.












