
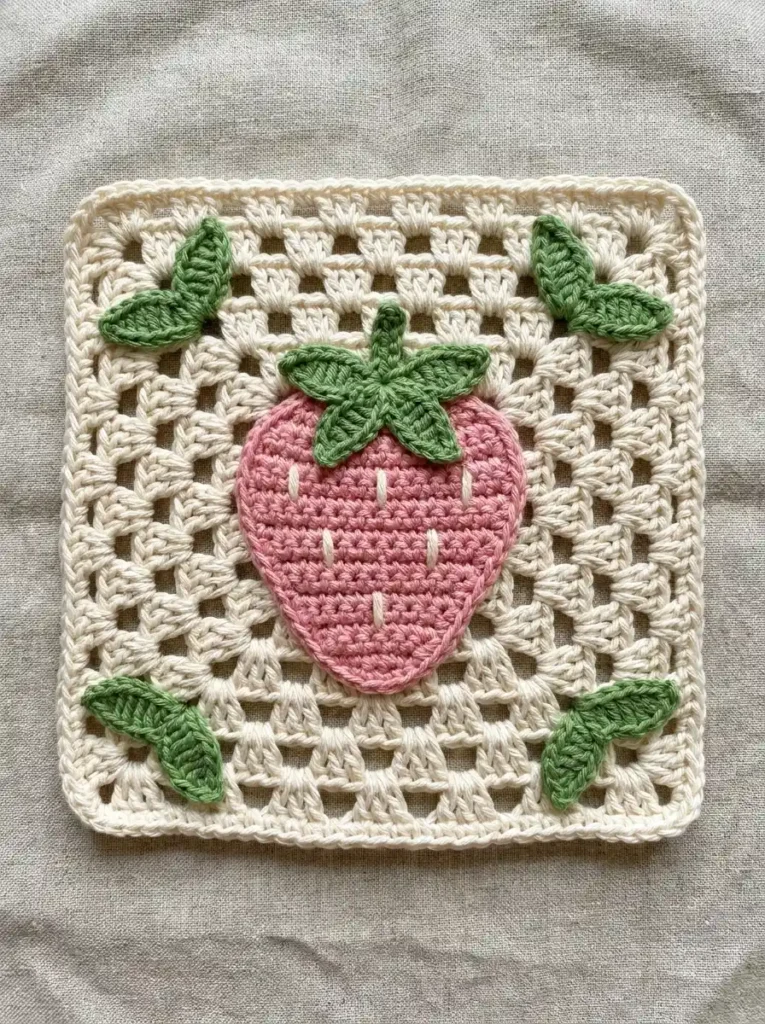
This strawberry granny square combines a warm cream open-granny background with a large pink berry, six simple cream seeds, a leafy green crown, and four two-leaf corner sprigs. The broad upper shoulders, tapered lower point, and layered green top make the strawberry easy to recognize while the corner leaves keep the whole square balanced.
The cream square is worked first and blocked flat. The strawberry body is crocheted separately in turned rows, finished with a simple edging, and decorated with embroidered seeds. The crown and corner foliage are made from small chain-based leaves that keep a visible center ridge and a clean pointed-oval silhouette.
Project at a glance
| Skill level | Advanced beginner to easy intermediate |
|---|---|
| Terminology | US crochet terms |
| Construction | Open granny square with separate strawberry and leaf appliqués |
| Yarn | DK or light-worsted cotton or cotton-blend |
| Hook | About 3.5 mm, or a size that gives neat defined stitches |
Exact gauge is not important for this decorative motif. Aim for a cream square that lies flat with clearly open chain spaces, while the pink strawberry and green leaves should feel firm enough to hold their shapes without becoming stiff.
Materials
- DK or light-worsted warm cream cotton or cotton-blend yarn for the square
- A small amount of soft strawberry-pink yarn for the berry
- A small amount of medium leafy green yarn for the crown and corner sprigs
- A short strand of cream yarn for the six strawberry seeds
- 3.5 mm crochet hook, or a compatible hook for your chosen yarn
- Yarn needle
- Scissors
- Blocking pins and a blocking surface
A smooth cotton or cotton-rich yarn works especially well because it keeps the granny clusters crisp and gives the appliqué pieces enough structure to hold their outlines. Using the same yarn weight for all colors also helps the strawberry and leaves stay in proportion to the square.
Stitches and abbreviations
- ch – chain
- sl st – slip stitch
- sc – single crochet
- hdc – half double crochet
- dc – double crochet
- sc2tog – single crochet two stitches together
- sp – space
- RS – right side
- WS – wrong side
Before you start
The cream base is worked in joined granny rounds with the RS facing throughout. Do not turn between rounds. The beginning ch 3 counts as the first dc, while slip-stitch joins do not count as stitches.
The strawberry is worked from its broad top edge downward in turned rows. The upper rows remain wide, then paired decreases gradually taper the berry toward its rounded lower point. A separate single-crochet edging smooths the stepped row ends.
The four leafy corners are not single leaves. Each corner uses a pair of matching leaves joined at their narrow bases, with the two tips opening toward the two nearby sides of the square.
Crochet pattern
Cream granny square
With cream yarn, ch 4 and join with a sl st in the first ch to form a small ring.
R1: Ch 3, 2 dc in the ring, ch 2, [3 dc in the ring, ch 2] × 3. Join with a sl st to the top of the beginning ch 3. Do not turn. (12 dc, 4 ch-2 corner spaces; 4 clusters)
Sl st across the next 2 dc and into the next ch-2 corner sp.
R2: Ch 3, 2 dc, ch 2, 3 dc in the same corner sp, ch 1, [(3 dc, ch 2, 3 dc) in the next corner sp, ch 1] × 3. Join to the top of the beginning ch 3. (24 dc, 4 ch-2 corner spaces, 4 ch-1 spaces; 8 clusters)
Sl st across to the next ch-2 corner sp.
R3: Ch 3, 2 dc, ch 2, 3 dc in the same corner sp. [Ch 1, 3 dc in the next ch-1 sp, ch 1, (3 dc, ch 2, 3 dc) in the next corner sp] × 3. Ch 1, 3 dc in the remaining ch-1 sp, ch 1. Join to the top of the beginning ch 3. (36 dc, 4 ch-2 corner spaces, 8 ch-1 spaces; 12 clusters)
Sl st across to the next ch-2 corner sp.
R4: Ch 3, 2 dc, ch 2, 3 dc in the same corner sp. [[Ch 1, 3 dc in the next ch-1 sp] × 2, ch 1, (3 dc, ch 2, 3 dc) in the next corner sp] × 3. [Ch 1, 3 dc in the next ch-1 sp] × 2, ch 1. Join to the top of the beginning ch 3. (48 dc, 4 ch-2 corner spaces, 12 ch-1 spaces; 16 clusters)
Sl st across to the next ch-2 corner sp.
R5: Ch 3, 2 dc, ch 2, 3 dc in the same corner sp. [[Ch 1, 3 dc in the next ch-1 sp] × 3, ch 1, (3 dc, ch 2, 3 dc) in the next corner sp] × 3. [Ch 1, 3 dc in the next ch-1 sp] × 3, ch 1. Join to the top of the beginning ch 3. (60 dc, 4 ch-2 corner spaces, 16 ch-1 spaces; 20 clusters)
Sl st across to the next ch-2 corner sp.
R6: Ch 3, 2 dc, ch 2, 3 dc in the same corner sp. [[Ch 1, 3 dc in the next ch-1 sp] × 4, ch 1, (3 dc, ch 2, 3 dc) in the next corner sp] × 3. [Ch 1, 3 dc in the next ch-1 sp] × 4, ch 1. Join to the top of the beginning ch 3. (72 dc, 4 ch-2 corner spaces, 20 ch-1 spaces; 24 clusters)
Sl st across to the next ch-2 corner sp.
R7: Ch 3, 2 dc, ch 2, 3 dc in the same corner sp. [[Ch 1, 3 dc in the next ch-1 sp] × 5, ch 1, (3 dc, ch 2, 3 dc) in the next corner sp] × 3. [Ch 1, 3 dc in the next ch-1 sp] × 5, ch 1. Join to the top of the beginning ch 3. (84 dc, 4 ch-2 corner spaces, 24 ch-1 spaces; 28 clusters)
Outer single-crochet edging
The final cream edging is worked separately so the square has a narrow continuous perimeter outside the open granny rounds.
Sl st across to the next ch-2 corner sp.
R8: Ch 1; this does not count as a stitch. Work 3 sc in the corner sp. Continue with 1 sc in each dc and 1 sc in every ch-1 sp. Work 3 sc in each remaining ch-2 corner sp. Join with a sl st to the first sc. Fasten off. (120 sc)
🧶 Checkpoint: Block the cream square before adding the appliqués. The seven granny rounds should remain open and flat, with one narrow edging round around the outside and four softly rounded corners.
Pink strawberry body
The strawberry is made separately and attached later. Work all rows in pink. Ch 1 at the beginning of each row does not count as a stitch.
Ch 19.
Row 1: Beginning in the second ch from the hook, sc in each ch across. Turn. (18 sc)
Row 2: Ch 1, turn, sc in each st across. (18 sc)
Row 3: Ch 1, turn, sc in each st across. (18 sc)
Row 4: Ch 1, turn, sc2tog, sc in each of the next 14 sts, sc2tog. (16 sc)
Row 5: Ch 1, turn, sc in each st across. (16 sc)
Row 6: Ch 1, turn, sc2tog, sc in each of the next 12 sts, sc2tog. (14 sc)
Row 7: Ch 1, turn, sc in each st across. (14 sc)
Row 8: Ch 1, turn, sc2tog, sc in each of the next 10 sts, sc2tog. (12 sc)
Row 9: Ch 1, turn, sc in each st across. (12 sc)
Row 10: Ch 1, turn, sc2tog, sc in each of the next 8 sts, sc2tog. (10 sc)
Row 11: Ch 1, turn, sc in each st across. (10 sc)
Row 12: Ch 1, turn, sc2tog, sc in each of the next 6 sts, sc2tog. (8 sc)
Row 13: Ch 1, turn, sc2tog, sc in each of the next 4 sts, sc2tog. (6 sc)
Row 14: Ch 1, turn, sc2tog, sc in each of the next 2 sts, sc2tog. (4 sc)
Row 15: Ch 1, turn, [sc2tog] × 2. Do not fasten off. (2 sc)
Strawberry edging
Turn the berry so the RS faces you. The edging smooths the stepped decreases and rounds the bottom tip.
Ch 1. Work 2 sc in the first unused foundation-chain loop at the upper edge, 1 sc in each of the next 16 foundation loops, and 2 sc in the final foundation loop. Work 1 sc into each of the 15 row-end spaces down the first side. Work 2 sc in each of the 2 stitches of Row 15. Work 1 sc into each of the 15 row-end spaces up the second side. Join with a sl st to the first sc. Fasten off with a long sewing tail. (54 sc)
Gently shape the berry with your fingers. The top should remain broad, the upper half should look full and rounded, and the lower half should taper smoothly toward a soft point rather than forming an egg or pear shape.
🧶 Checkpoint: Before adding the green crown, check the silhouette by itself. The berry should already read as a strawberry body: broad across the top, gently curved through the middle, and clearly tapered toward the bottom.
Add the six cream seeds
Use a yarn needle and a short strand of cream yarn. Make exactly six small vertical seed stitches on the RS of the strawberry.
Place three seeds across the upper half: one left of center, one near the center, and one right of center. Place two more across the middle section, offset between the upper three. Add the sixth seed near the center of the lower third.
Each seed should be a short straight stitch spanning only about one to two crochet-row heights. Keep the tension relaxed so the pink fabric does not pucker. Secure the cream yarn on the WS and weave in the ends.
Green crown leaves — make 4
The leafy crown uses four individually crocheted leaves. Two spread broadly across the upper shoulders and two angle downward over the strawberry. Their narrow bases meet at the top-center area.
With green yarn, ch 7.
Leaf round: Beginning in the second ch from the hook, sl st in the first ch, sc in the next ch, hdc in the next ch, dc in the next ch, hdc in the next ch, (sc, hdc, sc) in the final ch.
Rotate the foundation chain and continue into the unused loops on the opposite side: hdc in the next ch, dc in the next ch, hdc in the next ch, sc in the next ch, sl st in the final unused loop. Fasten off with a sewing tail. (13 sts)
Repeat until you have four matching crown leaves.
Short green strawberry stem
With green yarn, ch 3.
Row 1: Beginning in the second ch from the hook, sc in each ch. Turn. (2 sc)
Row 2: Ch 1, turn, sc in each st across. (2 sc)
Row 3: Ch 1, turn, sc in each st across. (2 sc)
Row 4: Ch 1, turn, sc2tog. Fasten off with a sewing tail. (1 sc)
This creates a short broad stem with a gently tapered top.
Corner leaves — make 8
Each of the four corners uses two leaves. The corner leaves are slightly longer than the crown leaves and are paired at their narrow ends to form simple V-shaped sprigs.
With green yarn, ch 8.
Leaf round: Beginning in the second ch from the hook, sl st in the first ch, sc in the next ch, hdc in the next ch, dc in each of the next 2 ch, hdc in the next ch, (sc, hdc, sc) in the final ch.
Rotate the foundation chain and continue into the unused loops on the opposite side: hdc in the next ch, dc in each of the next 2 ch, hdc in the next ch, sc in the next ch, sl st in the final unused loop. Fasten off with a long sewing tail. (15 sts)
Repeat until you have eight matching leaves.
Assembling the strawberry
Attach the berry
Lay the blocked cream square RS up. Position the pink strawberry vertically in the center. Keep the broad top level and point the tapered end toward the bottom edge of the square.
The strawberry should fill most of the central area while leaving a generous ring of visible cream granny texture around it. Sew around the pink edging with matching yarn, taking small stitches through solid cream cluster stitches whenever practical rather than pulling yarn tightly across the open spaces.
Add the stem and crown
Center the green stem above the strawberry. Tuck roughly the lower half behind the upper pink edge and sew that hidden section securely so only the short tapered top remains visible.
Arrange the four crown leaves with their narrow ends meeting near the center of the strawberry’s top edge. Angle the first leaf broadly toward the upper left and the second broadly toward the upper right. Angle the remaining two leaves diagonally downward over the left and right pink shoulders.
The upper pair may extend slightly onto the cream background, while the lower pair should overlap the pink berry. Keep all four complete leaf outlines readable.
Sew the narrow bases and center portions of the leaves securely with green yarn. Add a small hidden tack farther along a leaf only if it lifts excessively. Leaving the outer edges slightly free gives the crown the softly raised layered look.
Make the four leafy corner sprigs
Pair the eight larger leaves into four matching sets. For each sprig, overlap the two narrow leaf bases by about one stitch and tack them together securely with green yarn.
The leaves should open into a broad V rather than sitting directly on top of one another. Keep both complete leaf shapes visible.
Upper-left sprig
Place one sprig inside the upper-left corner. Point one leaf generally toward the top edge and the second generally toward the left edge. Keep the joined bases closer to the center of the square than the leaf tips.
Upper-right sprig
Mirror the placement in the upper-right corner, with one leaf pointing toward the top edge and the other toward the right edge.
Lower-left sprig
Position the third sprig in the lower-left corner, with its leaves pointing generally toward the bottom and left edges.
Lower-right sprig
Mirror that placement in the lower-right corner, with one leaf pointing toward the bottom edge and the other toward the right edge.
For each sprig, keep the leaf tips inside the cream edging rather than touching the outside border. Sew the overlapping base securely to the cream square, then add one small hidden tack near the middle of each leaf. Leave the tips and much of the outer edges slightly raised.
🧶 Checkpoint: Step back before fastening off the final sprig. You should see one large strawberry in the middle and four balanced two-leaf sprigs framing it from the corners, with open cream granny texture separating every major element.
Finishing your square
Weave all remaining ends into the WS. When hiding yarn behind the cream square, weave through the solid cluster stitches rather than stretching yarn across the open chain spaces.
If sewing the appliqués has pulled the square slightly inward, lightly damp-block the completed motif again. Pin the cream outer perimeter into shape and use your fingers to smooth the strawberry and leaf pieces without stretching them.
Allow the square to dry completely before removing the pins. The strawberry should remain flat against the center while the leafy crown and corner sprigs retain a small amount of natural lift.
Troubleshooting
- The strawberry looks like an egg: check that the upper rows remain noticeably wider than the lower rows and that all paired decreases were worked from Row 4 onward. Smooth the upper shoulders outward before sewing.
- The lower berry looks too sharply triangular: do not pull the decrease-row ends tightly. The final edging should soften the stepped sides and round the bottom tip.
- The crown hides too much of the strawberry: overlap only the lower two leaves deeply onto the pink body. Let the upper pair spread more horizontally across the shoulders.
- The corner sprigs look like single bulky leaves: separate the two leaf tips before sewing and overlap only their narrow bases.
- The cream square cups after assembly: the appliqué sewing stitches are probably too tight. Loosen the attachment tension and block the outer cream perimeter again.
Final check
- The cream base has seven open granny rounds followed by one narrow single-crochet edging round.
- The center strawberry is broad at the top, tapered at the bottom, and decorated with exactly six small cream seeds.
- The strawberry crown has one short stem and four clearly visible green leaves.
- Each of the four corners contains one two-leaf sprig, for eight corner leaves total.
- The finished square lies flat with visible cream space between the strawberry, corner foliage, and outer border.
Once the finished motif is blocked and dry, the pink strawberry should stand out immediately against the open cream square while the green crown and paired corner leaves give it a fresh leafy frame. If you make this square, feel free to share your finished version or leave a question if you get stuck on one of the shaped pieces.












