
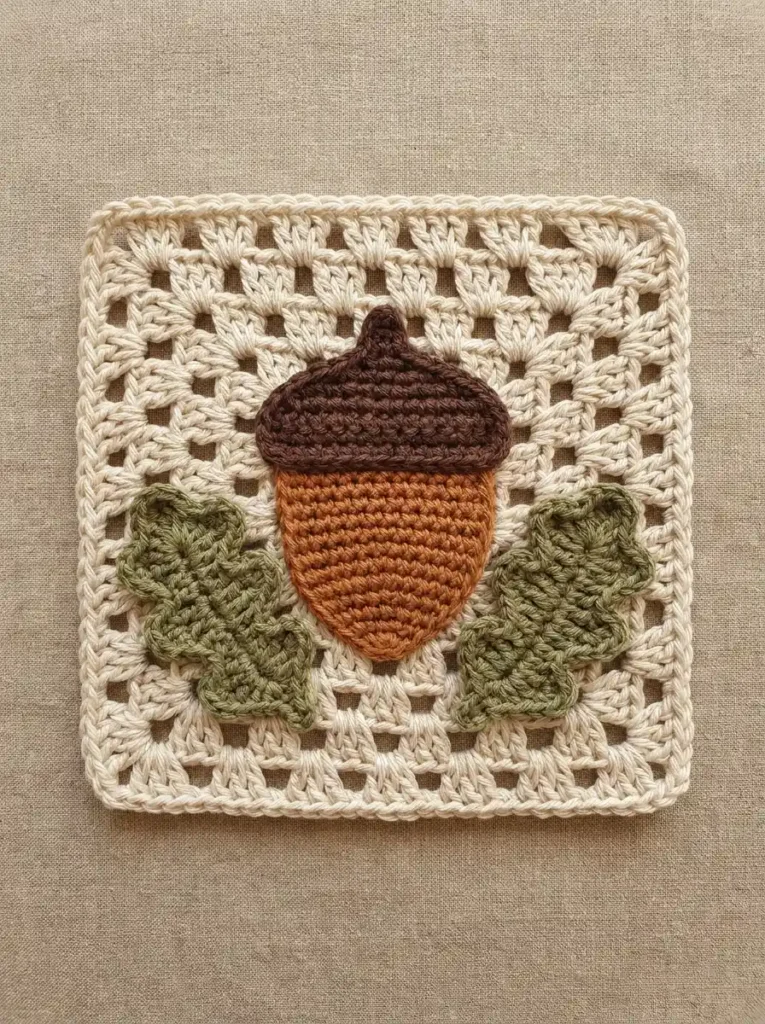
This harvest-inspired granny square pairs a warm cream open-granny background with one large two-tone acorn and two muted olive oak leaves. The dark brown cap, tapered burnt-orange nut, tiny stem, and broad three-lobed leaves give the center a clear autumn acorn-and-oak silhouette without making the motif overly complicated.
The cream square is crocheted and blocked first. The acorn nut, cap, stem, and two leaves are made separately, then layered onto the front so the decorative pieces keep their clearly defined edges and slightly raised appliqué texture.
Project at a glance
| Skill level | Advanced beginner to easy intermediate |
|---|---|
| Terminology | US crochet terms |
| Construction | Open granny square with separate acorn and oak-leaf appliqués |
| Yarn | DK or light-worsted cotton or cotton-blend |
| Hook | About 3.5 mm, or a size that gives neat defined stitches |
Exact gauge is not important for this decorative square. Aim for a cream base that lies flat with clearly open granny spaces, while the acorn and leaves should feel firm enough to keep their shapes without becoming stiff.
Materials
- DK or light-worsted cream cotton or cotton-blend yarn for the square
- A small amount of warm burnt-orange or chestnut yarn for the acorn nut
- A small amount of dark chocolate-brown yarn for the cap and stem
- A small amount of muted olive or sage-green yarn for the oak leaves
- 3.5 mm crochet hook, or a hook suitable for your chosen yarn
- Yarn needle
- Scissors
- Stitch marker
- Blocking pins and a blocking surface
A smooth cotton or cotton-rich yarn helps the cream clusters stay crisp and gives the appliqués enough body to hold their silhouettes. Use the same yarn weight for all four colors so the acorn, leaves, and base remain in proportion.
Stitches and abbreviations
- ch – chain
- sl st – slip stitch
- sc – single crochet
- hdc – half double crochet
- dc – double crochet
- sc2tog – single crochet two stitches together
- sp – space
- RS – right side
- WS – wrong side
Before you start
The cream square is worked in joined rounds with the RS facing throughout. Do not turn between rounds. The beginning ch 3 counts as the first dc; slip-stitch joins do not count as stitches.
The orange acorn nut and dark brown cap are worked separately in turned rows. The cap overlaps the wide top edge of the nut, which keeps the two-tone acorn simple while creating a clearly visible division between the cap and lower nut.
The oak leaves are worked in one continuous round around both sides of a short foundation chain. Each leaf has three broad lobes along each side and a rounded tip. Make both leaves from the same instructions so they remain consistent.
Crochet pattern
Cream granny square
With cream yarn, ch 4 and join with a sl st in the first ch to form a small ring.
R1: Ch 3, 2 dc in the ring, ch 2, [3 dc in the ring, ch 2] × 3. Join with a sl st to the top of the beginning ch 3. Do not turn. (12 dc, 4 ch-2 corner spaces; 4 clusters)
Sl st across the next 2 dc and into the next ch-2 corner sp.
R2: Ch 3, 2 dc, ch 2, 3 dc in the same corner sp, ch 1, [(3 dc, ch 2, 3 dc) in the next corner sp, ch 1] × 3. Join to the top of the beginning ch 3. (24 dc, 4 ch-2 corner spaces, 4 ch-1 spaces; 8 clusters)
Sl st across to the next ch-2 corner sp.
R3: Ch 3, 2 dc, ch 2, 3 dc in the same corner sp. [Ch 1, 3 dc in the next ch-1 sp, ch 1, (3 dc, ch 2, 3 dc) in the next corner sp] × 3. Ch 1, 3 dc in the remaining ch-1 sp, ch 1. Join to the top of the beginning ch 3. (36 dc, 4 ch-2 corner spaces, 8 ch-1 spaces; 12 clusters)
Sl st across to the next ch-2 corner sp.
R4: Ch 3, 2 dc, ch 2, 3 dc in the same corner sp. [[Ch 1, 3 dc in the next ch-1 sp] × 2, ch 1, (3 dc, ch 2, 3 dc) in the next corner sp] × 3. [Ch 1, 3 dc in the next ch-1 sp] × 2, ch 1. Join to the beginning ch 3. (48 dc, 4 ch-2 corner spaces, 12 ch-1 spaces; 16 clusters)
Sl st across to the next ch-2 corner sp.
R5: Ch 3, 2 dc, ch 2, 3 dc in the same corner sp. [[Ch 1, 3 dc in the next ch-1 sp] × 3, ch 1, (3 dc, ch 2, 3 dc) in the next corner sp] × 3. [Ch 1, 3 dc in the next ch-1 sp] × 3, ch 1. Join to the beginning ch 3. (60 dc, 4 ch-2 corner spaces, 16 ch-1 spaces; 20 clusters)
Sl st across to the next ch-2 corner sp.
R6: Ch 3, 2 dc, ch 2, 3 dc in the same corner sp. [[Ch 1, 3 dc in the next ch-1 sp] × 4, ch 1, (3 dc, ch 2, 3 dc) in the next corner sp] × 3. [Ch 1, 3 dc in the next ch-1 sp] × 4, ch 1. Join to the beginning ch 3. (72 dc, 4 ch-2 corner spaces, 20 ch-1 spaces; 24 clusters)
Outer single-crochet edging
Work the narrow outer edging as a separate round so the square has a smooth perimeter while the interior remains open.
Sl st across to the next ch-2 corner sp.
R7: Ch 1; this does not count as a stitch. Work 3 sc in the corner sp. Continue with 1 sc in each dc and 1 sc in every ch-1 sp. Work 3 sc in each remaining ch-2 corner sp. Join with a sl st to the first sc. Fasten off. (104 sc)
🧶 Checkpoint: Block the cream base before adding the appliqués. The six granny rounds should lie flat with clearly open spaces, four balanced corners, and one narrow continuous edge around the outside.
Burnt-orange acorn nut
The nut is worked from its broad top edge downward. Paired decreases at the beginning and end of alternating rows create the rounded taper toward the bottom.
With burnt-orange yarn, ch 15.
Row 1: Beginning in the second ch from the hook, sc in each ch across. Turn. (14 sc)
Row 2: Ch 1, turn, sc in each st across. (14 sc)
Row 3: Ch 1, turn, sc2tog, sc in each of the next 10 sts, sc2tog. (12 sc)
Row 4: Ch 1, turn, sc in each st across. (12 sc)
Row 5: Ch 1, turn, sc2tog, sc in each of the next 8 sts, sc2tog. (10 sc)
Row 6: Ch 1, turn, sc in each st across. (10 sc)
Row 7: Ch 1, turn, sc2tog, sc in each of the next 6 sts, sc2tog. (8 sc)
Row 8: Ch 1, turn, sc in each st across. (8 sc)
Row 9: Ch 1, turn, sc2tog, sc in each of the next 4 sts, sc2tog. (6 sc)
Row 10: Ch 1, turn, sc in each st across. (6 sc)
Row 11: Ch 1, turn, sc2tog, sc in each of the next 2 sts, sc2tog. (4 sc)
Row 12: Ch 1, turn, [sc2tog] × 2. (2 sc)
Row 13: Ch 1, turn, sc2tog. Fasten off with a long sewing tail. (1 sc)
Gently smooth the piece so the top stays broad and almost horizontal while the sides taper gradually toward the softly pointed lower end.
Dark brown acorn cap
The cap is a separate piece that overlaps the top several rows of the orange nut. Its lower edge is broad and nearly straight, while the upper rows narrow to form a shallow dome.
With dark brown yarn, ch 17.
Row 1: Beginning in the second ch from the hook, sc in each ch across. Turn. (16 sc)
Row 2: Ch 1, turn, sc in each st across. (16 sc)
Row 3: Ch 1, turn, sc2tog, sc in each of the next 12 sts, sc2tog. (14 sc)
Row 4: Ch 1, turn, sc2tog, sc in each of the next 10 sts, sc2tog. (12 sc)
Row 5: Ch 1, turn, sc2tog, sc in each of the next 8 sts, sc2tog. (10 sc)
Row 6: Ch 1, turn, sc2tog, sc in each of the next 6 sts, sc2tog. Fasten off with a long sewing tail. (8 sc)
Flatten the cap with Row 1 forming its broad lower edge. The piece should be slightly wider than the orange nut beneath it.
Short brown stem
With dark brown yarn, ch 4.
Row 1: Beginning in the second ch from the hook, sc in each ch across. Turn. (3 sc)
Row 2: Ch 1, turn, sc in each st across. Turn. (3 sc)
Row 3: Ch 1, turn, sc in each st across. Fasten off with a long sewing tail. (3 sc)
The finished stem is intentionally short and broad. Only the upper portion will remain visible above the cap.
Oak leaves — make 2
Each oak leaf is worked in one continuous round around a foundation chain. The three larger stitch groups along each side form the broad rounded lobes.
With olive or sage yarn, ch 10.
Leaf round: Beginning in the second ch from the hook, sl st in the first ch, sc in the next ch, (hdc, 2 dc, hdc) in the next ch, sc in the next ch, (hdc, 3 dc, hdc) in the next ch, sc in the next ch, (hdc, 2 dc, hdc) in the next ch, sc in the next ch, 5 hdc in the final ch.
Rotate the foundation chain and continue into the unused loops along the opposite side: sc in the next ch, (hdc, 2 dc, hdc) in the next ch, sc in the next ch, (hdc, 3 dc, hdc) in the next ch, sc in the next ch, (hdc, 2 dc, hdc) in the next ch, sc in the next ch, sl st in the final unused loop. Fasten off with a long sewing tail. (41 sts total)
Gently shape the leaf with your fingers. There should be three broad lobes along each side, a rounded upper tip formed by the 5 hdc, and a narrow base at the opposite end.
Make the second leaf from the same instructions.
🧶 Checkpoint: Before assembly, compare the two leaves side by side. Both should have three clearly readable lobes on each side and approximately the same overall width and length. Small handmade differences are fine, but neither leaf should have an extra lobe.
Assembling the acorn
Join the nut and cap
Lay the orange nut RS up with its broad Row 1 edge at the top. Place the dark brown cap over the upper portion so the cap’s broad Row 1 edge runs horizontally across the orange piece.
Overlap the cap enough to cover approximately the upper two rows of the orange nut. The cap should extend a little beyond the orange body on both sides, while the tapered orange section remains completely visible below it.
Using dark brown yarn, sew the lower edge and side edges of the cap securely to the orange nut. Leave the upper curved portion free from tight stitching so the cap keeps a lightly raised appliqué appearance.
Add the stem
Center the short brown stem behind the top of the cap. Hide approximately the lower half of the stem beneath the cap and sew that hidden section securely to the back of the acorn.
Only a small rounded brown tab should remain visible above the cap. Keep it centered rather than leaning strongly to either side.
Attach the acorn and oak leaves
Position the acorn
Lay the blocked cream square RS up. Center the assembled acorn vertically on the square. The stem points toward the top edge, and the orange tip points toward the bottom.
The acorn should dominate the middle of the square without covering the outer granny rounds. Leave a generous cream frame visible above, below, and on both sides.
Sew the orange nut to the cream base with matching orange yarn, working small stitches close to its outer edge. Then add a few hidden dark-brown stitches through the cap so the upper section stays secure.
Position the left leaf
Place one olive leaf beside the lower-left portion of the acorn. Angle the leaf so its rounded tip points outward and slightly upward toward the left side of the square.
Tuck the narrow base of the leaf slightly beneath the lower-left side of the orange nut. Only a small overlap is needed; the three outer lobes should remain completely visible.
Sew the narrow base and central portion of the leaf securely to the cream square with matching green yarn. Add a small tack near the base of each large outer lobe if necessary, but do not flatten the complete perimeter.
Position the right leaf
Place the second leaf beside the lower-right portion of the acorn as a mirror of the left leaf. Its tip points outward and slightly upward toward the right side.
Tuck its narrow base the same distance beneath the orange nut and keep the outer lobes fully visible. Sew it in place using the same attachment method as the left leaf.
🧶 Checkpoint: The finished center should read as one clear harvest motif: a tall two-tone acorn in the middle with two matching oak leaves framing its lower half. Keep both leaf tips visible and leave plenty of open cream granny texture around the entire arrangement.
Finishing your square
Weave all remaining ends into the WS. When working behind the cream square, weave through the solid granny clusters rather than stretching yarn across the open chain spaces.
If sewing the appliqués has pulled the center inward, lightly damp-block the completed square again. Pin the cream outer perimeter into shape, then smooth the acorn and leaves gently with your fingers rather than stretching them.
Allow the motif to dry completely before removing the blocking pins.
Troubleshooting
- The cream square cups at the corners: the corner chains or final sc edging are probably too tight. Relax those stitches and block the base flat before attaching the appliqués.
- The orange nut looks triangular instead of softly tapered: gently block the side edges into a rounded curve and avoid pulling the decrease rows tightly during sewing.
- The cap looks too narrow: make sure the 16-stitch Row 1 edge is positioned across the nut and that the cap extends slightly beyond both orange sides.
- A leaf does not look oak-like: check that all three lobe groups were worked along each side of the foundation chain and spread the dc groups gently before sewing.
- The two leaves look uneven: position the narrow bases at matching heights beside the acorn and mirror their angles before adding the final sewing stitches.
Final check
- The cream base has six open granny rounds followed by one narrow single-crochet edging round.
- The center acorn has one tapered orange nut, one broad dark brown cap, and one short visible stem.
- There are exactly two olive oak leaves, each with three broad lobes along both sides.
- The leaves mirror each other beside the lower half of the acorn while leaving their outer lobes visible.
- The finished square lies flat with a clear cream granny frame surrounding the appliqué arrangement.
Once the square is blocked and dry, the dark cap and warm orange nut should make the acorn stand out clearly while the two olive leaves soften the lower edges of the motif. If you make this harvest square, feel free to share your finished version or leave a question if you get stuck on one of the shaped pieces.












