
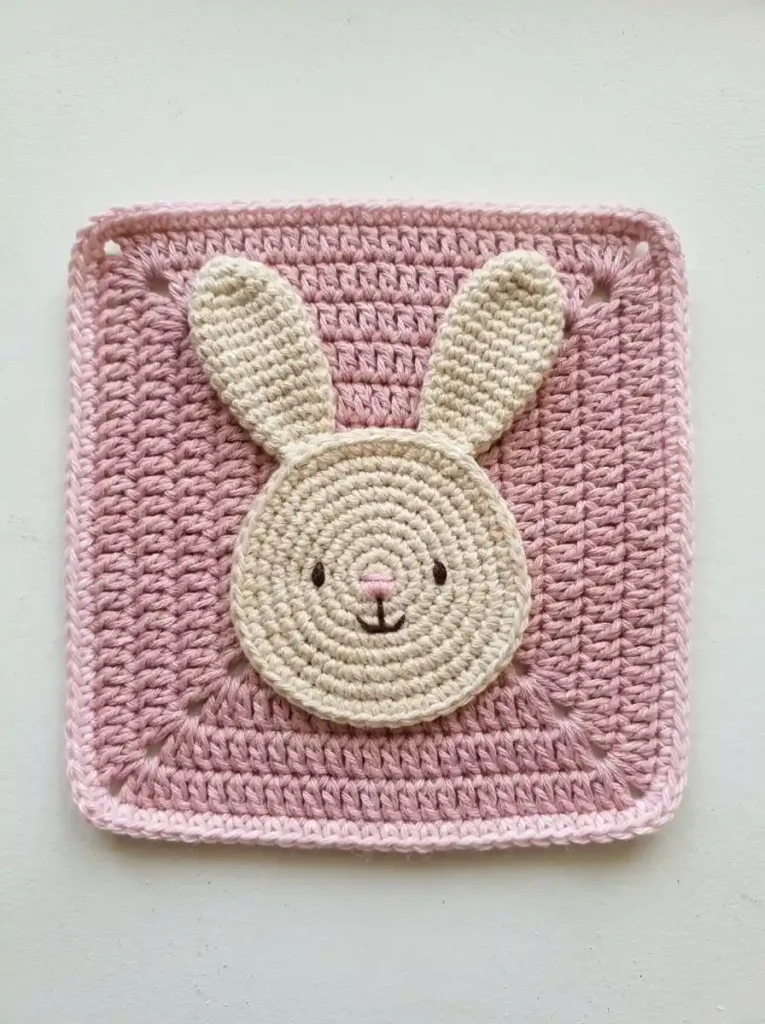
This baby bunny granny square combines a soft solid-crochet background with a raised cream bunny face and two long rounded ears. The dusty-pink and cream palette keeps the motif simple and sweet, while the separate bunny pieces give the face the gentle dimensional look that makes it stand slightly above the square.
The square is worked from the center outward in joined double-crochet rounds and finished with a narrow lighter-pink single-crochet edging. The bunny head is a flat single-crochet circle, while the two ears are worked separately in turned rows with narrow bases, long gently rounded sides, and softly curved tips.
Project at a glance
| Skill level | Advanced beginner |
|---|---|
| Terminology | US crochet terms |
| Construction | Center-out square with separately crocheted head and ears |
| Yarn | DK or light-worsted smooth cotton or cotton-blend yarn |
| Hook | 3.5 mm or size needed for a firm, defined fabric |
Materials
- DK or light-worsted cotton or cotton-blend yarn in dusty rose for the main square
- A small amount of pale pink for the narrow outer edging
- A small amount of warm cream yarn for the bunny head and ears
- A small amount of soft pink yarn or embroidery floss for the nose
- A small amount of dark brown yarn or embroidery floss for the eyes and mouth
- 3.5 mm crochet hook
- Yarn needle
- Stitch marker
- Scissors
- Blocking pins and mat if desired
A smooth yarn works particularly well for this design because the individual rounds of the bunny face and the horizontal rows of the ears remain easy to see. Cotton or a cotton blend also helps the square stay flat while giving the ears enough structure to keep their long rounded shape.
Stitches and abbreviations
- ch – chain
- ch-sp – chain space
- sl st – slip stitch
- sc – single crochet
- hdc – half double crochet
- dc – double crochet
- inc – work 2 sc in the same stitch
- sc2tog – single crochet 2 stitches together
- MR – adjustable magic ring
- RS – right side
- st(s) – stitch(es)
Before you start
The pink square is worked in joined rounds with the RS facing throughout. The beginning ch 3 counts as the first dc. Slip-stitch joins do not count as stitches.
The cream bunny head is worked in continuous rounds. Do not join at the end of those rounds; move a stitch marker to the first stitch of each new round.
The ears are made separately in turned rows. Ch 1 at the beginning of an ear row does not count as a stitch.
🧶 Crochet Tip: Keep the four ch-2 corner spaces relaxed while making the square. Tight corner chains can pull the corners upward even when every stitch count is correct.
Crochet pattern
Dusty-pink square
With dusty rose yarn, make an MR.
R1: Ch 3, 2 dc in ring, ch 2, [3 dc in ring, ch 2] × 3. Pull the ring closed and join with a sl st to the top of the beginning ch 3. (12 dc total; 3 dc per side; 4 ch-2 corner spaces)
R2: Sl st in each of the next 2 dc and into the next ch-2 corner space. Ch 3, dc, ch 2, 2 dc in the same corner space. [Dc in each of the next 3 dc, then work 2 dc, ch 2, 2 dc in the next ch-2 corner space] × 3. Dc in each of the remaining 3 dc. Join to the top of the beginning ch 3. (28 dc total; 7 dc per side; 4 ch-2 corner spaces)
R3: Sl st across to the next ch-2 corner space. Ch 3, dc, ch 2, 2 dc in the same space. [Dc in each of the next 7 dc, then work 2 dc, ch 2, 2 dc in the next ch-2 corner space] × 3. Dc in each of the remaining 7 dc. Join. (44 dc total; 11 dc per side; 4 ch-2 corner spaces)
R4: Sl st across to the next ch-2 corner space. Ch 3, dc, ch 2, 2 dc in the same space. [Dc in each of the next 11 dc, then work 2 dc, ch 2, 2 dc in the next ch-2 corner space] × 3. Dc in each of the remaining 11 dc. Join. (60 dc total; 15 dc per side; 4 ch-2 corner spaces)
R5: Sl st across to the next ch-2 corner space. Ch 3, dc, ch 2, 2 dc in the same space. [Dc in each of the next 15 dc, then work 2 dc, ch 2, 2 dc in the next ch-2 corner space] × 3. Dc in each of the remaining 15 dc. Join. (76 dc total; 19 dc per side; 4 ch-2 corner spaces)
R6: Sl st across to the next ch-2 corner space. Ch 3, dc, ch 2, 2 dc in the same space. [Dc in each of the next 19 dc, then work 2 dc, ch 2, 2 dc in the next ch-2 corner space] × 3. Dc in each of the remaining 19 dc. Join. (92 dc total; 23 dc per side; 4 ch-2 corner spaces)
R7: Sl st across to the next ch-2 corner space. Ch 3, dc, ch 2, 2 dc in the same space. [Dc in each of the next 23 dc, then work 2 dc, ch 2, 2 dc in the next ch-2 corner space] × 3. Dc in each of the remaining 23 dc. Join. (108 dc total; 27 dc per side; 4 ch-2 corner spaces)
R8: Sl st across to the next ch-2 corner space. Ch 3, dc, ch 2, 2 dc in the same space. [Dc in each of the next 27 dc, then work 2 dc, ch 2, 2 dc in the next ch-2 corner space] × 3. Dc in each of the remaining 27 dc. Join. (124 dc total; 31 dc per side; 4 ch-2 corner spaces)
Fasten off the dusty rose yarn.
Pale-pink outer edging
Join pale pink yarn to any dc with the RS facing.
Edging round: Ch 1, sc in every dc around. In each ch-2 corner space work sc, ch 2, sc. Join with a sl st to the first sc. (132 sc total; 33 sc along each finished side when the corner sc at each end are included; 4 ch-2 corner spaces)
Fasten off and weave in the yarn ends.
🧶 Checkpoint: The square should lie flat with four matching softly rounded corners and a narrow pale-pink line clearly visible around the darker dusty-rose body.
Cream bunny head
The bunny head is crocheted separately as a flat circle. Work continuously and use a stitch marker to identify the first stitch of each round.
With cream yarn, make an MR.
R1: Work 6 sc in the ring. (6 sts)
R2: Inc in each st around. (12 sts)
R3: [Sc in next st, inc in next st] × 6. (18 sts)
R4: [Sc in next 2 sts, inc in next st] × 6. (24 sts)
R5: [Sc in next 3 sts, inc in next st] × 6. (30 sts)
R6: [Sc in next 4 sts, inc in next st] × 6. (36 sts)
R7: [Sc in next 5 sts, inc in next st] × 6. (42 sts)
R8: [Sc in next 6 sts, inc in next st] × 6. (48 sts)
R9: [Sc in next 7 sts, inc in next st] × 6. (54 sts)
R10: [Sc in next 8 sts, inc in next st] × 6. (60 sts)
Sl st loosely in the next st to soften the end of the spiral. Fasten off, leaving a long tail for sewing.
The finished circle should remain flat with a softly handmade outline. If it begins to ruffle noticeably, use a slightly smaller hook for the head rather than removing an increase round.
Long rounded bunny ears
Make two identical ears with cream yarn. Each ear is crocheted separately from its narrow lower attachment edge toward the rounded tip. The middle remains fairly narrow but extends for several rows, creating the long upright shape rather than a short leaf-shaped ear.
Ch 6.
Row 1: Sc in 2nd ch from hook and in each remaining ch. Turn. (5 sts)
Row 2: Ch 1, 2 sc in first st, sc in next 3 sts, 2 sc in last st. Turn. (7 sts)
Row 3: Ch 1, 2 sc in first st, sc in next 5 sts, 2 sc in last st. Turn. (9 sts)
Rows 4–11: Ch 1, sc in each st across. Turn. (9 sts)
Row 12: Ch 1, sc2tog, sc in next 5 sts, sc2tog. Turn. (7 sts)
Row 13: Ch 1, sc in each st across. Turn. (7 sts)
Row 14: Ch 1, sc2tog, sc in next 3 sts, sc2tog. Turn. (5 sts)
Row 15: Ch 1, sc in each st across. Turn. (5 sts)
Row 16: Sl st in first st, sc in next st, hdc in next st, sc in next st, sl st in last st. (5 sts)
Fasten off, leaving a long sewing tail at the lower edge.
The completed ear should have a narrow 5-stitch base, widen smoothly to 9 stitches, remain long through the middle, and then taper gradually into a rounded five-stitch cap. The sides should look softly curved rather than sharply angled.
Make the second ear exactly the same way.
🧶 Checkpoint: Place both ears side by side before assembly. They should be noticeably longer than they are wide, with narrow bases, nearly parallel middle sections, and softly rounded tips.
Add the bunny face
Embroider the facial details before sewing the head onto the square. This keeps the embroidery tails hidden on the back of the cream circle.
Orient the circle so the slight end-of-round transition sits toward the bottom.
Eyes: With dark brown yarn or embroidery floss, make two tiny short vertical stitches. Place them on the same horizontal level slightly above the center of the face, with a generous cream space between them. Keep the eyes narrow and understated.
Nose: With soft pink yarn or embroidery floss, make a very small horizontal oval centered between the eyes and slightly below their level. Use only enough short satin stitches to create the compact pink nose.
Mouth: With dark brown yarn, make one short vertical stitch straight down from the center of the nose. From its lower end, work a few tiny backstitches into a shallow curved smile, extending a short distance to the left and right.
Keep the embroidery tension relaxed. Pulling the stitches too firmly can pucker the center of the bunny face.
Assemble the bunny motif
Lay the finished square RS up. The bunny head sits centrally from left to right but slightly below the vertical center of the square, leaving a generous area of pink fabric above it for the two long ears.
Attach the ears first
Place the two ears behind the future head position before sewing them permanently. Angle the left ear gently toward the upper left and the right ear gently toward the upper right. Keep a small visible gap between their inner edges.
The ear tips should remain inside the main pink field with a visible strip of pink between each tip and the pale outer border.
Tuck approximately the lower one to two rows of each ear behind the future head position. Keep the bases separated so they enter behind the circle near its upper-left and upper-right areas rather than meeting at the center.
Using each cream sewing tail, secure the 5-stitch base directly to the pink square. Stitch across the lower edge of the ear and add one discreet anchoring stitch along each lower side if needed. Leave the long middle and upper portions free so the ears retain their gentle raised appearance.
Check the square from directly above. The ears should have similar lengths and widths and should angle outward by roughly the same amount, while still retaining a little natural handmade asymmetry.
Attach the head
Place the cream circle over the ear bases so their lower attachment rows disappear completely underneath it. Center the head horizontally and check that the eyes remain level.
Thread the long cream tail onto a yarn needle. Sew the head around its complete circumference, catching the back loop or back strand of each outer cream stitch rather than wrapping the seam over the visible front edge.
Pass the needle through the pink fabric immediately beneath the edge of the head, then return through the next back strand of the cream outer round. Continue evenly around the circle.
This keeps the visible front loops of the last cream round clean and allows the edge of the bunny face to remain slightly raised instead of being flattened by a prominent sewing seam.
Keep the sewing secure but relaxed. The center of the head should rest against the square while the outer cream edge retains a small amount of natural relief.
🧶 Checkpoint: From directly above, the head should completely cover both ear bases. The ears should remain long, clearly separate, and gently angled outward, with neither tip touching the outer border.
Finishing your square
Weave all remaining tails securely into stitches of the matching color on the back. Avoid carrying dark embroidery yarn across open cream areas where it could show through from the front.
Lightly block the pink square so its sides sit straight and its four corners remain softly rounded. Keep the corner chain spaces relaxed rather than stretching them into sharp points.
While the ears are slightly damp, shape them with your fingers so the lower portions remain narrow, the middle sections stay long and gently full, and the upper edges finish in smooth rounded tips.
Avoid pressing the bunny appliqué completely flat during blocking. The head and ears should retain a small amount of natural dimension above the pink background.
Troubleshooting
- The pink square cups at the corners: the ch-2 corner spaces are probably too tight. Work those chains more loosely and block the square before attaching the bunny.
- The square sides ripple: the dc stitches may be too loose compared with the corners. Use slightly firmer tension rather than changing the established corner increases.
- The bunny head becomes wavy: the sc fabric is probably too loose. Use a slightly smaller hook for the head so all ten increase rounds can remain in place.
- The ears look too short or squat: make sure Rows 4–11 are all worked before beginning the decreases. Those repeated 9-stitch rows create the long straight middle section.
- The ears look too wide: check the first three rows. Each ear should reach only 9 stitches at its widest point.
- An ear has a pointed tip: keep Row 16 relaxed. The taller hdc in the center with shorter stitches on either side creates the softly rounded cap.
- The ear bases remain visible beside the head: slide the lower one or two rows slightly farther underneath the cream circle before completing the head seam.
- The head edge looks flattened: the sewing stitches may be too tight or may be wrapping over the visible front loops. Sew through the back strands of the final cream round and relax the seam tension.
After light blocking, the finished motif should show a broad dusty-pink square with a narrow pale-pink outer edge, one large round cream bunny face, and two long narrow ears rising above it with softly rounded tips. The tiny dark eyes, pink nose, and shallow embroidered smile complete the face without adding unnecessary layers.
If you make your own bunny square, feel free to share how it turned out or leave a question if you need help with the ear shaping or assembly.












