
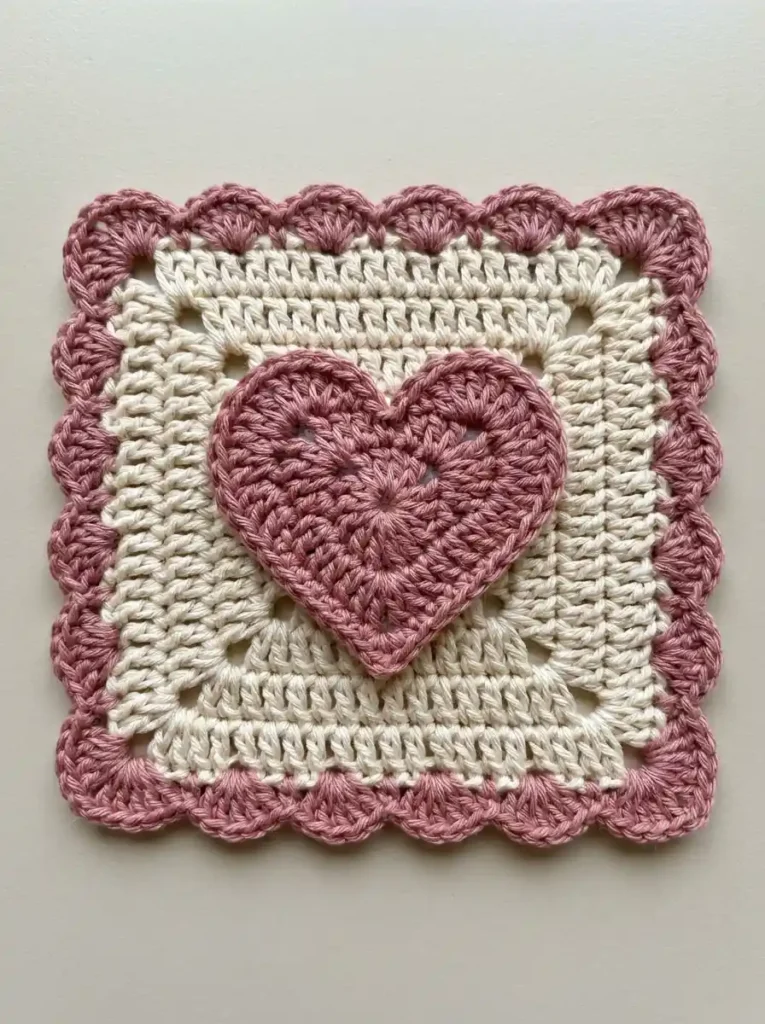
This compact crochet square pairs a warm cream solid granny-square base with a raised dusty-rose heart and a matching shell border. The heart sits directly over the center of the square, with two rounded lobes, a clear center notch, a pointed lower tip, and just enough depth to stand away from the cream background.
The square, heart, and edging are worked as distinct construction stages. The heart is crocheted separately and sewn on with a tiny amount of filling underneath, while the rose scallops are worked directly into the finished cream square so the outer edge stays secure and evenly spaced.
Project at a glance
| Skill level | Confident beginner to intermediate |
|---|---|
| Terminology | US crochet terms |
| Construction | Center-out square, separate heart appliqué, attached scalloped edging |
| Yarn | DK-weight cotton or cotton-blend |
| Hook | 3.5 mm crochet hook |
The finished size will vary with yarn and tension, but the design is intended to stay compact. The cream base should be firm enough to support the heart without feeling stiff, while the heart itself benefits from slightly tighter tension so its outline stays crisp.
Materials
- DK-weight cotton or cotton-blend yarn in warm cream for the square
- DK-weight cotton or cotton-blend yarn in muted dusty rose for the heart and scalloped border
- 3.5 mm crochet hook
- A very small amount of polyester fiberfill
- Tapestry needle
- Stitch marker
- Scissors
A smooth yarn is useful for this motif because the individual dc posts remain easy to see and the rose shell border keeps its fan-shaped definition. Use the same yarn weight for both colors so the heart and border stay in proportion with the cream square.
Stitches and abbreviations
- ch – chain
- ch-sp – chain space
- sl st – slip stitch
- sc – single crochet
- hdc – half double crochet
- dc – double crochet
- tr – treble crochet
- MR – magic ring
- RS – right side
For the scalloped edging, an ordinary shell means 5 dc worked into the same stitch. Each corner uses a slightly larger 7-dc shell.
Before you start
The cream square is worked in joined rounds without turning. The beginning ch 3 counts as the first dc in every square round. Slip-stitch joins do not count as stitches.
The heart is worked separately from the center outward. Its first stage creates the basic heart silhouette, the second stage enlarges and rounds the lobes, and a final sc edging gives the heart its defined outer outline.
Keep the corner ch-2 spaces relaxed throughout the cream square. Tight corners will pull upward once the scalloped border is added.
Crochet pattern
Cream solid granny square
With cream yarn, ch 4 and join with a sl st in the first ch to form a small center ring.
R1: Ch 3, 2 dc into the ring, ch 2, [3 dc into the ring, ch 2] × 3. Join with a sl st to the top of the beginning ch 3. Do not turn. (12 dc, 4 ch-2 corner spaces)
Sl st across the next 2 dc and into the next ch-2 corner space.
R2: Ch 3, 1 dc in the same corner space, ch 2, 2 dc in the same corner space. Dc in each of the next 3 dc. [Work 2 dc, ch 2, 2 dc in the next corner space; dc in each of the next 3 dc] × 3. Join to the top of the beginning ch 3. (28 dc, 4 ch-2 corner spaces)
Sl st in the next dc and into the next corner space.
R3: Ch 3, 1 dc in the same corner space, ch 2, 2 dc in the same corner space. Dc in each of the next 7 dc. [Work 2 dc, ch 2, 2 dc in the next corner space; dc in each of the next 7 dc] × 3. Join. (44 dc, 4 ch-2 corner spaces)
Sl st in the next dc and into the next corner space.
R4: Ch 3, 1 dc in the same corner space, ch 2, 2 dc in the same corner space. Dc in each of the next 11 dc. [Work 2 dc, ch 2, 2 dc in the next corner space; dc in each of the next 11 dc] × 3. Join. (60 dc, 4 ch-2 corner spaces)
Sl st in the next dc and into the next corner space.
R5: Ch 3, 1 dc in the same corner space, ch 2, 2 dc in the same corner space. Dc in each of the next 15 dc. [Work 2 dc, ch 2, 2 dc in the next corner space; dc in each of the next 15 dc] × 3. Join. (76 dc, 4 ch-2 corner spaces)
Fasten off the cream yarn and weave in the tail. There are now 19 dc between each pair of corner spaces.
🧶 Checkpoint: Before adding the decorative edge, the cream motif should lie flat with four matching open corners and five clearly defined structural rounds. Gently smooth the sides with your fingers if needed.
Dusty-rose scalloped border
The scallops are worked directly into R5 of the cream square. Do not make a separate border strip.
With the RS facing, join dusty-rose yarn to the first dc immediately after any ch-2 corner space. This stitch is used only as the starting position; do not work into it yet.
Scallop round: Skip the first dc, sc in the next dc, [skip the next dc, work 5 dc in the next dc, skip the next dc, sc in the next dc] × 4, skip the final dc of the side, work 7 dc into the next ch-2 corner space.
Repeat the same side sequence three more times: skip the first dc after the corner, sc in the next dc, [skip the next dc, 5 dc in the next dc, skip the next dc, sc in the next dc] × 4, skip the final dc, then work 7 dc in the next corner space.
After completing the fourth corner shell, join with a sl st to the first sc of the round. (16 five-dc side shells, 4 seven-dc corner shells)
Fasten off and weave the tail into the back.
The border should show four smaller shell scallops along each straight side, with one larger rounded shell wrapping each corner. The corner shells are intentionally wider so the outer silhouette stays square rather than pulling inward.
🧶 Watch for: If the rose border begins to ruffle strongly, the shell stitches are probably being worked too loosely. If the edge cups upward, loosen the shells slightly, especially at the corners.
Dusty-rose heart
The heart is made as one separate piece. It begins in an MR and grows outward around a central heart-shaped structure, so both lobes and the lower point remain part of the same continuous motif.
With dusty-rose yarn, make an MR. Leave the ring slightly open until the first heart stage is complete.
R1: Ch 3, work 3 tr into the MR, 4 dc into the MR, 1 tr into the MR, 4 dc into the MR, 3 tr into the MR, ch 3, then sl st into the MR. Pull the ring closed enough to form a compact center without distorting the stitches. (15 tall sts, 2 ch-3 side sections)
The first and last groups of 3 tr form the beginnings of the two upper lobes. The single central tr between the two 4-dc groups marks the lower point.
Shape the heart lobes and point
Continue with the same yarn. The top-center MR attachment between the two ch-3 sections is the heart’s notch.
R2: Ch 1. Work 3 sc evenly around the first ch-3 section. Across the 15 tall stitches of R1, work the following sequence:
2 sc in the first tr, 3 hdc in the next tr, 2 sc in the next tr, sc in the next dc, hdc in the next dc, dc in the next dc, tr in the next dc, then work tr, ch 1, tr in the central tr.
Continue symmetrically along the opposite side: tr in the next dc, dc in the next dc, hdc in the next dc, sc in the next dc, 2 sc in the next tr, 3 hdc in the next tr, and 2 sc in the final tr.
Work 3 sc evenly around the final ch-3 section and sl st into the MR at the top-center notch. (30 sts, 1 ch-1 point space)
The two groups containing 3 hdc create the fullest area of the upper lobes, while the taller stitches toward the bottom lengthen the heart into its lower point.
Heart outline
The final round creates the clean raised edge around the heart.
Join the dusty-rose yarn, if necessary, in the first R2 stitch beside the upper notch.
R3: Ch 1 and sc in each R2 stitch around. When you reach the ch-1 space at the lower point, work 3 sc into that space. Continue with 1 sc in each remaining R2 stitch. At the top center, sl st into the original MR to deepen the notch, then join with a sl st to the first sc. (33 sc)
Fasten off, leaving a long sewing tail.
🧶 Checkpoint: The finished heart should have two similarly sized rounded lobes, a visible V-shaped notch between them, smoothly narrowing sides, and one distinct lower point. Keep the final sc edging relaxed so it follows the shape instead of curling inward.
Attach the puffy heart
Place the finished square RS up on a flat surface. Position the dusty-rose heart directly over the center ring of the cream square, with the heart notch aligned toward the midpoint of the top side and the lower point aligned toward the midpoint of the bottom side.
Check the spacing before sewing. The heart should cover the central portion of the cream square while still leaving a generous band of cream crochet visible around all four sides. It should not reach the scalloped border.
Thread the long dusty-rose tail onto a tapestry needle. Begin sewing through the outer R3 stitches of the heart and small portions of the cream square beneath them. Use short, discreet stitches and keep the heart’s outline visible.
Work around most of the perimeter but stop before closing the final section near the lower side of the heart.
Through the remaining opening, place a very small pinch of polyester fiberfill beneath the center of the heart. Spread it with the tip of your fingers so the filling sits mainly under the broad middle and upper lobes rather than forming one hard lump.
Continue sewing the remaining edge closed.
The finished heart should be only gently raised. Its perimeter stays close to the cream square while the center sits slightly higher, creating a soft dimensional shadow around the appliqué.
Do not pack the heart firmly. Too much filling will make the lobes balloon upward, hide the crochet stitch definition, and pull the cream square out of shape.
Finishing your square
Weave all remaining yarn tails securely into the back. Check the four cream corners and gently arrange the dusty-rose shells so their rounded edges face outward evenly.
If the cream square needs a little shaping, lightly dampen the base and pin the four sides into a square. Avoid pressing or pinning directly through the raised heart.
Allow the motif to dry completely, then remove the pins and gently reshape the scallops with your fingers. The rose border can have tiny differences from shell to shell; slight handmade variation suits this design as long as the edge remains balanced overall.
Troubleshooting
- The cream square is cupping: the ch-2 corners are probably too tight. Relax the corner chains and make sure every corner receives the complete 2 dc, ch 2, 2 dc increase.
- The scalloped edge is extremely wavy: looseness in the 5-dc shells can add too much circumference. Keep the shell stitches even and avoid adding extra stitches between shells.
- The heart’s two lobes look different: check that the R2 shaping is worked symmetrically on both sides of the central point and that the matching tr stitches receive the same increases.
- The lower heart point looks rounded: make sure the central R2 point contains tr, ch 1, tr and that R3 places 3 sc into that ch-1 space.
- The heart looks like a stuffed cushion: remove some fiberfill. Only a thin layer is needed to lift the center while keeping the crochet surface and outer outline clearly visible.
Final details to check
- The cream square lies flat with four matching open corners.
- The dusty-rose border forms four evenly spaced side shells plus a broader scallop at each corner.
- The heart has two rounded lobes, a definite top notch, and one pointed lower tip.
- The heart is centered on the cream square and raised only slightly through the middle.
- A clear band of cream crochet remains visible between the heart and the rose outer edging.
Once the final ends are tucked away, the heart square is ready to use as a small decorative motif or combine with coordinating crochet squares. If you make one, feel free to share how yours turned out or leave a question if you get stuck on the shaping.












