
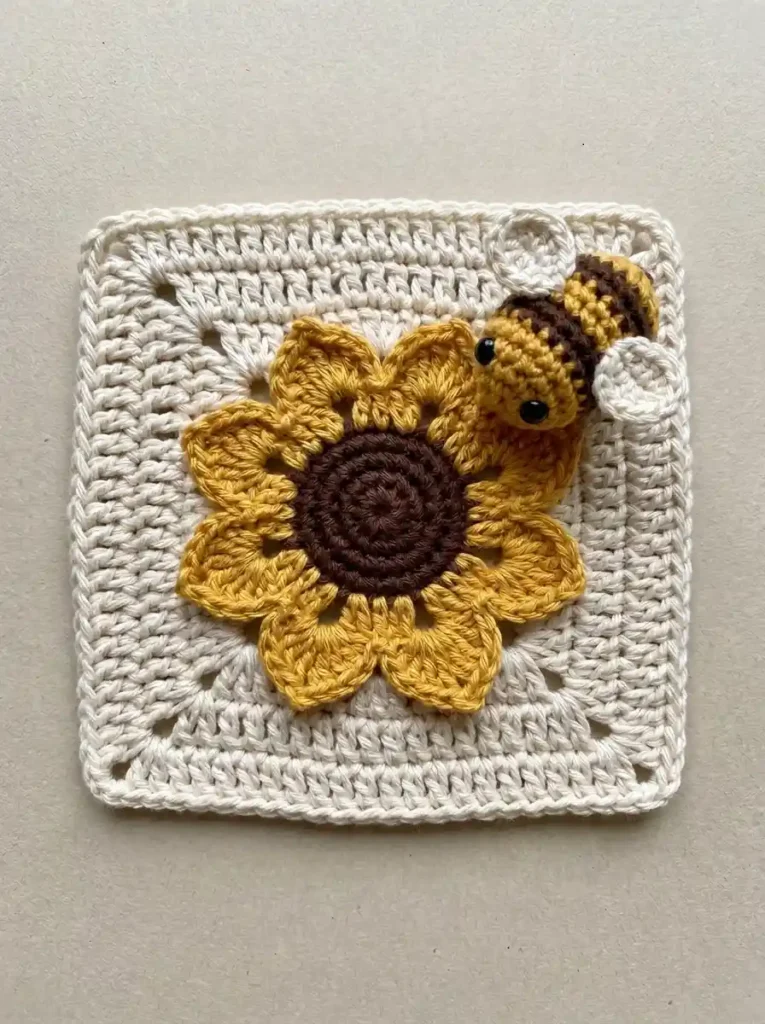
This cheerful crochet square combines a raised golden sunflower with a tiny striped bee perched diagonally across the upper-right petals. The sunflower has a dark, visibly ridged center surrounded by eight broad petals, while the bee has a noticeably rounded yellow face, a slimmer striped abdomen, two small cream wings, and two black eyes.
The flower and bee are made separately and attached to a cream solid granny square. Keeping these pieces separate makes it easier to preserve the dimensional petals, rounded bee body, raised wings, and clear placement of each feature.
Project at a glance
| Skill level | Confident beginner to intermediate |
|---|---|
| Terminology | US crochet terms |
| Construction | Solid square, separate sunflower, lightly stuffed bee |
| Yarn | DK-weight cotton or cotton-blend |
| Hook | 3.5 mm crochet hook |
The exact finished size will depend on yarn and tension. Aim for a compact square with clear stitch definition and a firm enough bee fabric that a small amount of stuffing does not show between the stitches.
Materials
- DK-weight cream cotton or cotton-blend yarn for the square and wings
- DK-weight golden-yellow yarn for the sunflower petals, bee head, stripe, and tail
- DK-weight deep warm-brown yarn for the sunflower center and bee stripes
- Two small black safety eyes sized appropriately for the bee’s face
- 3.5 mm crochet hook
- Small amount of polyester fiberfill
- Tapestry needle
- Stitch marker
- Scissors
A smooth cotton or cotton-blend yarn is especially useful here because the sunflower center relies on visible stitch ridges and the petals need enough definition to keep their broad rounded outlines.
🧶 Crochet Tip: If this square will be used for a baby or very young child, replace the safety eyes with firmly embroidered black eyes.
Stitches and abbreviations
- ch – chain
- ch-sp – chain space
- sl st – slip stitch
- sc – single crochet
- hdc – half double crochet
- dc – double crochet
- tr – treble crochet
- inc – work 2 sc in the same stitch
- dec – single crochet 2 stitches together
- MR – magic ring
- BLO – back loop only
- RS – right side
Before you start
The cream square is worked in joined rounds without turning. The beginning ch 3 counts as the first dc, while slip-stitch joins do not count as stitches.
The brown sunflower center is different: it is worked in a continuous spiral. Mark the first stitch of each round and move the marker upward as you work. From R2 onward, work in the BLO. This leaves a series of unused front loops and produces the pronounced concentric spiral ridges across the brown center.
The bee is worked from its large yellow face toward the tail in joined sc rounds. Keep all joins along one underside line so the color-change seam can be hidden against the sunflower.
🧶 Crochet Tip: Use relaxed tension for the cream square and flower, but slightly firmer tension for the bee. Overstuffing is not needed; the head should be softly rounded rather than stretched tight.
Crochet pattern
Cream solid granny square
With cream yarn, ch 4 and join with a sl st in the first ch to form a small ring.
R1: Ch 3, 2 dc into the ring, ch 2, [3 dc into the ring, ch 2] × 3. Join with a sl st to the top of the beginning ch 3. Do not turn. (12 dc, 4 ch-2 corner spaces)
Sl st across the next 2 dc and into the next ch-2 corner space.
R2: Ch 3, 1 dc in the same corner space, ch 2, 2 dc in the same corner space. Dc in each of the next 3 dc. [Work 2 dc, ch 2, 2 dc in the next corner space; dc in each of the next 3 dc] × 3. Join to the top of the beginning ch 3. (28 dc, 4 ch-2 corner spaces)
Sl st in the next dc and into the next ch-2 corner space.
R3: Ch 3, 1 dc in the same corner space, ch 2, 2 dc in the same corner space. Dc in each of the next 7 dc. [Work 2 dc, ch 2, 2 dc in the next corner space; dc in each of the next 7 dc] × 3. Join. (44 dc, 4 ch-2 corner spaces)
Sl st in the next dc and into the next corner space.
R4: Ch 3, 1 dc in the same corner space, ch 2, 2 dc in the same corner space. Dc in each of the next 11 dc. [Work 2 dc, ch 2, 2 dc in the next corner space; dc in each of the next 11 dc] × 3. Join. (60 dc, 4 ch-2 corner spaces)
Sl st in the next dc and into the next corner space.
R5: Ch 3, 1 dc in the same corner space, ch 2, 2 dc in the same corner space. Dc in each of the next 15 dc. [Work 2 dc, ch 2, 2 dc in the next corner space; dc in each of the next 15 dc] × 3. Join. (76 dc, 4 ch-2 corner spaces)
Sl st in the next dc and into the next corner space.
R6: Ch 3, 1 dc in the same corner space, ch 2, 2 dc in the same corner space. Dc in each of the next 19 dc. [Work 2 dc, ch 2, 2 dc in the next corner space; dc in each of the next 19 dc] × 3. Join. (92 dc, 4 ch-2 corner spaces)
Final cream edging
Sl st in the next dc and into the next ch-2 corner space.
Edging round: Ch 1, work 3 sc in the corner space. Sc in each of the next 23 dc. [Work 3 sc in the next corner space; sc in each of the next 23 dc] × 3. Join with a sl st to the first sc. (104 sc)
Fasten off and weave in the ends.
🧶 Checkpoint: The base should lie flat with straight sides, four matching corner openings, and a narrow continuous cream edge around the perimeter.
Ridged brown sunflower center
Make the sunflower separately. Begin with deep warm-brown yarn and an MR.
Work continuously without joining. Place a marker in the first stitch of each round.
R1: Work 8 sc into the MR. Pull the ring closed. (8 sc)
From this point onward, work every stitch in the BLO.
R2: Inc in each stitch around. (16 sc)
R3: [Sc in the next stitch, inc in the next stitch] × 8. (24 sc)
R4: [Sc in each of the next 2 stitches, inc in the next stitch] × 8. (32 sc)
R5: [Sc in each of the next 3 stitches, inc in the next stitch] × 8. (40 sc)
After the final stitch of R5, sl st loosely in the BLO of the next stitch to soften the height change, then fasten off.
The unused front loops should create visible concentric ridges across the surface, with the continuous rounds forming a subtle spiral from the center outward.
Eight golden sunflower petals
The petals are worked directly onto the unused front loops of R5, so the brown center remains one piece and the petals sit slightly above its outer edge.
Join golden-yellow yarn with a sl st in the unused front loop of any R5 stitch.
Petal foundation: Ch 7, skip the next 4 unused front loops, and sl st in the next unused front loop. [Ch 7, skip the next 4 front loops, sl st in the next front loop] × 7. (8 ch-7 loops)
You should have exactly eight evenly distributed chain loops, with five brown stitches allocated to each petal position.
Petal shaping: Sl st into the first ch-7 loop. Working around the complete chain loop rather than into individual chains, work sc, hdc, 2 dc, 3 tr, 2 dc, hdc, sc. Sl st back into the brown front-loop anchor at the end of the petal.
Move directly into the next ch-7 loop and repeat the same sequence. Continue until all eight loops have been filled. (8 petals)
Each petal should be narrow where it meets the brown center, broad through its outer half, and softly rounded at the tip. The foundation chain remains visible as a small elongated opening inside the petal rather than being completely filled.
Fasten off and weave the yellow tail securely into the back of the flower.
🧶 Checkpoint: Before attaching the sunflower, make sure the brown center has a visible spiral-ridged texture and exactly eight broad golden petals surround it. The petals should have small open centers and slightly raised outer edges.
Chubby bee head
The bee is made as one continuous head-and-abdomen piece, but the rounds are joined to keep the color bands clean. The yellow face is deliberately wider than the striped abdomen.
Begin with golden-yellow yarn.
R1: Make an MR. Ch 1, work 6 sc into the ring. Join to the first sc. (6 sc)
R2: Ch 1, inc in each stitch around. Join. (12 sc)
R3: Ch 1, [sc in the next stitch, inc in the next stitch] × 6. Join. (18 sc)
R4: Ch 1, sc in each stitch around. Join. (18 sc)
R5: Ch 1, sc in each stitch around. Join. (18 sc)
Add the eyes
Turn the bee so the joining seam is underneath. Place two small black safety eyes through the opposite side of the yellow head between R3 and R4.
Space the eyes evenly across the rounded face. Check the placement from the front before securing the backs: both eyes should remain clearly visible while leaving plenty of yellow crochet around them.
Secure the backs inside the open head.
Narrow the head
Continue with golden-yellow yarn.
R6: Ch 1, [sc in the next stitch, dec over the next 2 stitches] × 6. Join. (12 sc)
This decrease is important because it creates a distinct neck-like narrowing behind the round face instead of making the entire bee one equally thick tube.
Striped abdomen
Change to deep brown at the join.
R7: Ch 1, sc in each stitch around. Join. (12 sc)
R8: Ch 1, sc in each stitch around. Join. (12 sc)
Change to golden yellow.
R9: Ch 1, sc in each stitch around. Join. (12 sc)
R10: Ch 1, sc in each stitch around. Join. (12 sc)
Change to deep brown.
R11: Ch 1, sc in each stitch around. Join. (12 sc)
R12: Ch 1, sc in each stitch around. Join. (12 sc)
Change back to golden yellow.
R13: Ch 1, sc in each stitch around. Join. (12 sc)
Begin adding small pieces of fiberfill through the open end. Fill the face more fully than the abdomen. The yellow head should stay visibly round while the striped portion remains narrower and gently cylindrical.
Taper the yellow end
Continue in golden yellow.
R14: Ch 1, [sc in the next stitch, dec over the next 2 stitches] × 4. Join. (8 sc)
Add only enough additional stuffing to smooth the end.
R15: Ch 1, dec around. Join. (4 sc)
Fasten off, leaving a short yarn tail. Thread it through the front loops of the remaining stitches, pull the opening closed, and hide the end inside the body.
🧶 Checkpoint: The bee should have a noticeably larger rounded yellow face followed by a slimmer abdomen with a broad brown band, broad yellow band, second brown band, and a short rounded yellow end.
Small round cream wings
Make two identical wings separately with cream yarn. These wings are compact round-to-oval discs rather than long leaf-shaped pieces.
Ch 3 and join with a sl st in the first ch to form a small ring.
R1: Ch 1, work 6 sc into the ring. Join with a sl st to the first sc. (6 sc)
R2: Ch 1, work 2 hdc in each stitch around. Join with a sl st to the first hdc. (12 hdc)
Fasten off, leaving a long tail for sewing.
Make the second wing in exactly the same way.
Do not stuff the wings. Their small center opening and dense outer round give them enough thickness to appear softly raised once attached.
Assembling the sunflower square
Attach the sunflower
Lay the cream square RS up and center the sunflower over it. Spread the eight petals evenly around the brown disc before beginning to sew.
Using matching brown yarn, sew the underside of the brown center securely to the cream square. Work around the outer portion of the center with small concealed stitches so the brown spiral surface remains undisturbed.
Next, use golden-yellow yarn to place a small securing stitch near the inner base of each petal. Do not sew around the complete petal edge.
Leaving most of each golden petal free allows its sides and outer tip to lift slightly away from the cream square and preserves the dimensional flower shape.
Attach the cream wings to the bee
Position one wing on each side of the striped abdomen around its middle section.
Place the inner edge of each wing against the bee while allowing most of the round disc to extend outward. Angle the wings slightly backward toward the tail.
Use the cream yarn tail to sew down only a short inner portion of each wing. Do not sew around the full circumference.
Once attached, gently lift the free portion of each wing. One wing may appear more fully visible than the other when the bee is viewed from above, which suits the diagonal position of the finished bee.
Position the bee
Place the bee diagonally across the upper-right section of the sunflower.
The large yellow face should point downward and inward toward the brown flower center. Allow the underside of the face to overlap the upper-right golden petals.
Angle the striped abdomen upward toward the top-right corner of the cream square. The yellow end should remain visible beyond the final brown band.
Keep most of the brown sunflower center exposed. Both black eyes should remain visible from directly above, along with the cream wing on the viewer’s right and at least part of the opposite wing.
Sew the bee in place
Using matching golden-yellow yarn, make several concealed sewing stitches beneath the lower portion of the bee’s head where it rests on the sunflower.
Add a second attachment beneath the abdomen where it meets the upper-right flower area or cream square.
Do not sew around the complete bee. Securing it at these two underside areas is enough to hold the position while keeping the head and abdomen visibly raised.
🧶 Checkpoint: Viewed from above, the finished motif should show a large eight-petal sunflower with a clearly ridged brown center and one chubby bee perched diagonally at the upper right. The bee’s two eyes, round face, stripes, yellow end, and two cream wings should remain distinguishable.
Finishing your square
Weave all remaining yarn ends securely into the back of the work. Keep the sewing tension gentle enough that the cream square stays flat beneath the appliqué.
If the base needs shaping, lightly damp-block the cream square while leaving the flower and bee uncompressed. Pin the four corners and sides into an even square and allow it to dry completely.
After blocking, gently lift and arrange the outer edges of the golden petals. Lift the free portions of both cream wings as well so they retain their softly raised appearance.
Troubleshooting
- The brown sunflower center looks smooth instead of ridged: make sure R2 through R5 are worked in the BLO. The unused front loops are what create the visible concentric spiral lines.
- The petals are crowded: confirm that R5 contains 40 stitches and that each petal foundation spans five of those stitches: one anchor followed by four skipped front loops.
- The bee looks like one long tube: make sure R6 reduces the head from 18 stitches to 12 and avoid packing the abdomen as firmly as the face.
- The wings look too large: use the compact 6-sc center and 12-hdc outer round rather than adding another round.
- The bee hides too much of the flower: rotate it toward the top-right corner until the head overlaps the upper petals but most of the brown flower center remains visible.
Final details to check
- The brown center has five rounds and visible spiral-like ridges.
- Exactly eight golden petals surround the brown center, each with a broad rounded outline and small internal opening.
- The bee has a visibly fuller yellow face and a narrower striped abdomen.
- The abdomen shows brown, yellow, brown, then a short yellow end.
- Two small black eyes and two compact cream wings remain clearly recognizable.
Once the final yarn ends are hidden and the dimensional pieces are arranged, your chubby bee sunflower granny square is ready to use as a decorative motif or combine with other crochet squares. If you make one, feel free to share how yours turned out or leave a question if you get stuck.












