
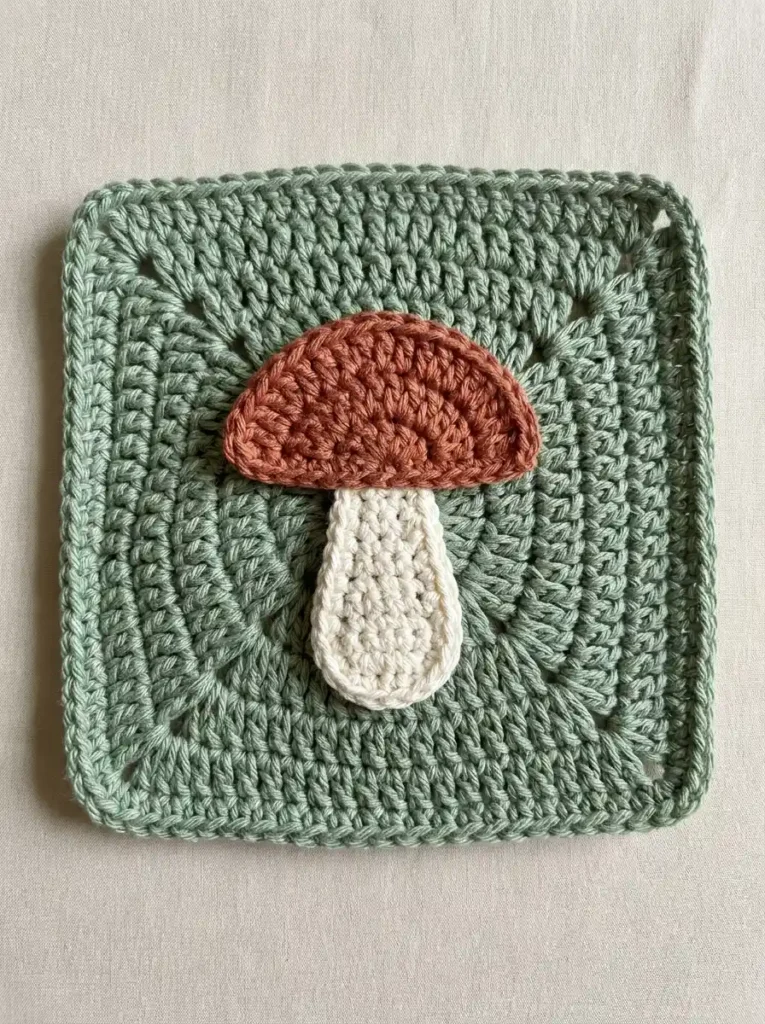
This cottagecore mushroom square pairs a muted sage solid granny square with a broad rust-colored mushroom cap and a softly rounded cream stem. The simple color palette and chunky silhouette keep the mushroom easy to recognize while letting the crochet texture remain the main feature.
The square is worked from the center outward in joined double-crochet rounds. The mushroom cap and stem are crocheted separately and sewn flat to the finished square. The cap is built as a low semicircular fan, while the stem is worked around a short foundation chain to create its narrow top and rounded lower end.
Project at a glance
| Skill level | Advanced beginner |
|---|---|
| Terminology | US crochet terms |
| Construction | Center-out square with two separate sewn appliqués |
| Square | 7 structural rounds plus 1 sc edging round |
| Cap | 4 semicircular dc rows plus sc edging |
| Yarn | DK or light-worsted smooth cotton or cotton blend |
| Hook | 3.5 mm |
Materials
- DK or light-worsted smooth cotton or cotton-blend yarn in muted sage green for the square
- A small amount of warm terracotta or rust yarn for the mushroom cap
- A small amount of cream or soft white yarn for the mushroom stem
- 3.5 mm crochet hook
- Yarn needle
- Scissors
- Optional removable stitch markers
A smooth yarn with clear stitch definition works best for this motif. Aim for fabric that is firm enough to hold the square’s shape without becoming stiff, with appliqué pieces that remain flexible enough to sit neatly against the background.
Stitches and abbreviations
- ch – chain
- sc – single crochet
- dc – double crochet
- sl st – slip stitch
- st – stitch
- sts – stitches
- ch-sp – chain space
- RS – right side
Before you start
The sage square is worked in joined rounds with the RS facing throughout. Do not turn between rounds. The beginning ch 3 counts as the first dc, while slip-stitch joins do not count as stitches.
The cream stem is worked in joined rounds around both sides of a foundation chain. Its beginning ch 1 does not count as a stitch.
The terracotta cap is worked back and forth in turned semicircular rows. Its beginning ch 3 counts as the first dc.
Keep the square’s corner ch-2 spaces relaxed. Tight corner chains can pull the corners upward even when the stitch counts are correct.
Crochet pattern
Sage-green square
With sage-green yarn, make a magic ring.
R1: Ch 3, work 2 dc into the ring, ch 2, then [3 dc into the ring, ch 2] × 3. Tighten the ring. Join with a sl st to the top of the beginning ch 3. (12 dc, 4 ch-2 corner spaces)
Sl st in each of the next 2 dc, then sl st into the next ch-2 corner space.
R2: Ch 3, dc in the same corner space, ch 2, 2 dc in the same corner space. Dc in each of the next 3 dc. [(2 dc, ch 2, 2 dc) in the next corner space, dc in each of the next 3 dc] × 3. Join with a sl st to the top of the beginning ch 3. (28 dc, 4 ch-2 corner spaces; 7 dc per side)
Sl st in the next dc, then sl st into the next ch-2 corner space.
R3: Ch 3, dc in the same corner space, ch 2, 2 dc in the same corner space. Dc in each of the next 7 dc. [(2 dc, ch 2, 2 dc) in the next corner space, dc in each of the next 7 dc] × 3. Join with a sl st to the top of the beginning ch 3. (44 dc, 4 ch-2 corner spaces; 11 dc per side)
Sl st in the next dc, then sl st into the next ch-2 corner space.
R4: Ch 3, dc in the same corner space, ch 2, 2 dc in the same corner space. Dc in each of the next 11 dc. [(2 dc, ch 2, 2 dc) in the next corner space, dc in each of the next 11 dc] × 3. Join with a sl st to the top of the beginning ch 3. (60 dc, 4 ch-2 corner spaces; 15 dc per side)
Sl st in the next dc, then sl st into the next ch-2 corner space.
R5: Ch 3, dc in the same corner space, ch 2, 2 dc in the same corner space. Dc in each of the next 15 dc. [(2 dc, ch 2, 2 dc) in the next corner space, dc in each of the next 15 dc] × 3. Join with a sl st to the top of the beginning ch 3. (76 dc, 4 ch-2 corner spaces; 19 dc per side)
Sl st in the next dc, then sl st into the next ch-2 corner space.
R6: Ch 3, dc in the same corner space, ch 2, 2 dc in the same corner space. Dc in each of the next 19 dc. [(2 dc, ch 2, 2 dc) in the next corner space, dc in each of the next 19 dc] × 3. Join with a sl st to the top of the beginning ch 3. (92 dc, 4 ch-2 corner spaces; 23 dc per side)
Sl st in the next dc, then sl st into the next ch-2 corner space.
R7: Ch 3, dc in the same corner space, ch 2, 2 dc in the same corner space. Dc in each of the next 23 dc. [(2 dc, ch 2, 2 dc) in the next corner space, dc in each of the next 23 dc] × 3. Join with a sl st to the top of the beginning ch 3. (108 dc, 4 ch-2 corner spaces; 27 dc per side)
🧶 Checkpoint: The square should now have a broad solid center-out structure with four matching corner openings. It should lie reasonably flat before the narrow finishing edge is added.
Final square edging
Sl st in the next dc, then sl st into the next ch-2 corner space.
Edging round: Ch 1. Work 3 sc in the starting corner space, sc in each of the next 27 dc, then [3 sc in the next corner space, sc in each of the next 27 dc] × 3. Join with a sl st to the first sc. (120 sc)
Fasten off and weave in the ends.
Cream mushroom stem
The stem is made separately and sewn onto the square later. It is worked around both sides of a short foundation chain rather than in horizontal rows. Keeping most of the increases around one end creates the narrow upper stem and the softly rounded, wider base.
With cream yarn, ch 8.
R1: Starting in the second ch from the hook, sc in each of the next 6 ch, work 5 sc in the last ch. Rotate the work so you can crochet along the unused loops on the opposite side of the foundation chain. Sc in each of the next 6 ch, then work 2 sc into the same foundation ch that contains the first sc of the round. Join with a sl st to the first sc. Do not turn. (19 sc)
R2: Ch 1, sc in each of the first 6 sts, work 2 sc in each of the next 5 sts around the rounded lower end, then sc in each of the remaining 8 sts. Join with a sl st to the first sc. Do not turn. (24 sc)
R3: Ch 1, sc in each of the first 6 sts, [sc in the next st, 2 sc in the next st] × 5, then sc in each of the remaining 8 sts. Join with a sl st to the first sc. Do not turn. (29 sc)
R4: Ch 1, sc in each of the first 6 sts, [sc in each of the next 2 sts, 2 sc in the next st] × 5, then sc in each of the remaining 8 sts. Join with a sl st to the first sc. (34 sc)
Fasten off, leaving a long cream tail for sewing.
🧶 Checkpoint: The finished stem should resemble an elongated teardrop or short mushroom stalk. The upper portion stays fairly narrow, while the lower end becomes fuller and smoothly rounded. The foundation chain should run vertically through the center.
Terracotta mushroom cap
The cap is made separately as a low semicircular fan. Four expanding rows create the chunky rounded dome without making the cap too tall or oversized for the square.
With terracotta or rust yarn, make a magic ring.
Row 1, RS: Ch 3 and work 5 dc into the ring. Tighten the ring. Turn. (6 dc)
Row 2: Ch 3, dc in the first st, then work 2 dc in each of the remaining 5 sts. Turn. (12 dc)
Row 3: Ch 3, 2 dc in the next st, then [dc in the next st, 2 dc in the next st] × 5. Turn. (18 dc)
Row 4: Ch 3, dc in the next st, 2 dc in the next st, then [dc in each of the next 2 sts, 2 dc in the next st] × 5. (24 dc)
Cap edging
Do not turn after Row 4.
Ch 1. Work 1 sc into the end of each of Rows 4, 3, 2, and 1 down the first straight half of the lower edge. Work 1 sc into the center ring. Work 1 sc into the end of each of Rows 1, 2, 3, and 4 up the opposite half of the lower edge. Continue with 1 sc in each of the 24 stitches of Row 4 around the curved outer edge. Join with a sl st to the first sc. (33 sc)
Fasten off, leaving a long terracotta tail for sewing.
🧶 Checkpoint: The finished cap should be broad and low, with a rounded upper edge and a nearly straight lower edge. It should be clearly wider than the stem but still leave plenty of sage-green square visible on both sides.
Assembling the mushroom
Lay the finished sage square flat with the RS facing up and locate its vertical centerline.
Place the cream stem vertically on this centerline, with the narrower end pointing upward and the rounded end pointing toward the lower edge of the square. Leave a broad band of uncovered sage crochet between the bottom of the stem and the square’s border.
Using the long cream tail, sew around the outer edge of the stem with small relaxed whipstitches. Secure the full perimeter while keeping the stitches loose enough that the sage background remains flat.
Place the terracotta cap directly above the stem. Center the cap horizontally over the square and align the middle of its straight lower edge with the middle of the stem.
Bring the lower edge of the cap slightly over the narrow top of the stem. Only a small overlap is needed. The cream stem should disappear beneath the center of the cap without leaving a visible gap between the two pieces.
The cap should extend clearly beyond both sides of the stem but remain well inside the square’s outer border.
Using the terracotta tail, sew around the complete sc edging of the cap. Keep the stitches small and relaxed so the curved edge remains smooth and the appliqué retains a subtle raised handmade appearance.
🧶 Watch for: Attach the stem first and the cap second. The cap should overlap the stem’s narrow upper edge just enough to create one continuous mushroom silhouette.
Finishing your square
Weave the remaining yarn tails into the wrong side of the work, keeping each tail within matching-colored stitches whenever possible.
Light blocking helps straighten the sides and settle the corners. Shape the square evenly without stretching the mushroom appliqués.
For cotton yarn, lightly dampen the finished square, smooth it into shape, and allow it to dry completely. If using steam, keep the heat appropriate for the fiber and avoid pressing directly onto the mushroom.
The cap and stem should retain a small amount of natural relief above the sage background rather than being pressed completely flat.
Troubleshooting
- The square cups upward: Check that every corner contains 2 dc, ch 2, 2 dc, and make the corner chains slightly looser.
- The square ruffles: Recheck the side counts. R7 should have 27 dc between each pair of corner spaces before the sc edging is added.
- The stem looks like a plain oval: Make sure the increases in the later rounds remain concentrated around the rounded lower section instead of being spread evenly around the entire piece.
- The stem cups near the bottom: Check that all five prescribed increases were completed in R2, R3, and R4 and avoid tightening those increase stitches.
- The cap becomes too tall or too large: Stop the main cap after Row 4. The cap should have row totals of 6, 12, 18, and 24 dc before the narrow sc edging is added.
- The cap becomes a full circle: Do not join the dc shaping rows. Turn after Rows 1 through 3 so the piece remains a semicircular fan.
- The square puckers around the mushroom: Ease the appliqué sewing stitches until the mushroom lies securely against the square without pulling the sage fabric inward.
A few final details to check
- The sage base has seven structural rounds plus its narrow sc edging.
- The cream stem is narrow toward the top and rounded through the lower end.
- The terracotta cap has four expanding dc rows plus one narrow sc edging.
- The cap remains broad and low rather than becoming circular or excessively tall.
- The cap overlaps the narrow top of the stem with no visible gap.
Once the square has been lightly blocked and the appliqués are sitting smoothly, the chunky rust-and-cream mushroom should stand clearly against the sage background. If you make this square, feel free to share your finished version or leave a question if you need help with the shaping or placement.












