
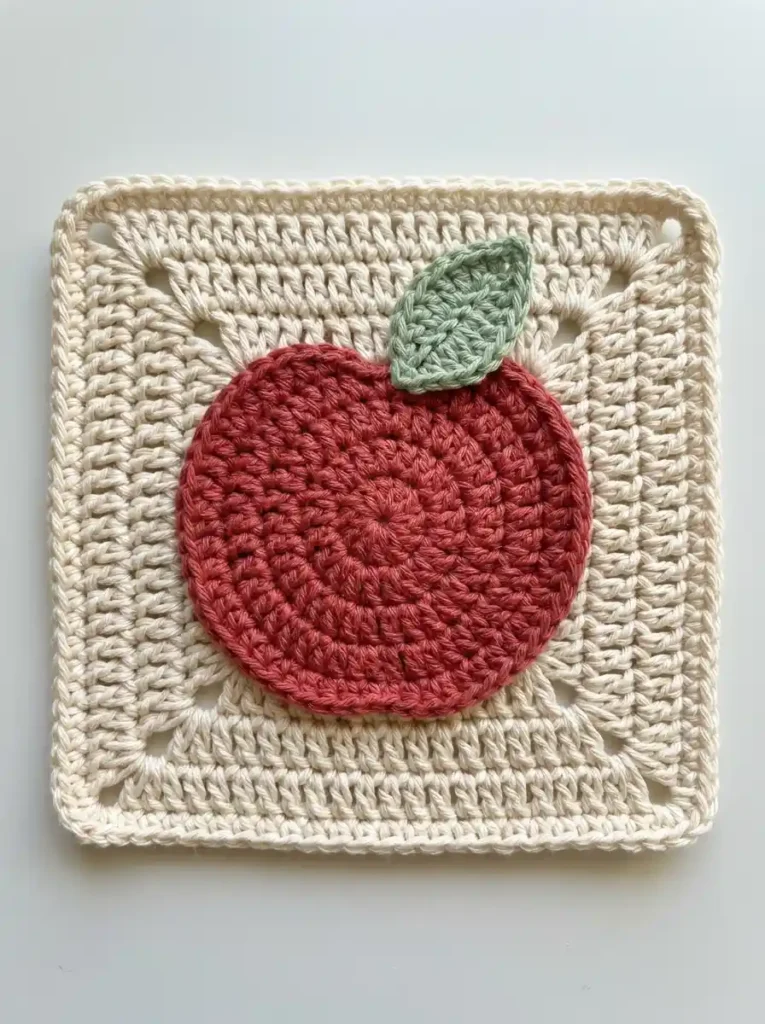
This apple granny square combines a warm cream center-out square with a large raised red apple and one broad sage-green leaf. The fruit is deliberately almost circular, with only a tiny dip at the upper center, while the angled leaf gives the simple red center its recognizable apple shape.
The cream square is crocheted first and finished with a narrow single-crochet edge. The apple and leaf are made separately and sewn on afterward, which creates the slight raised layering and clearly defined edges of the finished motif.
Project at a glance
| Skill level | Confident beginner |
|---|---|
| Terminology | US crochet terms |
| Construction | Center-out square with separate apple and leaf appliqués |
| Yarn | DK or light-worsted cotton |
| Hook | 3.5 mm crochet hook |
| Finished size | Usually around 5.5 to 6.5 inches square with the suggested yarn and hook |
Materials
- DK or light-worsted cotton yarn in warm cream for the square
- Small amount of muted brick or apple red yarn
- Small amount of soft sage green yarn
- 3.5 mm crochet hook
- Yarn needle
- Scissors
- Stitch marker, optional
- Blocking mat and pins, optional
Use the same yarn weight for all three colors. A smooth cotton or cotton-rich yarn works particularly well because it gives the cream square clear stitch definition while allowing the red apple and green leaf to keep their slightly raised edges.
Exact gauge is not critical for this decorative motif. Aim for a firm but flexible fabric with clearly defined stitches. The square should lie flat without feeling stiff, and the red apple should be dense enough to hold a clean rounded edge.
Stitches and abbreviations
- ch — chain
- ch-sp — chain space
- dc — double crochet
- hdc — half double crochet
- sc — single crochet
- sl st — slip stitch
- st/sts — stitch/stitches
- RS — right side
Before you start
The cream square is worked in joined rounds without turning. The beginning ch 3 counts as the first dc, while the slip-stitch join does not count as a stitch. A ch-2 space is maintained at every corner, producing the small diagonal openings visible toward each corner of the finished square.
The apple is made separately in joined hdc rounds. A final narrow sc edge gives the fruit its clearly defined perimeter. Only two stitches at the upper center are shortened to slip stitches, creating the very shallow notch beneath the leaf without turning the apple into a heart shape.
The leaf is also crocheted separately. It is worked around both sides of a short foundation chain and then edged with a second round, creating a broad pointed leaf with a visible center ridge.
Crochet pattern
Cream square
With cream yarn, make a magic ring. Keep the RS facing you throughout and do not turn.
R1: Ch 3, 2 dc in the ring, ch 2, [3 dc in the ring, ch 2] × 3. Pull the ring closed and join with a sl st to the top of the beginning ch 3. (12 dc, 4 ch-2 corner spaces)
To begin R2, sl st in each of the next 2 dc, then sl st into the next ch-2 corner space.
R2: Ch 3, 1 dc in the same corner space, ch 2, 2 dc in the same corner space, [1 dc in each of the next 3 dc, (2 dc, ch 2, 2 dc) in the next ch-2 corner space] × 3, 1 dc in each of the final 3 dc. Join to the top of the beginning ch 3. (28 dc, 4 ch-2 corner spaces; 7 dc per side)
From this point onward, after each joined dc round, sl st in the next dc and then sl st into the following ch-2 corner space before beginning the next round.
R3: Ch 3, 1 dc in the same corner space, ch 2, 2 dc in the same corner space, [1 dc in each of the next 7 dc, (2 dc, ch 2, 2 dc) in the next corner space] × 3, 1 dc in each of the final 7 dc. Join. (44 dc, 4 ch-2 corner spaces; 11 dc per side)
R4: Move to the next corner as described above. Ch 3, 1 dc in the same corner space, ch 2, 2 dc in the same corner space, [1 dc in each of the next 11 dc, (2 dc, ch 2, 2 dc) in the next corner space] × 3, 1 dc in each of the final 11 dc. Join. (60 dc, 4 ch-2 corner spaces; 15 dc per side)
R5: Move to the next corner. Ch 3, 1 dc in the same corner space, ch 2, 2 dc in the same corner space, [1 dc in each of the next 15 dc, (2 dc, ch 2, 2 dc) in the next corner space] × 3, 1 dc in each of the final 15 dc. Join. (76 dc, 4 ch-2 corner spaces; 19 dc per side)
R6: Move to the next corner. Ch 3, 1 dc in the same corner space, ch 2, 2 dc in the same corner space, [1 dc in each of the next 19 dc, (2 dc, ch 2, 2 dc) in the next corner space] × 3, 1 dc in each of the final 19 dc. Join. (92 dc, 4 ch-2 corner spaces; 23 dc per side)
R7: Move to the next corner. Ch 3, 1 dc in the same corner space, ch 2, 2 dc in the same corner space, [1 dc in each of the next 23 dc, (2 dc, ch 2, 2 dc) in the next corner space] × 3, 1 dc in each of the final 23 dc. Join. (108 dc, 4 ch-2 corner spaces; 27 dc per side)
🧶 Checkpoint: The square should lie flat with straight sides and a neat diagonal sequence of small corner openings. The openings should remain visible rather than being pulled closed by tight corner chains.
Outer cream edging
After joining R7, sl st in the next dc and then into the next ch-2 corner space.
R8: Ch 1; this does not count as a stitch. Work 3 sc in the same corner space, 1 sc in each of the next 27 dc, [3 sc in the next ch-2 corner space, 1 sc in each of the next 27 dc] × 3. Join with a sl st to the first sc. Fasten off. (120 sc)
The final sc round should form a narrow, continuous outer line with softly rounded corners. Lightly block the square before adding the appliqués, straightening the sides without stretching the corner openings closed.
Rounded red apple
The red apple is made separately and sewn onto the square afterward. The main body uses hdc to create the broad concentric texture of the fruit, followed by a narrower sc edging round.
With red yarn, make a magic ring. Work in joined rounds without turning. Ch 1 at the beginning of each round does not count as a stitch.
R1: Ch 1, work 8 hdc in the ring. Pull the ring firmly closed and join with a sl st to the first hdc. (8 hdc)
R2: Ch 1, work 2 hdc in each stitch around. Join. (16 hdc)
R3: Ch 1, [1 hdc in the next stitch, 2 hdc in the next stitch] × 8. Join. (24 hdc)
R4: Ch 1, [1 hdc in each of the next 2 stitches, 2 hdc in the next stitch] × 8. Join. (32 hdc)
R5: Ch 1, [1 hdc in each of the next 3 stitches, 2 hdc in the next stitch] × 8. Join. (40 hdc)
R6: Ch 1, [1 hdc in each of the next 4 stitches, 2 hdc in the next stitch] × 8. Join. (48 hdc)
For the final round, treat the R6 join as the upper center of the apple. The two slip stitches positioned on either side of this round boundary create only a tiny indentation; the rest of the perimeter remains a simple sc edge.
R7: Ch 1. Work 1 sl st in the same stitch as the R6 join, 1 sc in each of the next 46 stitches, then 1 sl st in the final stitch. Join to the first sl st and fasten off, leaving a long sewing tail. (46 sc, 2 sl sts)
Gently flatten and finger-shape the apple. The lower half should remain smoothly rounded, and the sides should stay full. At the top, the two slip stitches should produce only a shallow center dip between two very subtle shoulders.
🧶 Checkpoint: The finished apple should still look almost circular. If the upper dip is deep enough to make the fruit look heart-shaped, loosen those two slip stitches and reshape the edge before sewing.
Broad green leaf
The leaf is made separately around both sides of a foundation chain. The foundation forms the visible center line, while a second sc round produces the thicker, clearly outlined leaf edge.
With green yarn, ch 8.
R1: Beginning in the second ch from the hook, sl st in the first ch, sc in the next ch, hdc in the next ch, dc in the next ch, hdc in the next ch, sc in the next ch, then work (sc, ch 2, sc) in the final ch.
Rotate the work and continue along the unused loops on the opposite side of the foundation chain: sc in the next ch, hdc in the next ch, dc in the next ch, hdc in the next ch, sc in the next ch, sl st in the final ch. Join to the first sl st. (14 sts, 1 ch-2 tip space)
R2: Ch 1, sc in the same stitch and in each of the next 6 stitches, work (sc, ch 2, sc) in the ch-2 tip space, then sc in each of the remaining 7 stitches. Join with a sl st to the first sc. Fasten off, leaving a long sewing tail. (16 sc, 1 ch-2 tip space)
Finger-shape the leaf into a compact broad oval with a definite point at one end. Keep the middle full and rounded rather than stretching the leaf into a long narrow shape.
Assembling the motif
Position the apple
Lay the blocked cream square RS up. Place the red apple over the center with the shallow two-stitch dip at 12 o’clock.
The apple should cover most of the central cream area while leaving several complete cream rounds visible around it. Position it slightly below the exact vertical center of the square so there is enough cream background above the fruit for the leaf.
The red apple should occupy roughly two-thirds of the visible width of the square. Its sides and lower edge must remain well inside the cream border.
Thread the long red tail onto a yarn needle. Sew the apple to the cream square immediately inside the final red edging, catching only a small portion of each red edge stitch and the cream stitches underneath.
Keep the seam secure but relaxed. The red perimeter should remain slightly raised above the cream background instead of being pulled tightly flat.
Attach the leaf
Place the rounded base of the leaf over the shallow dip at the upper center of the apple. Angle the pointed end toward the upper right.
Approximately the lower quarter to third of the leaf should overlap the red fruit. The rest of the leaf should extend over the cream square. Keep the leaf close to the apple rather than positioning it high above the fruit.
Using the green sewing tail, secure the lower edge and lower side portions of the leaf to the apple with small hidden stitches. Leave most of the outer edge and pointed end free so the leaf retains the slight raised dimension of the finished motif.
For a square that will be handled frequently, add one small hidden anchoring stitch through the back of the leaf near its middle into the cream square beneath it. Keep this stitch loose enough that the leaf remains softly raised.
Finishing your apple square
Weave all remaining yarn tails securely into stitches on the back. Keep red and green tails within matching-color areas whenever possible so the darker yarn does not show through the cream fabric.
If the square needs a final adjustment, lightly mist the cream background and pin the four outer corners and sides into shape. Finger-shape the red apple and green leaf rather than pinning the appliqués flat.
The finished motif should have a softly handmade appearance: a cream square with small diagonal corner openings, one large raised red fruit with visible concentric rounds and a narrow outer edge, and one broad green leaf overlapping the upper center of the apple.
Troubleshooting
- The cream square cups at the corners: The ch-2 corner spaces are probably too tight. Work those chains more loosely so each new round has room to turn naturally.
- The apple ruffles: The hdc tension is too loose for the increase rate. Work the red stitches a little more firmly or use a slightly smaller hook for the apple.
- The apple forms a bowl: Check that all eight increases were worked in every increase round. Missing an increase or working very tightly can pull the outer rounds inward.
- The apple looks heart-shaped: The upper dip is too pronounced. The final edge needs only two short slip stitches at the center top; keep them relaxed and do not pinch the fruit while sewing.
- The apple looks completely circular: Make sure the two final slip stitches sit directly beside one another across the round join at the upper center. The leaf should be positioned over this small dip, which helps define the apple silhouette.
- The leaf looks too narrow: Keep the foundation chain relaxed and make sure the taller dc stitches sit at the widest part of both sides. The second sc round should create a broad outlined shape.
- The motif looks top-heavy: Move the apple slightly lower before sewing. The leaf adds height above the fruit, so the apple itself should sit just below the exact center of the square.
Once the apple and leaf are attached, the square is ready to use as a standalone motif or as part of a larger joined project. If you make one, feel free to share how yours turned out or leave a question if you get stuck on any part of the pattern.












